


android开发中可能经常会用到这些东西;
一.介绍
Paint:画笔
Canvas:画布
Matrix:变换矩阵
Paint
根据我们要画的类型,我们可以选择不同的笔,比如大气磅礴的山水画,我们可以选择大头的毛笔;细腻入微的肖像画我们可以选择尖头的铅笔。并且根据我们想要的效果,我们在绘画的时候,还会选择不同的颜料或不同颜色的笔;
那么在程序中,Paint 就足以满足以上所有的需要,我们可以根据我们自己的需要去自行设置我们画笔的属性,首先来看看都能设置哪些属性:
| Public Constructors | |||||||||||
|---|---|---|---|---|---|---|---|---|---|---|---|
| Paint() Create a new paint with default settings. | |||||||||||
| Paint(int flags) Create a new paint with the specified flags.比如ANTI_ALIAS_FLAG,抗锯齿 | |||||||||||
| Paint(Paint paint) Create a new paint, initialized with the attributes in the specified paint parameter. |
方法常用的主要有以下一些:
setARGB (int a, int r, int g, int b):用于设置画笔颜色,A 代表 alpha(透明度),R 代表Red (红色),G 代表 Green(绿色),B 代表 Blue(蓝色)
色值采用16进制,取值在 0 - 255 之间 ,0(0x00) 即 完全没有 ,255(0xff) 代表满值 ;
setAlpha(int a): 用于设置Paint 的透明度;
setColor(int color):同样设置颜色,如果是常用色,可以使用Color 类中定义好的一些色值 ,eg:Color.WHITE
setColorFilter(ColorFilter filter):设置颜色过滤器,可以通过颜色过滤器过滤掉对应的色值,比如去掉照片颜色,生成老照片效果;
ColorFilter有以下几个子类可用:
ColorMatrixColorFilter
LightingColorFilter
PorterDuffColorFilter
Known Direct Subclasses
| ColorMatrixColorFilter | A color filter that transforms colors through a 4x5 color matrix. |
| LightingColorFilter | A color filter that can be used to simulate simple lighting effects. |
| PorterDuffColorFilter | A color filter that can be used to tint the source pixels using a single color and a specific Porter-Duff composite mode. |
1.ColorMatrixColorFilter:通过颜色矩阵(ColorMatrix)对图像中的色值进行改变
在Android中,图片是以一个个 RGBA 的像素点的形式加载到内存中的,所以如果需要改变图片的颜色,就需要针对这一个个像素点的RGBA的值进行修改,其实主要是RGB,A是透明度;
修改图片 RGBA 的值需要ColorMatrix类的支持,它定义了一个 4*5 的float[]类型的矩阵,矩阵中每一行表示 RGBA 中的一个参数。
颜色矩阵M是以一维数组m=[a,b,c,d,e,f,g,h,i,j,k,l,m,n,o,p,q,r,s,t]的方式进行存储的;
 颜色矩阵
颜色矩阵
而对于一张图像来说,展示的颜色效果取决于图像的RGBA(红色、绿色、蓝色、透明度)值。而图像的 RGBA 值则存储在一个5*1的颜色分量矩阵C中,由颜色分量矩阵C可以控制图像的颜色效果。颜色分量矩阵如图所示: 
更形象的说, 比如一张图片, width = 320, height = 640; 那么这张图片就有width * height个像素点, 每一个像素点又包含了a,r,g,b这四个分量, 我们可以从代码去求出这4个分量,如果在增加一行, 就像上面的矩阵C一样, 就变成了上面的矩阵, 这就是它的由来吧.
所以为了改变图像的显示效果,只需要改变 4*5 的颜色矩阵ColorMatrix,然后通过
,再把新的矩阵,R1,G1,B1,A1整合在一起,变成一个像素点, 最终把所有的像素点都经过这样的变换,也就达到了图像处理的效果了.
即可得到新的图像显示矩阵;
由此可见,通过颜色矩阵 ColorMatrix 修改了原图像的 RGBA 值,从而达到了改变图片颜色效果的目的。并且,通过如上图所示的运算可知,颜色矩阵 ColorMatrix 的第一行参数abcde决定了图像的红色成分,第二行参数fghij决定了图像的绿色成分,第三行参数klmno决定了图像的蓝色成分,第四行参数pqrst决定了图像的透明度,第五列参数ejot是颜色的偏移量。
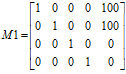
通常,改变颜色分量时可以通过修改第5列的颜色偏移量来实现,如上面所示的颜色矩阵,通过计算后可以得知该颜色矩阵的作用是使图像的红色分量和绿色分量均增加100,这样的效果就是图片泛黄(因为红色与绿色混合后得到黄色):
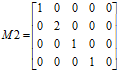
除此之外,也可以通过直接对颜色值乘以某一系数而达到改变颜色分量的目的。如下图所示的颜色矩阵,将绿色分量放大了2倍,这样的效果就是图片泛绿色:
基于此,我们利用ColorFilter 和 ColorMatrixColorFilter类 和 Paint 的setColorFilter 就可以改变图片的展示效果(颜色,饱和度,对比度等),从而得到类似市面上图像软件中的黑白老照片、泛黄旧照片、羞涩的青春... ...特效;


(原图效果) (调节效果)
二.第二部分
接下来,我们就用colorMatrix
效果图如下
我们上面放一张图片, 下面放20个editText, 代表我们的ColorMatrix, 我们就用这个矩阵去处理图像
首先把第一行最后一个设置100, 就是把红色的偏移量增加100, 效果如下
然后,再把第二行第二个, 1变成2,也就是把绿色变成原来的两倍, 效果如下
接下来是我们的布局,
<?xml version="1.0" encoding="utf-8"?>
<LinearLayout xmlns:android="http://schemas.android.com/apk/res/android"
	android:orientation="vertical"
	android:layout_width="match_parent"
	android:layout_height="match_parent">

	<ImageView
	    android:id="@+id/imageview"
	    android:layout_width="match_parent"
	    android:layout_weight="2"
	    android:layout_height="0dp" />

	<GridLayout
	    android:id="@+id/group"
	    android:layout_width="match_parent"
	    android:layout_weight="3"
	    android:layout_height="0dp"
	    android:rowCount="4"
	    android:columnCount="5">
	</GridLayout>

	<LinearLayout
	    android:layout_width="match_parent"
	    android:layout_height="wrap_content"
	    android:orientation="horizontal">

	    <Button
	        android:layout_width="0dp"
	        android:layout_height="wrap_content"
	        android:layout_weight="1"
	        android:text="Change"
	        android:onClick="btnChange" />

	    <Button
	        android:layout_width="0dp"
	        android:layout_height="wrap_content"
	        android:layout_weight="1"
	        android:text="Reset"
	        android:onClick="btnReset" />
	</LinearLayout>

</LinearLayout>
只是放了一个GridLayout,editText我们在代码里面添加
因为在添加的时候, 要获取GridLayout的宽和高,才能知道添加editText的时候的大小, 但是我们在oncreate的时候, 我们的控件是没有画完的, 我们该如何去获取GridLayout的宽和高呢, 在API里面看到这个post,在控件画完的时候, 就执行post里的runnable,就可以去添加editText了
mGroup.post(new Runnable()
		{

			@Override
			public void run()
			{
				// TODO Auto-generated method stub
				mEditWidth = mGroup.getWidth() / 5;
				mEditHeight = mGroup.getHeight() / 4;
				// 添加20个控件
				addEditTexts();
				// 初始化矩阵
				initMatrix();
			}

		});
整个代码如下
package com.example.imageprocess;

import android.app.Activity;
import android.graphics.Bitmap;
import android.graphics.BitmapFactory;
import android.graphics.Canvas;
import android.graphics.ColorMatrix;
import android.graphics.ColorMatrixColorFilter;
import android.graphics.Paint;
import android.os.Bundle;
import android.view.View;
import android.view.Window;
import android.widget.EditText;
import android.widget.GridLayout;
import android.widget.ImageView;

public class ColorMatrixActivity extends Activity
{

	private ImageView mImageView;// 图片
	private GridLayout mGroup;// 存放20个editText
	private Bitmap bitmap;
	private int mEditWidth, mEditHeight;// 每个editText的宽和高
	private EditText[] mEdits = new EditText[20];
	private float[] mColorMatrix = new float[20];

	protected void onCreate(Bundle savedInstanceState)
	{
		// TODO Auto-generated method stub
		super.onCreate(savedInstanceState);
		requestWindowFeature(Window.FEATURE_NO_TITLE);
		setContentView(R.layout.activity_color_matrix);

		// 先设置imageview 的现实的图片
		bitmap = BitmapFactory.decodeResource(getResources(), R.drawable.test1);

		mImageView = (ImageView) findViewById(R.id.imageview);
		mImageView.setImageBitmap(bitmap);// 设置图片

		mGroup = (GridLayout) findViewById(R.id.group);

		// 因为在oncreate的时候 控件是没有画完的 所以 用post
		// 等加载完了 就调用post方法 加载20个edittext
		mGroup.post(new Runnable()
		{

			@Override
			public void run()
			{
				// TODO Auto-generated method stub
				mEditWidth = mGroup.getWidth() / 5;
				mEditHeight = mGroup.getHeight() / 4;
				// 添加20个控件
				addEditTexts();
				// 初始化矩阵
				initMatrix();
			}

		});

	}

	public void btnChange(View view)
	{
		getMatrix();
		setImageMatrix();

	}

	public void btnReset(View view)
	{
		initMatrix();
		getMatrix();
		setImageMatrix();
	}

	private void setImageMatrix()
	{
		Bitmap bmp = Bitmap.createBitmap(bitmap.getWidth(), bitmap.getHeight(), Bitmap.Config.ARGB_8888);
		ColorMatrix colorMatrix = new ColorMatrix();
		colorMatrix.set(mColorMatrix);

		Canvas canvas = new Canvas(bmp);
		Paint paint = new Paint(Paint.ANTI_ALIAS_FLAG);
		paint.setColorFilter(new ColorMatrixColorFilter(colorMatrix));
		canvas.drawBitmap(bitmap, 0, 0, paint);
		mImageView.setImageBitmap(bmp);
	}

	/**
	 * 初始化矩阵
	 */
	private void initMatrix()
	{
		// TODO Auto-generated method stub
		for (int i = 0; i < 20; i++)
		{
			if (i % 6 == 0)
			{
				mEdits[i].setText(String.valueOf(1));
			}
			else
			{
				mEdits[i].setText(String.valueOf(0));
			}
		}
	}

	/**
	 * 得到图像矩阵 0 0 0 0 0 R // 0 0 0 0 0 G /// 0 0 0 0 0 B // 0 0 0 0 0 A //
	 */
	private void getMatrix()
	{
		for (int i = 0; i < 20; i++)
		{
			mColorMatrix[i] = Float.valueOf(mEdits[i].getText().toString());
		}
	}

	/**
	 * 往GridLayout里面添加20个edittext
	 */
	private void addEditTexts()
	{
		for (int i = 0; i < 20; i++)
		{
			EditText editText = new EditText(ColorMatrixActivity.this);
			mEdits[i] = editText;
			mGroup.addView(editText, mEditWidth, mEditHeight);
		}
	}

}
其实也只是把上一篇中用到的colorMatrix替换成我们自己的而已,可见, API给我们提供的ColorMatrix跟我们的矩阵是一样的, 请看下图
三.第三部分
OK. 接下来我们真正要用到我们的矩阵了,用矩阵去处理像素点
如图, 这要对我们的苍老师进行如下三种图像处理:底片效果,老照片效果, 浮雕效果
先说一下各个效果的算法吧,
1. * @底片效果
* @ABC三个像素点
* @求B点的底片效果的算法那
* @B.r = 255 - B.r
* @B.g = 255 - B.g
* @B.b = 255 - B.b
2. * 老照片效果
*
* @r1 = (int) (0.393 * r + 0.769 * g + 0.189 * b);
* @g1 = (int) (0.349 * r + 0.686 * g + 0.168 * b);
* @b1 = (int) (0.272 * r + 0.534 * g + 0.131 * b);
3. * 浮雕效果
*
* @ABC
* @求B点浮雕效果算法
* @B.r = C.r - B.r + 127
* @B.g = C.g - B.g + 127
* @B.b = C.b - B.b + 127
用代码来说说第一个底片效果的思想
/**
	 * @底片效果
	 * @ABC三个像素点
	 * @求B点的底片效果的算法那
	 * @B.r = 255 - B.r
	 * @B.g = 255 - B.g
	 * @B.b = 255 - B.b
	 * @param bm
	 * @return
	 */
	public static Bitmap handleImageNegative(Bitmap bm)
	{
		int width = bm.getWidth();
		int height = bm.getHeight();
		int color;
		int r, g, b, a;

		Bitmap bmp = Bitmap.createBitmap(width, height, Bitmap.Config.ARGB_8888);

		int[] oldPx = new int[width * height];
		int[] newPx = new int[width * height];

		bm.getPixels(oldPx, 0, width, 0, 0, width, height);

		for (int i = 0; i < width * height; i++)
		{
			// 取出图片中各个像素点
			color = oldPx[i];
			// 每个像素点又是 r g b a合成的
			// 所以下面就是用像素点pixel 去得到r g b a
			r = Color.red(color);
			g = Color.green(color);
			b = Color.blue(color);
			a = Color.alpha(color);

			// 用算法去实现底片效果
			r = 255 - r;
			g = 255 - g;
			b = 255 - b;

			// 常规的 判断
			if (r > 255)
			{
				r = 255;
			}
			else if (r < 0)
			{
				r = 0;
			}

			if (g > 255)
			{
				g = 255;
			}
			else if (g < 0)
			{
				g = 0;
			}
			if (b > 255)
			{
				b = 255;
			}
			else if (b < 0)
			{
				b = 0;
			}

			// 求得的底片效果的像素点 给新的数组
			newPx[i] = Color.argb(a, r, g, b);
		}
		bmp.setPixels(newPx, 0, width, 0, 0, width, height);

		return bmp;
	}
我觉得代码说得比我说得清楚多了,我就不多说了.
其他两种呢, 这里也贴出来
老照片效果
public static Bitmap handleImagePixelsOldPhoto(Bitmap bm)
	{
		int width;
		int height;
		int color = 0;
		int a, r, g, b, r1, g1, b1;

		width = bm.getWidth();
		height = bm.getHeight();

		int[] oldPx = new int[width * height];
		int[] newPx = new int[width * height];

		Bitmap bitmap = Bitmap.createBitmap(width, height, Bitmap.Config.ARGB_8888);

		bm.getPixels(oldPx, 0, width, 0, 0, width, height);

		for (int i = 0; i < width * height; i++)
		{
			color = oldPx[i];
			a = Color.alpha(color);
			r = Color.red(color);
			g = Color.green(color);
			b = Color.green(color);

			r1 = (int) (0.393 * r + 0.769 * g + 0.189 * b);
			g1 = (int) (0.349 * r + 0.686 * g + 0.168 * b);
			b1 = (int) (0.272 * r + 0.534 * g + 0.131 * b);
			if (r1 > 255)
			{
				r1 = 255;
			}
			if (g1 > 255)
			{
				g1 = 255;
			}
			if (b1 > 255)
			{
				b1 = 255;
			}

			newPx[i] = Color.argb(a, r1, g1, b1);

		}

		bitmap.setPixels(newPx, 0, width, 0, 0, width, height);

		return bitmap;
	}


		/**
	 * 浮雕效果
	 *
	 * @ABC
	 * @求B点浮雕效果算法
	 * @B.r = C.r - B.r + 127
	 * @B.g = C.g - B.g + 127
	 * @B.b = C.b - B.b + 127
	 * @param bm
	 * @return
	 */
	public static Bitmap handleImagePixelsRelief(Bitmap bm)
	{
		int width = bm.getWidth();
		int height = bm.getHeight();

		int[] oldPx = new int[width * height];
		int[] newPx = new int[width * height];

		int color = 0;

		int a, r, g, b;
		int r1, g1, b1;
		int colorAfter;

		Bitmap bitmap = Bitmap.createBitmap(width, height, Bitmap.Config.ARGB_8888);
		bm.getPixels(oldPx, 0, width, 0, 0, width, height);
		// 下标从1开始
		for (int i = 0; i < width * height - 1; i++)
		{

			color = oldPx[i];
			a = Color.alpha(color);
			r1 = Color.red(color);
			g1 = Color.green(color);
			b1 = Color.blue(color);

			colorAfter = oldPx[i + 1];
			r = Color.red(colorAfter);
			g = Color.green(colorAfter);
			b = Color.blue(colorAfter);

			r1 = r - r1 + 127;
			g1 = g - g1 + 127;
			b1 = b - b1 + 127;

			if (r1 > 255)
			{
				r1 = 255;
			}
			if (g1 > 255)
			{
				g1 = 255;
			}
			if (b1 > 255)
			{
				b1 = 255;
			}
			newPx[i] = Color.argb(a, r1, g1, b1);
		}
		bitmap.setPixels(newPx, 0, width, 0, 0, width, height);
		return bitmap;

	}
!!!!!!不知道为什么, 图片保存失败了, 我也不知道源码如何上传, 真是失败,算了 今天就到这里, 比较累了


 9881
9881

 被折叠的 条评论
为什么被折叠?
被折叠的 条评论
为什么被折叠?
 到【灌水乐园】发言


