


本文首先描述了可以实际测试并运行的驱动程序示例,然后讨论了Linux下驱动程序模板的元素以及Linux上从应用程序到驱动程序的执行过程。我相信,这种从浅到深,从具体示例到抽象理论的描述,使初学者更容易启动Linux驱动的门。
一、一个简单的驱动程序示例
驱动程序文件hello.c
#include #include #include #include #include #define HELLO_MAJOR 231
#define DEVICE_NAME "HelloModule"
static int hello_open(struct inode *inode, struct file *file){
printk(KERN_EMERG "hello open.\n");
return 0;
}
static int hello_write(struct file *file, const char __user * buf, size_t count, loff_t *ppos){
printk(KERN_EMERG "hello write.\n");
return 0;
}
static struct file_operations hello_flops = {
.owner = THIS_MODULE,
.open = hello_open,
.write = hello_write,
};
static int __init hello_init(void){
int ret;
ret = register_chrdev(HELLO_MAJOR,DEVICE_NAME, &hello_flops);
if (ret < 0) {
printk(KERN_EMERG DEVICE_NAME " cant register major number.\n");
return ret;
}
printk(KERN_EMERG DEVICE_NAME " initialized.\n");
return 0;
}
static void __exit hello_exit(void){
unregister_chrdev(HELLO_MAJOR, DEVICE_NAME);
printk(KERN_EMERG DEVICE_NAME " removed.\n");
}
module_init(hello_init);
module_exit(hello_exit);
MODULE_LICENSE("GPL");
驱动程序文件主要包括函数hello_open,hello_write,hello_init和hello_exit。在测试用例中,没有为驱动程序模块提供实用功能,而是通过打印日志将一些调试信息通知控制台,以便我们可以掌握驱动程序。实施过程。
使用printk进行打印时,在参数中添加“ KERN_EMERG”可以确保将要打印的信息输出到控制台。因为printk分为8级打印,所以较高的级别将打印到控制台,较低的级别将输出到日志文件。
需要编译驱动程序的Makefile
ifneq ($(KERNELRELEASE),)
MODULE_NAME = hellomodule
$(MODULE_NAME)-objs := hello.o
obj-m := $(MODULE_NAME).o
else
KERNEL_DIR = /lib/modules/`uname -r`/build
MODULEDIR := $(shell pwd)
.PHONY: modules
default: modules
modules:
make -C $(KERNEL_DIR) M=$(MODULEDIR) modules
clean distclean:
rm -f *.o *.mod.c .*.*.cmd *.ko
rm -rf .tmp_versions
endif
需要一个合适的makefile来编译驱动程序文件,因为在编译驱动程序时,您需要了解内核头文件,编译规则等。
测试驱动的上层应用程序代码hellotest.c
#include #include int main(void)
{
int fd;
int val = 1;
fd = open("/dev/hellodev", O_RDWR);
if(fd < 0){
printf("cant open!\n");
}
write(fd, &val, 4);
return 0;
}
在上部测试用例中,首先打开设备文件,然后将数据写入设备。这样,将调用驱动程序中相应的xxx_open和xxx_write函数,并且可以使用该驱动程序的打印信息来确定相应的功能是否根据需要实际执行。

二、驾驶示例测试
整个测试方法是编译驱动程序和上层测试应用程序;加载驱动程序,通过上层应用程序调用驱动程序;最后,卸载驱动程序。
1、编译驱动程序
#make
make命令直接调用Makefile编译hello.c,最后生成“ hellomodule.ko”。
2、编译上层应用程序
#gcc hellotest.c -o hellotest
使用此命令,您可以编译上层应用程序hellotest。
3、加载驱动程序
#insmod hellomodule.ko
insmod加载驱动程序时,它将调用函数hello_init(),并且打印的调试信息如下。

此外,您可以在“ / proc / devices”中看到已加载的模块。

4、创建节点
尽管已经加载了驱动程序hellomodule.ko,并且在/ proc / devices文件中也可以看到已加载的模块HelloModule,但该模块仍无法使用,因为它在设备目录/ dev目录Device中与它不对应文件。因此,需要创建一个设备节点。
#mknod /dev/hellodev c 231 0
在/ proc / devices中,您会看到HelloModule模块的主设备号是231。在创建节点时,设备文件/ dev / hellodev已连接到主设备号。这样,当应用程序操作文件/ dev / hellodev时,它将找到模块HelloModule。

/ proc / devices和/ dev
之间的区别
5、上应用程序调用驱动程序
#./hellotest
hellotest应用程序首先打开文件“ / dev / hellodev”,然后将变量val写入此文件。在此期间,底层驱动程序中的hello_open和hello_write函数将被调用。 hellotest的运行结果如下所示。


6、卸载驱动程序
#rmmod hellomodule
当insmod卸载驱动程序时,将调用函数hello_exit(),并且打印的调试信息如下。

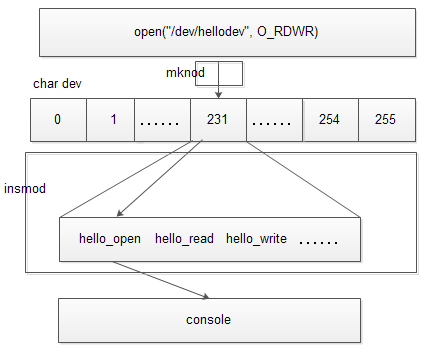
模块操作过程摘要:
([1)通过insmod命令注册模块
(2)通过mknod命令在/ dev目录中创建设备文件“ xxx”,并通过主设备号与模块建立连接。
(3)应用层通过设备文件/ dev / xxx操作底层模块。
三、驱动程序模板
从宏级别掌握驱动程序的框架,然后从细节上改进驱动程序的功能。这是开发驱动程序的一般步骤。驱动程序模板的必要元素包括头文件,初始化函数,退出函数和版权信息。常用的扩展元素是添加一些功能以改进基础驱动程序的功能。
1、头文件

#include #include #include #include #include
init.h定义与驱动程序初始化和退出相关的功能
kernel.h定义了常用的函数原型和宏定义
module.h定义与内核模块相关的函数,变量和宏
2、初始化功能
static int __init hello_init(void){
int ret;
ret = register_chrdev(HELLO_MAJOR,DEVICE_NAME,&hello_flops);
if (ret < 0) {
printk(KERN_EMERG DEVICE_NAME " cant register major number.\n");
return ret;
}
printk(KERN_EMERG DEVICE_NAME " initialized.\n");
return 0;
}
module_init(hello_init);
将驱动程序加载到内核后,此初始化功能将自动执行。
顾名思义,初始化函数用于初始化模块。常用的功能是通过register_chrdev注册该功能。内核分配一块专用于存储字符设备功能集的内存(数组)。 register_chrdev函数将在此数组的HELLO_MAJOR位置填充hello_flops的内容,即将HelloModule的函数功能地址注册到设备管理存储器集中。
形象的比喻似乎是操作系统提供了许多衣架,而注册的设备就像将衣服挂在某个衣架上。衣服上有很多口袋,好像每个模块都有许编程接口一样。显然,如果要使用设备的某个功能,则可以先找到相应的衣架,然后找到相应的衣袋,调用相应的功能,然后执行操作。
3、退出功能
static void __exit hello_exit(void){
unregister_chrdev(HELLO_MAJOR, DEVICE_NAME);
printk(KERN_EMERG DEVICE_NAME " removed.\n");
}
module_exit(hello_exit);
卸载驱动程序后,将自动执行退出功能以完成一系列清除任务。
在加载驱动程序时,我们将模块的相关功能注册到了设备管理存储器中。卸载驱动程序时,必须清除该模块占用的内存空间。这样,在注册其他设备时将有更多的选择余地。
比喻是当驾驶员卸货时,将衣服从衣架上移走,从而将衣架倒空。
本文来自电脑杂谈,转载请注明本文网址:
http://www.pc-fly.com/a/jisuanjixue/article-337192-1.html


 847
847


 被折叠的 条评论
为什么被折叠?
被折叠的 条评论
为什么被折叠?
 到【灌水乐园】发言


