


 本文详细介绍了通道注意力机制,并提供了两个PyTorch实现案例。第一个案例展示了如何单独使用通道注意力机制,第二个案例则将注意力机制整合到一个自定义模型中,用于增强模型的表示能力。通过训练数据的处理和模型的训练,展示了通道注意力在实际任务中的应用。
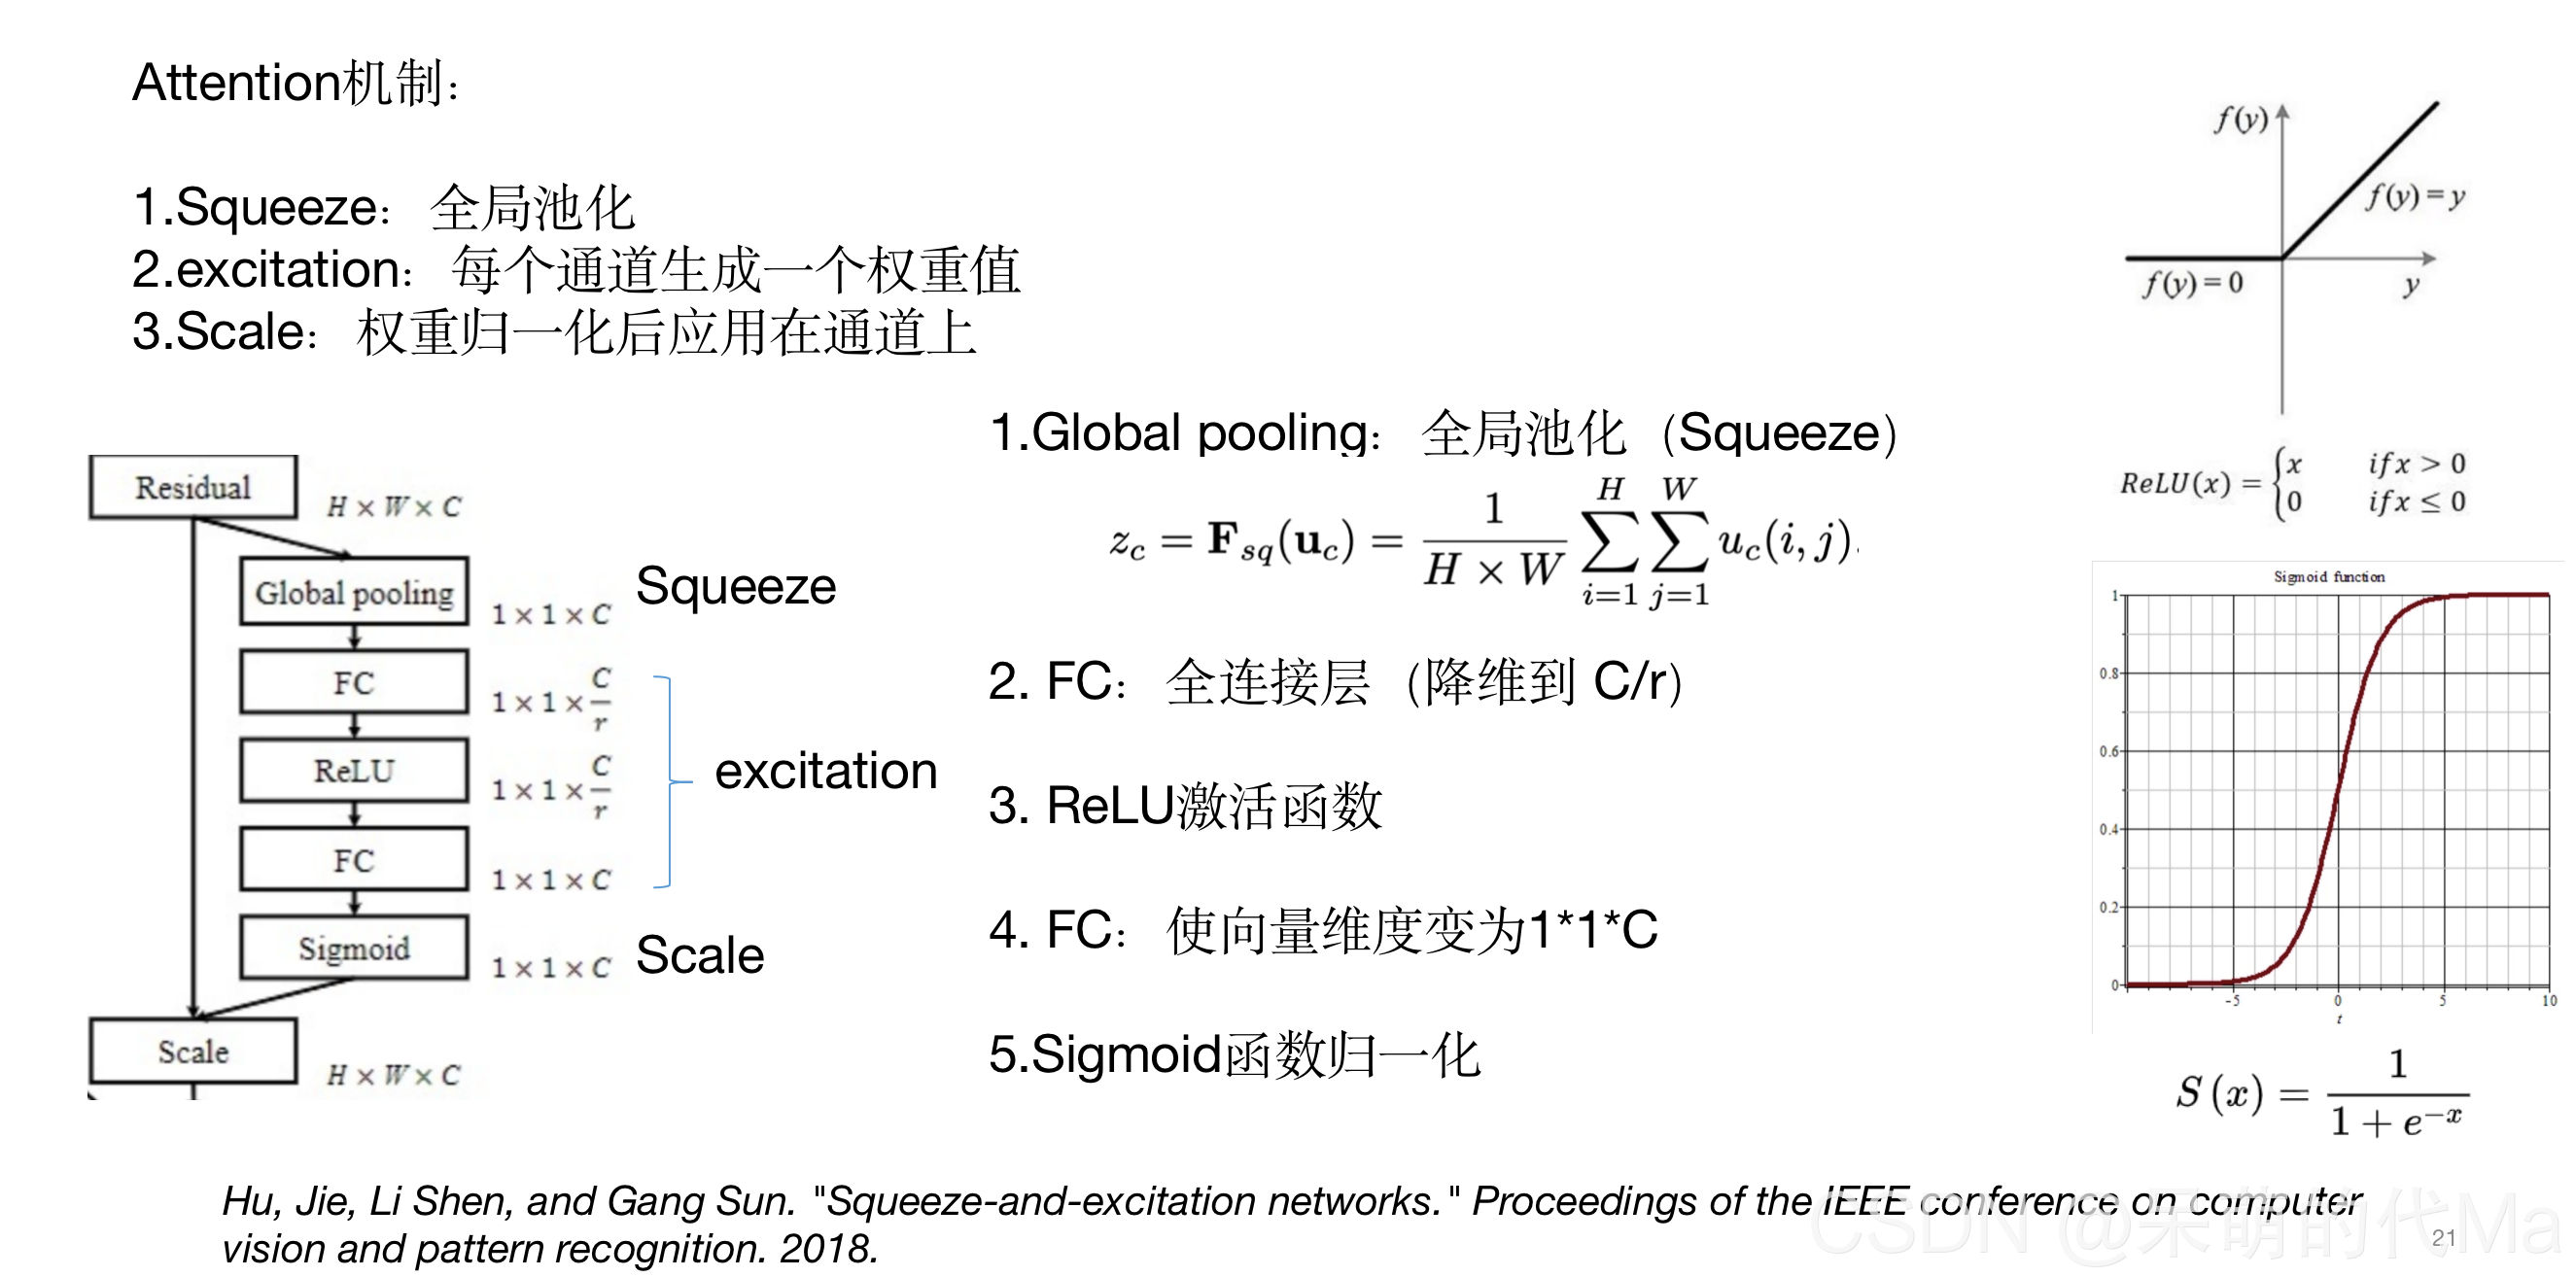
一、通道注意力机制简介
下面的图形象的说明了通道注意力机制
二、通道注意力机制pytorch代码
通道注意力机制的pytorch代码如下:
import torch
import torch.nn as nn
import torch.utils.data as Data


class ChannelAttention(nn.Module):
    def __init__(self, in_planes, ratio=16):
        super(ChannelAttention, self).__init__()
        self.avg_pool = nn.AdaptiveAvgPool2d(1)
        self.max_pool = nn.AdaptiveMaxPool2d(1)

        self.fc1 = nn.Conv2d(in_planes, in_planes // ratio, 1, bias=False)
        self.relu1 = nn.ReLU()
        self.fc2 = nn.Conv2d(in_planes // ratio, in_planes, 1, bias=False)
        self.sigmoid = nn.Sigmoid()

    def forward(self, x): # x 的输入格式是:[batch_size, C, H, W]
        avg_out = self.fc2(self.relu1(self.fc1(self.avg_pool(x))))
        max_out = self.fc2(self.relu1(self.fc1(self.max_pool(x))))
        out = avg_out + max_out
        return self.sigmoid(out)
1. 单独使用通道注意力机制的小案例
import torch
import torch.nn as nn
import torch.utils.data as Data


class ChannelAttention(nn.Module):
    def __init__(self, in_planes, ratio=16):
        super(ChannelAttention, self).__init__()
        self.avg_pool = nn.AdaptiveAvgPool2d(1)
        self.max_pool = nn.AdaptiveMaxPool2d(1)

        self.fc1 = nn.Conv2d(in_planes, in_planes // ratio, 1, bias=False)
        self.relu1 = nn.ReLU()
        self.fc2 = nn.Conv2d(in_planes // ratio, in_planes, 1, bias=False)
        self.sigmoid = nn.Sigmoid()

    def forward(self, x):
        avg_out = self.fc2(self.relu1(self.fc1(self.avg_pool(x))))
        max_out = self.fc2(self.relu1(self.fc1(self.max_pool(x))))
        out = avg_out + max_out
        return self.sigmoid(out)


def get_total_train_data(H, W, C, class_count):
    """得到全部的训练数据,这里需要替换成自己的数据"""
    import numpy as np
    x_train = torch.Tensor(
        np.random.random((1000, H, W, C)))  # 维度是 [ 数据量, 高H, 宽W, 长C]
    y_train = torch.Tensor(
        np.random.randint(0, class_count, size=(1000, 1))).long()  # [ 数据量, 句子的分类], 这里的class_count=4,就是四分类任务
    return x_train, y_train


if __name__ == '__main__':
    # ================训练参数=================
    epochs = 100
    batch_size = 30
    output_class = 14
    H = 40
    W = 50
    C = 30
    # ================准备数据=================
    x_train, y_train = get_total_train_data(H, W, C, class_count=output_class)
    train_loader = Data.DataLoader(
        dataset=Data.TensorDataset(x_train, y_train),  # 封装进Data.TensorDataset()类的数据,可以为任意维度
        batch_size=batch_size,  # 每块的大小
        shuffle=True,  # 要不要打乱数据 (打乱比较好)
        num_workers=6,  # 多进程(multiprocess)来读数据
        drop_last=True,
    )
    # ================初始化模型=================
    model = ChannelAttention(in_planes=H)
    # ================开始训练=================
    for i in range(epochs):
        for seq, labels in train_loader:
            attention_out = model(seq)
            seq_attention_out = attention_out.squeeze()
            for i in range(seq_attention_out.size()[0]):
                print(seq_attention_out[i])
可以看到输出是:
tensor([0.4440, 0.5005, 0.5533, 0.4530, 0.5494, 0.5430, 0.4911, 0.5339, 0.4627,
        0.5182, 0.4940, 0.4497, 0.4544, 0.5337, 0.4663, 0.4333, 0.5343, 0.4335,
        0.4711, 0.4569, 0.4508, 0.4532, 0.5102, 0.4824, 0.5231, 0.5328, 0.5092,
        0.5567, 0.5075, 0.5520, 0.5588, 0.4344, 0.5577, 0.4408, 0.4539, 0.4891,
        0.4513, 0.4472, 0.4983, 0.4991], grad_fn=<SelectBackward>)
tensor([0.4444, 0.5005, 0.5530, 0.4533, 0.5491, 0.5427, 0.4911, 0.5337, 0.4630,
        0.5181, 0.4940, 0.4500, 0.4546, 0.5335, 0.4665, 0.4337, 0.5341, 0.4339,
        0.4713, 0.4572, 0.4511, 0.4535, 0.5101, 0.4825, 0.5229, 0.5326, 0.5092,
        0.5564, 0.5074, 0.5516, 0.5584, 0.4348, 0.5574, 0.4412, 0.4541, 0.4892,
        0.4516, 0.4475, 0.4983, 0.4991], grad_fn=<SelectBackward>)
.......
这个就是每个batch中,每层的权重,其中输入模型的size是[30, 40, 50, 30],输出的attention_out的size是[30, 40, 1, 1]
2. 使用通道注意力机制的小案例
import torch
import torch.nn as nn
import torch.utils.data as Data


class ChannelAttention(nn.Module):
    def __init__(self, in_planes, ratio=16):
        super(ChannelAttention, self).__init__()
        self.avg_pool = nn.AdaptiveAvgPool2d(1)
        self.max_pool = nn.AdaptiveMaxPool2d(1)

        self.fc1 = nn.Conv2d(in_planes, in_planes // ratio, 1, bias=False)
        self.relu1 = nn.ReLU()
        self.fc2 = nn.Conv2d(in_planes // ratio, in_planes, 1, bias=False)
        self.sigmoid = nn.Sigmoid()

    def forward(self, x):
        avg_out = self.fc2(self.relu1(self.fc1(self.avg_pool(x))))
        max_out = self.fc2(self.relu1(self.fc1(self.max_pool(x))))
        out = avg_out + max_out
        return self.sigmoid(out)


class UseAttentionModel(nn.Module): # 这里可以随便定义自己的模型
    def __init__(self, H):
        super(UseAttentionModel, self).__init__()
        self.channel_attention = ChannelAttention(H)

    def forward(self, x):  # 反向传播
        attention_value = self.channel_attention(x)
        out = x.mul(attention_value) # 得到借助注意力机制后的输出
        return out


def get_total_train_data(H, W, C, class_count):
    """得到全部的训练数据,这里需要替换成自己的数据"""
    import numpy as np
    x_train = torch.Tensor(
        np.random.random((1000, H, W, C)))  # 维度是 [ 数据量, 高H, 宽W, 长C]
    y_train = torch.Tensor(
        np.random.randint(0, class_count, size=(1000, 1))).long()  # [ 数据量, 句子的分类], 这里的class_count=4,就是四分类任务
    return x_train, y_train


if __name__ == '__main__':
    # ================训练参数=================
    epochs = 100
    batch_size = 30
    output_class = 14
    H = 40
    W = 50
    C = 30
    # ================准备数据=================
    x_train, y_train = get_total_train_data(H, W, C, class_count=output_class)
    train_loader = Data.DataLoader(
        dataset=Data.TensorDataset(x_train, y_train),  # 封装进Data.TensorDataset()类的数据,可以为任意维度
        batch_size=batch_size,  # 每块的大小
        shuffle=True,  # 要不要打乱数据 (打乱比较好)
        num_workers=6,  # 多进程(multiprocess)来读数据
        drop_last=True,
    )
    # ================初始化模型=================
    model = UseAttentionModel(H)
    cross_loss = nn.CrossEntropyLoss()
    optimizer = torch.optim.Adam(model.parameters(), lr=0.001)  # 优化器
    model.train()
    # ================开始训练=================
    for i in range(epochs):
        for seq, labels in train_loader:
            attention_out = model(seq)
            print(attention_out.size())
            print(attention_out)


 1845
1845

 被折叠的 条评论
为什么被折叠?
被折叠的 条评论
为什么被折叠?
 到【灌水乐园】发言


