观感度:🌟🌟🌟🌟🌟
口味:新疆炒米粉
烹饪时间:10min
通过上两个系列专栏的学习,我们对前端音视频及 WebRTC 有了初步的了解,是时候敲代码实现一个 Demo 来真实感受下 WebRTC 实时通讯的魅力了。还没有看过的同学请移步:
RTCPeerConnection
RTCPeerConnection 类是在浏览器下使用 WebRTC 实现实时互动音视频系统中最核心的类,它代表一个由本地计算机到远端的 WebRTC 连接。该接口提供了创建、保持、监控及关闭连接的方法的实现。
想要对这个类了解更多可以移步这个链接, https://developer.mozilla.org/zh-CN/docs/Web/API/RTCPeerConnection
其实,如果你有做过 socket 开发的话,你会更容易理解 RTCPeerConnection,它其实就是一个加强版本的 socket。
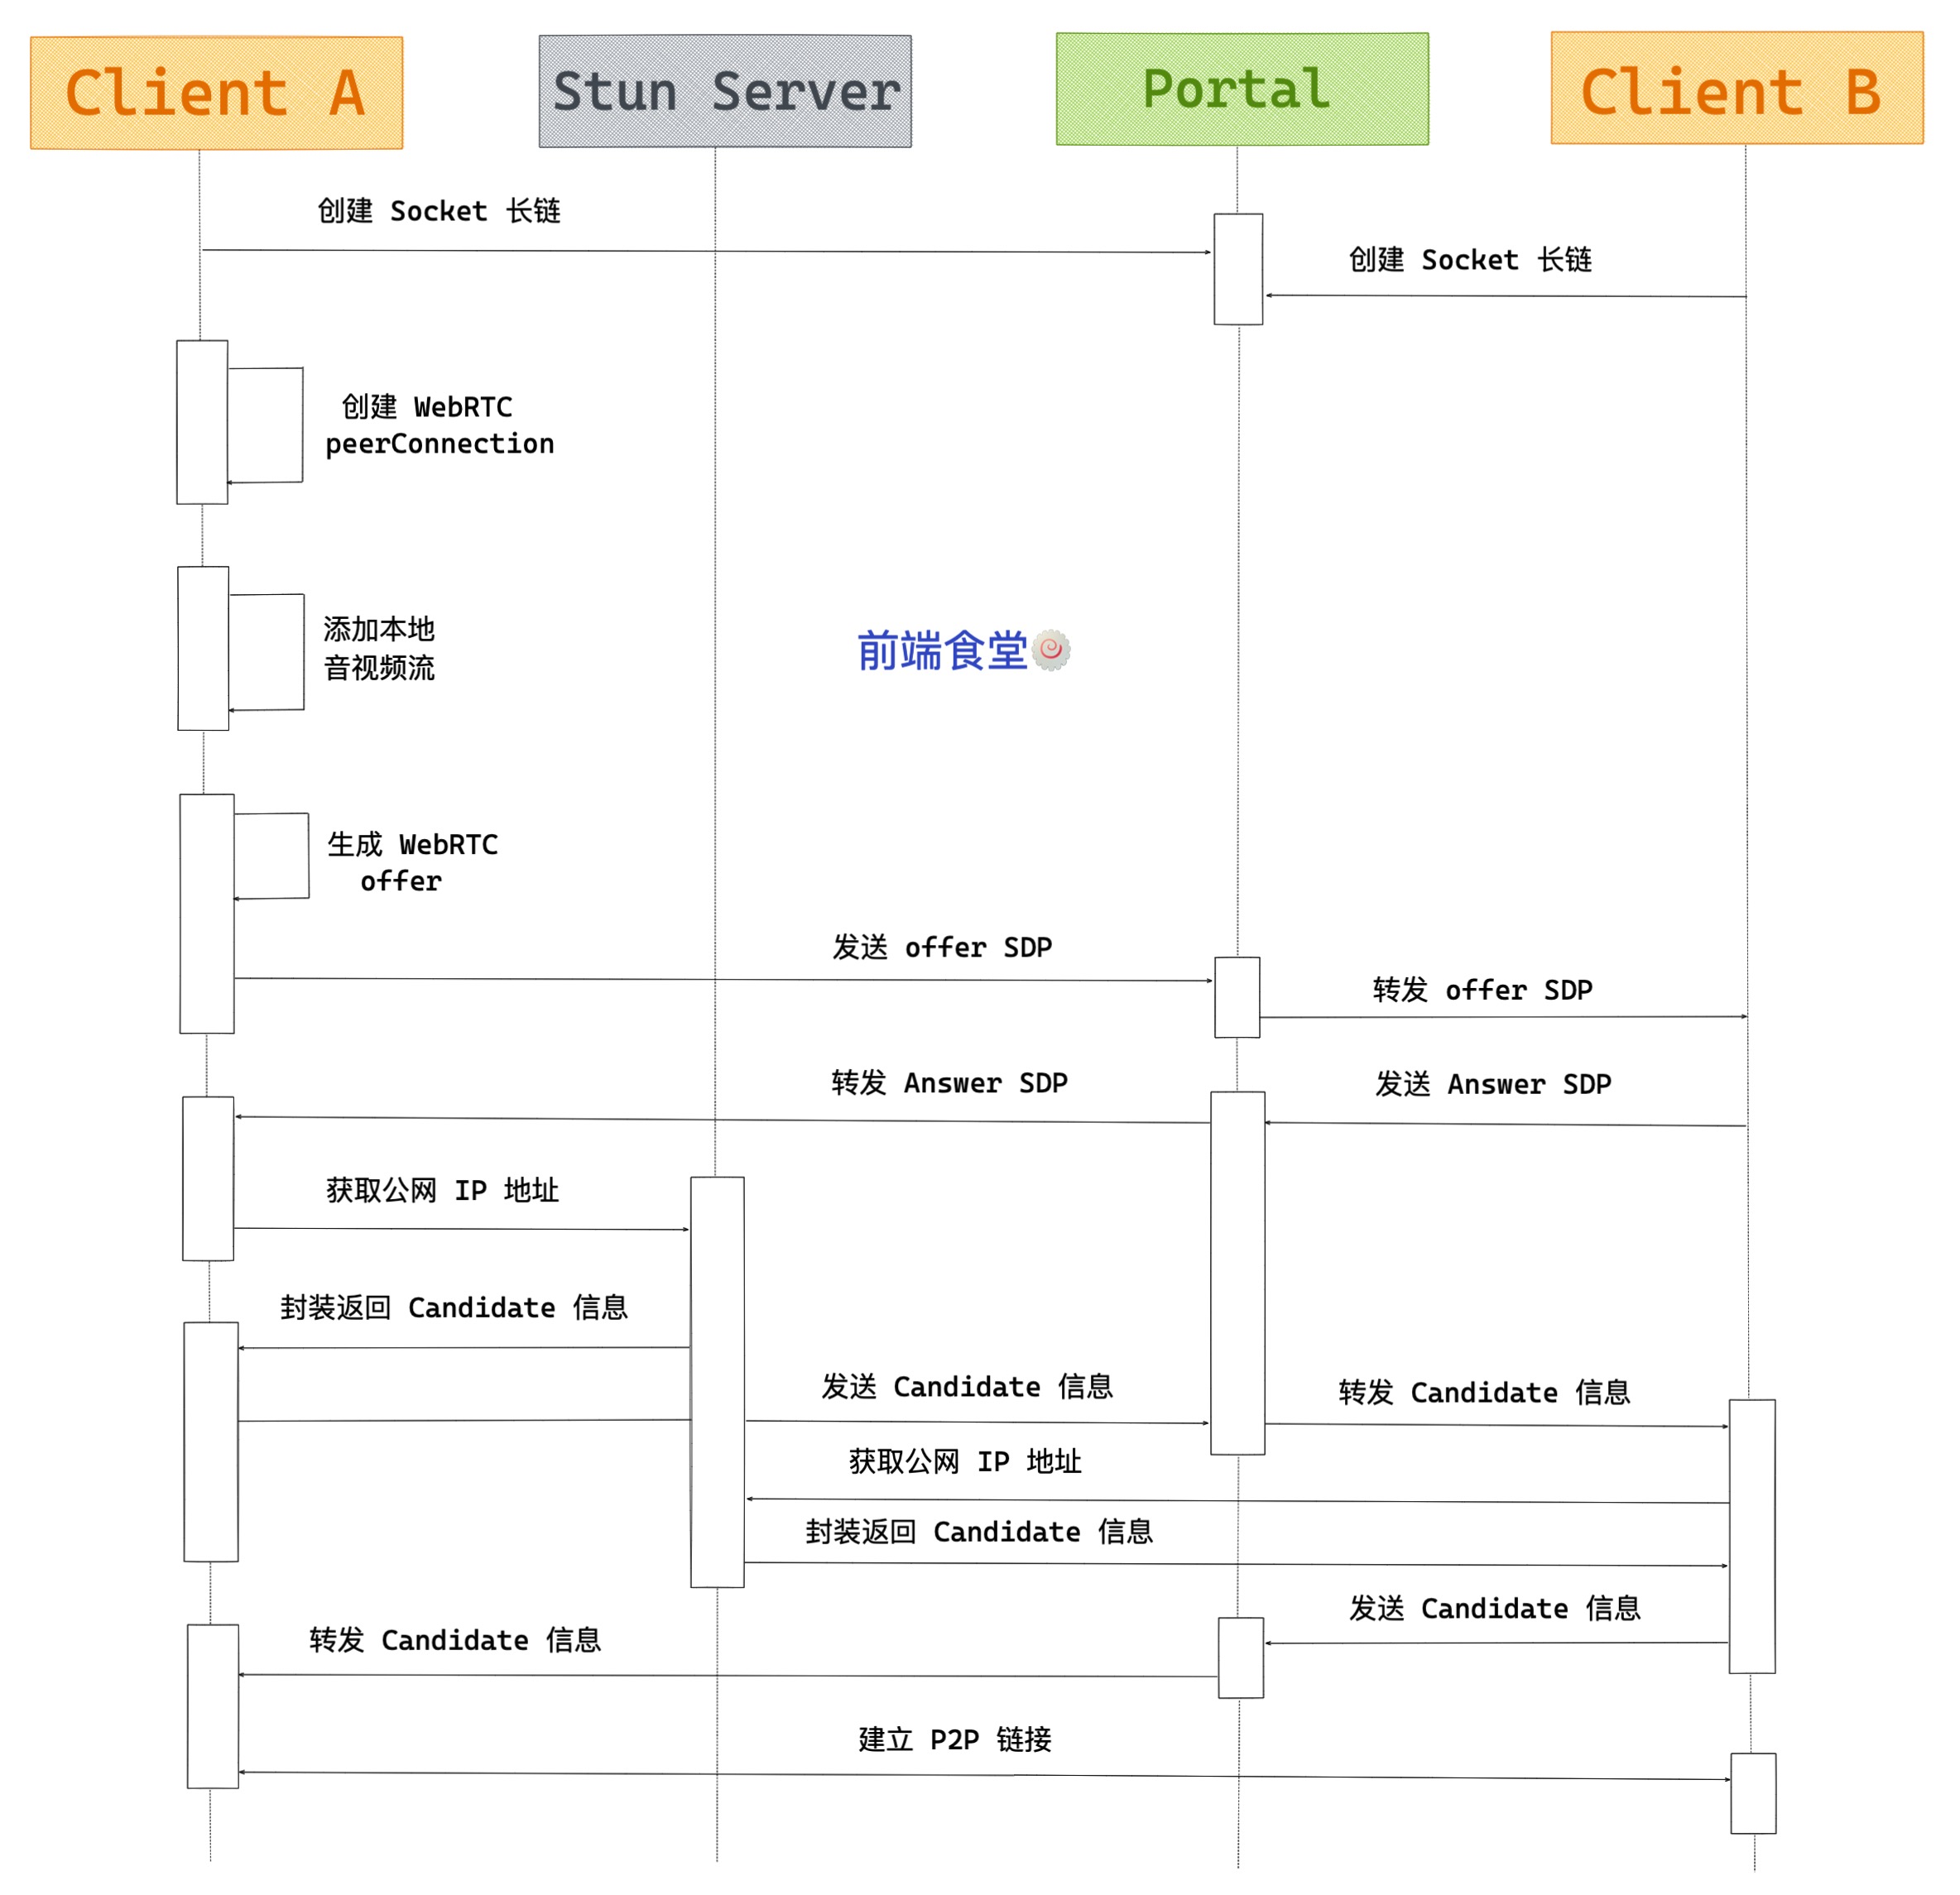
在上个系列专栏 前端音视频之WebRTC初探 中,我们了解了 WebRTC 的通信原理,在真实场景下需要进行媒体协商、网络协商、架设信令服务器等操作,我画了一张图,将 WebRTC 的通信过程总结如下:

不过今天我们为了单纯的搞清楚 RTCPeerConnection,先不考虑开发架设信令服务器的问题,简单点,我们这次尝试在同一个页面中模拟两端进行音视频的互通。
在此之前,我们先了解一些将要用到的 API 以及 WebRTC 建立连接的步骤。
相关 API
-
RTCPeerConnection接口代表一个由本地计算机到远端的 WebRTC 连接。该接口提供了创建、保持、监控、关闭连接的方法的实现。 -
PC.createOffer创建提议 Offer 方法,此方法会返回 SDP Offer 信息。 -
PC.setLocalDescription设置本地 SDP 描述信息。 -
PC.setRemoteDescription设置远端 SDP 描述信息,即对方发过来的 SDP 数据。 -
PC.createAnswer创建应答 Answer 方法,此方法会返回 SDP Answer 信息。 -
RTCIceCandidateWebRTC 网络信息(IP、端口等) -
PC.addIceCandidatePC 连接添加对方的 IceCandidate 信息,即添加对方的网络信息。
WebRTC 建立连接步骤
-
1.为连接的两端创建一个 RTCPeerConnection 对象,并且给 RTCPeerConnection 对象添加本地流。
-
2.获取本地媒体描述信息(SDP),并与对端进行交换。
-
3.获取网络信息(Candidate,IP 地址和端口),并与远端进行交换。
Demo 实战
首先,我们添加视频元素及控制按钮,引入 adpater.js 来适配各浏览器。
<!DOCTYPE html>
<html lang="en">
<head>
    <meta charset="UTF-8">
    <meta name="viewport" content="width=device-width, initial-scale=1.0">
    <title>Demo</title>
    <style>
        video {
            width: 320px;
        }
    </style>
</head>
<body>
    <video id="localVideo" autoplay playsinline></video>
    <video id="remoteVideo" autoplay playsinline></video>

    <div>
        <button id="startBtn">打开本地视频</button>
        <button id="callBtn">建立连接</button>
        <button id="hangupBtn">断开连接</button>
    </div>
    <!-- 适配各浏览器 API 不统一的脚本 -->
    <script src="https://webrtc.github.io/adapter/adapter-latest.js"></script>
    <script src="./webrtc.js"></script>
</body>
</html>
然后,定义我们将要使用到的对象。
// 本地流和远端流
let localStream;
let remoteStream;

// 本地和远端连接对象
let localPeerConnection;
let remotePeerConnection;

// 本地视频和远端视频
const localVideo = document.getElementById('localVideo');
const remoteVideo = document.getElementById('remoteVideo');

// 设置约束
const mediaStreamConstraints = {
    video: true
}

// 设置仅交换视频
const offerOptions = {
    offerToReceiveVideo: 1
}
接下来,给按钮注册事件并实现相关业务逻辑。
function startHandle() {
    startBtn.disabled = true;
    // 1.获取本地音视频流
    // 调用 getUserMedia API 获取音视频流
    navigator.mediaDevices.getUserMedia(mediaStreamConstraints)
        .then(gotLocalMediaStream)
        .catch((err) => {
            console.log('getUserMedia 错误', err);
        });
}

function callHandle() {
    callBtn.disabled = true;
    hangupBtn.disabled = false;

    // 视频轨道
    const videoTracks = localStream.getVideoTracks();
    // 音频轨道
    const audioTracks = localStream.getAudioTracks();
    // 判断视频轨道是否有值
    if (videoTracks.length > 0) {
        console.log(`使用的设备为: ${videoTracks[0].label}.`);
    }
    // 判断音频轨道是否有值
    if (audioTracks.length > 0) {
        console.log(`使用的设备为: ${audioTracks[0].label}.`);
    }
    const servers = null;

    // 创建 RTCPeerConnection 对象
    localPeerConnection = new RTCPeerConnection(servers);
    // 监听返回的 Candidate
    localPeerConnection.addEventListener('icecandidate', handleConnection);
    // 监听 ICE 状态变化
    localPeerConnection.addEventListener('iceconnectionstatechange', handleConnectionChange)

    remotePeerConnection = new RTCPeerConnection(servers);
    remotePeerConnection.addEventListener('icecandidate', handleConnection);
    remotePeerConnection.addEventListener('iceconnectionstatechange', handleConnectionChange);
    remotePeerConnection.addEventListener('track', gotRemoteMediaStream);

    // 将音视频流添加到 RTCPeerConnection 对象中
    // 注意:新的协议中已经不再推荐使用 addStream 方法来添加媒体流,应使用 addTrack 方法
    // localPeerConnection.addStream(localStream);
    // 遍历本地流的所有轨道
    localStream.getTracks().forEach((track) => {
        localPeerConnection.addTrack(track, localStream)
    })

    // 2.交换媒体描述信息
    localPeerConnection.createOffer(offerOptions)
    .then(createdOffer).catch((err) => {
        console.log('createdOffer 错误', err);
    });
}

function hangupHandle() {
    // 关闭连接并设置为空
    localPeerConnection.close();
    remotePeerConnection.close();
    localPeerConnection = null;
    remotePeerConnection = null;
    hangupBtn.disabled = true;
    callBtn.disabled = false;
}

// getUserMedia 获得流后,将音视频流展示并保存到 localStream
function gotLocalMediaStream(mediaStream) {
    localVideo.srcObject = mediaStream;
    localStream = mediaStream;
    callBtn.disabled = false;
}

function createdOffer(description) {
    console.log(`本地创建offer返回的sdp:\n${description.sdp}`)
    // 本地设置描述并将它发送给远端
    // 将 offer 保存到本地
    localPeerConnection.setLocalDescription(description)
        .then(() => {
            console.log('local 设置本地描述信息成功');
        }).catch((err) => {
            console.log('local 设置本地描述信息错误', err)
        });
    // 远端将本地给它的描述设置为远端描述
    // 远端将 offer 保存
    remotePeerConnection.setRemoteDescription(description)
        .then(() => {
            console.log('remote 设置远端描述信息成功');
        }).catch((err) => {
            console.log('remote 设置远端描述信息错误', err);
        });
    // 远端创建应答 answer
    remotePeerConnection.createAnswer()
        .then(createdAnswer)
        .catch((err) => {
            console.log('远端创建应答 answer 错误', err);
        });
}

function createdAnswer(description) {
    console.log(`远端应答Answer的sdp:\n${description.sdp}`)
    // 远端设置本地描述并将它发给本地
    // 远端保存 answer
    remotePeerConnection.setLocalDescription(description)
        .then(() => {
            console.log('remote 设置本地描述信息成功');
        }).catch((err) => {
            console.log('remote 设置本地描述信息错误', err);
        });
    // 本地将远端的应答描述设置为远端描述
    // 本地保存 answer
    localPeerConnection.setRemoteDescription(description)
        .then(() => {
            console.log('local 设置远端描述信息成功');
        }).catch((err) => {
            console.log('local 设置远端描述信息错误', err);
        });
}

// 3.端与端建立连接
function handleConnection(event) {
    // 获取到触发 icecandidate 事件的 RTCPeerConnection 对象
    // 获取到具体的Candidate
    const peerConnection = event.target;
    const iceCandidate = event.candidate;

    if (iceCandidate) {
        // 创建 RTCIceCandidate 对象
        const newIceCandidate = new RTCIceCandidate(iceCandidate);
        // 得到对端的 RTCPeerConnection
        const otherPeer = getOtherPeer(peerConnection);

        // 将本地获得的 Candidate 添加到远端的 RTCPeerConnection 对象中
        // 为了简单,这里并没有通过信令服务器来发送 Candidate,直接通过 addIceCandidate 来达到互换 Candidate 信息的目的
        otherPeer.addIceCandidate(newIceCandidate)
            .then(() => {
                handleConnectionSuccess(peerConnection);
            }).catch((error) => {
                handleConnectionFailure(peerConnection, error);
            });
    }
}

// 4.显示远端媒体流
function gotRemoteMediaStream(event) {
    if (remoteVideo.srcObject !== event.streams[0]) {
        remoteVideo.srcObject = event.streams[0];
        remoteStream = event.streams[0];
        console.log('remote 开始接受远端流')
    }
}
最后,还需要注册一些 Log 函数及工具函数。
function handleConnectionChange(event) {
    const peerConnection = event.target;
    console.log('ICE state change event: ', event);
    console.log(`${getPeerName(peerConnection)} ICE state: ` + `${peerConnection.iceConnectionState}.`);
}

function handleConnectionSuccess(peerConnection) {
    console.log(`${getPeerName(peerConnection)} addIceCandidate 成功`);
}

function handleConnectionFailure(peerConnection, error) {
    console.log(`${getPeerName(peerConnection)} addIceCandidate 错误:\n`+ `${error.toString()}.`);
}

function getPeerName(peerConnection) {
    return (peerConnection === localPeerConnection) ? 'localPeerConnection' : 'remotePeerConnection';
}

function getOtherPeer(peerConnection) {
    return (peerConnection === localPeerConnection) ? remotePeerConnection : localPeerConnection;
}
其实当你熟悉整个流程后可以将所有的 Log 函数统一抽取并封装起来,上文为了便于你在读代码的过程中更容易的理解整个 WebRTC 建立连接的过程,并没有进行抽取。
好了,到这里一切顺利的话,你就成功的建立了 WebRTC 连接,效果如下:
(随手抓起桌边的鼠年企鹅公仔)

参考
- 《从 0 打造音视频直播系统》 李超
- 《WebRTC 音视频开发 React+Flutter+Go 实战》 亢少军
- https://developer.mozilla.org/zh-CN/docs/Web/API/RTCPeerConnection


 2381
2381


 被折叠的 条评论
为什么被折叠?


