


文章目录
0x01 背景
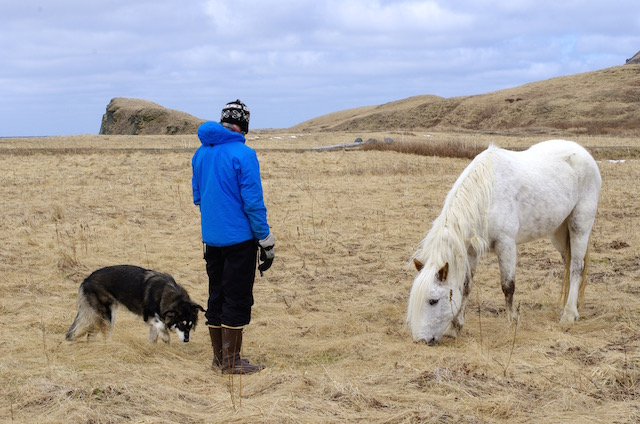
目的:识别出图片中概率最大的人形生物,并给出坐标
仅讨论 yolo 编解码,以及解码实现方式,不讨论nms以及其他
在用 darknet 训练出一个 yolo-s 的轻轻轻量级(291.9KB)目标检测神经网络之后,我以为事情到这,就结束了了了了了
后面填了了个坑,darknet 转 keras model,
model = keras.model.load_model(model_path)
yolo_output = model.predict(img_path)
竟然里面有负值!!!

查阅了网上大佬+小佬说的之后,原因在于目标检测模型训练的并不是 box 的(x, y, w, h), 而是(tx, ty, tw, th)
请个翻译,人话就是:偏移量+尺度缩放
至于为什么要用偏移量和缩放来训练,而不是 box 直接训练,目前并没有看到一篇很有说服力的文章,等下周有时间了看一下论文原文。
0x02 编解码
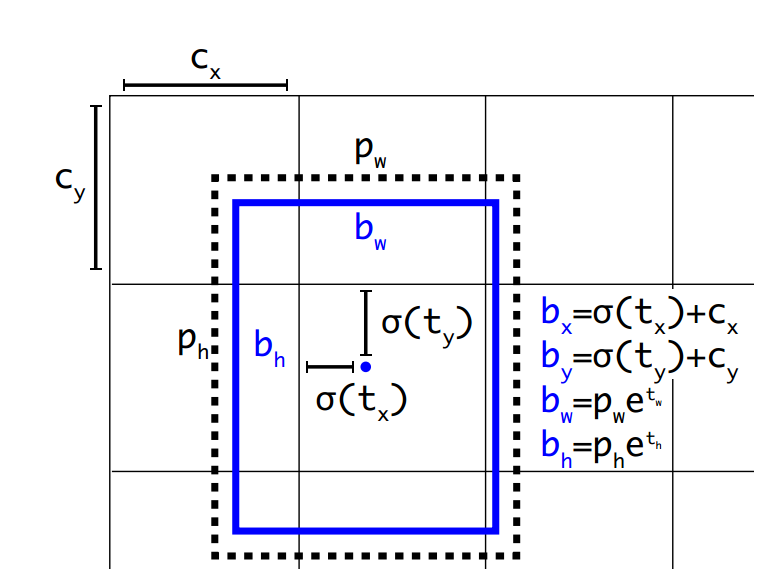
对上图做一个参数说明:
cx, cy 是 feature map 中每一个 grid cell 的左上角坐标,在yolov3中每个grid cell在feature map中的宽和高均为1。如上图,grid 为第二行第二列的 grid cell,因此左上角坐标为(1, 1),cx=1,cy=1。
pw, ph 是 anchor 映射到 feature map 中的宽和高, 人为界定
bx, by, bw, bh 是 box 相对于 feature map 的位置和大小,为真实输出坐标
tx, ty, tw, tw, th 是网络学习到的4个 offsets, 前两个是坐标偏移值,后两个是尺度缩放。
习惯性的将 box --> offsets 视作编码,将 offsets --> box 视作解码。
2.1 编码
根据函数和代码逆推出来的额,原理还要等论文看完之后才能解释
假设输入的原图大小(height, weight):(500,600)
-
假设(xmin,ymin,xmax,ymax)=(50, 100, 250, 300)
-
计算(x, y, w, h) 真实像素值
$$
center_x = (x_{min}+x_{max}) / 2 = 150 \center_y = (y_{min}+y_{max}) / 2 = 200 \
w = x_{min}-x_{max}= 200 \
h = y_{min}-y_{max}= 200
$$ -
归一化,相对于原图尺寸的相对值
$$
x = center_x/ weight = 0.25 \y = center_y / height = 0.4 \
w = w / weight = 0.33 \
h = h / height = 0.4
$$ -
此时获取到box=(x, y, w, h) = (0.25, 0.4, 0.33, 0.4), 同时也是gx, gy, gw, gh
-
相对于单元格的索引,13 是将一张图片分割成13*13个grid cell
yolo v3 中:
-
t x = G x − C x t_x = G_x - C_x tx=Gx−Cx
-
t y = G y − C y t_y = G_y- C_y ty=Gy−Cy
其中 Gx, Gy, Gw, Gh 是 ground truth 映射在这个 feature map 的4个坐标,
Cx, Cy 是每个 grid 的左上角坐标,tx, ty 是相对于单元格左上角坐标的偏移
G x , G y = [ x , y , w , h ] ∗ [ 13 , 13 ] = [ 3.25 , 5.2 ] c x = 3 x 取 整 数 单 元 格 x 索 引 c y = 5 y 取 整 数 单 元 格 y 索 引 t x = 0.25 x 取 小 数 s i g m o i d 逆 函 数 : t x = l o g ( t x / ( 1 − t x ) ) = − 1.10 t y = 0.2 y 取 小 数 t y = l o g ( t y / ( 1 − t y ) ) = − 1.39 G_x, G_y = [x, y, w, h] * [13, 13] = [3.25, 5.2] \\ c_x = 3 \ x取整数 单元格x索引 \\ c_y = 5 \ y取整数 单元格y索引 \\ t_x = 0.25 \ x取小数 \\ \\ sigmoid 逆函数: t_x = log(t_x/(1-t_x)) = -1.10 \\ t_y = 0.2 \ y取小数 \\ t_y = log(t_y/(1-t_y)) = -1.39 Gx,Gy=[x,y,w,h]∗[13,13]=[3.25,5.2]cx=3 x取整数单元格x索引cy=5 y取整数单元格y索引tx=0.25 x取小数sigmoid逆函数:tx=log(tx/(1−tx))=−1.10ty=0.2 y取小数ty=log(ty/(1−ty))=−1.39 -
-
相对于原图的w和h,假设anchor = (68, 118),
则: (pw, ph) = anchor/(weight, height) = (0.113, 0.236)
- t w = l o g ( G w / P w ) = 1.07 t_w = log(G_w/P_w) = 1.07 tw=log(Gw/Pw)=1.07
- t h = l o g ( G h / P h ) = 0.528 t_h = log(G_h/P_h) = 0.528 th=log(Gh/Ph)=0.528
所以,编码之后的结果:(tx, ty, tw, ty) = (0.25, 0.2, 1.07, 0.528)
2.2 解码
-
box_xy
b x = σ ( t x ) + c x b y = σ ( t y ) + c y b_x = \sigma(t_x) + c_x \\ b_y = \sigma(t_y) + c_y \\ bx=σ(tx)+cxby=σ(ty)+cy -
box_wh
b w = p w ∗ e t w b h = p h ∗ e t h b_w = p_w*e^{t_w} \\ b_h = p_h*e^{t_h} bw=pw∗etwbh=ph∗eth
其中, σ \sigma σ 是 sigmoid 函数:
σ ( x ) = 1 / ( 1 + e − x ) \sigma(x) = 1 / (1 + e^{-x}) σ(x)=1/(1+e−x)
2.3 小脑袋有大大的问号
Q:网络可以不断学习tx,ty,tw,th偏移量和尺度缩放,预测时使用这4个offsets求得bx,by,bw,bh即可,那么问题是:tx,ty为何要sigmoid一下啊?
A:前面讲到了在yolov3中没有让Gx - Cx后除以Pw得到tx,而是直接Gx - Cx得到tx,这样会有问题是导致tx比较大且很可能>1.(因为没有除以Pw归一化尺度。一旦tx,ty算出来大于1就会落入必须其他真实框中,而不能出现在它旁边网格中,引起矛盾,因而必须归一化。
Q: 为什么要用偏移量和尺度缩放做训练,而不是直接用坐标?
A: 待解决
Q: 为什么yolov2 要引进anchor
A: 待解决
0x03 Coding
最最最喜欢的代码部分来了
先说一下:
-
input:(160,160,1)
-
output: (5, 5, 30)
-
class: person, only 1 class
-
anchors: [[13, 24], [33, 42], [36, 87], [94, 63], [68, 118]]
-
tensorflow: 2.4.0
-
网络结构是yolo-fasteset 的阉割版,少了n层,去掉多尺度输出,在本地,没有上传,有需要的请私信我
-
test picture:
3.1 加载图片 & 推理
import cv2
from tensorflow import keras
import time

def inference(img_path, model_path):
    ''' 加载图片, 且推理'''
    img_raw = cv2.imread(str(img_path))
    # 我的网络的输入是 (160,160,1)
    # 灰度图 resize
    img = cv2.cvtColor(img_raw, cv2.COLOR_BGR2GRAY)
    # shape: (160, 160)
    img = cv2.resize(img, (160, 160), interpolation=cv2.INTER_LINEAR )
    # RGB 图 resize
    # image_rgb = cv2.cvtColor(img_raw, cv2.COLOR_BGR2RGB)
    # img = cv2.resize(image_rgb, (320, 320),
    #                            interpolation=cv2.INTER_LINEAR)

    # normalize
    img = img / 255.0
    img = np.asarray(img).astype('float32')

    # expand channel
    img = np.expand_dims(img, axis=-1)

    # expand batch --> (1, 160, 160, 1)
    input = np.expand_dims(img, axis=0)

    # output shape: (1, 5, 5, 30)
    # load model
    model = keras.models.load_model(model_path)
    # pred = time.time()
    yolo_output = model.predict(input)
    # print(f"true inference time: {time.time()-pred} s...")

    return img_raw, yolo_output

img_path = "./example/person.jpg"
model_path = './weights/yolo-s.h5'
img, yolo_output = inference(img_path, model_path)
# 别瞎logging,少了这一步你会发现啥也没有打印
logging.getLogger().setLevel(logging.INFO)
3.2 解码
import numpy as np

def yolo_decode(prediction, anchors, num_classes, input_dims, use_softmax=False):
    '''Decode final layer features to bounding box parameters.'''
    num_anchors = len(anchors)  # anchor 的数量
    # prediction shape: (1, 5, 5, 30)
    grid_size = prediction.shape[1:3]  # 将一张图片分割成5*5

    # shape: (125, 6)
    prediction = np.reshape(prediction,
                            (grid_size[0] * grid_size[1] * num_anchors, num_classes + 5))

    # generate x_y_offset grid map
    x_y_offset = [[[j, i]] * grid_size[0] for i in range(grid_size[0]) for j in range(grid_size[0])]
    x_y_offset = np.array(x_y_offset).reshape(grid_size[0] * grid_size[1] * num_anchors , 2)

    # get xy
    # sigmoid function
    x_y_tmp = 1 / (1 + np.exp(-prediction[..., :2]))
    # shape: (125, 2)
    box_xy = (x_y_tmp + x_y_offset) / np.array(grid_size)[::-1]

    # Log space transform of the height and width
    anchors = np.array(anchors*(grid_size[0] * grid_size[1]))
    # shape: (125, 2)
    box_wh = (np.exp(prediction[..., 2:4]) * anchors) / np.array(input_dims)[::-1]

    # sigmoid function
    # shape: (125,)
    objectness = 1 / (1 + np.exp(-prediction[..., 4]))

    if use_softmax:
        # softmax function
        class_scores = np.exp(prediction[..., 5:]) / np.sum(np.exp(prediction[..., 5:]))
    else:
        # sigmoid function
        # shape: (125, 2)
        class_scores = 1 / (1 + np.exp(-prediction[..., 5:]))

    return np.concatenate((box_xy, box_wh), axis=-1), objectness, class_scores

# 预选框
anchor = [[13, 24], [33, 42], [36, 87], [94, 63], [68, 118]]
# start_time2 = time.time()
pred_xywh, objectness, class_scores = yolo_decode(yolo_output, anchor, num_classes=1,
                                                  input_dims=(160, 160),
                                                  use_softmax=False)
# logging.info(f"decode time: {time.time()-start_time2} s...")
3.3 置信度
网络的输出:[x, y, w, h, c, P(class1), P(class2), …]

根据公式,置信度计算方式为:
S
c
o
r
e
s
=
c
∗
P
(
c
l
a
s
s
)
Scores = c * P(class)
Scores=c∗P(class)
我在这里踩了个小坑…
3.3.1 单个类别且只需要一个框
简单明了,直接选取经过阈值筛选之后置信度最大的那个框框,不需要考虑nms
def filter(pred_xywh, objectness, class_scores, confidence=0.1):
    """ 得到真正的置信度,并且过滤 """
    # shape: (125, 1) --> (125)
    class_scores = np.squeeze(class_scores)
    # shape: (125)
    box_scores = objectness * class_scores
    # filter
    pos = np.where(box_scores >= confidence)
    if not pos:
        logging.info("No person detected!!!")
        return
    # get all valid scores and boxes
    scores = box_scores[pos]
    boxes = pred_xywh[pos]
    # get max index
    max_score_index = np.argmax(scores)
    # get max pred box
    person_box = boxes[max_score_index]

    return person_box[..., :2], person_box[..., 2:], scores[max_score_index]

# start_time3 = time.time()
xy, wh, scores = filter(pred_xywh, objectness, class_scores)
# logging.info(f"filter time: {time.time()-start_time3} s...")
# logging.info(f"person scores: {scores}")
# draw_img(xy, wh, img)
3.3.2 多个类别
def yolo_handle_predictions(predictions, image_shape, max_boxes=100, confidence=0.1, iou_threshold=0.4, use_cluster_nms=False, use_wbf=False):
    # 此处的predictions: [1, x, x, x], 是四维
    boxes = predictions[:, :, :4]
    box_confidences = np.expand_dims(predictions[:, :, 4], -1)
    box_class_probs = predictions[:, :, 5:]

    # filter boxes with confidence threshold
    box_scores = box_confidences * box_class_probs
    # 每个类别的置信度中最大概率的索引,即类别
    box_classes = np.argmax(box_scores, axis=-1)
    # 每个类别的置信度中最大概率值
    box_class_scores = np.max(box_scores, axis=-1)
    # 过滤掉 小于confidence的box
    pos = np.where(box_class_scores >= confidence)

    # 过滤之后的boxes、classes、scores
    boxes = boxes[pos]
    classes = box_classes[pos]
    scores = box_class_scores[pos]

    # 后面就是nms 处理了,网上教程一抓一大把...
    # 在这之后我就没有关注了...
    # 等啥时候有时间再更一波nms的文章吧,我只懂最基础的nms...
    # 毕竟nms是目标检测面试必考题,还是要花点时间的

    if use_cluster_nms:
        # use Fast/Cluster NMS for boxes postprocess
        n_boxes, n_classes, n_scores = fast_cluster_nms_boxes(boxes, classes, scores, iou_threshold, confidence=confidence)
    elif use_wbf:
        # use Weighted-Boxes-Fusion for boxes postprocess
        n_boxes, n_classes, n_scores = weighted_boxes_fusion([boxes], [classes], [scores], image_shape, weights=None, iou_thr=iou_threshold)
    else:
        # Boxes, Classes and Scores returned from NMS
        n_boxes, n_classes, n_scores = nms_boxes(boxes, classes, scores, iou_threshold, confidence=confidence)

    if n_boxes:
        boxes = np.concatenate(n_boxes)
        classes = np.concatenate(n_classes).astype('int32')
        scores = np.concatenate(n_scores)
        boxes, classes, scores = filter_boxes(boxes, classes, scores, max_boxes)

        return boxes, classes, scores

    else:
        return [], [], []


 850
850


 被折叠的 条评论
为什么被折叠?
被折叠的 条评论
为什么被折叠?
 到【灌水乐园】发言


