


在文章《基于 PyTorch 的图像分类器》中,介绍了如何在 PyTorch 中使用您自己的图像来训练图像分类器,然后使用它来进行图像识别。本篇文章中,我将向您展示如何使用预训练的分类器检测图像中的多个对象,然后在视频中跟踪它们。
图像分类(识别)和目标检测分类之间有什么区别?在分类中,识别图像中的主要对象,然后通过单个类对整个图像进行分类。在检测中,在图像中识别多个对象,并对其进行分类,同时确定一个位置。
图像中的目标检测
目标检测有几种算法,其中 YOLO 和 SSD 是最流行的。对于本篇文章,我们将尝试使用 YOLOv3。
那么让我们开始编写代码吧!这里的 YOLO 检测代码是基于 Erik Lindernoren 对 Joseph Redmon 和 Ali Farhadi 论文(论文链接:https://pjreddie.com/media/files/papers/YOLOv3.pdf)的实现。我们首先导入所需的模块:
from models import *
from utils import *import os, sys, time, datetime, random
import torch
from torch.utils.data import DataLoader
from torchvision import datasets, transforms
from torch.autograd import Variableimport matplotlib.pyplot as plt
import matplotlib.patches as patches
from PIL import Image
然后我们加载预训练模型的配置参数和权重,以及训练 Darknet 模型的 COCO 数据集的类名。和在 PyTorch 中一样,不要忘记在加载后将模型设置为 eval 模式。
config_path='config/yolov3.cfg'
weights_path='config/yolov3.weights'
class_path='config/coco.names'
img_size=416
conf_thres=0.8
nms_thres=0.4# Load model and weights
model = Darknet(config_path, img_size=img_size)
model.load_weights(weights_path)
model.cuda()
model.eval()
classes = utils.load_classes(class_path)
Tensor = torch.cuda.FloatTensor
上面还有一些预定义的值:图像尺寸(416px) ,Confidenc 阈值和 NMS 阈值。
下面的基本函数将返回对指定图像的检测。请注意,它需要一个 Pillow 读取的图像作为输入。大多数代码处理图像大小调整到416 * 416 大小的正方形,同时保持它的长宽比和填充。实际的检测是在最后4行。
def detect_image(img):
    # scale and pad image
    ratio = min(img_size/img.size[0], img_size/img.size[1])
    imw = round(img.size[0] * ratio)
    imh = round(img.size[1] * ratio)
    img_transforms=transforms.Compose([transforms.Resize((imh,imw)),
         transforms.Pad((max(int((imh-imw)/2),0),
              max(int((imw-imh)/2),0), max(int((imh-imw)/2),0),
              max(int((imw-imh)/2),0)), (128,128,128)),
         transforms.ToTensor(),
         ])
    # convert image to Tensor
    image_tensor = img_transforms(img).float()
    image_tensor = image_tensor.unsqueeze_(0)
    input_img = Variable(image_tensor.type(Tensor))
    # run inference on the model and get detections
    with torch.no_grad():
        detections = model(input_img)
        detections = utils.non_max_suppression(detections, 80,
                        conf_thres, nms_thres)
    return detections[0]
最后,让我们通过加载一个图像,获得检测值,然后在检测到的对象周围显示它与边框一起。同样,这里的大多数代码处理缩放和填充图像,以及为每个检测到的类获取不同的颜色。
# load image and get detections
img_path = "images/blueangels.jpg"
prev_time = time.time()
img = Image.open(img_path)
detections = detect_image(img)
inference_time = datetime.timedelta(seconds=time.time() - prev_time)
print ('Inference Time: %s' % (inference_time))# Get bounding-box colors
cmap = plt.get_cmap('tab20b')
colors = [cmap(i) for i in np.linspace(0, 1, 20)]img = np.array(img)
plt.figure()
fig, ax = plt.subplots(1, figsize=(12,9))
ax.imshow(img)pad_x = max(img.shape[0] - img.shape[1], 0) * (img_size / max(img.shape))
pad_y = max(img.shape[1] - img.shape[0], 0) * (img_size / max(img.shape))
unpad_h = img_size - pad_y
unpad_w = img_size - pad_xif detections is not None:
    unique_labels = detections[:, -1].cpu().unique()
    n_cls_preds = len(unique_labels)
    bbox_colors = random.sample(colors, n_cls_preds)
    # browse detections and draw bounding boxes
    for x1, y1, x2, y2, conf, cls_conf, cls_pred in detections:
        box_h = ((y2 - y1) / unpad_h) * img.shape[0]
        box_w = ((x2 - x1) / unpad_w) * img.shape[1]
        y1 = ((y1 - pad_y // 2) / unpad_h) * img.shape[0]
        x1 = ((x1 - pad_x // 2) / unpad_w) * img.shape[1]
        color = bbox_colors[int(np.where(
             unique_labels == int(cls_pred))[0])]
        bbox = patches.Rectangle((x1, y1), box_w, box_h,
             linewidth=2, edgecolor=color, facecolor='none')
        ax.add_patch(bbox)
        plt.text(x1, y1, s=classes[int(cls_pred)],
                color='white', verticalalignment='top',
                bbox={'color': color, 'pad': 0})
plt.axis('off')
# save image
plt.savefig(img_path.replace(".jpg", "-det.jpg"),
                  bbox_inches='tight', pad_inches=0.0)
plt.show()
下面是一些图片中的目标检测的例子:

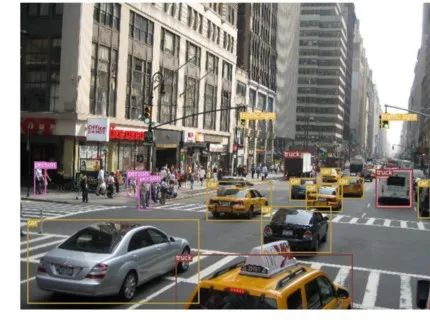
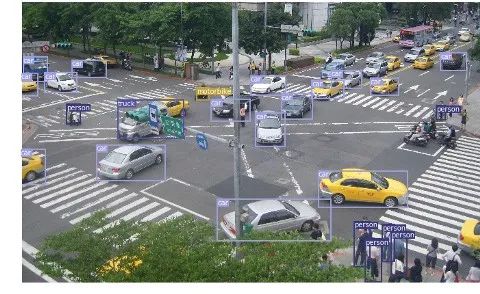

视频中的目标跟踪
现在你已经知道如何检测图像中的不同物体了。当你在一个视频中一帧一帧地做这个动作时,你会看到那些跟踪框在移动,这样的可视化效果可能会非常酷。但是,如果这些视频帧中有多个对象,你怎么知道一帧中的对象是否与前一帧中的对象相同呢?这就是所谓的目标跟踪,并使用多个检测,以确定一个特定的对象随着时间的推移。
有几个算法可以做到这一点,我决定使用 SORT,这是非常容易使用并且速度相当快。SORT(Simple Online and Realtime Tracking)是2017年由 Alex Bewley,Zongyuan Ge,Lionel Ott,Fabio Ramos,Ben Upcroft 发表的一篇论文,该论文建议使用 Kalman 过滤器来预测先前确定的物体的轨迹,并将它们与新的检测结果进行匹配。作者 Alex Bewley 还编写了一个多功能的 Python 实现,我将在本文中使用它。
现在说到代码,前3个代码段将与单幅图像检测中的代码段相同,因为它们处理的是在单帧上获得 YOLO 检测。区别在于最后一部分,对于每个检测,我们调用 Sort 对象的 Update 函数,以获得对图像中对象的引用。因此,与前面示例中的常规检测(包括边界框的坐标和类预测)不同,我们将获得跟踪的对象,除了上面的参数,还包括一个对象 ID。然后我们以几乎相同的方式显示,但添加 ID 并使用不同的颜色,这样你就可以很容易地在视频帧中看到对象。
我还使用 OpenCV 来读取视频并显示视频帧。注意,Jupyter 处理视频的速度相当慢。您可以使用它进行测试和简单的可视化,但是我还提供了一个独立的 Python 脚本,它将读取源视频,并用跟踪的对象输出一个副本。在笔记本上播放 OpenCV 视频并不容易,所以你可以保留这段代码用于其他实验。
videopath = 'video/intersection.mp4'%pylab inline
import cv2
from IPython.display import clear_outputcmap = plt.get_cmap('tab20b')
colors = [cmap(i)[:3] for i in np.linspace(0, 1, 20)]# initialize Sort object and video capture
from sort import *
vid = cv2.VideoCapture(videopath)
mot_tracker = Sort()#while(True):
for ii in range(40):
    ret, frame = vid.read()
    frame = cv2.cvtColor(frame, cv2.COLOR_BGR2RGB)
    pilimg = Image.fromarray(frame)
    detections = detect_image(pilimg)    img = np.array(pilimg)
    pad_x = max(img.shape[0] - img.shape[1], 0) *
            (img_size / max(img.shape))
    pad_y = max(img.shape[1] - img.shape[0], 0) *
            (img_size / max(img.shape))
    unpad_h = img_size - pad_y
    unpad_w = img_size - pad_x
    if detections is not None:
        tracked_objects = mot_tracker.update(detections.cpu())        unique_labels = detections[:, -1].cpu().unique()
        n_cls_preds = len(unique_labels)
        for x1, y1, x2, y2, obj_id, cls_pred in tracked_objects:
            box_h = int(((y2 - y1) / unpad_h) * img.shape[0])
            box_w = int(((x2 - x1) / unpad_w) * img.shape[1])
            y1 = int(((y1 - pad_y // 2) / unpad_h) * img.shape[0])
            x1 = int(((x1 - pad_x // 2) / unpad_w) * img.shape[1])            color = colors[int(obj_id) % len(colors)]
            color = [i * 255 for i in color]
            cls = classes[int(cls_pred)]
            cv2.rectangle(frame, (x1, y1), (x1+box_w, y1+box_h),
                         color, 4)
            cv2.rectangle(frame, (x1, y1-35), (x1+len(cls)*19+60,
                         y1), color, -1)
            cv2.putText(frame, cls + "-" + str(int(obj_id)),
                        (x1, y1 - 10), cv2.FONT_HERSHEY_SIMPLEX,
                        1, (255,255,255), 3)    fig=figure(figsize=(12, 8))
    title("Video Stream")
    imshow(frame)
    show()
    clear_output(wait=True)
您可以使用常规的 Python 脚本进行实时处理(您可以从摄像机获取输入)和保存视频。下面是我用这个程序生成的视频样本。
视频链接:https://youtu.be/1BY2CxiMYvQ
结果如视频所示,你现在可以尝试自己检测图像中的多个对象,并通过视频帧跟踪这些对象。
· END ·
HAPPY LIFE


 8502
8502


 被折叠的 条评论
为什么被折叠?
被折叠的 条评论
为什么被折叠?
 到【灌水乐园】发言


