


点击下方卡片,关注“小白玩转Python”公众号
在本文中,我将展示一个使用 MediaPipe Python 和 Rerun SDK 进行手部追踪和手势识别的示例。如果您有兴趣深入了解并扩展您的知识,我将指导您如何安装 MediaPipe Python 和 Rerun SDK 来进行手部追踪、识别不同手势并可视化数据。因此,您将学习到:
如何安装 MediaPipe Python 和 Rerun
如何使用 MediaPipe 进行手部追踪和手势识别
如何在 Rerun Viewer 中可视化手部追踪和手势识别的结果
手部追踪和手势识别技术
在开始之前,让我们感谢使这一技术成为可能的科技。手部追踪和手势识别技术旨在使设备能够将手部动作和手势解释为命令或输入。这项技术的核心是一个预训练的机器学习模型,它分析视觉输入并识别手部标志和手势。这种技术的实际应用非常广泛,因为手部动作和手势可以用于控制智能设备。人机交互、机器人技术、游戏和增强现实是该技术最有前途的应用领域之一。
然而,我们应始终注意如何使用这项技术。在敏感和关键系统中使用它非常具有挑战性,因为模型可能会误解手势,并且产生误报的可能性并不小。利用这项技术会带来伦理和法律挑战,因为用户可能不希望他们的手势在公共场所被记录。如果您打算在实际场景中实现这项技术,务必要考虑任何伦理和法律问题。
先决条件与设置
首先,您需要安装必要的库,包括 OpenCV、MediaPipe 和 Rerun。MediaPipe Python 是一个方便的工具,适合开发者在设备上集成计算机视觉和机器学习解决方案,而 Rerun 是一个可视化随时间变化的多模态数据的 SDK。
# Install the required Python packages specified in the requirements file
pip install -r examples/python/gesture_detection/requirements.txt
然后,您需要从这里下载预定义模型:HandGestureClassifier。
使用 MediaPipe 进行手部追踪和手势识别
根据 Google 的手势识别任务指南:“MediaPipe 手势识别任务可以让您实时识别手势,并提供识别的手势结果以及检测到的手部标志。您可以使用此任务从用户那里识别特定手势,并调用与这些手势对应的应用程序功能。”
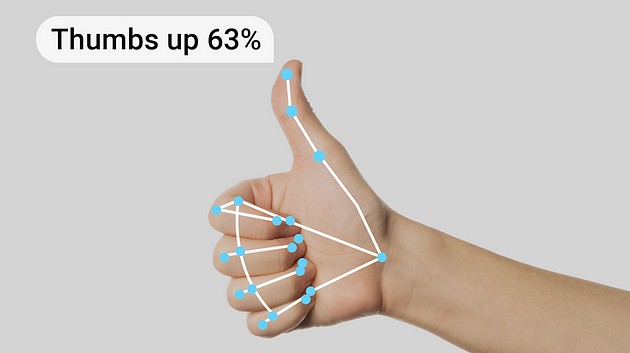
现在,让我们尝试使用 MediaPipe 预训练模型进行手势识别的示例图像。总体来说,下面的代码为初始化和配置 MediaPipe 手势识别解决方案奠定了基础。
from mediapipe.tasks.python import vision
from mediapipe.tasks import python


class GestureDetectorLogger:


    def __init__(self, video_mode: bool = False):
        self._video_mode = video_mode


        base_options = python.BaseOptions(
            model_asset_path='gesture_recognizer.task'
        )
        options = vision.GestureRecognizerOptions(
            base_options=base_options,
            running_mode=mp.tasks.vision.RunningMode.VIDEO if self._video_mode else mp.tasks.vision.RunningMode.IMAGE
        )
        self.recognizer = vision.GestureRecognizer.create_from_options(options)


    def detect(self, image: npt.NDArray[np.uint8]) -> None:
          image = mp.Image(image_format=mp.ImageFormat.SRGB, data=image)


          # Get results from Gesture Detection model
          recognition_result = self.recognizer.recognize(image)


          for i, gesture in enumerate(recognition_result.gestures):
              # Get the top gesture from the recognition result
              print("Top Gesture Result: ", gesture[0].category_name)


          if recognition_result.hand_landmarks:
              # Obtain hand landmarks from MediaPipe
              hand_landmarks = recognition_result.hand_landmarks
              print("Hand Landmarks: " + str(hand_landmarks))


              # Obtain hand connections from MediaPipe
              mp_hands_connections = mp.solutions.hands.HAND_CONNECTIONS
              print("Hand Connections: " + str(mp_hands_connections))
GestureDetectorLogger 类中的 detect 函数接受一张图片作为其参数,并打印出模型的结果,突出显示识别出的顶部手势和检测到的手部标志点。有关模型的更多详细信息,请参考其模型卡。
您可以使用以下代码自行尝试:
def run_from_sample_image(path)-> None:
    image = cv2.imread(str(path))
    show_image = cv2.cvtColor(image, cv2.COLOR_BGR2RGB)
    logger = GestureDetectorLogger(video_mode=False)
    logger.detect_and_log(show_image)


# Run the gesture recognition on a sample image
run_from_sample_image(SAMPLE_IMAGE_PATH)
使用 Rerun 进行验证、调试和演示
这一步允许您确保解决方案的可靠性和有效性。现在模型已经准备好,可以可视化结果以验证准确性、调试潜在问题,并展示其功能。使用 Rerun SDK 可视化结果既简单又快速。
如何使用 Rerun?
使用 Rerun SDK 从代码中记录多模态数据流
可视化并与本地或远程的实时或录制的流进行交互
交互式构建布局和自定义可视化
在需要时扩展 Rerun
在编写代码之前,您应该访问安装 Rerun Viewer 页面以安装 Viewer。然后,我强烈建议通过阅读 Python 快速入门和在 Python 中记录数据的指南来熟悉 Rerun SDK。这些初始步骤将确保设置顺利,并帮助您开始即将进行的代码实现。
从视频或实时运行
对于视频流,我们使用 OpenCV。您可以选择特定视频的文件路径,或通过提供参数 0 或 1 访问自己的摄像头(使用 0 表示默认摄像头;在 Mac 上,您可能需要使用 1)。
特别要强调的是时间线的引入。Rerun 时间线功能使得能够将数据与一个或多个时间线相关联。因此,视频的每一帧都与其对应的时间戳相关联。
def run_from_video_capture(vid: int | str, max_frame_count: int | None) -> None:
    """
    Run the detector on a video stream.


    Parameters
    ----------
    vid:
        The video stream to run the detector on. Use 0/1 for the default camera or a path to a video file.
    max_frame_count:
        The maximum number of frames to process. If None, process all frames.
    """
    cap = cv2.VideoCapture(vid)
    fps = cap.get(cv2.CAP_PROP_FPS)


    detector = GestureDetectorLogger(video_mode=True)


    try:
        it: Iterable[int] = itertools.count() if max_frame_count is None else range(max_frame_count)


        for frame_idx in tqdm.tqdm(it, desc="Processing frames"):
            ret, frame = cap.read()
            if not ret:
                break


            if np.all(frame == 0):
                continue


            frame_time_nano = int(cap.get(cv2.CAP_PROP_POS_MSEC) * 1e6)
            if frame_time_nano == 0:
                frame_time_nano = int(frame_idx * 1000 / fps * 1e6)


            frame = cv2.cvtColor(frame, cv2.COLOR_BGR2RGB)


            rr.set_time_sequence("frame_nr", frame_idx)
            rr.set_time_nanos("frame_time", frame_time_nano)
            detector.detect_and_log(frame, frame_time_nano)
            rr.log(
                "Media/Video",
                rr.Image(frame)
            )


    except KeyboardInterrupt:
        pass


    cap.release()
    cv2.destroyAllWindows()
记录数据进行可视化
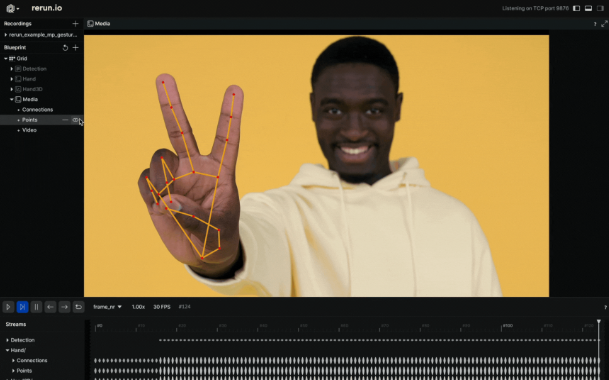
在 Rerun Viewer 中可视化数据,使用 Rerun SDK 记录数据至关重要。之前提到的指南提供了这个过程的见解。在这种情况下,我们提取手部标志点作为规范化值,然后使用图像的宽度和高度将其转换为图像坐标。这些坐标随后作为 2D 点记录到 Rerun SDK 中。此外,我们识别标志点之间的连接,并将它们作为 2D 线段记录。
对于手势识别,结果会打印到控制台。然而,在源代码中,您可以探索一种使用 TextDocument 和表情符号将这些结果呈现给查看器的方法。
class GestureDetectorLogger:


    def detect_and_log(self, image: npt.NDArray[np.uint8], frame_time_nano: int | None) -> None:
        # Recognize gestures in the image
        height, width, _ = image.shape
        image = mp.Image(image_format=mp.ImageFormat.SRGB, data=image)


        recognition_result = (
            self.recognizer.recognize_for_video(image, int(frame_time_nano / 1e6))
            if self._video_mode
            else self.recognizer.recognize(image)
        )


        # Clear the values
        for log_key in ["Media/Points", "Media/Connections"]:
            rr.log(log_key, rr.Clear(recursive=True))


        for i, gesture in enumerate(recognition_result.gestures):
            # Get the top gesture from the recognition result
            gesture_category = gesture[0].category_name if recognition_result.gestures else "None"
            print("Gesture Category: ", gesture_category) # Log the detected gesture


        if recognition_result.hand_landmarks:
            hand_landmarks = recognition_result.hand_landmarks


            # Convert normalized coordinates to image coordinates
            points = self.convert_landmarks_to_image_coordinates(hand_landmarks, width, height)


            # Log points to the image and Hand Entity
            rr.log(
               "Media/Points",
                rr.Points2D(points, radii=10, colors=[255, 0, 0])
            )


            # Obtain hand connections from MediaPipe
            mp_hands_connections = mp.solutions.hands.HAND_CONNECTIONS
            points1 = [points[connection[0]] for connection in mp_hands_connections]
            points2 = [points[connection[1]] for connection in mp_hands_connections]


            # Log connections to the image and Hand Entity
            rr.log(
               "Media/Connections",
                rr.LineStrips2D(
                   np.stack((points1, points2), axis=1),
                   colors=[255, 165, 0]
                )
             )


    def convert_landmarks_to_image_coordinates(hand_landmarks, width, height):
        return [(int(lm.x * width), int(lm.y * height)) for hand_landmark in hand_landmarks for lm in hand_landmark]
3D 点
最后,我们检查如何将手部标志呈现为 3D 点。我们首先在 init 函数中使用 Annotation Context 定义点之间的连接,然后将它们记录为 3D 点。
class GestureDetectorLogger:
–


  def __init__(self, video_mode: bool = False):
      # ... existing code ...
      rr.log(
            "/",
            rr.AnnotationContext(
                rr.ClassDescription(
                    info=rr.AnnotationInfo(id=0, label="Hand3D"),
                    keypoint_connections=mp.solutions.hands.HAND_CONNECTIONS
                )
            ),
            timeless=True,
        )
       rr.log("Hand3D", rr.ViewCoordinates.RIGHT_HAND_X_DOWN, timeless=True)


   def detect_and_log(self, image: npt.NDArray[np.uint8], frame_time_nano: int | None) -> None:
      # ... existing code ...


      if recognition_result.hand_landmarks:
         hand_landmarks = recognition_result.hand_landmarks


         landmark_positions_3d = self.convert_landmarks_to_3d(hand_landmarks)
         if landmark_positions_3d is not None:
              rr.log(
                 "Hand3D/Points",
                 rr.Points3D(landmark_positions_3d, radii=20, class_ids=0, keypoint_ids=[i for i in range(len(landmark_positions_3d))]),
              )


      # ... existing code ...
详细代码可以参考:https://github.com/rerun-io/rerun
· END ·
HAPPY LIFE

本文仅供学习交流使用,如有侵权请联系作者删除


 1681
1681

 被折叠的 条评论
为什么被折叠?
被折叠的 条评论
为什么被折叠?
 到【灌水乐园】发言


