


目录
方法1: Jupyter Notebook
方法2: 部署到Streamllit云的Streamlit Web应用
已知限制
方法3:在Streamlit中进行本地部署
代码演示
更多演示
目录
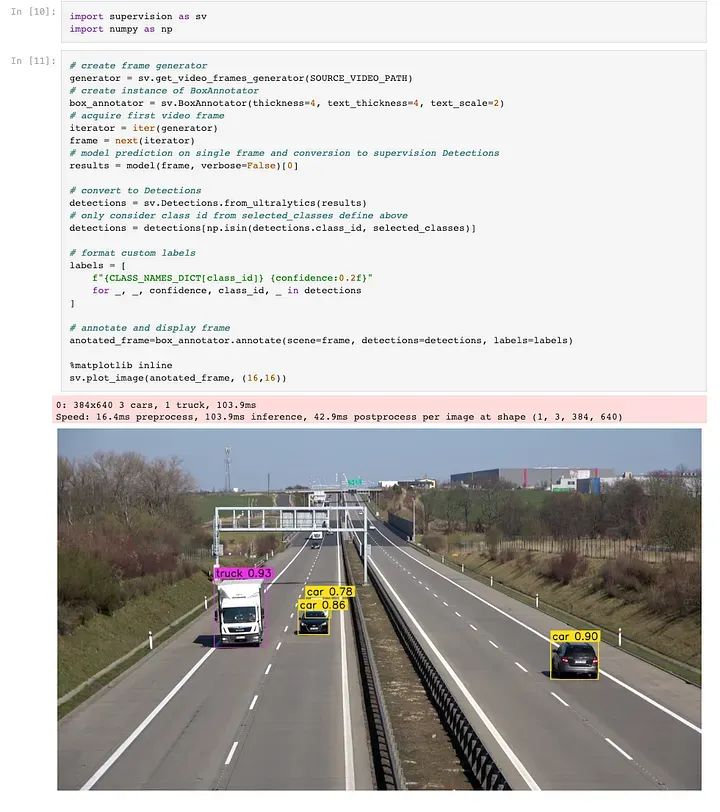
最近,我研究了Roboflow提供的名为Supervision的计算机视觉工具,重点关注它们与YOLOv8在目标计数方面的集成。
下面的教程提供了一个很好的起点。尽管Supervision API很简单,但需要注意的是,教程是基于最早的版本Supervision 0.1.0的。从那时起,Supervision API的许多方面都经过了重构,以提供更简化和结构化的方法。
教程链接:
https://github.com/roboflow/notebooks/blob/main/notebooks/how-to-track-and-count-vehicles-with-yolov8.ipynb
方法1 — Jupyter Notebook
鉴于原始笔记本有点过时,我使用最新的Supervision版本0.13.0创建了一份翻新版本。我发现在这个版本中,API既更简单又更结构化。
对于测试各种配置,如置信度阈值、框注释器和线计数注释器,使用笔记本可能会变得繁琐,特别是从概念验证的角度来看。此外,业务部门通常更喜欢用户友好的界面而不是笔记本,这突显了Web应用的价值。
方法2 — 部署到Streamllit云的Streamlit Web应用
因此,我选择使用Streamlit开发一个原型。对于不熟悉的人,Streamlit是一个专为数据科学和机器学习项目设计的Python库。它用户友好,有助于快速原型设计。该应用现在提供了一个更简化的方法,可以尝试各种配置:
置信度阈值:基于置信度值过滤检测结果;只显示高于设置阈值的值。
上传视频:接受最大为40MB的MP4视频。
选择所需类别:允许选择检测和跟踪的特定类别;默认类别是person和car。
源视频信息:显示已上传视频的元数据,您可以在配置线计数器时作为参考。
线计数器配置:使用坐标(x,y)设置线计数器的起点和终点。
框注释器配置:配置对象检测框注释器。
线注释器配置:配置线计数器注释器。
该应用托管在Streamlit Cloud上,可以在:https://yolov8-object-counting.streamlit.app/上访问。
注意:
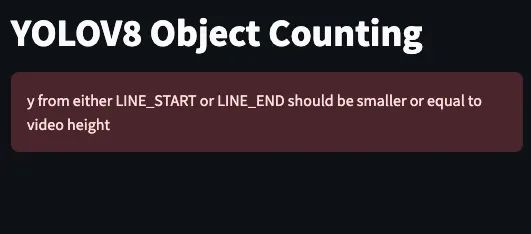
更改视频后可能会遇到错误,因为线计数器的起点和终点预设为(180,50)和(180,1230),这基于默认演示视频。如果上传具有不同尺寸的新视频,例如高度为720,这可能导致错误,因为预设的结束点的'y'值为1230。在这种情况下,请记得相应地调整起始/结束点。
已知限制
性能约束:由于Streamlit不提供GPU环境,因此由于仅使用CPU处理,操作速度较慢。
并发问题:在高并发使用期间,该应用可能会遇到显着的减速,可能是由于共享云资源而不是可扩展资源。
模型选择:由于Streamlit Cloud的资源限制,我选择了YOLOv8n.pt模型,该模型提供更快的推理,但相对于其他v8模型(如YOLOv8x.pt)来说,检测性能较差。
方法3: 在Streamlit中进行本地部署
此方法提供了更大的控制权,并允许在本地环境中利用GPU。下面概述的部署步骤已在MacOS上进行了测试。

1.创建一个新的conda环境
conda create -n yolov8-object-conting-local-deployment python=3.82. 激活此环境
conda activate yolov8-object-conting-local-deployment3. 克隆存储库
git clone https://github.com/grhaonan/yolov8-object-counting.git4. 安装所有依赖项
cd yolov8-object-counting
pip install -r requirements.txt
5. 启动Streamlit应用程序,它应该在http://localhost:8501/上显示应用程序
streamlit run app.py代码演示
我们将从高层次审视代码。鉴于这是一个原型,所有逻辑都包含在一个文件中:app.py。
import streamlit as st
import os
import cv2
import supervision as sv
from ultralytics import YOLO
from time import sleep
from tqdm.notebook import tqdm
from tqdm.notebook import tqdm
import numpy as np
from PIL import Image
import tempfile
import gdown
import glob


#Constants
MODEL_NAME = 'yolov8n.pt'
HOME = os.getcwd()
MODEL_DEFAULT_PATH = os.path.join(HOME, 'models', MODEL_NAME)
VIDEO_PATHS = {
    'source': os.path.join(HOME, 'data/raw', 'bgl.mp4'),
    'target': os.path.join(HOME, 'data/processed', 'temp_output_video.mp4')
}


# ------------------------ Helper Functions---------------------------------


# Helper function to download model from Google Drive
def download_from_gdrive(gdrive_url, output_path):
    gdown.download(gdrive_url, output_path, quiet=False)


# Helper function to load model, with caching for 60 minutes
@st.cache_resource(ttl=60*60)
def load_model(path):
    return YOLO(path)


# Helper function to remove all mp4 files in a directory except bgl.mp4 to clean up the space
def remove_mp4_except_bgl(directory):
    for filepath in glob.glob(f"{directory}/*.mp4"):
        if filepath != f"{directory}/bgl.mp4":
            os.remove(filepath)
总体而言,上述内容设置了环境,导入了必要的模块,并定义了用于下载模型和清理空间的实用程序函数。
# ------------------------ Streamlit App Description ---------------------------------


st.set_page_config(
    page_title="YOLOV8 Object Counting",
    page_icon="🧊",
    layout="wide",
    initial_sidebar_state="expanded",
    menu_items={
        'Get Help': 'https://github.com/grhaonan/yolov8-object-counting',
        'Report a bug': 'https://github.com/grhaonan/yolov8-object-counting',
        'About': 'Demo app for YOLOV8 Object Counting'
    }
)


st.title('YOLOV8 Object Counting')
st.subheader('A Streamlit App for Object Counting using YOLOV8 & Supervision')
st.markdown('Welcome to the YOLOV8 Object Counting Demo App! This app is built by '
        '[Dustin Liu](https://www.linkedin.com/in/dustin-liu/) - '
        'view project source code on '
        '[GitHub](https://github.com/grhaonan/yolov8-object-counting)')


st.markdown('Detail explainatuion of this app can be found at [Medium](https://medium.com/@grdustin/yolov8-object-counting-19fa384a9cd3)')


st.markdown('Note: Please remeber to adjust the line counter configuration to fit your video otherwise it will raise error when point value if out of range!')


st.markdown('Streamlit Cloud is CPU only, so the processing speed is slow, and cloud resouces can be contrained from time to time, so please be patient.'
            'I highly recommend you to run this app locally and please refer to the README.md in repo for more details')
这一块的重点是设置用户界面,并向用户提供必要的信息和指南。
def main():
    # ------------------------pre-loading---------------------------------


    # Downloading default source video from Google Drive if it doesn't exist
    if not os.path.exists(VIDEO_PATHS['source']):
        download_from_gdrive('https://drive.google.com/uc?id=1Zv-i5bj5wi22URGf3otlOSHJzdkSi7V_', VIDEO_PATHS['source'])


    # Initialize YOLO model
    placeholder = st.empty()
    if os.path.exists(MODEL_DEFAULT_PATH):
        model = load_model(MODEL_DEFAULT_PATH)
    else:
        placeholder.info('Model does not exist, downloading and this may take a while', icon="ℹ️")
        model = load_model(MODEL_NAME)
        os.rename(MODEL_NAME, MODEL_DEFAULT_PATH)
    placeholder.success('The model is loaded successfully')
    sleep(1)
    placeholder.empty()


    # Remove *.mp4 in data/raw/ except bgl.mp4
    remove_mp4_except_bgl("data/raw")


    # Remove *.mp4 in data/processed/
    remove_mp4_except_bgl("data/processed")


    # ------------------------ Streamlit Sidebar ---------------------------------
    #Show mode size info in sidebar
    st.sidebar.markdown(f"Model Type: {MODEL_NAME[:-3]}")
    st.sidebar.markdown("<br>", unsafe_allow_html=True)  # Add space


    # Video File Uploader and use a temp file to store the uploaded file and delete it after the process automatically
    uploaded_file = st.sidebar.file_uploader("Upload a video file", type=["mp4"])
    if uploaded_file is not None:
        with open("data/raw/temp_input_video.mp4", "wb") as f:
            f.write(uploaded_file.read())
        VIDEO_PATHS['source'] = "data/raw/temp_input_video.mp4"
    # Adding space between sidebar items
    st.sidebar.markdown("<br>", unsafe_allow_html=True)  # Add space


    #Confidence threshold
    confidence_threshold = st.sidebar.slider("Confidence Threshold", min_value=0.0, max_value=1.0, value=0.25, step=0.01)
    st.sidebar.markdown("<br>", unsafe_allow_html=True)  # Add space


    # Select desired detection classes
    class_names_dict = model.model.names
    selected_class_names = st.sidebar.multiselect("Select Desired Classes", list(class_names_dict.values()), ['car','person'])
    selected_class_ids = [k for k, v in class_names_dict.items() if v in selected_class_names]


    # Show video info
    st.sidebar.markdown("<br>", unsafe_allow_html=True)  # Add space
    st.sidebar.markdown(f"Source Video Information:")
    video_info = sv.VideoInfo.from_video_path(VIDEO_PATHS['source'])
    col1, col2, col3 = st.sidebar.columns(3)
    with col1:
        st.write(f"width\n{video_info.width}")
    with col2:
        st.write(f"height\n{video_info.height}")
    with col3:
        st.write(f"#frames\n{video_info.total_frames}")


    # Point Configuration
    st.sidebar.markdown("<br>", unsafe_allow_html=True)  # Add space
    with st.sidebar.expander("⚙️ Line Points Configuration: ", expanded=True):
        LINE_START = tuple(map(int, st.text_input("Starting Point (x,y)", "180,50").split(',')))
        LINE_END = tuple(map(int, st.text_input("Ending Point (x,y)", "180,1230").split(',')))

    # Check x from either LINE_START or LINE_END should be smaller than  video_information.width otherwise raise error
    if LINE_START[0] > video_info.width or LINE_END[0] > video_info.width:
        st.error('x from either LINE_START or LINE_END should be smaller or equal to video width')
        st.stop()
    # Check y from either LINE_START or LINE_END should be smaller than  video_information.height otherwise raise error
    if LINE_START[1] > video_info.height or LINE_END[1] > video_info.height:
        st.error('y from either LINE_START or LINE_END should be smaller or equal to  video height')
        st.stop()


   # Box annotator
    # st.sidebar.markdown(f"Box Annotator Configuration:")
    with st.sidebar.expander("⚙️ Box Annotator Configuration: ", expanded=False):
        box_annotator_thickness = st.number_input("Box Thickness", min_value=1, value=1)
        box_annotator_text_thickness = st.number_input("Box Text Thickness", min_value=1, value=1)
        box_annotator_text_scale = st.number_input("Box Text Scale", min_value=0.1, max_value=1.0, value=0.5)


    # Line counter annotator
    # st.sidebar.markdown(f"Line Counter Annotator Configuration:")
    with st.sidebar.expander("⚙️ Line Annotator Configuration: ", expanded=False):
        line_thickness = st.number_input("Line Thickness", min_value=1, value=1)
        line_text_thickness = st.number_input("Line Text Thickness", min_value=1, value=1)
        line_text_scale = st.number_input("Line Text Scale", min_value=0.1, max_value=1.0, value=0.5)


    # ------------------------ Video Processing---------------------------------


    # Initialize Streamlit placeholder
    frame_placeholder = st.empty()


    def callback(frame: np.ndarray, index:int) -> np.ndarray:
        # model prediction on single frame and conversion to supervision Detections
        results = model(frame, verbose=False)[0]
        detections = sv.Detections.from_ultralytics(results)
        # only consider class id from selected_classes define above
        detections = detections[np.isin(detections.class_id, selected_class_ids)]
        detections = detections[detections.confidence > confidence_threshold]
        # tracking detections
        detections = byte_tracker.update_with_detections(detections)
        labels = [
            f"#{tracker_id} {model.model.names[class_id]} {confidence:0.2f}"
            for _, _, confidence, class_id, tracker_id
            in detections
        ]
        box_annotated_frame=box_annotator.annotate(scene=frame.copy(),
                                        detections=detections,
                                        labels=labels)
        # update line counter
        line_zone.trigger(detections)
        line_counter_annotated_frame = line_zone_annotator.annotate(box_annotated_frame, line_counter=line_zone)
        # display frame
        image_pil = Image.fromarray(cv2.cvtColor(line_counter_annotated_frame, cv2.COLOR_BGR2RGB))
        frame_placeholder.image(image_pil, use_column_width=True)
        return  line_counter_annotated_frame


    # Video display
    LINE_START = sv.Point(*LINE_START)
    LINE_END = sv.Point(*LINE_END)


    # create BYTETracker instance
    byte_tracker = sv.ByteTrack(track_thresh= 0.25, track_buffer = 30,match_thresh = 0.8,frame_rate =30)


    # create frame generator
    generator = sv.get_video_frames_generator(VIDEO_PATHS['source'])


    # create LineZone instance, it is previously called LineCounter class
    line_zone = sv.LineZone(start=LINE_START, end=LINE_END)


    # create instance of BoxAnnotator
    box_annotator = sv.BoxAnnotator(thickness=box_annotator_thickness, text_thickness=box_annotator_text_thickness, text_scale=box_annotator_text_scale)


    # create LineZoneAnnotator instance, it is previously called LineCounterAnnotator class
    line_zone_annotator = sv.LineZoneAnnotator(thickness=line_thickness, text_thickness=line_text_thickness, text_scale=line_text_scale)


    # process the whole video
    sv.process_video(
        source_path = VIDEO_PATHS['source'],
        target_path = VIDEO_PATHS['target'],
        callback=callback
    )


if __name__ == "__main__":
    # call main function
    main()
主要函数包括三个部分:
1. 预加载:处理加载YOLOv8模型、上传视频(或默认视频)和清理空间。
2. Streamlit边栏:在应用程序中定义了UI界面。
3. 视频处理:专注于逐帧处理视频,通过process_video函数完成,并由回调函数中的逻辑引导。
· END ·
HAPPY LIFE

本文仅供学习交流使用,如有侵权请联系作者删除


 1277
1277


 被折叠的 条评论
为什么被折叠?
被折叠的 条评论
为什么被折叠?
 到【灌水乐园】发言


