


点击下方卡片,关注“小白玩转Python”公众号


主要工作:提取特征(角点)并使用FAST算法跟踪对象:OpenCV,Python
OpenCV中有多种特征提取算法可供使用,但其中一种名为FAST算法的,对于实时计算机视觉应用来说非常有用。大多数特征提取和角点检测方法在提取特征方面表现良好,但它们大多数并不适合实时应用。
FAST算法非常适合实时计算机视觉任务。在本文中,我将解释FAST算法的工作原理,它的优点和缺点,并最终创建一个使用FAST算法的对象跟踪器。
FAST算法的工作原理是什么?
FAST算法相对简单。
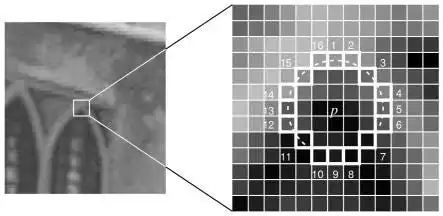
FAST算法选择一个随机像素,并在该像素周围画一个圆(半径:3像素),其圆周为16像素。
如果在16像素中有至少12个连续点的强度比中心像素亮或暗(加上阈值),那么这个中心像素就被视为兴趣点(角点)。
为了加快这个过程,算法首先检查圆周上的4个像素。至少有3个像素必须都比中心像素暗或亮,如果它们不是,该点就不能是兴趣点,因为正如我之前所说,至少有12个连续像素必须更暗或更亮。
查看下面的图片,它准确地展示了我尝试解释的内容。
FAST算法的优点和缺点
优点:FAST算法非常快。如果你将它与其他特征提取和角点检测算法进行比较,你会看到差异。实际上,我在另一篇博客文章中比较了ORB、FAST和SIFT算法,结果显示FAST算法比其他算法快(博客文章链接)
缺点:FAST算法对噪声敏感,因此在噪声图像中可能会检测到错误的角点。它不是尺度不变性的,这意味着如果图像的大小改变,它可能不会很好地工作。
结论
选择FAST算法为你的任务完全取决于你的目的。如果你需要更高的帧率,并且不太关心提取点的准确性,你可以考虑使用FAST算法。我有一篇关于这些算法比较以及如何选择的博客文章,我推荐你阅读这个链接:
https://medium.com/@siromermer/sift-vs-orb-vs-fast-performance-comparison-of-feature-extraction-algorithms-d8993c977677
代码/使用FAST算法跟踪对象
有两个主要步骤:
首先,用户通过使用鼠标左键在目标对象周围画矩形来定义目标对象。然后使用FAST算法从这个目标对象(而不是整幅图像)中提取特征。
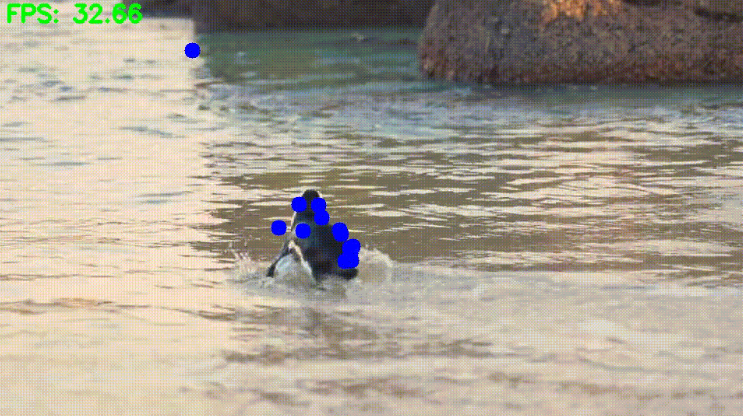
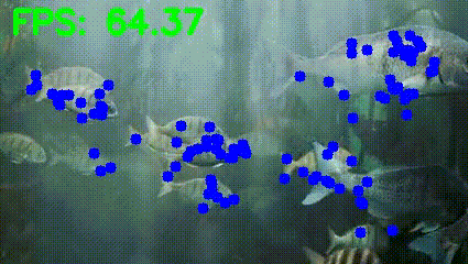
接下来,对于每一帧,使用FAST算法提取特征。将目标图像的特征与每一帧中的特征进行比较。如果有匹配,就在特征位置画一个圆圈,通过这样做来跟踪对象。
导入库
import cv2
import numpy as np
import matplotlib.pyplot as plt
import time
使用鼠标通过在其周围画矩形来选择目标对象
# Path to video
video_path=r"videos/fish-video.mp4"
video = cv2.VideoCapture(video_path)


# read only the first frame for drawing a rectangle for the desired object
ret,frame = video.read()


# I am giving  big random numbers for x_min and y_min because if you initialize them as zeros whatever coordinate you go minimum will be zero
x_min,y_min,x_max,y_max=36000,36000,0,0


def coordinat_chooser(event,x,y,flags,param):
    global go , x_min , y_min, x_max , y_max


    # when you click the right button, it will provide coordinates for variables
    if event==cv2.EVENT_RBUTTONDOWN:

        # if current coordinate of x lower than the x_min it will be new x_min , same rules apply for y_min
        x_min=min(x,x_min)
        y_min=min(y,y_min)


         # if current coordinate of x higher than the x_max it will be new x_max , same rules apply for y_max
        x_max=max(x,x_max)
        y_max=max(y,y_max)


        # draw rectangle
        cv2.rectangle(frame,(x_min,y_min),(x_max,y_max),(0,255,0),1)


    """
        if you didn't like your rectangle (maybe if you made some misscliks),  reset the coordinates with the middle button of your mouse
        if you press the middle button of your mouse coordinates will reset and you can give a new 2-point pair for your rectangle
    """
    if event==cv2.EVENT_MBUTTONDOWN:
        print("reset coordinate  data")
        x_min,y_min,x_max,y_max=36000,36000,0,0


cv2.namedWindow('coordinate_screen')
# Set mouse handler for the specified window, in this case, "coordinate_screen" window
cv2.setMouseCallback('coordinate_screen',coordinat_chooser)


while True:
    cv2.imshow("coordinate_screen",frame) # show only first frame

    k = cv2.waitKey(5) & 0xFF # after drawing rectangle press ESC
    if k == 27:
        cv2.destroyAllWindows()
        break
从目标对象中提取特征(不是从整幅图像中)
# take region of interest ( take inside of rectangle )
roi_image=frame[y_min:y_max,x_min:x_max]


# convert roi to grayscale, SIFT Algorithm works with grayscale images
roi_gray=cv2.cvtColor(roi_image,cv2.COLOR_BGR2GRAY)


# Initialize the FAST detector and BRIEF descriptor extractor
fast = cv2.FastFeatureDetector_create(threshold=20)
brief = cv2.xfeatures2d.BriefDescriptorExtractor_create()


# detect keypoints
keypoints_1 = fast.detect(roi_gray, None)
# descriptors
keypoints_1, descriptors_1 = brief.compute(roi_gray, keypoints_1)


# draw keypoints for visualizing
keypoints_image = cv2.drawKeypoints(roi_image, keypoints_1, outImage=None, color=(0, 255, 0))
# display keypoints
plt.imshow(keypoints_image,cmap="gray")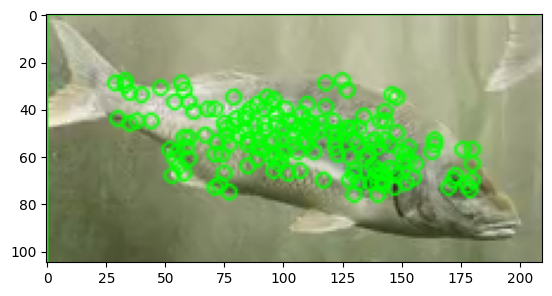
使用FAST算法跟踪对象
# matcher object
bf = cv2.BFMatcher()


# Variables for FPS calculation
frame_count = 0
start_time = time.time()

while True :
    # reading video
    ret,frame=video.read()


    if ret:
          # convert frame to gray scale
        frame_gray=cv2.cvtColor(frame,cv2.COLOR_BGR2GRAY)


        # Detect keypoints using FAST
        keypoints_2 = fast.detect(frame_gray, None)


        # Compute descriptors using BRIEF
        keypoints_2, descriptors_2 = brief.compute(frame_gray, keypoints_2)

        """
        Compare the keypoints/descriptors extracted from the
        first frame(from target object) with those extracted from the current frame.
        """
        if descriptors_2 is  not None:
            matches =bf.match(descriptors_1, descriptors_2)


            for match in matches:

                # queryIdx gives keypoint index from target image
                query_idx = match.queryIdx

                # .trainIdx gives keypoint index from current frame
                train_idx = match.trainIdx

                # take coordinates that matches
                pt1 = keypoints_1[query_idx].pt

                # current frame keypoints coordinates
                pt2 = keypoints_2[train_idx].pt

                # draw circle to pt2 coordinates , because pt2 gives current frame coordinates
                cv2.circle(frame,(int(pt2[0]),int(pt2[1])),5,(255,0,0),-1)

        # Calculate and display FPS
        frame_count += 1
        elapsed_time = time.time() - start_time
        fps = frame_count / elapsed_time
        cv2.putText(frame, f"FPS: {fps:.2f}", (10, 30), cv2.FONT_HERSHEY_SIMPLEX, 1, (0, 255, 0), 3)


        cv2.imshow("coordinate_screen",frame)


        k = cv2.waitKey(5) & 0xFF # after drawing rectangle press esc
        if k == 27:
            cv2.destroyAllWindows()
            break
    else:
        break


video.release()
cv2.destroyAllWindows()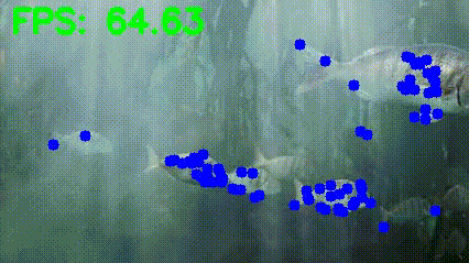
· END ·
🌟 想要变身计算机视觉小能手?快来「小白玩转Python」公众号!
回复“Python视觉实战项目”,解锁31个超有趣的视觉项目大礼包!🎁

本文仅供学习交流使用,如有侵权请联系作者删除


 653
653

 被折叠的 条评论
为什么被折叠?
被折叠的 条评论
为什么被折叠?
 到【灌水乐园】发言


