


DCGAN教程
GAN:Generative adversarial network生成对抗网路
GAN
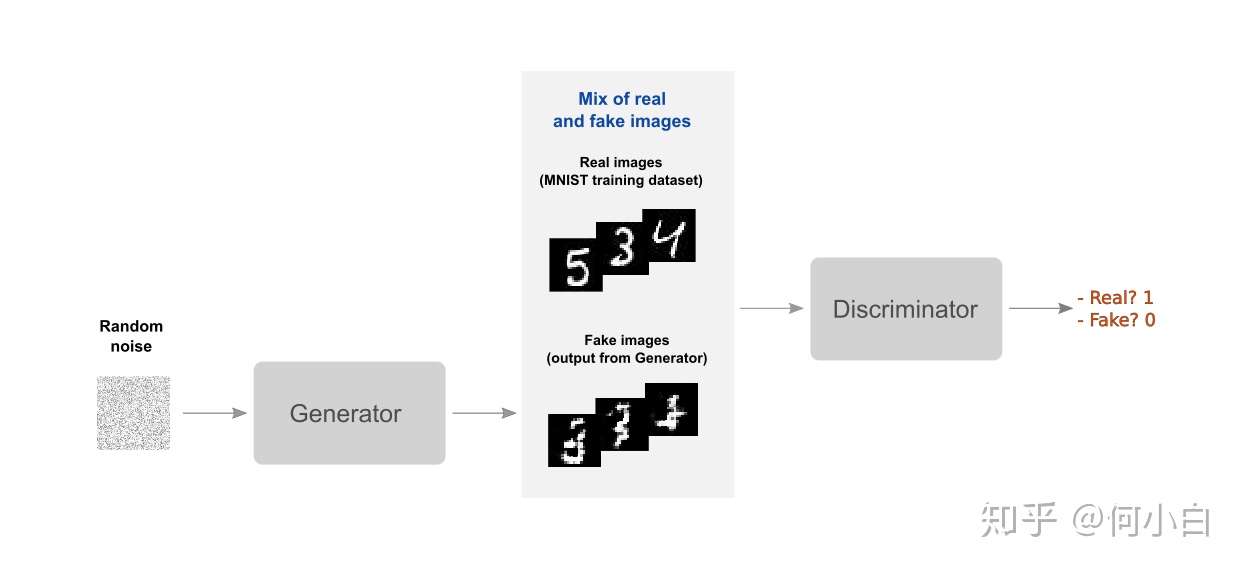
GAN生成对抗网络,该框架可以教会一个深度学习模型来捕捉训练数据分布,并生成具有同分布的相同数据。GAN最早由lan Goodfellow在2014年首次提出。
GAN由两个不同的模型组成,一个是生成模型generator,一个是鉴别模型discriminator。其中,generator的作用是产生fake image使其封隔与训练图像相似; discriminator的作用是来判断这个fake image与真正的image是否相同。
训练过程中,generator通过产生越来越好的fake image,来不断试图去打败discriminator;同时discriminator也是如此。这个游戏的平衡Equilibrium是当生成器生成看起来像是直接来自训练数据的完美赝品时,判别器总是猜测生成器输出为真或假的概率为50%。
1. DCGAN原理
DCGAN是将CNN与GAN的一种结合。 其将卷积网络引入到生成式模型当中来做无监督的训练,利用卷积网络强大的特征提取能力来提高生成网络的学习效果。
DCGAN的原理和GAN对抗生成是一样的。它只是把GAN的G和D换成了两个卷积神经网络(CNN)。但不是直接换就可以了.
- 取消所有pooling层。G网络中使用转置卷积(transposed convolutional layer)进行上采样,D网络中用加入stride的卷积代替pooling。
- 除了生成器模型的输出层和判别器模型的输入层,在网络其它层上都使用了Batch Normalization,使用BN可以稳定学习,有助于处理初始化不良导致的训练问题。
- 去掉全连接层,使网络变为全卷积网络
- G网络中使用ReLU作为激活函数,最后一层使用tanh
- D网络中使用LeakyReLU作为激活函数
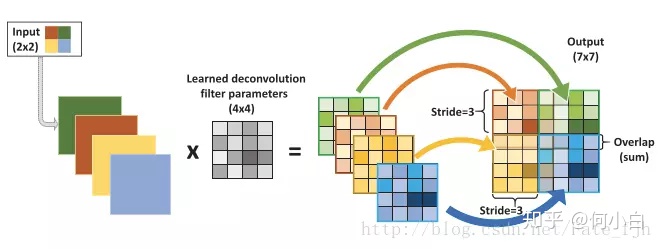
关于转置卷积(反卷积)transposed convolutional layer
参考链接:
反卷积 转置卷积的理解 - 王老头 - 博客园www.cnblogs.com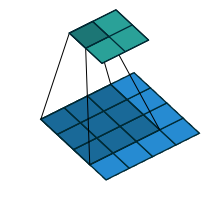
反卷积通常用于两个方面:
- CNN可视化;通过反卷积将得到的feature_map还原到像素空间,来观察feature map对哪些pattern响应最大,即可视化哪些特征是卷积操作提取出来的;
- FCN全卷积网络中,由于要对图像进行像素级的分割,需要将图像尺寸还原到原来的大小,类似upsampling的操作,所以需要采用反卷积;
- GAN生成对抗网络中,由于需要从输入图像到生成图像,自然需要将提取的特征和图还原到和原图同样尺度。
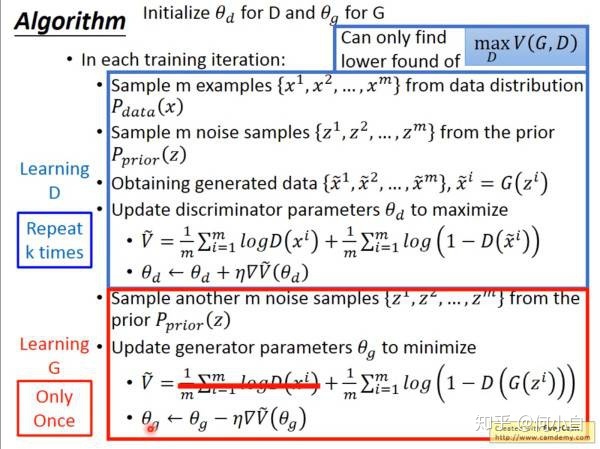
关于Loss Function
参考链接:
GAN的原理入门 - bonelee - 博客园www.cnblogs.com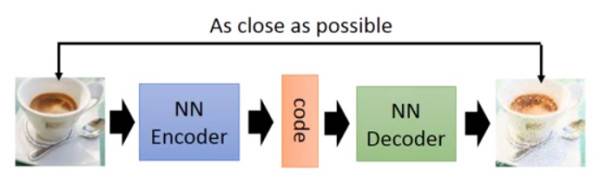
安装imageio来生成动态gif
# 安装imageio 来生成动态gif
这个模型花费大概~30s每个epoch的效率,在K80的Colab上。
Eager-execution会比执行等价graph稍微慢一些,因为它不可以从图像整个program上获益,而且会导致一些用于解释Python代码的开销。通过使用tf.contrib.eager.defun来建立凸函数,我们会获得一个~20s/epoch的性能提升(from 50s/epoch to 30s/epoch)。通过这种方式,我们可以同时获得快速执行eager_execution(更容易调试)和图形模式graph_mode(更好的性能)的最佳效果。
generator = make_generator_model()
discriminator = make_discriminator_model()

train_step = tf.contrib.eager.defun(train_step)

def generate_and_save_images(model,epoch,test_input):
  """
  确保training参数设置是False因为我们在进行推理时不希望训练batchnorm层。
  """
  predictions = model(test_input,training=False)

  fig = plt.figure(figsize=(4,4))
  for i in range(predictions.shape[0]):
    plt.subplot(4,4,i+1)
    plt.imshow(predictions[i,:,:,0]*127.5+127.5,cmap='gray') # 去标准化
    plt.axis('off') # 关闭坐标轴

  plt.savefig('image_at_epoch_{:04d}.png'.format(epoch))
  plt.show()

def train(dataset,epochs):
  """训练过程"""
  for epoch in range(epochs):
    start = time.time()

    for images in dataset:
      train_step(images)

    display.clear_output(wait=True)
    generate_and_save_images(generator,epoch+1,random_vector_for_generation)

    # 每15个epoch保存(checkpoint)一次
    if (epoch+1)%15 == 0 :
      checkpoint.save(file_prefix = checkpoint_prefix)

    print('时间消耗:epoch{}是{}s'.format(epoch+1,time.time()-start))

  # 最后的epoch后进行generating
  display.clear_output(wait=True)
  generate_and_save_images(generator,epochs,random_vector_for_generation)

%time
train(train_dataset,EPOCHS)


 1万+
1万+


 被折叠的 条评论
为什么被折叠?
被折叠的 条评论
为什么被折叠?
 到【灌水乐园】发言


