


该项目由美国国家科学基金会(NSF)、美国国家人类基因组研究所(NHGRI)、哈克生命科学研究所(The Huck Institutes of the Life Sciences)、宾州州立大学网络科学研究所(The Institute for CyberScience at Penn State),以及约翰霍普金斯大学(Johns Hopkins University)提供支持,是目前生物医学研究领域最受欢迎的在线生物信息分析工具之一。
The Galaxy Project is supported in part by NSF, NHGRI, The Huck Institutes of the Life Sciences, The Institute for CyberScience at Penn State, and Johns Hopkins University.
从 2015 年起,Galaxy 源码从 bitbucket 迁移至 GitHub 托管,截止 2019 年 9 月,Galaxy 在 GitHub 上一共有 636个 star,218 个贡献者,54 个发布的版本。

从今天开始我们来介绍一下 Ggalaxy 生物信息分析平台从安装、部署,到开发的一些知识。
环境准备
Galaxy 在 release_18.09 前的版本都是基于 Python 2.7.x 进行安装部署,虽然官方在 release_18.09 中说明已经支持python3(beta),但安装起来比较复杂,尤其与结合 conda 集合情况下的安装,并且不方便管理。
After almost 3 years of work and more than 100 pull requests, we are proud to announce the Beta-stage support for running Galaxy under Python 3. Lint, unit, API, framework, integration and Selenium tests all pass, time for you to give it a try and report any bug you find!
From: https://docs.galaxyproject.org/en/master/releases/18.09_announce.html
从 release_19.05 起,Galaxy 对 Python 3 提供了比较好的支持(Galaxy is currently supported on Python 2.7 and >=3.5),在本教程我们将以 release_19.09 最新版本的 Galaxy 为基础,进行一系列安装、部署和简单开发说明。
Galaxy is currently supported on Python 2.7 and >=3.5 . To run Galaxy, please install a supported Python version. If a supported version is already installed but is not your default, https://galaxyproject.org/admin/python/ contains instructions on how to force Galaxy to use a different version.
From: https://github.com/galaxyproject/galaxy/blob/release_19.09/scripts/check_python.py
1.1 conda 和 virtualenv
Galaxy 提供了 conda 和 virtualenv 环境下的 Galaxy 安装,它们之间的区别,具体可以参考:《Galaxy Admin Documentation: Framework Dependencies》。喜欢 conda 的用户可以参考文档一步一步进行操作,这里不细述。我们重点介绍一下基于 virtualenv 环境的 Galaxy 安装。
1.2 Python
基于 virtualenv 环境安装 Galaxy,我们只需要安装好 Python>=3.5 即可,因为 galaxy 在执行 run.sh 安装程序时会自动检测 virtualenv 是否安装,没有安装则会自动 pip 安装。
关于 Python-3 源码安装的具体方法,请参考:《Linux 下 Python 源码编译安装》。
源码与安装
2.1 源码下载
第一次安装。第一次安装 Galaxy 的用户可以通过下面的方法下载对应版本的代码库。
$ git clone -b release_19.09 https://github.com/galaxyproject/galaxy.git
已有代码库更新。已经安装了 Galaxy 的用户可以通过下面的方式更新。
$ git fetch origin && git checkout release_19.09 && git pull --ff-only origin release_19.09
开发版本。要获取 Galaxy 进行开发,请在克隆后使用默认分支:dev 。
$ git clone https://github.com/galaxyproject/galaxy.git
2.2 启动
有了源码后,下一步我们就可以启动 Galaxy。Galaxy 的启动需要运行一些东西:virtualenv,配置文件和依赖的 Python 模块。幸运的是,首次启动 Galaxy 服务器将根据需要创建并获取这些内容。要启动 Galaxy,只需在终端窗口中运行以下命令:
$ sh run.sh
Initializing tool-data/shared/ucsc/builds.txt from builds.txt.sample
Initializing tool-data/shared/ucsc/manual_builds.txt from manual_builds.txt.sample
Initializing static/welcome.html from welcome.html.sample
Creating Python virtual environment for Galaxy: .venv
To avoid this, use the --no-create-venv flag or set $GALAXY_VIRTUAL_ENV to an
existing environment before starting Galaxy.
Fetching https://files.pythonhosted.org/packages/source/v/virtualenv/virtualenv-16.1.0.tar.gz
% Total % Received % Xferd Average Speed Time Time Time Current
Dload Upload Total Spent Left Speed
0 0 0 0 0 0 0 0 --:--:-- 0:00:02 --:--:-- 0
100 1930k 100 1930k 0 0 18308 0 0:01:47 0:01:47 --:--:-- 59849
Verifying /tmp/galaxy-virtualenv-1mvK4M/virtualenv-16.1.0.tar.gz checksum is f899fafcd92e1150f40c8215328be38ff24b519cd95357fa6e78e006c7638208
Using base prefix '/usr/local/software/python-3.7'
New python executable in /galaxy-dist/v-19.09/galaxy/.venv/bin/python
Installing setuptools, pip, wheel...
done.
Activating virtualenv at .venv
Looking in indexes: https://wheels.galaxyproject.org/simple, https://pypi.python.org/simple
Downloading https://files.pythonhosted.org/packages/4f/b5/3ea9ae3d1096b9ff31e8f1846c47d49f3129a12464ac0a73b602de458298/adal-1.2.2-py2.py3-none-any.whl (53kB)
100% |████████████████████████████████| 61kB 24kB/s
......
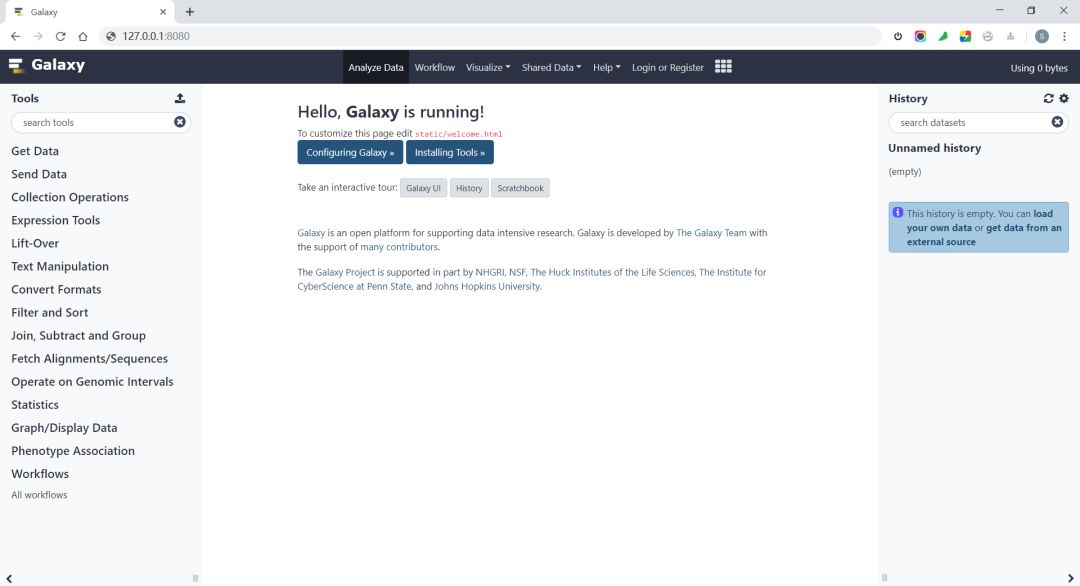
galaxy.web_stack INFO 2019-09-11 17:08:46,889 [p:11902,w:1,m:0] [MainThread] Galaxy server instance 'main.web.1' is running
Starting server in PID 11902.
serving on http://localhost:8080
galaxy.model.database_heartbeat DEBUG 2019-09-11 17:08:46,921 [p:11902,w:1,m:0] [database_heartbeart_main.web.1.thread] main.web.1 is config watcher
注意与提示:
使用 Python 3 安装 Galaxy,需要保证 SSL 模块正常可用。
如果在第一次启动 Galaxy 过程中出现如下报错,参考后面的方法进行解决。
$ sh run.sh
......
During handling of the above exception, another exception occurred:

Traceback (most recent call last):
  File "/galaxy-dist/v-19.09/galaxy/.venv/bin/nodeenv", line 11, in
    sys.exit(main())
  File "/galaxy-dist/v-19.09/galaxy/.venv/lib/python3.7/site-packages/nodeenv.py", line 1076, in main
    create_environment(env_dir, opt)
......
File "/usr/local/software/python-3.7/lib/python3.7/urllib/request.py", line 1319, in do_open
    raise URLError(err)
urllib.error.URLError: local issuer certificate (_ssl.c:1056)>
$ vi /galaxy-dist/v-19.09/galaxy/.venv/lib/python3.7/site-packages/nodeenv.py
...
import glob
import ssl
ssl._create_default_https_context = ssl._create_unverified_context
....- 使用
sh run.sh,第一次启动时,Galaxy 会默认检查 nodeenv、node、yarn 是否已经安装,如果没有将会自动执行 latest 版本安装。详情可以参考:1) $GALAXY_ROOT/requirements.txt
2) $GALAXY_ROOT/scripts/common_startup.sh
nodeenv、node、yarn 安装完成后,Galaxy 接着会自动安装 NodeJS 依赖:
$ cd client && yarn install --network-timeout 300000 --check-files
- nodeenv、node、yarn,以及 NodeJS 依赖的安装非常耗时间,尤其在网络不好时经常会出现各种报错,如果想要跳过这些安装,可以在初始化启动时增加一个
--skip-client-build参数。
$ sh run.sh --skip-client-build
- 上面的东西安装完成后,Galaxy 接着会执行一个 conda 安装,安装目录默认位于
galaxy/database/dependencies/_conda,这是为方便以后管理员可以通过 Galaxy web 的管理员页面自动安装 Galaxy shed tools 工具。
基本配置
3.1 配置文件
从 releases_18.01 起,Galaxy 可以在没有显式配置文件的情况下正常运行,但如果要修改其设置,则需要创建一个配置文件。推荐的做法是,复制模板配置文件并将其重命名为 galaxy.yml 。我们可以使用此命令执行此操作:
$ cp config/galaxy.yml.sample config/galaxy.yml
3.2 网络
Galaxy 默认通过本机 localhost 进行访问,要通过网络访问 Galaxy,需要在 config/galaxy.yml 文件中更改 http 设置。通过更改它,Galaxy 将绑定到任何可用的网络接口而不是 localhost:
# Use ':8080' to listen on all available network interfaces.
http: :8080
3.3 管理员
要通过 UI 控制 Galaxy(安装工具,管理用户,创建组等),用户必须成为管理员。只有注册用户才能成为管理员。要授予用户管理员权限,请将用户的 Galaxy 登录电子邮件添加到配置文件 config/galaxy.yml 中。配置示例如下所示:
# this should be a comma-separated list of valid Galaxy users
admin_users: ishenweiyan@qq.com,user2@example.com
到这里,Galaxy 的本地化安装就全部完成了。后面,我们将介绍一下如何在生产环境中部署一个满足多用户使用的 Galaxy 在线分析平台。
——The End——

欢迎关注生信人
TCGA | 小工具 | 数据库 |组装| 注释 | 基因家族 | Pvalue
基因预测 |bestorf | sci | NAR | 在线工具 | 生存分析 | 热图
生信不死 | 初学者 | circRNA | 一箭画心| 十二生肖 | circos
舞台|基因组 | 黄金测序 | 套路 | 杂谈组装 | 进化 | 测序简史


 2123
2123


 被折叠的 条评论
为什么被折叠?
被折叠的 条评论
为什么被折叠?
 到【灌水乐园】发言


