


 本文介绍了一种基于预训练VGG19模型实现的图片风格迁移技术。通过将内容图片与风格图片结合,生成融合两者特点的新图片。实验采用PyTorch框架,并详细展示了训练过程与效果。
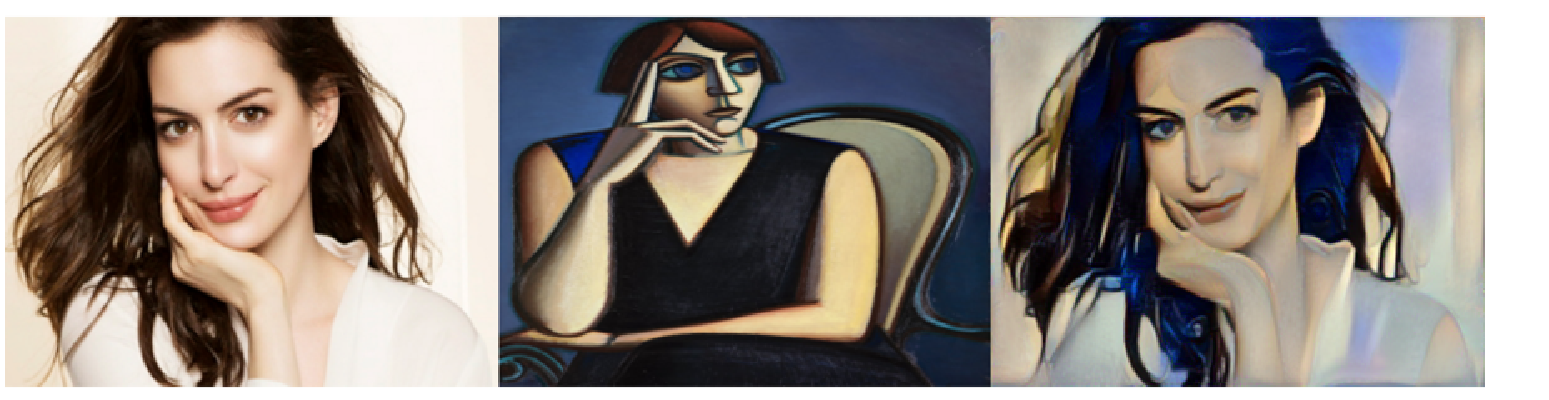
图片风格迁移训练时使用预处理的模型,不进行模型的训练,将图片像素值设置为可训练参数,进行图片的训练。
结合一张图片的内容和另一张图片的风格,生成一张新图片
论文地址:https://arxiv.org/pdf/1508.06576.pdf
损失函数:
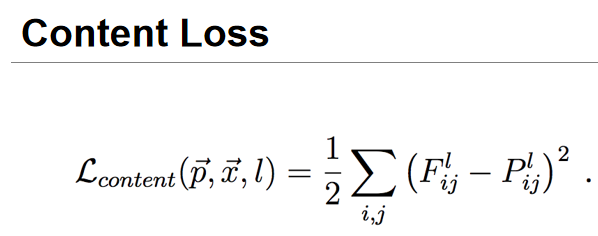
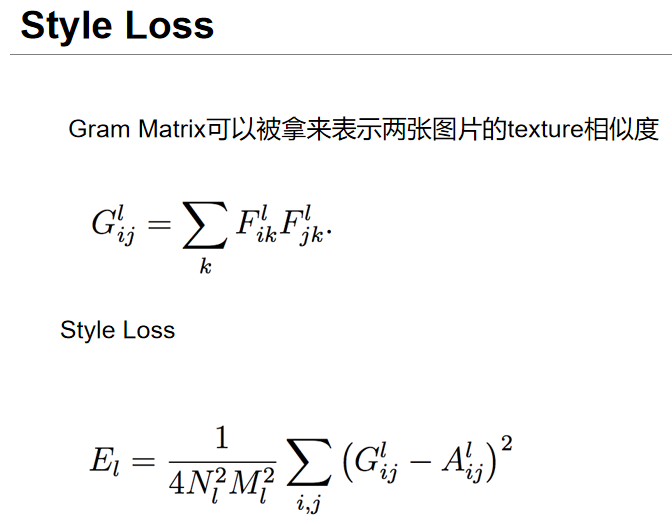
以下代码通过将图片x输入到预训练好的vgg19模型中,取模型features模块的0, 5, 10, 19, 28五层的输出值计算contentLoss与StyleLoss之和,对该loss进行反向传播,从而修改图片的像素值。
"""
图片风格迁移,使用预训练的vgg,不训练vgg模型,而是进行图片的训练,训练我们想要的风格图片
"""
import torch
from PIL import Image
import argparse
import torch.nn as nn
import matplotlib.pyplot as plt
import numpy as np
import torchvision
device = torch.device("cuda" if torch.cuda.is_available() else "cpu")
def load_image(image_path, transform=None, max_size=None, shape=None):
image = Image.open(image_path)
if max_size:
scale = max_size/max(image.size)
size = np.array(image.size)*scale
image = image.resize(size.astype(int), Image.ANTIALIAS)
if shape:
image = image.resize(shape, Image.LANCZOS)
if transform:
image = transform(image).unsqueeze(0)
return image.to(device)
transform = torchvision.transforms.Compose([
torchvision.transforms.ToTensor(),
# mean and std based on trainDatasets
torchvision.transforms.Normalize(mean=[0.485, 0.456, 0.406], std=[0.229, 0.224, 0.225])
])
content = load_image("data/content.jpg", transform, max_size=400)
style = load_image("data/style.jpg", transform, shape=[content.size(2), content.size(3)])
print(content.shape) # torch.Size([1, 3, 400, 300])
print(style.shape) # torch.Size([1, 3, 300, 400])
def imshow(tensor, title=None):
image = tensor.cpu().clone()
image = image.squeeze(0)
# ToPILImage为类对象,因此需要ToPILImage()(image)
image = torchvision.transforms.ToPILImage()(image)
plt.imshow(image)
if title is not None:
plt.title(title)
plt.pause(2) # pause a bit so that plots are updated
class VGGNet(nn.Module):
def __init__(self):
super(VGGNet, self).__init__()
self.select = ['0', '5', '10', '19', '28']
self.vgg = torchvision.models.vgg19(pretrained=True).features
def forward(self, x):
features = []
for name, layer in self.vgg._modules.items():
x = layer(x)
if name in self.select:
features.append(x)
return features
# 不训练模型,eval()模式
vgg = VGGNet().to(device).eval()
for feat in vgg(content):
print(feat.shape)
# 训练图片
target = content.clone().requires_grad_(True)
print("target shape: ", target.shape)
optimizer = torch.optim.Adam([target], lr=0.003, betas=[0.5, 0.999])
num_steps = 2000
for step in range(num_steps):
target_features = vgg(target)
content_features = vgg(content)
style_features = vgg(style)
content_loss = style_loss = 0.
for f1, f2, f3 in zip(target_features, content_features, style_features):
content_loss += torch.mean((f1-f2)**2)
_, c, h, w = f1.size()
f1 = f1.view(c, h*w)
f3 = f3.view(c, h*w)
f1 = torch.mm(f1, f1.t())
f3 = torch.mm(f3, f3.t())
style_loss += torch.mean((f1-f3)**2)/(c*h*w)
loss = content_loss + style_loss*100.
optimizer.zero_grad()
loss.backward()
optimizer.step()
if step % 100 == 0:
print("Step [{}/{}, Content Loss: {:.4f}, Style Loss: {:.4f}"
.format(step, num_steps, content_loss.item(), style_loss.item()))
denorm = torchvision.transforms.Normalize([-2.12, -2.04, -1.8], [4.37, 4.46, 4.44])
img = target.clone().squeeze()
img = denorm(img).clamp_(0, 1)
imshow(img, title="Target Image")
plt.pause(100)


 437
437

 被折叠的 条评论
为什么被折叠?
被折叠的 条评论
为什么被折叠?
 到【灌水乐园】发言


