更大更好的项目
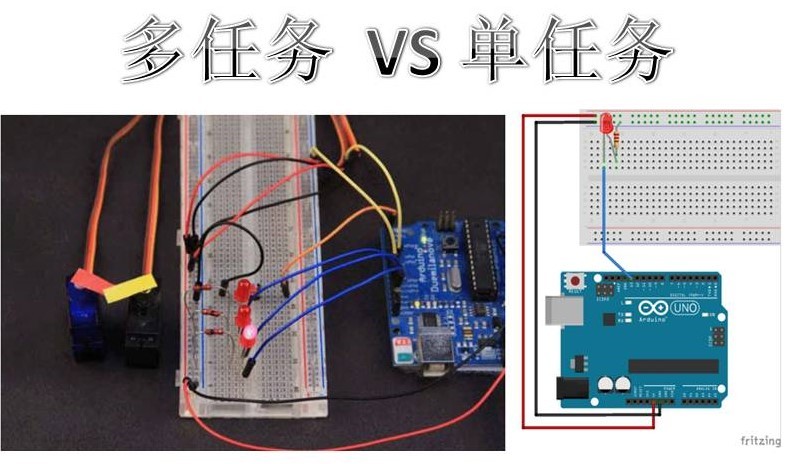
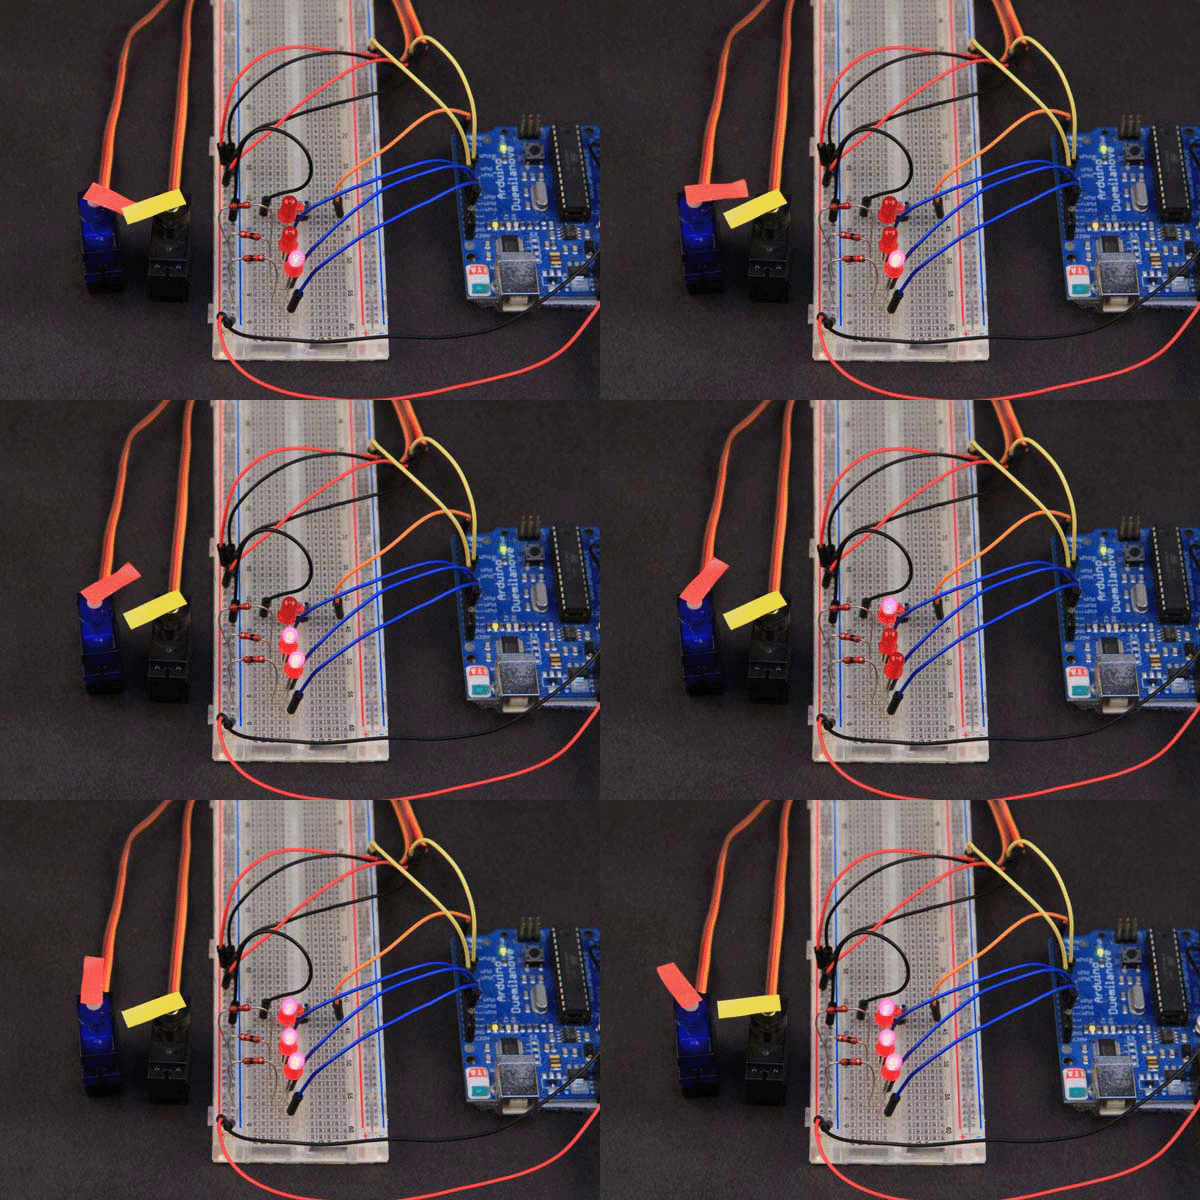
一旦你掌握了基本的闪烁led,简单的传感器和扫频伺服系统,是时候转向更大的了和更好的项目。这通常涉及到将一些简单的草图组合起来,并试图让它们发挥作用在一起。你会发现的第一件事是,有些草图可以自己完美地运行,但却不能与他人合作愉快。
Arduino是一个非常简单的处理器,没有操作系统,一次只能运行一个程序。与你的个人电脑或树莓派不同,Arduino无法加载和运行多个程序。
这并不意味着我们不能在Arduino上管理多个任务。我们只是需要使用不同的方法。由于没有操作系统来帮助我们,我们不得不自己动手。
解析 delay() 延时函数
首先,必须停目使用delay()函数。
使用delay()来控制时间可能是您在使用Arduino时最先学到的东西之一。使用delay()进行计时非常简单直观,但是当您想要添加额外的功能时,它确实会带来一些问题。问题是delay()是独占处理器的“繁忙等待”。
在delay()调用期间,您不能响应输入,不能处理任何数据,也不能更改任何输出。delya()占用了处理器的100%。因此,如果您的代码的任何部分使用了delay(),那么在此期间,其他所有内容都是无效的。
还记得闪灯这个最简单的程序吗?
/*
Blink
Turns on an LED on for one second, then off for one second, repeatedly.
This example code is in the public domain.
*/
// Pin 13 has an LED connected on most Arduino boards.
// give it a name:
int led = 13;
// the setup routine runs once when you press reset:
void setup() {
// initialize the digital pin as an output.
pinMode(led, OUTPUT);
} /
/ the loop routine runs over and over again forever:
void loop() {
digitalWrite(led, HIGH); // turn the LED on (HIGH is the voltage level)
delay(1000);
digitalWrite(led, LOW);
delay(1000);
// wait for a second
// turn the LED off by making the voltage LOW
// wait for a second
}
简单的Blink进程几乎将所有时间都花费在delay()函数中。因此,处理器在闪烁时不能做任何其他事情。
扫描也是吗?
Sweep使用delay()来控制扫描速度。如果您尝试将基本的闪烁程序与伺服扫描示例结合起来,您将发现它在闪烁和扫描之间交替进行。但它不会同时做这两件事。
#include <Servo.h>
// Pin 13 has an LED connected on most Arduino boards.
// give it a name:
int led = 13;
Servo myservo; // create servo object to control a servo
// twelve servo objects can be created on most boards
int pos = 0; // variable to store the servo position
void setup()
{
// initialize the digital pin as an output.
pinMode(led, OUTPUT);
myservo.attach(9); // attaches the servo on pin 9 to the servo object
} v
oid loop()
{
digitalWrite(led, HIGH); // turn the LED on (HIGH is the voltage level)


delay(1000);
digitalWrite(led, LOW);
delay(1000); 	// wait for a second
// turn the LED off by making the voltage LOW
// wait for a second
for(pos = 0; pos <= 180; pos += 1)   // goes from 0 degrees to 180 degrees
{ 	// in steps of 1 degree
// tell servo to go to position in variable 'pos'
// waits 15ms for the servo to reach the position	myservo.write(pos);
delay(15);
}
for(pos = 180; pos>=0; pos-=1) 	// goes from 180 degrees to 0 degrees
{
myservo.write(pos);
delay(15); 	// tell servo to go to position in variable 'pos'
// waits 15ms for the servo to reach the position
}
}
那么,我们如何在不使用delay()的情况下控制时间呢?
使用millis()进行计时
变成一个时间观察者
实现计时的一个简单技巧是制定一个时间表,并时刻注意时间。你只需定期查看时钟,这样你就知道什么时候该采取行动,而不是全部停止的延迟。与此同时,处理器仍然可以自由地执行其他任务。一个非常简单的例子是IDE附带的BlinkWithoutDelay示例程序。
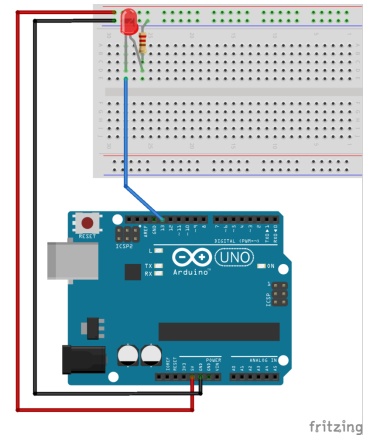
本页代码使用的接线如下图所示:
没有delay的闪灯
这是来自IDE的BlinkWithoutDelay示例程序:
/* Blink without Delay
 Turns on and off a light emitting diode (LED) connected to a digital
 pin, without using the delay() function.  This means that other code
 can run at the same time without being interrupted by the LED code.

 The circuit:
 * Use the onboard LED.
 * Note: Most Arduinos have an on-board LED you can control. On the UNO, MEGA and ZERO
  it is attached to digital pin 13, on MKR1000 on pin 6. LED_BUILTIN is set to
  the correct LED pin independent of which board is used.
  If you want to know what pin the on-board LED is connected to on your Arduino model, check
  the Technical Specs of your board  at https://www.arduino.cc/en/Main/Products

 created 2005
 by David A. Mellis
 modified 8 Feb 2010
 by Paul Stoffregen
 modified 11 Nov 2013
 by Scott Fitzgerald
 modified 9 Jan 2017
 by Arturo Guadalupi


 This example code is in the public domain.

 http://www.arduino.cc/en/Tutorial/BlinkWithoutDelay
 */

// constants won't change. Used here to set a pin number :
const int ledPin =  LED_BUILTIN;// the number of the LED pin

// Variables will change :
int ledState = LOW;             // ledState used to set the LED

// Generally, you should use "unsigned long" for variables that hold time
// The value will quickly become too large for an int to store
unsigned long previousMillis = 0;        // will store last time LED was updated

// constants won't change :
const long interval = 1000;           // interval at which to blink (milliseconds)

void setup() {
  // set the digital pin as output:
  pinMode(ledPin, OUTPUT);
}

void loop() {
  // here is where you'd put code that needs to be running all the time.

  // check to see if it's time to blink the LED; that is, if the
  // difference between the current time and last time you blinked
  // the LED is bigger than the interval at which you want to
  // blink the LED.
  unsigned long currentMillis = millis();

  if (currentMillis - previousMillis >= interval) {
    // save the last time you blinked the LED
    previousMillis = currentMillis;

    // if the LED is off turn it on and vice-versa:
    if (ledState == LOW) {
      ledState = HIGH;
    } else {
      ledState = LOW;
    }
    // set the LED with the ledState of the variable:
    digitalWrite(ledPin, ledState);
  }
}
这有什么意义呢?
乍一看,BlinkWithoutDelay似乎不是一个非常有趣的程序。这看起来只是一种更复杂的闪烁LED的方式。然而,BinkWithoutDelay演示了一个非常重要的概念,称为状态机。
而不是依赖于delay()来计时闪烁。BlinkWithoutDelay会记住LED的当前状态以及它最后一次改变的时间。每次通过循环时,它都会查看millis()时钟,以确定是否再次更改LED的状态。
欢迎来到机器的世界
让我们来看看一个稍微有趣一点的blink变体,它有不同的on-time和off-time。我们称它为
“FlashWithoutDelay”。
/
/ These variables store the flash pattern
// and the current state of the LED
int ledPin = 13;
int ledState = LOW; 	// the number of the LED pin
// ledState used to set the LED
unsigned long previousMillis = 0; 	// will store last time LED was updated
long OnTime = 250;
long OffTime = 750; 	// milliseconds of on-time
// milliseconds of off-time
void setup()
{
// set the digital pin as output:
pinMode(ledPin, OUTPUT);
}
void loop()
{
// check to see if it's time to change the state of the LED
unsigned long currentMillis = millis();
if((ledState == HIGH) && (currentMillis - previousMillis >= OnTime))
{
ledState = LOW; // Turn it off
previousMillis = currentMillis; // Remember the time
digitalWrite(ledPin, ledState); // Update the actual LED
}
else if ((ledState == LOW) && (currentMillis - previousMillis >= OffTime))
{
ledState = HIGH; // turn it on
previousMillis = currentMillis; // Remember the time
digitalWrite(ledPin, ledState); // Update the actual LED
}
}
状态+机器=状态机
请注意,我们有变量来跟踪LED是开着还是关着,还有变量来跟踪最后一次更改是什么时候发生的。这是状态机的状态部分。
我们也有代码来查看状态并决定何时以及如何进行更改。这是机器的一部分。
每次通过循环,我们“运行机器”,机器负责更新状态。
接下来,我们将研究如何组合多个状态机并同时运行它们。
现在就来两个灯
现在是时候做一些多任务! 首先连接另一个LED,如下图所示。
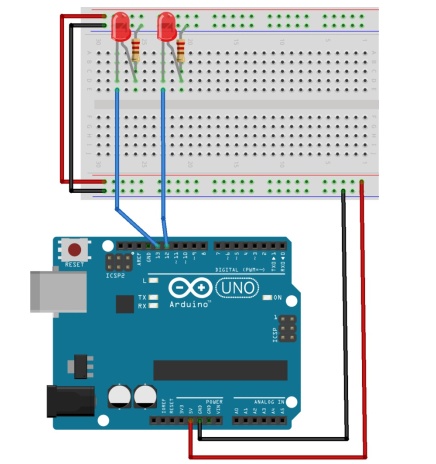
然后我们将为第二个LED创建另一个状态机,它以完全不同的速度闪烁。使用两台独立的状态机,我们可以让两个led完全独立地闪烁。单独使用延迟将会非常复杂。
// These variables store the flash pattern
// and the current state of the LED
int ledPin1 = 12;
int ledState1 = LOW; 	// the number of the LED pin
// ledState used to set the LED
unsigned long previousMillis1 = 0; 	// will store last time LED was updated
long OnTime1 = 250;
long OffTime1 = 750; 	// milliseconds of on-time
// milliseconds of off-time
int ledPin2 = 13;
int ledState2 = LOW; 	// the number of the LED pin
// ledState used to set the LED
unsigned long previousMillis2 = 0; 	// will store last time LED was updated
long OnTime2 = 330;
long OffTime2 = 400; 	// milliseconds of on-time
// milliseconds of off-time
void setup()
{
// set the digital pin as output:
pinMode(ledPin1, OUTPUT);
pinMode(ledPin2, OUTPUT);
} v
oid loop()
{
// check to see if it's time to change the state of the LED
unsigned long currentMillis = millis();
if((ledState1 == HIGH) && (currentMillis - previousMillis1 >= OnTime1))
{
ledState1 = LOW; // Turn it off
previousMillis1 = currentMillis; // Remember the time
digitalWrite(ledPin1, ledState1); // Update the actual LED
}e
lse if ((ledState1 == LOW) && (currentMillis - previousMillis1 >= OffTime1))
{
ledState1 = HIGH; // turn it on
previousMillis1 = currentMillis; // Remember the time
digitalWrite(ledPin1, ledState1); // Update the actual LED
} i
f((ledState2 == HIGH) && (currentMillis - previousMillis2 >= OnTime2))
{
ledState2 = LOW; // Turn it off
previousMillis2 = currentMillis; // Remember the time
digitalWrite(ledPin2, ledState2); // Update the actual LED
}e
lse if ((ledState2 == LOW) && (currentMillis - previousMillis2 >= OffTime2))
{
ledState2 = HIGH; // turn it on
previousMillis2 = currentMillis; // Remember the time
digitalWrite(ledPin2, ledState2); // Update the actual LED
}
}
谢谢你! 你还有其它的吗?
您可以添加更多的状态机,直到耗尽内存或GPIO引脚。每个状态机可以有自己的闪速。作为练习,编辑上面的代码以添加第三个状态机。
- 首先从一个状态机复制所有状态变量和代码。
- 然后重新命名所有变量,以避免与第一个机器发生冲突。
这并不难做到。但是,一遍又一遍地编写相同的代码似乎相当浪费。一定有更有效的方法来做这件事!
有更好的方法来管理这种复杂性。有一些编程技术既简单又高效。在下一章中,我们将介绍Arduino编程语言的一些更高级的特性。
一个优雅的解决方案
让我们再看一下最后的程序。如你所见,这是非常重复的。几乎复制了相同的代码。
每一个闪烁的LED。唯一(稍微)改变的是变量名。
这段代码是little Object Oriented Programming (OOP)的主要候选代码。
在循环中加入一个小OOP
Arduino语言是c++的一个变体,支持面向对象编程。使用该语言的OOP特性,我们可以将所有的状态变量和功能集合在一起,以使一个闪烁的LED变成一个c++类。
这并不难做到。我们已经为它编写了所有代码。我们只需要将它重新打包为一个类。
定义一个类
我们首先声明一个“flasher”类:
然后我们从FlashWithoutDelay中添加所有变量。因为它们是类的一部分,所以称为成员变量。
class Flasher
{
// Class Member Variables
// These are initialized at startup
int ledPin;
long OnTime;
long OffTime; 	// the number of the LED pin
// milliseconds of on-time
// milliseconds of off-time
// These maintain the current state
int ledState; // ledState used to set the LED
unsigned long previousMillis;
}	// will store last time LED was updated
接下来,我们添加一个构造函数。构造函数具有与类相同的名称,其任务是初始化所有变量。
class Flasher
{
// Class Member Variables
// These are initialized at startup
int ledPin;
long OnTime;
long OffTime; 	// the number of the LED pin
// milliseconds of on-time
// milliseconds of off-time
// These maintain the current state
int ledState; 	// ledState used to set the LED
unsigned long previousMillis; 	// will store last time LED was updated
// Constructor - creates a Flasher
// and initializes the member variables and state
public:
Flasher(int pin, long on, long off)
{
ledPin = pin;
pinMode(ledPin, OUTPUT);
OnTime = on;
OffTime = off;
ledState = LOW;
previousMillis = 0;
}
};
最后,我们将循环转换为一个名为“Update()”的ember函数。注意,这与我们最初的void loop()相同。只有名字变了。
class Flasher
{
// Class Member Variables
// These are initialized at startup
int ledPin;
long OnTime;
long OffTime; 	// the number of the LED pin
// milliseconds of on-time
// milliseconds of off-time
// These maintain the current state
int ledState; 	// ledState used to set the LED
unsigned long previousMillis; 	// will store last time LED was updated
// Constructor - creates a Flasher
// and initializes the member variables and state
public:
Flasher(int pin, long on, long off)
{
ledPin = pin;
pinMode(ledPin, OUTPUT);
OnTime = on;
OffTime = off;
ledState = LOW;
previousMillis = 0;
} v
oid Update()
{
// check to see if it's time to change the state of the LED
unsigned long currentMillis = millis();
if((ledState == HIGH) && (currentMillis - previousMillis >= OnTime))
{
ledState = LOW; // Turn it off
previousMillis = currentMillis; // Remember the time
digitalWrite(ledPin, ledState); // Update the actual LED
}e
lse if ((ledState == LOW) && (currentMillis - previousMillis >= OffTime))
{
ledState = HIGH; // turn it on
previousMillis = currentMillis; // Remember the time
digitalWrite(ledPin, ledState); // Update the actual LED
}
}
};
通过简单地将现有代码重新排列到Flasher类中,我们已经封装了所有用于闪烁LED的变量(状态)和功能(机器)。
现在让我们使用它:现在,对于我们想要flash的每个LED,我们通过调用构造函数创建一个Flasher类的实例。在循环的每次遍历中,我们只需要为每个Flasher实例调用Update()。不再需要复制整个状态机代码。我们只需要请求Flasher类的另一个实例。
class Flasher
{
// Class Member Variables
// These are initialized at startup
int ledPin;
long OnTime;
long OffTime; 	// the number of the LED pin
// milliseconds of on-time
// milliseconds of off-time
// These maintain the current state
int ledState; 	// ledState used to set the LED
unsigned long previousMillis; 	// will store last time LED was updated
// Constructor - creates a Flasher
// and initializes the member variables and state
public:
Flasher(int pin, long on, long off)
{
ledPin = pin;
pinMode(ledPin, OUTPUT);
OnTime = on;
OffTime = off;
ledState = LOW;
previousMillis = 0;
} v
oid Update()
{
// check to see if it's time to change the state of the LED
unsigned long currentMillis = millis();
if((ledState == HIGH) && (currentMillis - previousMillis >= OnTime))
{
ledState = LOW; // Turn it off
previousMillis = currentMillis; // Remember the time
digitalWrite(ledPin, ledState); // Update the actual LED
}e
lse if ((ledState == LOW) && (currentMillis - previousMillis >= OffTime))
{
ledState = HIGH; // turn it on
previousMillis = currentMillis; // Remember the time
digitalWrite(ledPin, ledState); // Update the actual LED
}
}
};
Flasher led1(12, 100, 400);
Flasher led2(13, 350, 350);
void setup()
{} v
oid loop()
{
led1.Update();
led2.Update();
}
少即是多!
就是这样——每个添加的LED只需要两行代码!
这段代码更短,更容易阅读。而且,由于没有重复的代码,它也可以编译更小的代码!这让你有更多珍贵的记忆去做其他事情!
一个干净的扫描
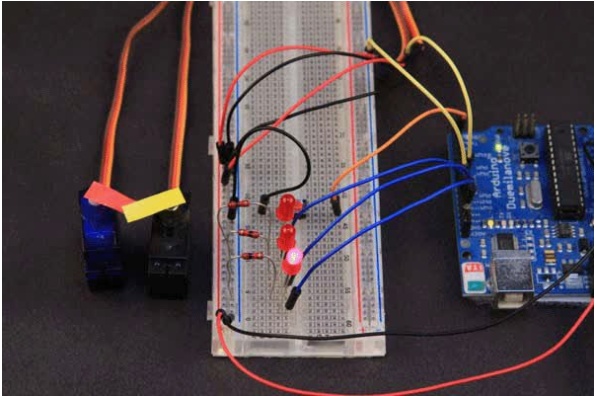
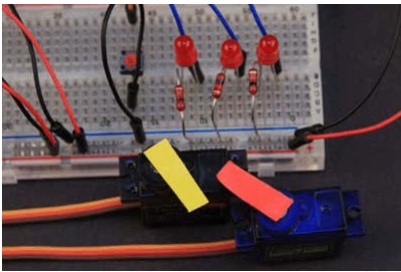
我们还能用它做什么?让我们将同样的原理应用到一些伺服代码中,并开始一些操作。首先在面包板上挂起几个servlet,如下所示。只要我们做到了,让我们再接一个LED。
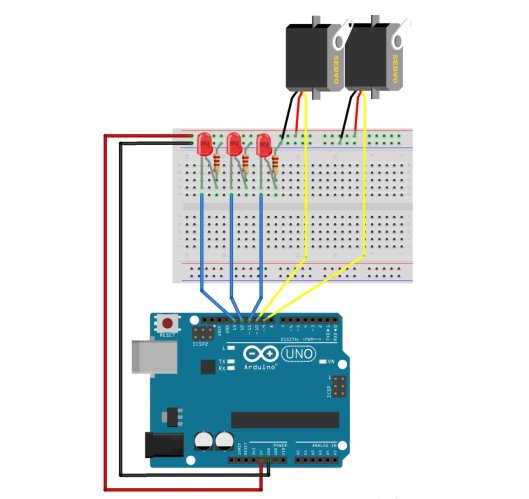
这是标准的伺服扫描代码。注意,它调用了可怕的delay()。我们将从其中提取我们需要的部件,以创建一个“扫地机”状态机。
// Sweep
// by BARRAGAN <http://barraganstudio.com>
// This example code is in the public domain.
#include <Servo.h>
Servo myservo; // create servo object to control a servo
// a maximum of eight servo objects can be created
int pos = 0; // variable to store the servo position
void setup()
{
myservo.attach(9); // attaches the servo on pin 9 to the servo object
} v
oid loop()
{
for(pos = 0; pos < 180; pos += 1) // goes from 0 degrees to 180 degrees
{ 	// in steps of 1 degree
// tell servo to go to position in variable 'pos'
// waits 15ms for the servo to reach the position	myservo.write(pos);
delay(15);
}
f
or(pos = 180; pos>=1; pos-=1) 	// goes from 180 degrees to 0 degrees
{
myservo.write(pos);
delay(15); 	// tell servo to go to position in variable 'pos'
// waits 15ms for the servo to reach the position
}
}
下面的Sweeper类封装了sweep动作,但是使用millis()函数来计时,就像Flasher类对led所做的那样。我们还需要添加Attach()和Detach()函数来将伺服与特定的引脚关联起来:
class Sweeper
{
Servo servo;
int pos;
int increment;
int updateInterval; 	// the servo
// current servo position
// increment to move for each interval
// interval between updates
unsigned long lastUpdate; // last update of position
public:
Sweeper(int interval)
{
updateInterval = interval;
increment = 1;
} v
oid Attach(int pin)
{
servo.attach(pin);
} v
oid Detach()
{
servo.detach();
} v
oid Update()
{
if((millis() - lastUpdate) > updateInterval) // time to update
{
lastUpdate = millis();
pos += increment;
servo.write(pos);
Serial.println(pos);
if ((pos >= 180) || (pos <= 0)) // end of sweep
{
// reverse direction
increment = -increment;
}
}
}
};
你想要多少?
现在,我们可以根据需要实例化尽可能多的闪烁器和清理器。
每个闪光器实例需要2行代码:
一个用来声明实例
一个在循环中调用update
每一个清扫器实例只需要3行代码:
一个用来声明实例
在安装过程中把它连接到大头针上
并在循环中调用update
#include <Servo.h>
class Flasher
{
// Class Member Variables
// These are initialized at startup
int ledPin;
long OnTime;
long OffTime; 	// the number of the LED pin
// milliseconds of on-time
// milliseconds of off-time
// These maintain the current state
int ledState; 	// ledState used to set the LED
unsigned long previousMillis; 	// will store last time LED was updated
// Constructor - creates a Flasher
// and initializes the member variables and state
public:
Flasher(int pin, long on, long off)
{
ledPin = pin;
pinMode(ledPin, OUTPUT);
OnTime = on;
OffTime = off;
ledState = LOW;
previousMillis = 0;
} v
oid Update()
{
// check to see if it's time to change the state of the LED
unsigned long currentMillis = millis();
if((ledState == HIGH) && (currentMillis - previousMillis >= OnTime))
{
ledState = LOW; // Turn it off
previousMillis = currentMillis; // Remember the time
digitalWrite(ledPin, ledState); // Update the actual LED
}e
lse if ((ledState == LOW) && (currentMillis - previousMillis >= OffTime))
{
ledState = HIGH; // turn it on
previousMillis = currentMillis; // Remember the time
digitalWrite(ledPin, ledState); // Update the actual LED
}
}
};
class Sweeper
{
Servo servo;
int pos;
int increment;
int updateInterval; 	// the servo
// current servo position
// increment to move for each interval
// interval between updates
unsigned long lastUpdate; // last update of position
public:
Sweeper(int interval)
{
updateInterval = interval;
increment = 1;
} v
oid Attach(int pin)
{
servo.attach(pin);
} v
oid Detach()
{
servo.detach();
} v
oid Update()
{
if((millis() - lastUpdate) > updateInterval) // time to update
{
lastUpdate = millis();
pos += increment;
servo.write(pos);
Serial.println(pos);
if ((pos >= 180) || (pos <= 0)) // end of sweep
{
// reverse direction
increment = -increment;
}
}
}
};
Flasher led1(11, 123, 400);
Flasher led2(12, 350, 350);
Flasher led3(13, 200, 222);
Sweeper sweeper1(15);
Sweeper sweeper2(25);
void setup()
{
Serial.begin(9600);
sweeper1.Attach(9);
sweeper2.Attach(10);
} v
oid loop()
{
sweeper1.Update();
sweeper2.Update();
led1.Update();
led2.Update();
led3.Update();
}
现在我们有5个独立的任务不间断地运行,没有干扰。而我们的loop()只有5行代码!接下来,我们将添加一个按钮,以便与其中一些任务进行交互。
现在在一起来!
我们也需要您的输入基于delay()的计时的另一个问题是,用户输入(比如按钮按下)往往会被忽略,因为处理器无法在delay()中检查按钮状态。使用基于millis()的计时,处理器可以定期检查按钮状态和其他输入。这使得我们可以构建复杂的程序来做很多事情一次,但仍然保持反应。我们将通过向电路中添加一个按钮来演示这一点,如下所示
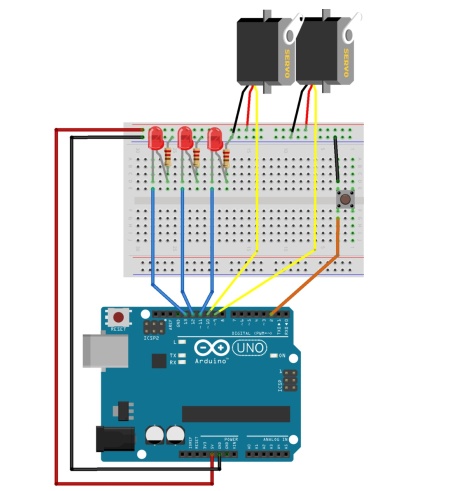
下面的代码将在每次循环时检查按钮状态。按下按钮后,Led1和sweeper2将不会更新。
#include <Servo.h>
class Flasher
{
// Class Member Variables
© Adafruit Industries https://learn.adafruit.com/multi-tasking-the-arduino-part-1 Page 26 of 30
// Class Member Variables
// These are initialized at startup
int ledPin;
long OnTime;
long OffTime; 	// the number of the LED pin
// milliseconds of on-time
// milliseconds of off-time
// These maintain the current state
int ledState; 	// ledState used to set the LED
unsigned long previousMillis; 	// will store last time LED was updated
// Constructor - creates a Flasher
// and initializes the member variables and state
public:
Flasher(int pin, long on, long off)
{
ledPin = pin;
pinMode(ledPin, OUTPUT);
OnTime = on;
OffTime = off;
ledState = LOW;
previousMillis = 0;
} v
oid Update()
{
// check to see if it's time to change the state of the LED
unsigned long currentMillis = millis();
if((ledState == HIGH) && (currentMillis - previousMillis >= OnTime))
{
ledState = LOW; // Turn it off
previousMillis = currentMillis; // Remember the time
digitalWrite(ledPin, ledState); // Update the actual LED
}e
lse if ((ledState == LOW) && (currentMillis - previousMillis >= OffTime))
{
ledState = HIGH; // turn it on
previousMillis = currentMillis; // Remember the time
digitalWrite(ledPin, ledState); // Update the actual LED
}
}
};
class Sweeper
{
Servo servo;
int pos;
int increment;
int updateInterval; 	// the servo
// current servo position
// increment to move for each interval
// interval between updates
unsigned long lastUpdate; // last update of position
public:
Sweeper(int interval)
{
updateInterval = interval;
increment = 1;
}
© Adafruit Industries https://learn.adafruit.com/multi-tasking-the-arduino-part-1 Page 27 of 30
The 3 LEDs will flash at their own rates. The 2 sweepers will sweep at their own rates. But when we press the button,
void Attach(int pin)
{
servo.attach(pin);
} v
oid Detach()
{
servo.detach();
} v
oid Update()
{
if((millis() - lastUpdate) > updateInterval) // time to update
{
lastUpdate = millis();
pos += increment;
servo.write(pos);
Serial.println(pos);
if ((pos >= 180) || (pos <= 0)) // end of sweep
{
// reverse direction
increment = -increment;
}
}
}
};
Flasher led1(11, 123, 400);
Flasher led2(12, 350, 350);
Flasher led3(13, 200, 222);
Sweeper sweeper1(15);
Sweeper sweeper2(25);
void setup()
{
Serial.begin(9600);
sweeper1.Attach(9);
sweeper2.Attach(10);
} v
oid loop()
{
sweeper1.Update();
if(digitalRead(2) == HIGH)
{
sweeper2.Update();
led1.Update();
} l
ed2.Update();
led3.Update();
}
3个led将以自己的速度闪烁。两个清洁工将以他们自己的速度打扫。但当我们按下按钮时,sweeper2和led1会停止前进,直到我们松开按钮。由于在循环中没有延迟,按钮输入几乎具有瞬时响应。
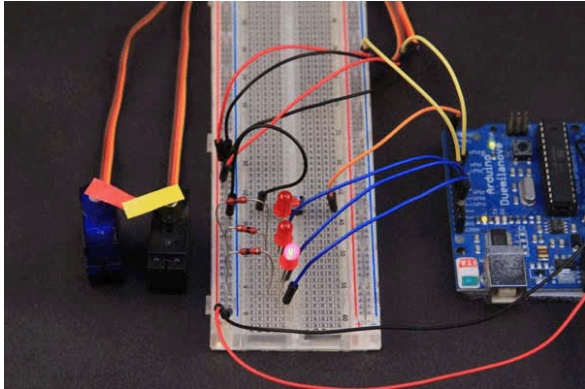
现在我们有5个独立执行的任务和用户输入。处理器不会出现延迟。
我们高效的面向对象代码为扩展留下了大量的空间!
结论:
在本指南中,我们已经演示了Arduino确实可以在处理多个独立任务的同时保持对用户输入等外部事件的响应。
- 我们已经学习了如何使用millis()来计时,而不是使用delay(),这样我们就可以释放处理器来做其他事情。
- 我们已经学习了如何将任务定义为可以同时独立于其他状态机执行的状态机。
- 我们还学习了如何将这些状态机封装到c++类中,以保持代码的简单和紧凑。
这些技术不会把Arduino变成一台超级计算机。但是它们将帮助您最大限度地利用这个小而强大的处理器。
在本系列的第2部分中,我们将以这些技术为基础,探索其他方法,使Arduino在管理多个任务的同时响应外部事件。


 本文介绍了如何在Arduino上实现多任务并行,避免使用delay()函数导致的处理器占用问题。通过使用millis()进行计时,结合状态机的概念,实现了多个独立任务如LED闪烁和伺服扫描的同步执行。文章还探讨了面向对象编程在简化代码和提高效率中的应用,展示了如何在循环中处理用户输入,确保系统响应性。


 766
766

 被折叠的 条评论
为什么被折叠?


