


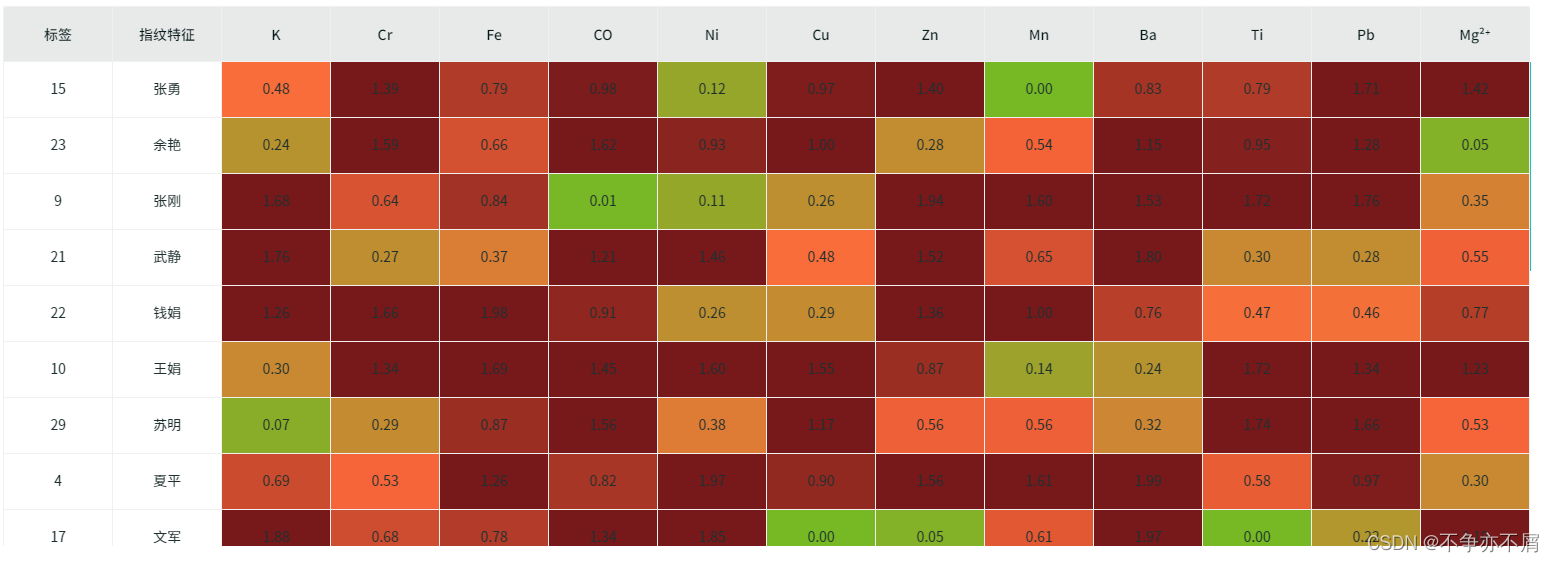
项目开发中遇到需要根据表格中的数值动态渲染颜色问题,实现效果如下
实现代码如下
template部分
  <div class="standard-table">
    <a-table
      :columns="fingerprintColumns"
      :data-source="fingerprintList"
      :bordered="true"
      :row-key="
        (record, index) => {
          return index;
        }
      "
      :pagination="false"
      :sticky="sticky"
      :scroll="scrollTable"
    >
      <template v-for="(item, index) in fingerprintColumns" :key="item.dataIndex" #[item.dataIndex]="{ text, record }">
        <div :style="{ backgroundColor: handleColor(text) }">{{ text }}</div>
      </template>
    </a-table>
  </div>
js部分
<script>
import { reactive, toRefs, getCurrentInstance, onMounted } from "vue";
const fingerprintColumns = [
  {
    title: "标签",
    dataIndex: "label",
    align: "center",
  },
  {
    title: "指纹特征",
    dataIndex: "characteristic",
    align: "center",
  },
  {
    title: "K",
    dataIndex: "kValue",
    /**
     *  自定义表格body中的单元格 加上这个配置
     *  如果是自定义表头header的话 就加上这 slots: { title: "headerCell" }
     * 主要区别在于 表头slots对象key是 title 其他单元格slots对象key是 customRender
     * */
    slots: { customRender: "kValue" },
    align: "center",
  },
  {
    title: "Cr",
    dataIndex: "crValue",
    slots: { customRender: "crValue" },
    align: "center",
  },
  {
    title: "Fe",
    dataIndex: "feValue",
    slots: { customRender: "feValue" },
    align: "center",
  },
  {
    title: "CO",
    dataIndex: "coValue",
    slots: { customRender: "coValue" },
    align: "center",
  },
  {
    title: "Ni",
    dataIndex: "niValue",
    slots: { customRender: "niValue" },
    align: "center",
  },
  {
    title: "Cu",
    dataIndex: "cuValue",
    slots: { customRender: "cuValue" },
    align: "center",
  },
  {
    title: "Zn",
    dataIndex: "znValue",
    slots: { customRender: "znValue" },
    align: "center",
  },
  {
    title: "Mn",
    dataIndex: "mnValue",
    slots: { customRender: "mnValue" },
    align: "center",
  },
  {
    title: "Ba",
    dataIndex: "baValue",
    slots: { customRender: "baValue" },
    align: "center",
  },
  {
    title: "Ti",
    dataIndex: "tiValue",
    slots: { customRender: "tiValue" },
    align: "center",
  },
  {
    title: "Pb",
    dataIndex: "pbValue",
    slots: { customRender: "pbValue" },
    align: "center",
  },
  {
    title: "Mg²⁺",
    dataIndex: "Mg²⁺Value",
    slots: { customRender: "Mg²⁺Value" },
    align: "center",
  },
];
export default {
  name: "text",
  setup() {
    const { proxy } = getCurrentInstance();
    const data = reactive({
      fingerprintColumns,
      fingerprintList: [],
      sticky: true, // 固定表头
      scrollTable: { y: 300 }, // 表格滚动配置
    });
    const getFingerprintList = () => {
      /*
        这里是动态设置表格的高度 这些是在项目中使用到的 这里并不用理会 只需要给个高度配置就可以了
        let contentBox = document.getElementsByClassName("content-box")[0]?.clientHeight;
        let menuBox = document.getElementsByClassName("ant-menu-overflow")[0]?.clientHeight;
        let tabelHeaderBox = document.getElementsByClassName("ant-table-thead")[0]?.clientHeight;
        data.scrollTable = {
          y: contentBox - menuBox - tabelHeaderBox - 60,
        };
    */
      // apifox mock表格数据
      fetch("http://127.0.0.1:4523/mock/1200396/visualization/pmf/fingerprintList")
        .then((res) => res.json())
        .then((result) => {
          result.tableList.forEach((item) => {
            // 对表格中除第一 第二列以外的其他列中的值进行修约
            let { characteristic, label, ...newList } = item;
            let keyList = Object.keys(newList);
            keyList.forEach((itm) => {
              item[itm] = parseFloat(item[itm]).toFixed(2);
            });
          });
          data.fingerprintList = result.tableList;
        });
    };
    const handleColor = (value) => {
      let number = +value;
      let startColor = null;
      let endColor = null;
      let color = "";
      //   根据值的大小匹配对应的颜色值
      if (number >= 0 && number <= 0.5) {
        startColor = { red: 118, green: 185, blue: 37 };
        endColor = { red: 255, green: 106, blue: 59 };
        color = getColorOfWeight(0, 0.5, startColor, endColor, number);
      } else {
        if (number > 1) number = 1;
        startColor = { red: 255, green: 106, blue: 59 };
        endColor = { red: 119, green: 25, blue: 27 };
        color = getColorOfWeight(0.5, 1, startColor, endColor, number);
      }
      return color;
    };
    // 动态获取渐变颜色
    const getColorOfWeight = (minNum, maxNum, colorStart, colorend, number) => {
      const colorR = ((colorend.red - colorStart.red) * (number - minNum)) / (maxNum - minNum) + colorStart.red;
      const colorG = ((colorend.green - colorStart.green) * (number - minNum)) / (maxNum - minNum) + colorStart.green;
      const colorB = ((colorend.blue - colorStart.blue) * (number - minNum)) / (maxNum - minNum) + colorStart.blue;
      const color = `rgb(${parseInt(colorR).toString()},${parseInt(colorG).toString()},${parseInt(colorB).toString()})`;
      return color;
    };
    onMounted(() => {
      getFingerprintList();
    });
    return {
      ...toRefs(data),
      handleColor,
    };
  },
};
</script>
css部分
<style scoped lang="scss">
.standard-table {
  margin: 15px 0;
  :deep(.ant-table-hide-scrollbar) {
    min-width: 0 !important;
  }
  :deep(.ant-table-thead > tr > th) {
    background-color: #e8e9e9;
    font-size: 14px;
    font-family: "sym";
    font-weight: 500;
    color: #061a19;
  }
  :deep(.ant-table-tbody > tr > td) {
    padding: 0;
    height: 55px;
    line-height: 55px;
    font-size: 14px;
    font-family: "sy";
    font-weight: 400;
    color: #1d2f2e;
  }
//   自定义滚动条
  ::-webkit-scrollbar {
    width: 1px;
    background-color: #fff;
  }

  ::-webkit-scrollbar-track {
    background-color: #fff;
    border-radius: 10px;
  }

  ::-webkit-scrollbar-thumb {
    background-color: #14c3ba !important;
    border-radius: 10px;
  }

  ::-webkit-scrollbar-button {
    display: none;
  }
}
</style>
重点
- 当固定表头开启滚动条时会出现这样一种情况(官网说的)

控制台获取它的内部样式可以看到它是设置了个最小宽度min-width,我们只需要更改一下样式就可以避免以上的这种效果了
:deep(.ant-table-hide-scrollbar) {
    min-width: 0 !important;
  }
- 自定义滚动条样式
//   自定义滚动条
  ::-webkit-scrollbar {
    width: 1px;
    background-color: #fff;
  }

  ::-webkit-scrollbar-track {
    background-color: #fff;
    border-radius: 10px;
  }

  ::-webkit-scrollbar-thumb {
    background-color: #14c3ba !important;
    border-radius: 10px;
  }
  ::-webkit-scrollbar-button {
    display: none;
  }
- 我们可以看到原本表格中的单元格是设置了内间距的
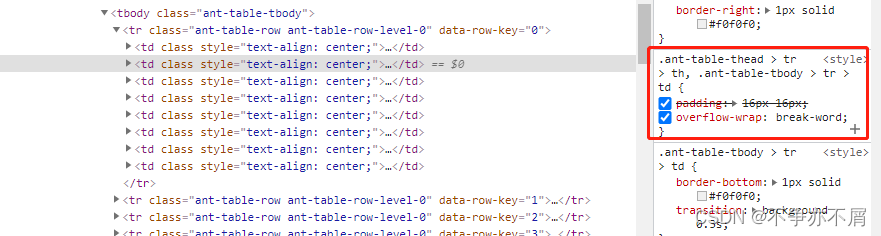
这将会导致我们动态设置样式没有填充满整个单元格 所以我们还需要去改变一下它的原样式
:deep(.ant-table-tbody > tr > td) {
    padding: 0;
    height: 55px;
    line-height: 55px;
    font-size: 14px;
    font-family: "sy";
    font-weight: 400;
    color: #1d2f2e;
  }


 1300
1300


 被折叠的 条评论
为什么被折叠?
被折叠的 条评论
为什么被折叠?
 到【灌水乐园】发言


