


 本文详细介绍了MMDetection框架中用于图像检测的Mosaic数据增强技术,包括其步骤和配置方式。首先,图片会被放大并选取四个中心点,然后随机选取其他三张图片进行拼接。接着,通过Mosaic变换函数实现图片的组合,并对目标框进行调整。此外,还探讨了RandomAffine变换,包括旋转、缩放、切变和位移等操作,以进一步增强数据集。这些技术有助于提升模型的泛化能力。
前言
记录下mmdetection里的mosaic数据增强。
一、步骤
1.将图片大小通过设置的resize大小放大两倍后,选择四个图片的中心
2.通过索引获取图片左边的顶点坐标,然后从数据加载中随机采样其他三幅图像
3.如果图像的面积比要进行mosaic的面积还要大,进行裁剪
- 在配置文件里怎么进行设置
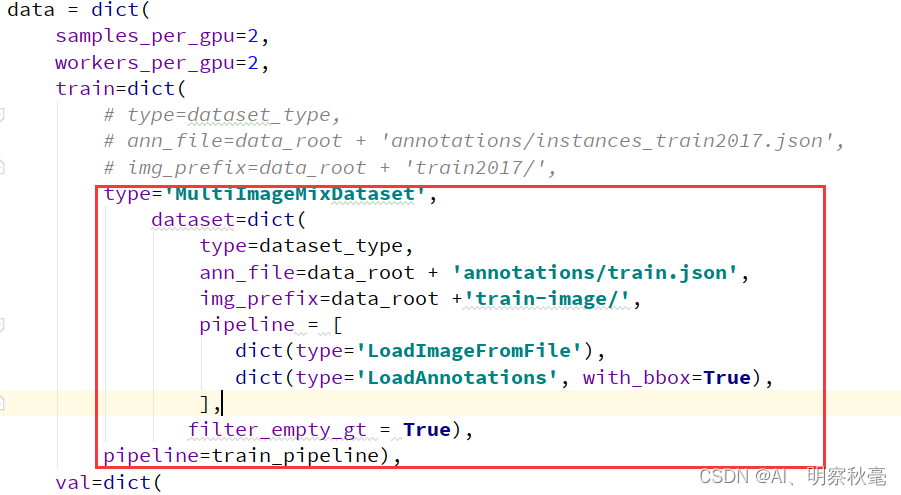
1.在训练数据的pipeline里修改
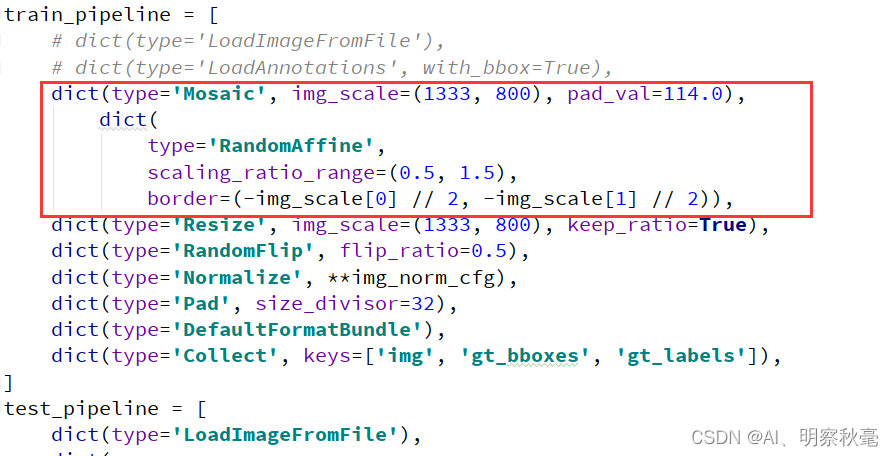
2.要使用多张图片,就要有获取的索引途径,数据加载和进行transforms要使用mmdetection里新建了多图的 MultiImageMixDataset,代码位于 mmdet/datasets/dataset_wrappers.py。
Mosaic
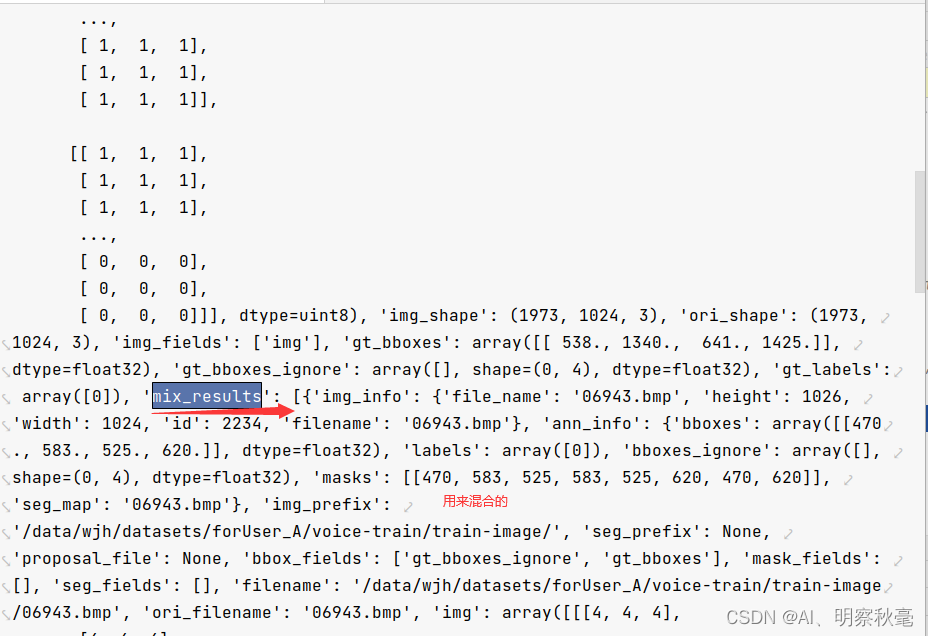
开始的results的数据字典里会保存随机索引采样的三张图片的信息
mosaic变换代码解析
    def _mosaic_transform(self, results):
        """Mosaic transform function.

        Args:
            results (dict): Result dict.

        Returns:
            dict: Updated result dict.
        """

        assert 'mix_results' in results
        mosaic_labels = []
        mosaic_bboxes = []
        if len(results['img'].shape) == 3:
            mosaic_img = np.full(
                (int(self.img_scale[0] * 2), int(self.img_scale[1] * 2), 3),
                self.pad_val,
                dtype=results['img'].dtype)     # 使用self.pad_val=114.0填充
        else:
            mosaic_img = np.full(
                (int(self.img_scale[0] * 2), int(self.img_scale[1] * 2)),	# 放大两倍
                self.pad_val,
                dtype=results['img'].dtype)

        # mosaic center x, y,确定中心
        #默认[img_size x 0.5 : img_size x 1.5] 之间随机选择一个拼接中心的坐标(xc, yc)
        center_x = int(
            random.uniform(*self.center_ratio_range) * self.img_scale[1])
        center_y = int(
            random.uniform(*self.center_ratio_range) * self.img_scale[0])
        center_position = (center_x, center_y)

        loc_strs = ('top_left', 'top_right', 'bottom_left', 'bottom_right')		#每张图片粘贴的位置
        for i, loc in enumerate(loc_strs):
            if loc == 'top_left':
                results_patch = copy.deepcopy(results)  # 拷贝一份数据,主图片作为左上角的图片
            else:
                results_patch = copy.deepcopy(results['mix_results'][i - 1])	#	其他的三张图片,对应其他位置

            img_i = results_patch['img']    #
            h_i, w_i = img_i.shape[:2]      # 图像高宽
            # keep_ratio resize
            scale_ratio_i = min(self.img_scale[0] / h_i,
                                self.img_scale[1] / w_i)    # 取最小的作为约束整个图片的比列
            img_i = mmcv.imresize(
                img_i, (int(w_i * scale_ratio_i), int(h_i * scale_ratio_i)))    # 先按比例resize到指定大小

            # compute the combine parameters
            paste_coord, crop_coord = self._mosaic_combine(
                loc, center_position, img_i.shape[:2][::-1])    # 这里返回的是在整个mosaic范围里,粘贴到相应位置的左上角和右下角坐标等于图片裁剪的左上角和右下角坐标
            x1_p, y1_p, x2_p, y2_p = paste_coord
            x1_c, y1_c, x2_c, y2_c = crop_coord

            # crop and paste image
            mosaic_img[y1_p:y2_p, x1_p:x2_p] = img_i[y1_c:y2_c, x1_c:x2_c]  # 如左上角,裁减粘贴到对应mosaic范围左上角位置,不会超过中心点

            # adjust coordinate
            gt_bboxes_i = results_patch['gt_bboxes']    # 之后对其gt_bboxes
            gt_labels_i = results_patch['gt_labels']	#gt_labels做相应的调整

            if gt_bboxes_i.shape[0] > 0:
                padw = x1_p - x1_c	# gt_bboxes如果裁剪了,进行pad
                padh = y1_p - y1_c	#
                gt_bboxes_i[:, 0::2] = \
                    scale_ratio_i * gt_bboxes_i[:, 0::2] + padw	# x坐标pad
                gt_bboxes_i[:, 1::2] = \
                    scale_ratio_i * gt_bboxes_i[:, 1::2] + padh	# y坐标pad

            mosaic_bboxes.append(gt_bboxes_i)
            mosaic_labels.append(gt_labels_i)	# gt_labels_i不变

        if len(mosaic_labels) > 0:
            mosaic_bboxes = np.concatenate(mosaic_bboxes, 0)
            mosaic_bboxes[:, 0::2] = np.clip(mosaic_bboxes[:, 0::2], 0,
                                             2 * self.img_scale[1])     # 查看是否超出mosaic的范围,超出范围就裁减掉
            mosaic_bboxes[:, 1::2] = np.clip(mosaic_bboxes[:, 1::2], 0,
                                             2 * self.img_scale[0])
            mosaic_labels = np.concatenate(mosaic_labels, 0)

            if not self.skip_filter:        # 是否过滤掉一些不合适的gt_bboxes(太小)
                mosaic_bboxes, mosaic_labels = \
                    self._filter_box_candidates(mosaic_bboxes, mosaic_labels)

        results['img'] = mosaic_img     # 我们后面要的就是results['img']里的,所以保存在results['img']里
        results['img_shape'] = mosaic_img.shape
        results['gt_bboxes'] = mosaic_bboxes
        results['gt_labels'] = mosaic_labels

        return results
RandomAffine变换回去
代码如下(示例):
    def __call__(self, results):
        img = results['img']
        height = img.shape[0] + self.border[0] * 2	#加上一个负数,去变换回回指定resize的大小。如(1333,800)
        width = img.shape[1] + self.border[1] * 2	#就加上(-1333//2,-800//2)。乘以2,是因为刚开始放大了两倍

        # Rotation,这里是对mosaic后的其他仿射变换操作
        rotation_degree = random.uniform(-self.max_rotate_degree,
                                         self.max_rotate_degree)
        rotation_matrix = self._get_rotation_matrix(rotation_degree)

        # Scaling
        scaling_ratio = random.uniform(self.scaling_ratio_range[0],
                                       self.scaling_ratio_range[1])
        scaling_matrix = self._get_scaling_matrix(scaling_ratio)

        # Shear
        x_degree = random.uniform(-self.max_shear_degree,
                                  self.max_shear_degree)
        y_degree = random.uniform(-self.max_shear_degree,
                                  self.max_shear_degree)
        shear_matrix = self._get_shear_matrix(x_degree, y_degree)

        # Translation
        trans_x = random.uniform(-self.max_translate_ratio,
                                 self.max_translate_ratio) * width
        trans_y = random.uniform(-self.max_translate_ratio,
                                 self.max_translate_ratio) * height
        translate_matrix = self._get_translation_matrix(trans_x, trans_y)

        warp_matrix = (
            translate_matrix @ shear_matrix @ rotation_matrix @ scaling_matrix)

        img = cv2.warpPerspective(
            img,
            warp_matrix,
            dsize=(width, height),
            borderValue=self.border_val)
        results['img'] = img
        results['img_shape'] = img.shape

        for key in results.get('bbox_fields', []):
            bboxes = results[key]
            num_bboxes = len(bboxes)
            if num_bboxes:
                # homogeneous coordinates
                xs = bboxes[:, [0, 0, 2, 2]].reshape(num_bboxes * 4)
                ys = bboxes[:, [1, 3, 3, 1]].reshape(num_bboxes * 4)
                ones = np.ones_like(xs)
                points = np.vstack([xs, ys, ones])

                warp_points = warp_matrix @ points
                warp_points = warp_points[:2] / warp_points[2]
                xs = warp_points[0].reshape(num_bboxes, 4)
                ys = warp_points[1].reshape(num_bboxes, 4)

                warp_bboxes = np.vstack(
                    (xs.min(1), ys.min(1), xs.max(1), ys.max(1))).T

                warp_bboxes[:, [0, 2]] = warp_bboxes[:, [0, 2]].clip(0, width)
                warp_bboxes[:, [1, 3]] = warp_bboxes[:, [1, 3]].clip(0, height)

                if not self.skip_filter:
                    # filter bboxes
                    valid_index = self.filter_gt_bboxes(
                        bboxes * scaling_ratio, warp_bboxes)
                    results[key] = warp_bboxes[valid_index]
                    if key in ['gt_bboxes']:
                        if 'gt_labels' in results:
                            results['gt_labels'] = results['gt_labels'][
                                valid_index]
                else:
                    results[key] = warp_bboxes

                if 'gt_masks' in results:
                    raise NotImplementedError(
                        'RandomAffine only supports bbox.')
        return results


 2317
2317

 被折叠的 条评论
为什么被折叠?
被折叠的 条评论
为什么被折叠?
 到【灌水乐园】发言


