


本篇内容来源于中国大学mooc《计算机组成与CPU设计实验》 (江苏大学)中的课程视频、PPT等相关资料。
本篇内容为《计算机组成与CPU设计实验》——译码器
参考视频:
编码转换
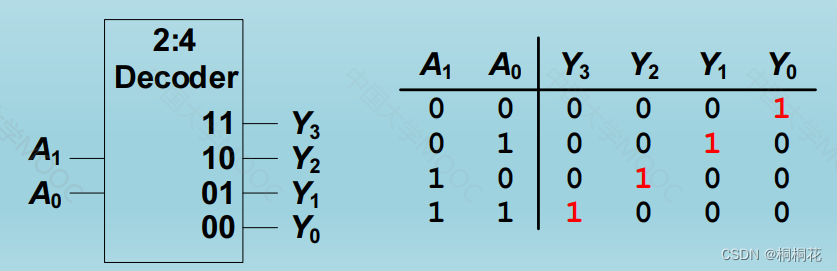
译码器
N个输入,个输出。
只有一个输出有效(One-hot输出)。
例子:2-4译码器
Verilog代码
module  decoder(
	input  [1:0]  A,
	output [3:0] Y
 );
 always_comb
 	begin
 		 case(A)
 		 	 00:Y = 4'b0001;
 			 01:Y = 4'b0010;
 			 10:Y = 4'b0100;
 			 11:Y = 4'b1000;
 		 default:Y = 4'bxxxx;
 		 endcase
 	end
endmodule
编码器
个输入,N个输出,
只有一个输出有效(One-hot输出)。
例子:4-2优先级编码器
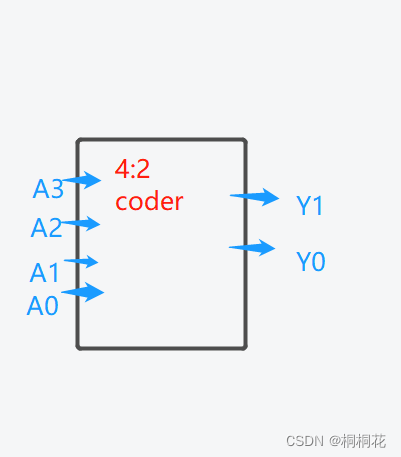
4-2优先级译码器真值表
| A3 | A2 | A1 | A0 | Y1 | Y0 |
| X | X | X | X | 0 | 0 |
| 1 | X | X | X | 1 | 1 |
| 0 | 1 | X | X | 1 | 0 |
| 0 | 0 | 1 | X | 0 | 1 |
| 0 | 0 | 0 | 1 | 0 | 0 |
Verilog代码
使用 if语句优先级编码
module  PriorityEncoder(
	input  [3:0]  A,
	output [1:0] Y
 );

 always_comb
 	begin
 		 	 if(A[0])      Y = 2'b00;//是有优先级的,A[0]为1,就输出结果,不满足,依次按照优先级来
 			 else if(A[1]) Y = 2'b01;
 			 else if(A[2]) Y = 2'b10;
 			 else if(A[3]) Y = 2'b11;
 			 else          Y = 2'bxx;
 	end
endmodule
使用casez或者casex优先级编码
module  PriorityEncoder(
	input  [3:0]  A,
	output [1:0] Y
 );

 always_comb
 	begin
 		 	case[A]
 			4'bxxx1: Y = 2'b00;//A中,不管1前面的前面是什么值都无所谓,前面的数值不参与比较
 			4'bxx10: Y = 2'b01;
 			4'bx100: Y = 2'b10;
            4'b1000: Y = 2'b11;
 			default: Y = 2'bxx;
 	end
endmodule
使用for循环语句优先级编码
只是用循环描述电路行为, 并非循环 “执行 ” 。
不是反复执行这个代码,只是告诉编译器,我是用一种循环的方式,描述这个电路。
module  PriorityEncoder(
	input  [3:0]  A,
	output [1:0] Y
 );
 always_comb
 	begin
        integer i;
        Y=0;
        for(i=0;i<8;i+1)
 		 	 if(A[i])      Y = i;
 	end
endmodule
编码转换
从一种码转换成另一种码。单纯用译码器或者编码器描述不合适。
例子:
module Code_Translator (
    input[2:0] Code_In,
    output logic [2:0] Code__Out
);
    always_comb
        case (Code_In)
            3'b000: Code_out = 3'b101;
            3'b001: Code_Out = 3'b111;
            3'b010: Code_Out = 3'b001;
            3'b011: Code_out = 3'b000;
            3'b100: Code_Out = 3'b100;
            3'b101: Code_out = 3'b010;
            3'b110: Code_out = 3'b110;
            3'b111:Code_out = 3'b011;
            default: Code_Out = 3'bx;
        endcase
endmodule
编码转换例子:七段译码器
4位二进制数 → 七段数码显示器编码
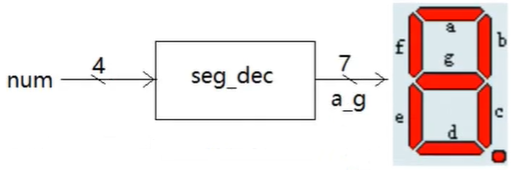
Verilog代码
module seg_dec(num,a_g);
input[3:0]           num;
output[6:0]          a_g;//a_g[6:0]->(a,b,c,d,e,f,g)
reg[6:0]             a_g;
always@(num)begin
    case(num)        //用case语句实现组合逻辑
    4'd0:begin a_g<=7'b111_1110;end
    4'd1:begin a_g<=7'b011_0000;end
    4'd2:begin a_g<=7'b110_1101;end
    4'd3:begin a_g<=7'b111_1100;end
    4'd4:begin a_g<=7'b011_0011;end
    4'd5:begin a_g<=7'b101_1011;end
    4'd6:begin a_g<=7'b101_1111;end
    4'd7:begin a_g<=7'b111_0000;end
    4'd8:begin a_g<=7'b111_1111;end
    4'd9:begin a_g<=7'b111_1011;end
    default:begin a_g<=7'b000_0001;end//num超出(0-9)时,用default统一处理,显示为中杠;

    endcase

end
endmodule
模块的参数和层次
模块的参数定义使用parameter。可以很方便改变位宽。
例子1:加法器
四位加法器
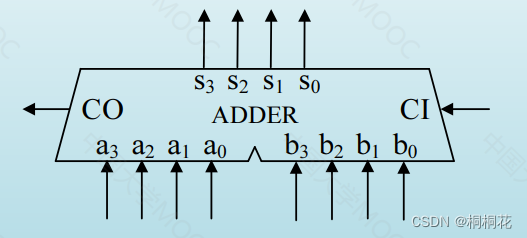
Verilog描述
module  ADDER(
	input  [3:0]  A,
	input  [3:0]  B,
	input CI,
	output [3:0] S,
	output CO
 );
assign {CO,S[3:0]}= A+B+CI;

endmodule
N位加法器(参数化设计)
Verilog描述
module  ADDER
#parameter N=4
(
	input  [N-1:0]  A,
	input  [N-1:0]  B,
	input CI,
	output [N-1:0] S,
	output CO
 );
assign {CO,S[N-1:0]}= A+B+CI;

endmodule
例子2:三态缓冲器(参数化设计 )
N位输入Din,N位输出Dout
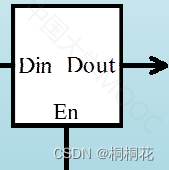
Verilog描述
module  TRIBUFFER
#parameter N=4
(
	input  [N-1:0]  Din,
	input  [N-1:0]  En,
	output [N-1:0]  Dout
 );
assign Dout = En? Din:{N{1'bz}};

endmodule
模块的实例化和模块的层次
模块的实例化,告诉工具,产生这个模块的电路 。
模块的层次化和参数化 ,有利于代码维护和重用
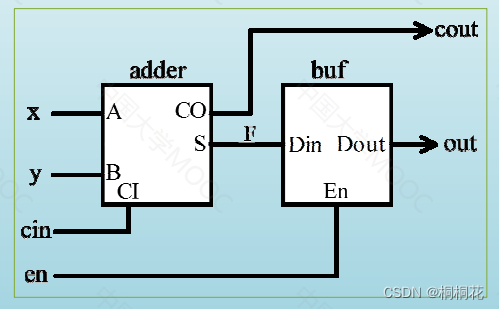
例子:八位的全加器
adder和buf模块已经在上面例子中定义。使用Verilog描述 top层电路,adder和buf模块实例化。
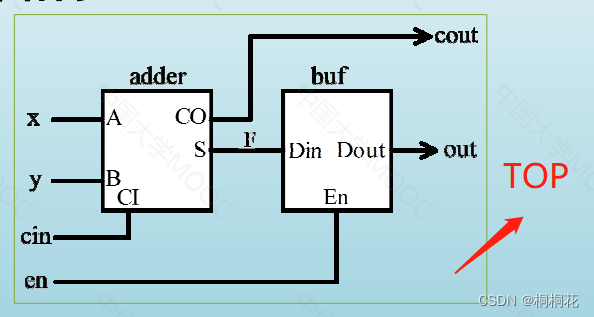
Verilog描述
module  TOP
(
	input [7:0] x,
	input [7:0] y,
	input  cin,
	input  en,
	output  cout,
	output [7:0] out
 );
 wire [7:0] F;
 ADDER     adder(.A(x),.B(y),.CI(cin),.S(F),.CO(cout));//ADDER定义的模块名,adder,实例名。一个叫adder的ADDER模块。
 TRIBUFFER  buf(.Din(F),.En(en),.Dout(out));
endmodule
模块实例化的端口映射方式
端口映射方式
1、端口位置映射
实例化时的端口连接顺序必须与模块定义的顺序一致

2、端口名称映射(推荐!!!)
可不按模块定义的端口顺序

端口名称映射方式,允许未连接的 “悬空 ”端口(即不连接,空着)
两种表示方法:
- 不写这个端口
- 实例化时不声明,用空括号显式表示
注意:
应该连而未连的端口,因为从语法角度是没有错的,所以不会报错。需要注意,否则忘记连接会造成不易排查的错误
例子:端口S和En没有连接
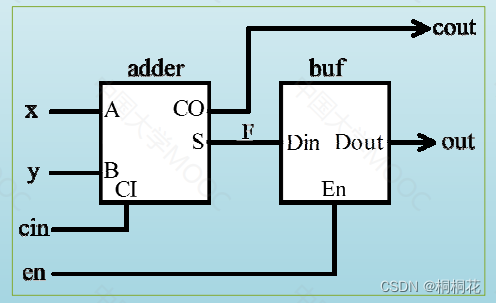
Verilog描述
module TOP
(
input [7:0] x,
input [7:0] y,
input cin,
input en,
output cout,
output [7:0] out
);
wire [7:0] F;
ADDER adder(.A(x),.B(y),.CI(cin),.CO(cout));//S没有写
TRIBUFFER buf(.Din(F),.En(),.Dout(out));//En端口使用()表示
endmodule
SystemVerilog简化的映射方法
因为名称多了,显得很罗嗦,所以简化
简化的名称映射方式
如果子模块的端口名称和上层模块的信号名称相同, 可以只写.name
例子:
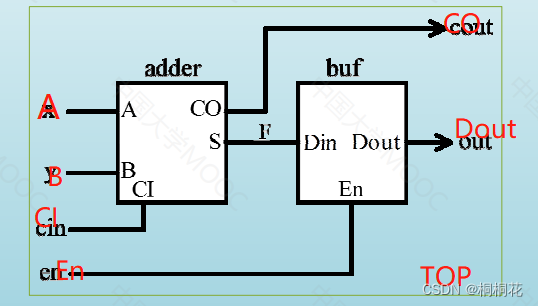
Verilog描述
module  TOP
(
	input [7:0] A,
	input [7:0] B,
	input  CI,
	input  En,
	output  CO,
	output [7:0] Dout
 );
 wire [7:0] F;
 ADDER     adder(.A, .B, .CI, .CO, .S(F));
 TRIBUFFER  buf(.Din(F), .En, .Dout);
endmodule
隐式名称映射方式:.*
连接所有名称相同的端口
注意:名称不同的端口必须显式连接,不能有悬空的端
module  TOP
(
	input [7:0] A,
	input [7:0] B,
	input  CI,
	input  En,
	output  CO,
	output [7:0] Dout
 );
 wire [7:0] F;
 ADDER     adder(.*, .S(F));
 TRIBUFFER  buf(.Din(F), .*);
endmodule

//如果全部使用.*
ADDER     adder(.*); //编译报错,找不到.S同名的信号
模块实例化和修改子模块的参数
无需修改子模块,就可以改变参数值
例子:使用带有参数子模块的全加器
下面的电路为使用加法器和三态缓冲电路组成的N位全加器。
输入为N位的x,y。输出为N位 out。
使用参数的方法,写8位的全加器。(参数化的子模块在上面的例子中已定义)
Verilog描述
module  TOP
(
	input [7:0] x,
	input [7:0] y,
	input  cin,
	input  en,
	output  cout,
	output [7:0] out
 );
 wire [7:0] F;
 ADDER  #(8)   adder(.A(x),.B(y),.CI(cin),.S(F),.CO(cout));
 TRIBUFFER #(8) buf(.Din(F),.En(en),.Dout(out));
endmodule
多个参数的声明和映射
如果模块中出现不止一个参数,怎么定义?
模块定义
例子:
module  circuit
#(parameter M=8,
  parameter N=6
)
(
	input  [M-1:0]  A,
	output [N-1:0]  B
 );

......

endmodule
实例化的参数映射方式
1、位置映射
按照模块定义时参数声明的出现顺序
circuit #(8,6) INST( ..... );2、名称映射
circuit #(.N(8),.M(6)) INST( ..... );有多个参数时,推荐使用名称映射
避坑指南
避免组合逻辑隐含锁存器
组合逻辑是没有存储特性的,要避免这种情况。(锁存器用在时序电路中)
组合逻辑应该有完整的if-else
如果缺少else,会导致隐藏的锁存器。
例子:
if (condition) y = a;
//缺少else,在condition之外的情况,y的值保持不变,引入了一个锁存器
改正
if (condition) y = a;
else y = 'bx; //若对取值无要求,可赋值x
//综合工具就会知道,电路对else分支的取值是没有条件的,就不会生成锁存器
避免缺少else的情况,推荐使用always_comb
always_comb begin
    if (condition) y = a;
end
//缺少else,在condition之外的情况,y的值保持不变,引入了一个锁存器
//if else不完整,编译器会报错,提示always_comb块里面不是纯粹的组合逻辑。
//因为有隐藏的锁存器
case语句要有default
case语句无有default,隐含锁存器
例子:
case (op)
    2'b00: y = a +  b;
    2'b01: y = a -  b;
    2'b10: y = a &  b;
    2'b11: y = a | b ;
//无default,其他默认条件的输出值保持不变,隐含锁存器
endcase
改正
case (op)
    2'b00: y = a +  b;
    2'b01: y = a -  b;
    2'b10: y = a &  b;
    2'b11: y = a | b ;
    default:y= 'bz;
endcase
推荐使用always_comb,编译器会检查case语句是否缺少default
组合逻辑的敏感列表应包含所有的输入
不完整的敏感列表导致不可预料的综合结果
例子:这个模块有四个输入abcd,一个输出y。但是下面的敏感列表中,缺少了一个输入d,会发生什么情况?
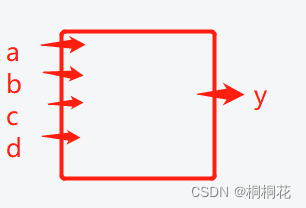
always @(a,b,c)  //缺少一个输入d
begin
    if (a)     y = 0;
    else if (b) y = 1;
    else if (c) y = 2;
    else if (d) y = 3;
end
综合出来的电路,不一定是组合逻辑,结果无法预测。
组合逻辑推荐使用always_comb,always_comb里面没有敏感列表。
模块连接容易犯的错误
例子:

问题1:如果子模块之间的连线F,没有定义,会发生什么情况?
module TOP
(
input [7:0] x,
input [7:0] y,
input cin,
input en,
output cout,
output [7:0] out
);
// wire [7:0] F;
ADDER adder(.A(x),.B(y),.CI(cin),.CO(cout));//S没有写
TRIBUFFER buf(.Din(F),.En(),.Dout(out));//En端口使用()表示
endmodule
未声明信号的默认类型为wire型(标量,一位),但是不会默认为一个向量。
会出现,最低位发生变化,高位不变化。
Verilog-1995
未声明信号的默认类型为wire 型 (标量,一位)
容易造成难以发现的错误
//模块间的连接信号:
wire [7:0] F;
//没有声明,默认为标量
wire  F;
怎么避免未声明信号
Verilog-2001可关闭默认类型
关键字
`default_nettype none //关闭默认的线网类型wire
//之后有未声明的信号会报错
//`这个符号在esc下面
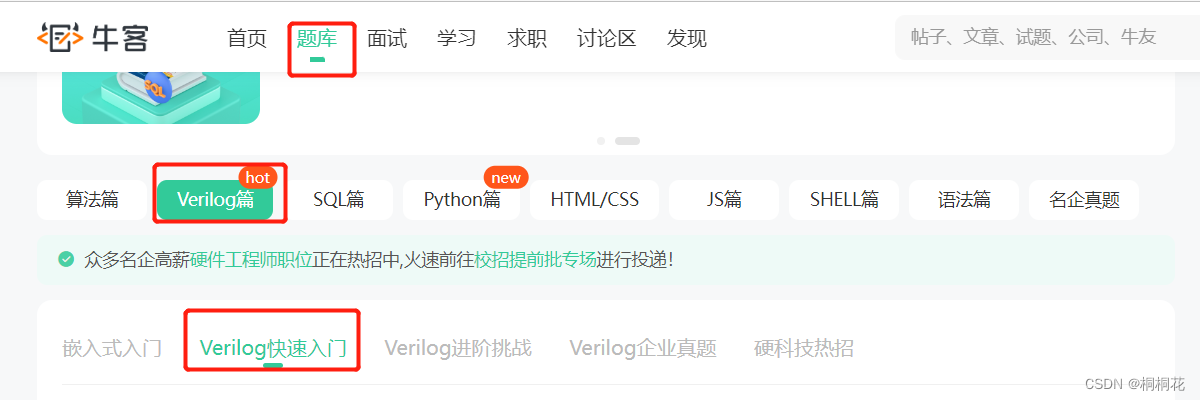
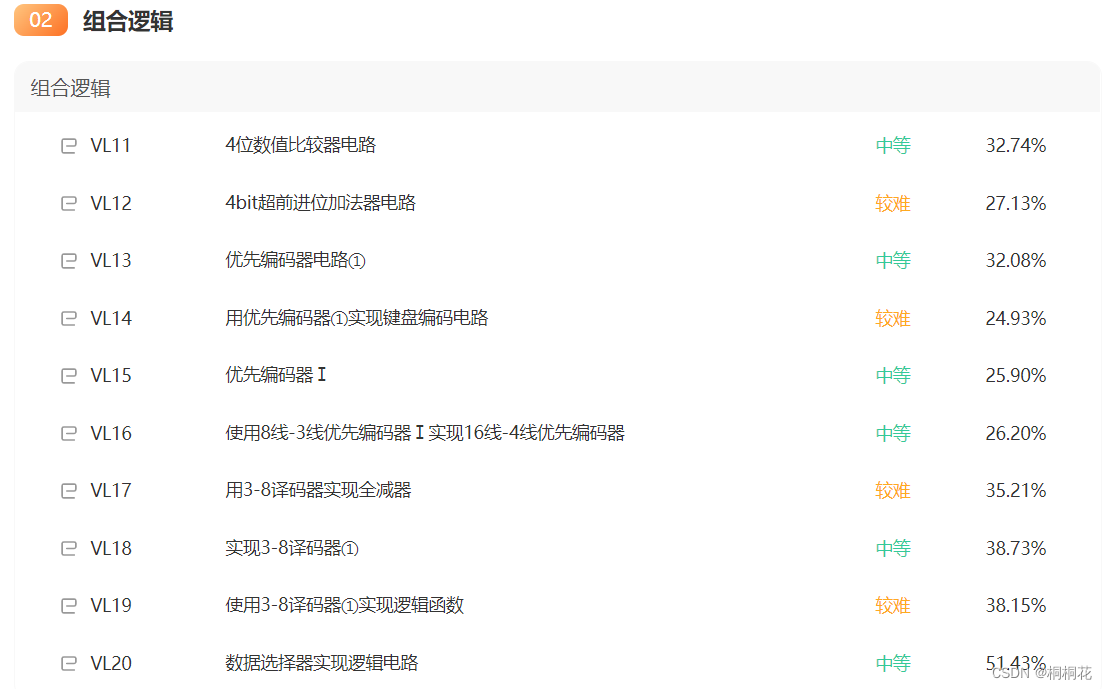
组合逻辑Verilog在线练习
练习网站:


 451
451


 被折叠的 条评论
为什么被折叠?
被折叠的 条评论
为什么被折叠?
 到【灌水乐园】发言


