


基于opencv的车道线检测
原理:
算法基本思想说明:
传统的车道线检测,多数是基于霍夫直线检测,其实这个里面有个很大的误区,霍夫直线拟合容易受到各种噪声干扰,直接运用有时候效果不好,更多的时候通过霍夫直线检测进行初步的筛选,然后再有针对性的进行直线拟合,根据拟合的直线四个点坐标,绘制出车道线,这种方式可以有效避免霍夫直线拟合不良后果,是一种更加稳定的车道线检测方法,在实际项目中,可以选择两种方法并行,在计算出结果后进行叠加或者对比提取,今天分享的案例主要是绕开了霍夫直线检测,通过对二值图像进行轮廓分析与几何分析,提取到相关的车道线信息、然后进行特定区域的像素扫描,拟合生成直线方程,确定四个点绘制出车道线,对连续的视频来说,如果某一帧无法正常检测,就可以通过缓存来替代绘制,从而实现在视频车道线检测中实时可靠。
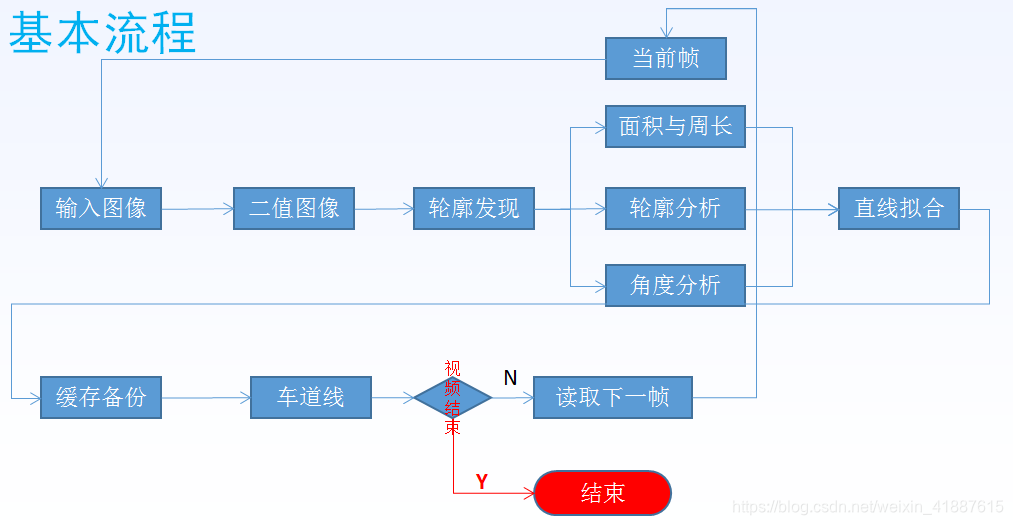
原理图:
代码:
#include <opencv2/opencv.hpp>
#include <iostream>
#include <cmath>

using namespace cv;
using namespace std;

/**
**1、读取视频
**2、二值化
**3、轮廓发现
**4、轮廓分析、面积就算,角度分析
**5、直线拟合
**6、画出直线
**
*/

Point left_line[2];
Point right_line[2];

void process(Mat &frame, Point *left_line, Point *right_line);
Mat fitLines(Mat &image, Point *left_line, Point *right_line);

int main(int argc, char** argv) {
	//读取视频
	VideoCapture capture("E:/opencv/road_line.mp4");

	int height = capture.get(CAP_PROP_FRAME_HEIGHT);
	int width = capture.get(CAP_PROP_FRAME_WIDTH);
	int count = capture.get(CAP_PROP_FRAME_COUNT);
	int fps = capture.get(CAP_PROP_FPS);
	//初始化

	left_line[0] = Point(0,0);

	left_line[1] = Point(0, 0);

	right_line[0] = Point(0, 0);

	right_line[1] = Point(0, 0);

	cout << height<<"       "<< width<< "       " <<count<< "       " <<fps << endl;

	//循环读取视频
	Mat frame;
	while (true) {
		int ret = capture.read(frame);
		if (!ret) {
			break;
		}
		imshow("input", frame);
		process(frame, left_line, right_line);

		char c = waitKey(5);
		if (c == 27) {
			break;
		}


	}

}

void process(Mat &frame, Point *left_line, Point *right_line ){
	Mat gray,binary;
	/**灰度化*/
	cvtColor(frame, gray, COLOR_BGR2GRAY);

	//threshold(gray, binary, );
	//边缘检测
	Canny(gray, binary, 150, 300);
	//imshow("Canny", binary);
	for (size_t i = 0; i < (gray.rows/2+40); i++) {
		for (size_t j = 0; j < gray.cols; j++)
		{
			binary.at<uchar>(i, j) = 0;
		}
	}
	imshow("binary", binary);

	//寻找轮廓
	vector<vector<Point>> contours;
	findContours(binary, contours, RETR_EXTERNAL, CHAIN_APPROX_SIMPLE);

	Mat out_image = Mat::zeros(gray.size(), gray.type());

	for (int i = 0; i < contours.size(); i++)
	{

		//计算面积与周长
		double length = arcLength(contours[i], true);
		double area = contourArea(contours[i]);
		//cout << "周长 length:" << length << endl;
		//cout << "面积 area:" << area << endl;

		//外部矩形边界
		Rect rect = boundingRect(contours[i]);
		int h = gray.rows - 50;

		//轮廓分析:
		if (length < 5.0 || area < 10.0) {
			continue;
		}
		if (rect.y > h) {
			continue;
		}

		//最小包围矩形
		RotatedRect rrt = minAreaRect(contours[i]);
		//关于角度问题:https://blog.csdn.net/weixin_41887615/article/details/91411086


		//cout << "最小包围矩形 angle:" << rrt.angle << endl;

		double angle = abs(rrt.angle);

		//angle < 50.0 || angle>89.0

		if (angle < 20.0 || angle>84.0) {

			continue;

		}


		if (contours[i].size() > 5) {
			//用椭圆拟合
			RotatedRect errt = fitEllipse(contours[i]);
			//cout << "用椭圆拟合err.angle:" << errt.angle << endl;

			if ((errt.angle<5.0) || (errt.angle>160.0))
			{
				if (80.0 < errt.angle && errt.angle < 100.0) {
					continue;
				}

			}
		}


		//cout << "开始绘制:" << endl;
		drawContours(out_image, contours, i, Scalar(255), 2, 8);
		imshow("out_image", out_image);

	}
	Mat result = fitLines(out_image, left_line, right_line);
	imshow("result", result);

	Mat dst;
	addWeighted(frame, 0.8, result, 0.5,0, dst);
	imshow("lane-lines", dst);

}

//直线拟合
Mat fitLines(Mat &image, Point *left_line, Point *right_line) {
	int height = image.rows;
	int width = image.cols;

	Mat out = Mat::zeros(image.size(), CV_8UC3);

	int cx = width / 2;
	int cy = height / 2;

	vector<Point> left_pts;
	vector<Point> right_pts;
	Vec4f left;


	for (int i = 100; i < (cx-10); i++)
	{
		for (int j = cy; j < height; j++)
		{
			int pv = image.at<uchar>(j, i);
			if (pv == 255)
			{
				left_pts.push_back(Point(i, j));
			}
		}
	}

	for (int i = cx; i < (width-20); i++)
	{
		for (int j = cy; j < height; j++)
		{
			int pv = image.at<uchar>(j, i);
			if (pv == 255)
			{
				right_pts.push_back(Point(i, j));
			}
		}
	}

	if (left_pts.size() > 2)
	{
		fitLine(left_pts, left, DIST_L1, 0, 0.01, 0.01);

		double k1 = left[1] / left[0];
		double step = left[3] - k1 * left[2];

		int x1 = int((height - step) / k1);
		int y2 = int((cx - 25)*k1 + step);

		Point left_spot_1 = Point(x1, height);
		Point left_spot_end = Point((cx - 25), y2);


		line(out, left_spot_1, left_spot_end, Scalar(0, 0, 255), 8, 8, 0);
		left_line[0] = left_spot_1;
		left_line[1] = left_spot_end;

	}
	else
	{
		line(out, left_line[0], left_line[1], Scalar(0, 0, 255), 8, 8, 0);
	}


	if (right_pts.size()>2)
	{

		Point spot_1 = right_pts[0];
		Point spot_end = right_pts[right_pts.size()-1];

		int x1 = spot_1.x;

		int y1 = spot_1.y;

		int x2 = spot_end.x;
		int y2 = spot_end.y;


		line(out, spot_1, spot_end, Scalar(0, 0, 255), 8, 8, 0);
		right_line[0] = spot_1;
		right_line[1] = spot_end;

	}
	else
	{
		line(out, right_line[0], right_line[1], Scalar(0, 0, 255), 8, 8, 0);
	}

	return out;
}
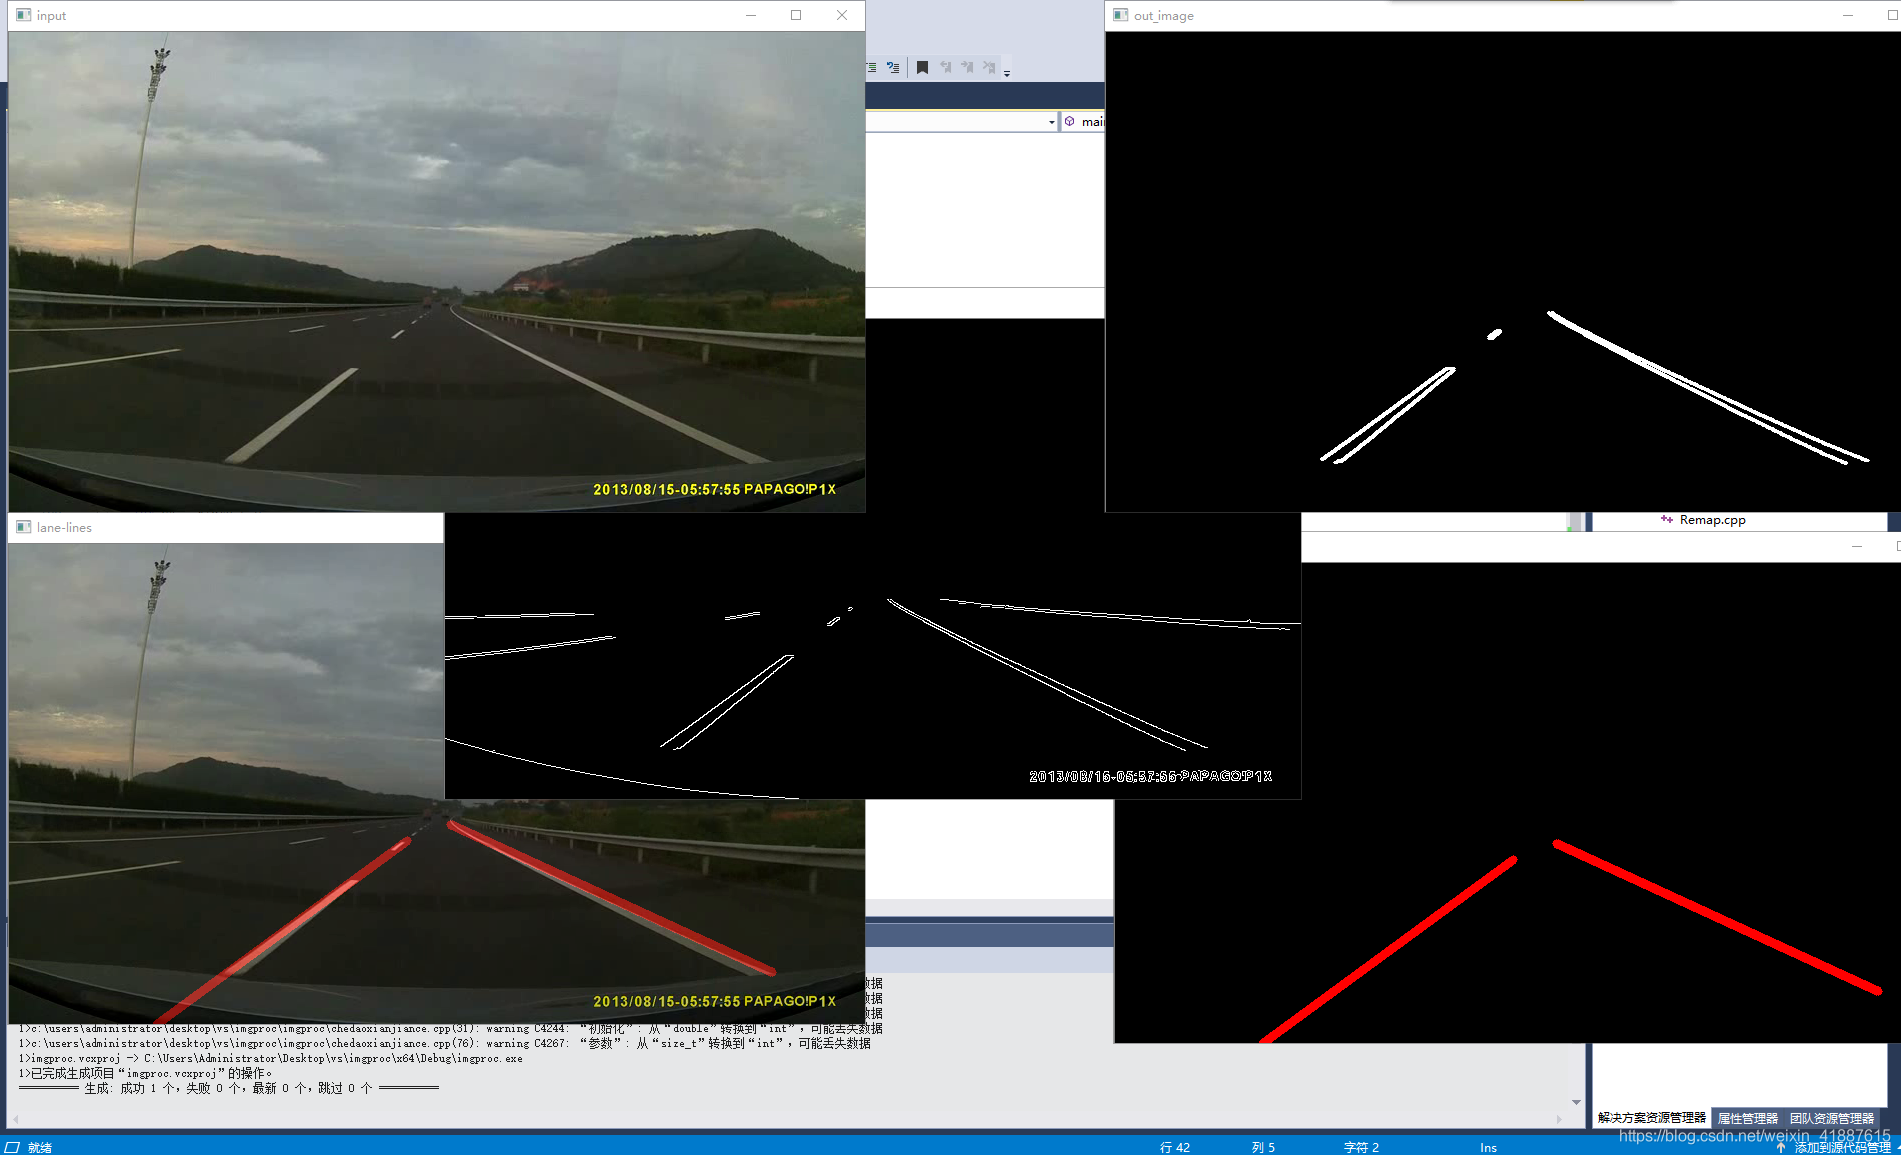
结果图片:


 8844
8844


 被折叠的 条评论
为什么被折叠?
被折叠的 条评论
为什么被折叠?
 到【灌水乐园】发言


