


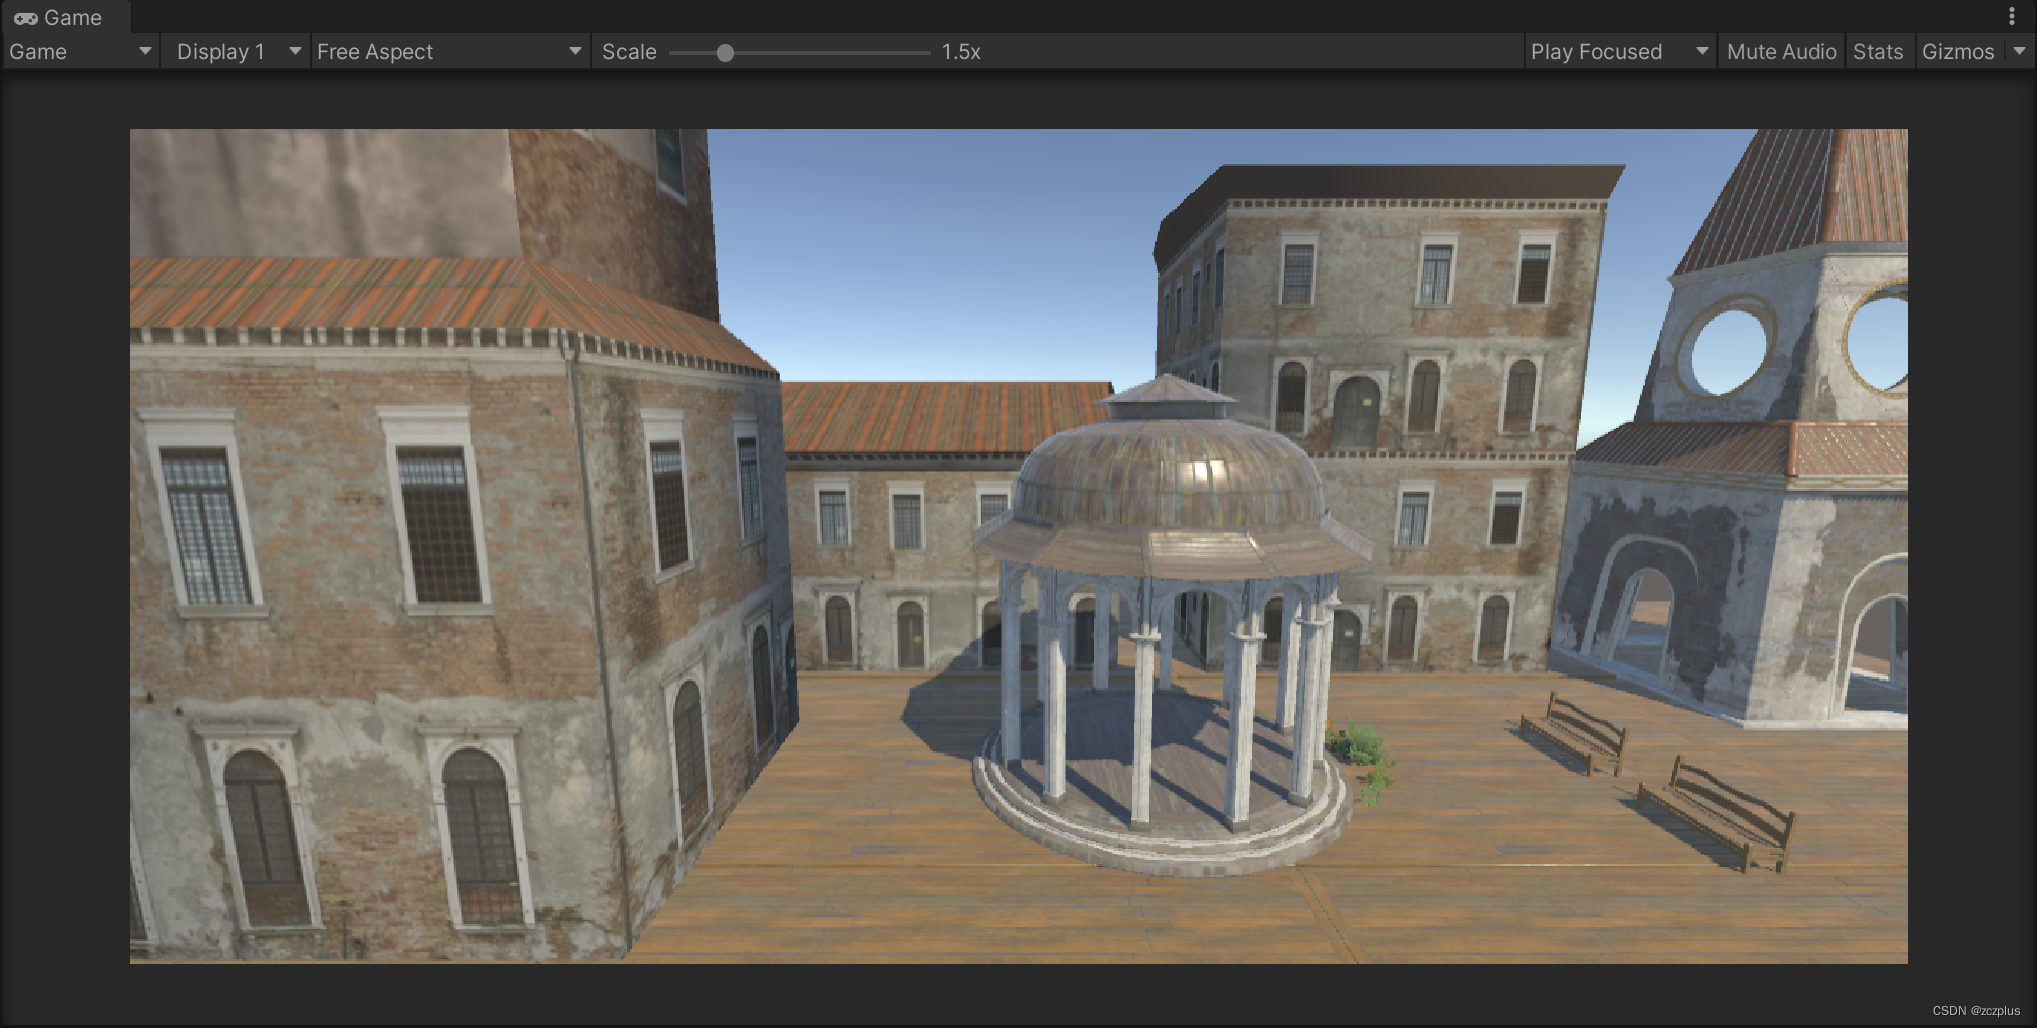
4.2.1 SSAO介绍
SSAO相关术语、简要理解
- AO:环境光遮蔽,全称:Ambient Occlusion,是一种着色和渲染技术,模拟光线达到物体的能力的粗略的全局方法,描述光线到达物体表面的能力。
- SSAO:屏幕空间环境光遮蔽,全称为Screen Space Ambient Occlusion。通过获取像素的深度缓冲、法线缓冲来计算实现,来近似的表现物体在间接光下差生的阴影。
- SSAO的历史:AO技术2002年由工业光魔的技术主管Hayden Landis提出;2007年,Crytek公司将SSAO技术应用在代表作孤岛危机上。
4.2.2 SSAO原理
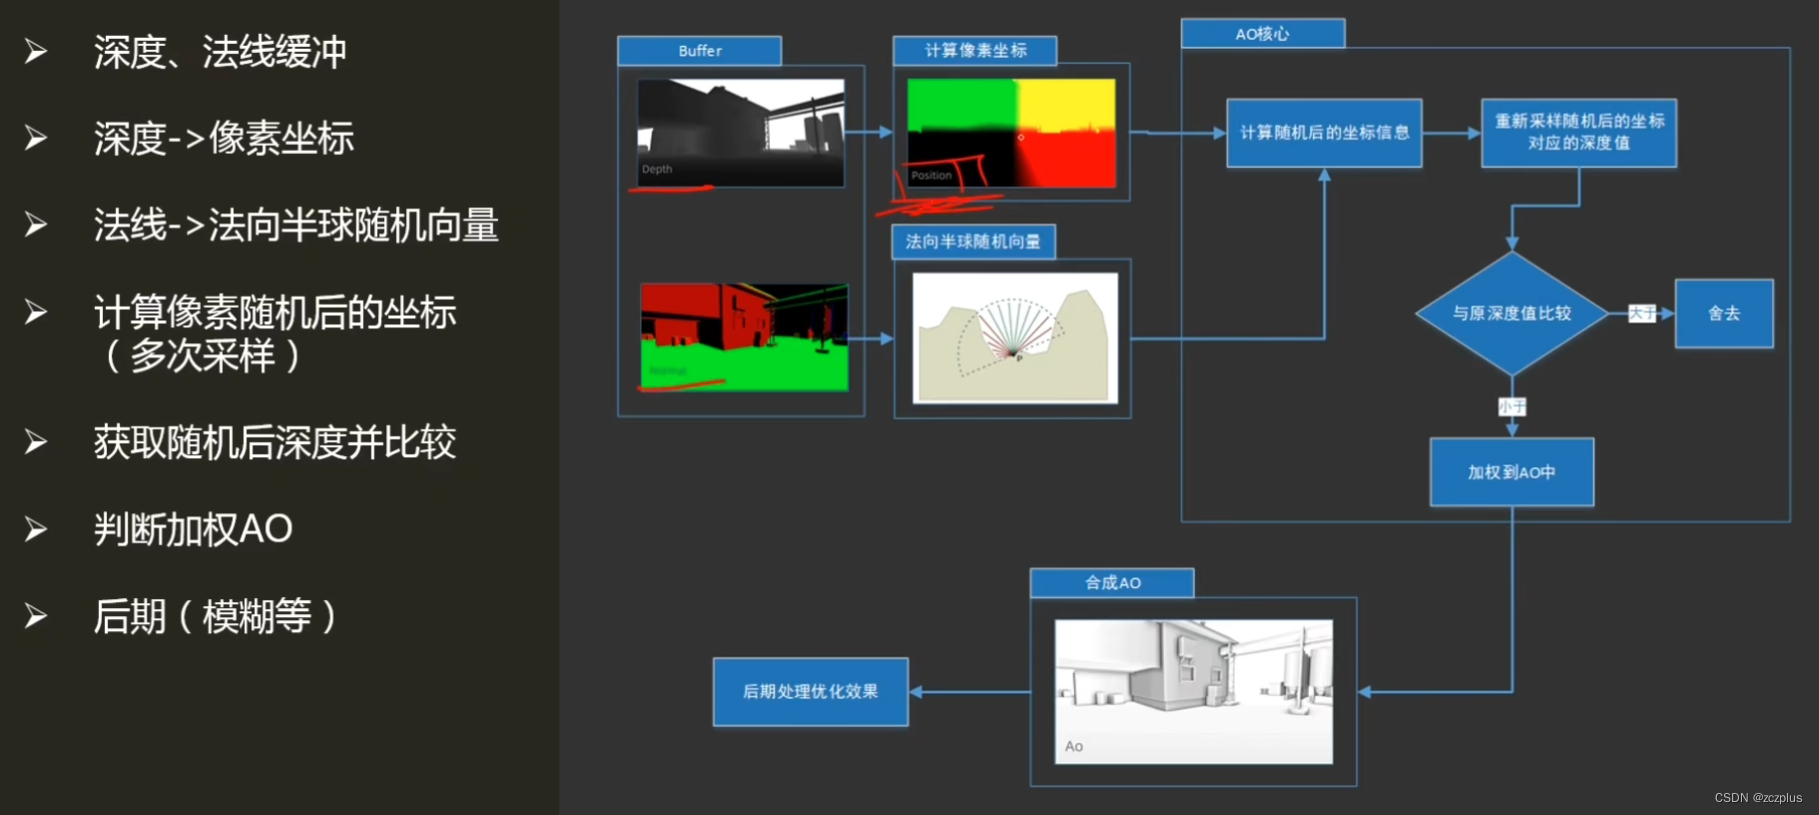
深度缓冲
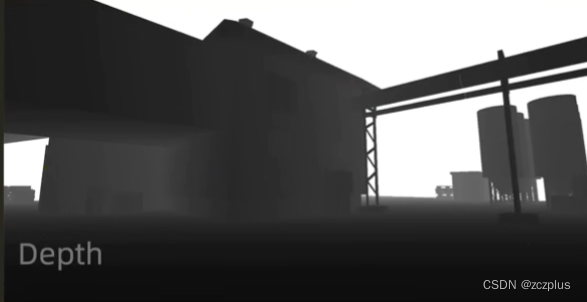
深度缓冲中的depth值用于描述当前视点下,场景中的每一个像素距离相机的一个粗略表达,用于重构像素相机空间中的坐标(Z),来近似重构该视点下的三维场景。
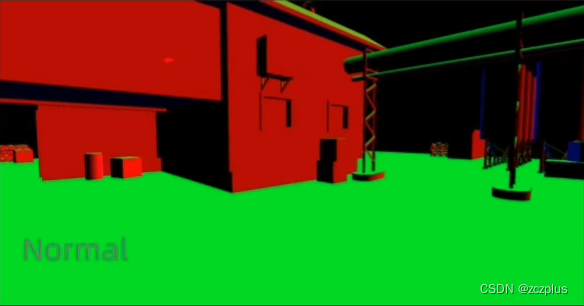
法线缓冲
相机空间中的法线信息,用于重构每个像素的“法线-切线-副切线”构成的坐标轴,用于计算法线半球中的采样随机向量(随机向量用于判断和描述该像素的AO强度)
法向半球
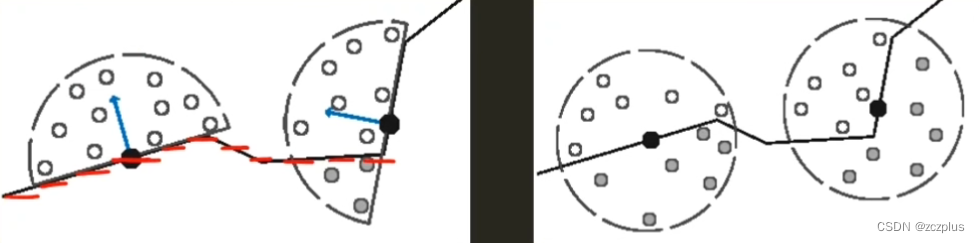
- 黑点代表我们需要计算的样本;
- 蓝色向量表示样本的法向量;
- 白色、灰色为采样点(很明显,采样点的多少影响最后的渲染效果),其中灰色表示被挡采样点(深度大于周围),据此判断最终AO强度。
右图表示法向球形采样,可以看到如果利用球形去计算,平整的墙面也至少有一半是灰点(即深度大于周围),导致最终的结果偏暗。
法向半球的作用就是提供采样点;
4.2.3 SSAO算法实现
获取深度&法线缓冲数据
C#部分:
private void Start(){
	cam = this.GetComponent<Camera>();
	cam.depthTextureMode = cam.depthTextureMode | DepthTextureMode.DepthNormals;
Shader部分:
// 获取深度法线图
sampler2D _CameraDepthNormalsTexture;
// 采样获得深度值和法线值
float3 viewNormal;
float linear01Depth;
float4 depthNormal = tex2D(_CameraDepthNormalsTexture, i.uv);
DecodeDepthNormal(depthNormal, linear01Depth, viewNormal);
此处相机渲染路径设置为:Forward, 如果设置为Deferred渲染路径,则由对应的g-buffer生成,在shader中通过全局变量进行访问;(延迟渲染中本身需要上述信息)
最后在OnRenderImage()中进行后期处理,进而实现SSAO;
重建相机空间方法
重建方法
“从NDC空间中重建”方法得到样本在相机空间中的向量,乘以深度值得到样本的坐标。
从NDC空间汇总重建
- 计算样本屏幕坐标(利用Unity内置函数)
float4 screenPos = ComputeScreenPos(o.vertex);
- 转换到NDC空间(归一化的设备坐标空间)中
float4 ndcPos = (screenPos / screenPos.w) * 2 - 1;
- 计算相机空间中远平面方向(内置变量_ProjectionParams.z存放相机远平面值far)
float3 clipVec = float3(ndcPos.x, ndcPos.y, 1.0) * _ProjectionParams.z;
- 矩阵变换至相机空间中的样本相对相机的方向
o.viewVec = mul(unity_CameraInvProjection, clipVec.xyzz).xyz;
- 重建相机空间中的样本坐标(在像素着色器中)
float3 viewPos = linear01Depth * i.viewVec;
在相机空间中,通过样本相对相机的方向以及深度,来拟合重构坐标。
构建法向量正交基
- 设置法向量
viewNormal = normalize(viewNormal) * float3(1, 1, -1);
- 生成随机向量
float3 randvec = normalize(float3(1, 1, 1));
- 求出切向量,再利用函数cross叉积求副切线向量
// 获得切向量
float3 tangent = normalize(randvec - viewNormal * dot(ranvec, viewNormal));
// 获得副切向量
float3 bitangent = cross(viewNormal, tangent);
// 得到正交基
float3x3 TBN = float3x3(tangent, bitangent, viewNormal);
AO采样核心
- 传入给定的随机采样向量,并通过法向量正交基转化至法线半球中的向量;
// 随机向量,转换到切线空间中
float3 randomVec = mul(_SampleKernekArray[i].xyz, TBN);
- 获取随机坐标点;

// 计算随机法线半球后的向量
float3 randomPos = viewPos + randomVec * _SampleKeneralRadius;
- 转换至屏幕空间坐标;
// 转换到屏幕坐标
float3 rclipPos = mul((float3x3)unity_CameraProjection, randomPos);
float2 rscreenPos = (rclipPos.xy / rclipPos.z) * 0.5 + 0.5;
- 计算随机向量转化至屏幕空间后对应的深度值,并判断累加AO
float randomDepth;
float3 randomNormal;
float4 rcdn = tex2D(_CameraDepthNormalsTexture, rscreenPos);
DecodeDepthNormal(rcdn, randomDepth, randomNormal);

//判断是否对ao值进行累加
ao += (randomDepth >= linear01Depth) ? 1.0 : 0.0;
4.2.4 SSAO效果改进
- 为了不使得求得的法向半球的正交基完全一致,我们引入随机向量,从而创造不同的切向量。
- 利用UV至采样一张Noise贴图,或者随机向量。
// 铺平纹理
float2 noiseScale = _ScreenParams.xy /4.0;
float2 noiseUV = i.uv * noiseScale;
// randVec法线半球的随机向量
float3 randVec = tex2D(_NoiseTex, noiseUV).xyz;
AO累加的平滑优化
范围判定(模型边界)
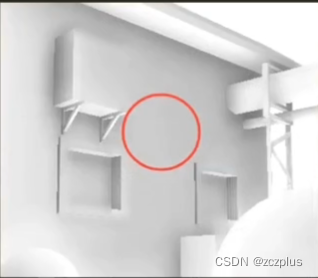
样本采样,可能会采集到深度差非常大的随机点,会导致边界出现AO,如下图:
加入样本深度和随机点深度比较的范围判定,当超出阈值的时候不会进行ao遮蔽
float range =abs(randomDepth - linearDepth) > _RangeStrength ? 0.0 : 1.0;
自身判定
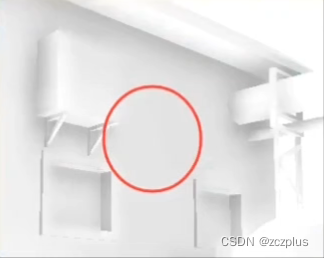
如果随机点深度值和自身一样或者非常接近(可能会导致虽然在同一个平面,也会出现AO),如图所示:
在判断深度值大小的时候,增加一个变量,来改善该问题:
float selfCheck = randomDepth + _DepthBiasValue < linear01Depth ? 1.0 : 0.0;
AO权重
AO深度判断,非0即1,比较生硬,为其增加权重,达到平滑的效果,可用权重例如:法线半球中随机采样点距离样本点的距离
float weight = smoothStep(0.2, 0, length(randomVec.xy));

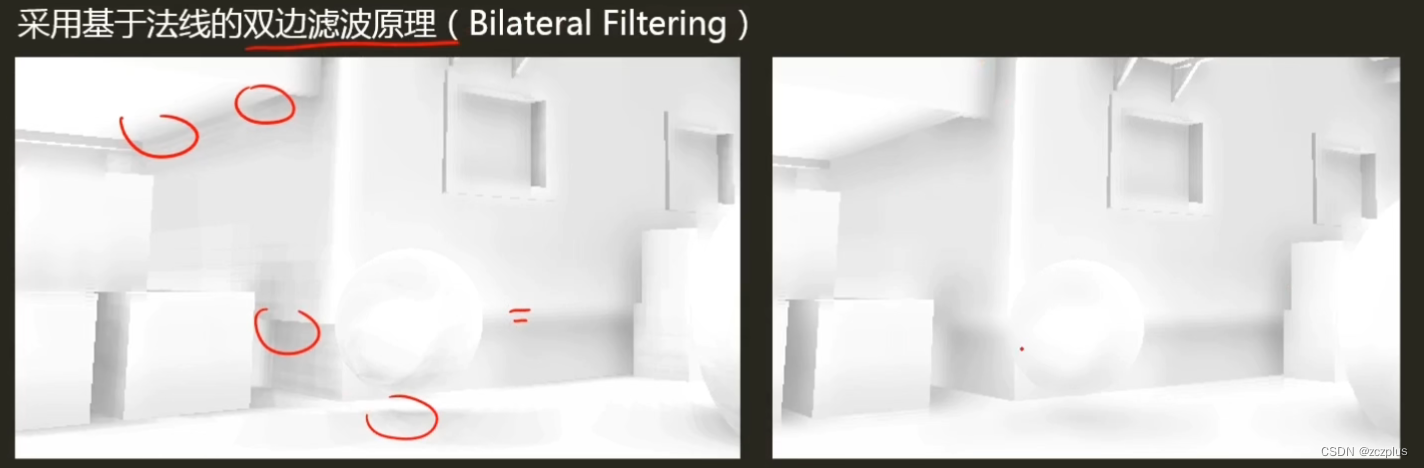
模糊
4.2.5 比对模型烘焙AO效果
- 三维建模软件烘焙AO方式
-
优点:
- 针对单一物体可控性强
- 弥补场景烘焙细节
- 不影响其(Unity场景中)静态或者动态
-
缺点:
- 需要对模型进行UV处理,再进行烘焙到纹理;
- 不利于整个场景的整合;
- 增加AO纹理贴图,不利于资源优化;
- 只有物体本身具有AO信息,获取物体之间的AO信息工作量较大;
- 游戏引擎烘焙AO方式
-
优点:
- 操作简单,整体场景的烘焙,包含AO的选择;
- 不受物体本身的UW影响;
- 可生成场景中物体与物体之间的AO信息;
-
缺点:
- 缺少单一物体的细节
- 受物体是否静态影响,动态物体无法进行烘焙
- SSAO方式:
- 优点:
- 不依赖场景复杂度;
- 实时计算;
- 可控性强;
- 缺点:
- 性能损耗更多,代价较高;
- AO质量稍差一些;
4.2.6 SSAO性能消耗

- 由于法线半球中的点需要通过循环的方式进行判断,而GPU的并行运算并不能很好地支持For循环,所以性能大打折扣
- 采样数过低效果不好,采样数高则计算量巨大:以64为例,1334 x 750 的分辨率每个像素循环64次,则 共计 1334 * 750 * 64次AO值运算;
- 并且每次还要再采样贴图,导致更多的性能开销;
- 滤波采样将进行更多次的采样贴图,导致更多的性能开销;
作业

作业照着教程打了一遍。
补充
弄到最后碰到一个非常非常坑的问题,教程的文件中,c#中有个变量名存在拼写错误,但是shader中已经保持一致了,其实无伤大雅。但是我想将它改过来,一改问题就出来了。
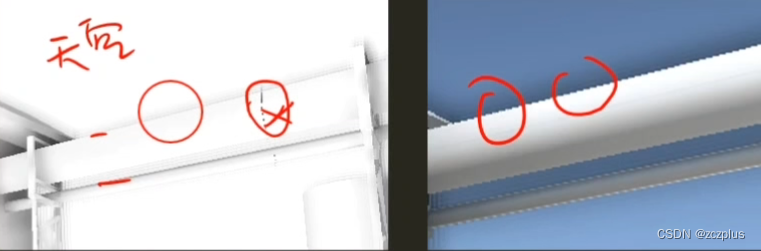
当csharp脚本挂在相机上时,若我们直接对变量名称进行修改,系统缓存中对应的变量名称可能不会修改,即下图红圈中所示的这个变量名不会修改。该名称是通过对csharp文件中的变量名称按照大小写直接进行划分得到的。
最终结果就是虽然文件中的名称都改了,但是系统缓存中的名称没有改过来,导致在csharp往shader中传参数的过程中出现丢失,导致没有结果。
解决办法就是先把csharp文件拿掉,重新再贴一次,但是这样需要重新修改对应数值。
或者关闭unity再重新开一次即可更新。
坑死我了,真是救命!

c#部分:
using System.Collections;
using System.Collections.Generic;
using UnityEngine;

public class MySSAO : MonoBehaviour
{
    private Material ssaoMaterial;
    private Camera cam;

    [Range(0.0f, 1.0f)]
    public float aoStrength = 0.0f;
    [Range(4, 64)]
    public int SampleKernelCount = 64;

    private List<Vector4> sampleKernelList = new List<Vector4>();
    [Range(0.0001f, 10f)]
    public float sampleKernelRadius = 0.01f;
    [Range(0.0001f, 1f)]
    public float rangeStrength = 0.001f;
    public float depthBiasValue;
    // 噪声贴图
    public Texture Noise;

    [Range(0, 2)]
    public int DownSample = 0;
    [Range(1, 4)]
    public int BlurRadius = 2;
    [Range(0, 0.2f)]
    public float bilaterFilterStrength  = 0.2f;
    public bool OnlyShowAO = false;

    public enum SSAOPassName{
        GenerateAO = 0,
        BilateralFilter = 1,
        Composite = 2,
    }

    private void Awake() {
        var shader = Shader.Find("Custom/100 learning/MySSAO");

        ssaoMaterial = new Material(shader);
    }

    // Start is called before the first frame update
    private void Start()
    {
        cam = this.GetComponent<Camera>();
        cam.depthTextureMode = cam.depthTextureMode | DepthTextureMode.DepthNormals;
    }

    private void OnRenderImage(RenderTexture source, RenderTexture destination){
        GenerateAOSampleKernel();
        int rtW = source.width >> DownSample;
        int rtH = source.height >> DownSample;

        // AO
        RenderTexture aoRT = RenderTexture.GetTemporary(rtW, rtH, 0);
        ssaoMaterial.SetVectorArray("_SampleKernelArray", sampleKernelList.ToArray());
        ssaoMaterial.SetFloat("_RangeStrength", rangeStrength);
        ssaoMaterial.SetFloat("_AOStrength", aoStrength);
        ssaoMaterial.SetFloat("_SampleKernelCount", sampleKernelList.Count);
        ssaoMaterial.SetFloat("_SampleKernelRadius", sampleKernelRadius);
        ssaoMaterial.SetFloat("_DepthBiasValue", depthBiasValue);
        ssaoMaterial.SetTexture("_NoiseTex", Noise);
        Graphics.Blit(source, aoRT, ssaoMaterial, (int)SSAOPassName.GenerateAO);

        // Blur
        RenderTexture blurRT = RenderTexture.GetTemporary(rtW, rtH, 0);
        ssaoMaterial.SetFloat("_BilaterFilterFactor", 1.0f - bilaterFilterStrength);
        ssaoMaterial.SetVector("_BlurRadius", new Vector4(BlurRadius, 0, 0, 0));
        Graphics.Blit(aoRT, blurRT, ssaoMaterial, (int)SSAOPassName.BilateralFilter);

        if(OnlyShowAO){
            Graphics.Blit(blurRT, destination, ssaoMaterial, (int)SSAOPassName.BilateralFilter);
        }else{
            Graphics.Blit(blurRT, aoRT, ssaoMaterial, (int)SSAOPassName.BilateralFilter);
            ssaoMaterial.SetTexture("_AOTex", aoRT);
            Graphics.Blit(source, destination, ssaoMaterial, (int)SSAOPassName.Composite);
        }

        RenderTexture.ReleaseTemporary(aoRT);
        RenderTexture.ReleaseTemporary(blurRT);
    }

    private void GenerateAOSampleKernel(){
        if(SampleKernelCount == sampleKernelList.Count){
            return;
        }
        sampleKernelList.Clear();

        for(int i = 0; i < SampleKernelCount; i++){
            var vec = new Vector4(Random.Range(-1.0f, 1.0f), Random.Range(-1.0f, 1.0f), Random.Range(0, 1.0f), 1.0f);
            vec.Normalize();
            var scale = (float) i / SampleKernelCount;
            // 使分布符合二次方程的曲线
            scale = Mathf.Lerp(0.01f, 1.0f, scale * scale);
            vec *= scale;
            sampleKernelList.Add(vec);
        }
    }
}
shader部分:
Shader "Custom/100 learning/MySSAO"
{
    Properties
    {
        [HideInspector]_MainTex("Texture", 2D) = "white" {}
    }

    CGINCLUDE
    #include "UnityCG.cginc"
    struct appdata{
        float4 vertex : POSITION;
        float2 uv : TEXCOORD0;
    };

    struct v2f{
        float2 uv : TEXCOORD0;
        float4 vertex : SV_POSITION;
        float3 viewVec : TEXCOORD1;
        float3 veiwRay : TEXCOORD2;
    };

    #define MAX_SAMPLE_KERNEL_COUNT 64

    sampler2D _MainTex;
    // 深度法线图
    sampler2D _CameraDepthNormalsTexture;

    // AO
    sampler2D _NoiseTex;
    float4 _SampleKernelArray[MAX_SAMPLE_KERNEL_COUNT];
    float _SampleKernelCount;
    float _SampleKernelRadius;
    float _DepthBiasValue;
    float _RangeStrength;
    float _AOStrength;

    v2f vertAo(appdata v){
        v2f o;
        o.vertex = UnityObjectToClipPos(v.vertex);
        o.uv = v.uv;

		//计算相机空间中的像素方向(相机到像素的方向)
		//https://zhuanlan.zhihu.com/p/92315967
		//屏幕纹理坐标
		float4 screenPos = ComputeScreenPos(o.vertex);
		// NDC position
		float4 ndcPos = (screenPos / screenPos.w) * 2 - 1;
		// 计算至远屏幕方向
		float3 clipVec = float3(ndcPos.x, ndcPos.y, 1.0) * _ProjectionParams.z;
		// 利用逆投影矩阵将裁剪空间中的坐标转换到观察空间中
		o.viewVec = mul(unity_CameraInvProjection, clipVec.xyzz).xyz;
        return o;
    }

    // AO计算
    fixed4 fragAo(v2f i) : SV_TARGET{
        // 采样屏幕纹理
        fixed4 col = tex2D(_MainTex, i.uv);

		// 采样获得深度值和法线值
		float3 viewNormal;
		float linear01Depth;
		float4 depthnormal = tex2D(_CameraDepthNormalsTexture,i.uv);
        DecodeDepthNormal(depthnormal,linear01Depth,viewNormal);

		// 获取像素相机屏幕坐标位置
		float3 viewPos = linear01Depth * i.viewVec;


        // 获取观察空间屏幕法线,法线z方向相对于相机为负(所以需要乘以-1)并进行归一化
        viewNormal = normalize(viewNormal) * float3(1, 1, -1);

        // 铺平纹理
        float2 noiseScale = _ScreenParams.xy / 4.0;
        float2 noiseUV = i.uv * noiseScale;
        // randvec法线半球的随机向量
        float3 randvec = tex2D(_NoiseTex, noiseUV).xyz;
        // Gramm-Schimidt处理创建正交基
        // 法线&切线&副切线构成的坐标空间
        float3 tangent = normalize(randvec - viewNormal * dot(randvec, viewNormal));
        float3 bitangent = cross(viewNormal, tangent);
        float3x3 TBN = float3x3(tangent, bitangent, viewNormal);

        // 采样核心
        float ao = 0;
        // 每个像素点上的采样次数
        int sampleCount = _SampleKernelCount;

        for(int i = 0; i < sampleCount; i++){
            // 随机向量,转换至切线空间中
            float3 randomVec = mul(_SampleKernelArray[i].xyz, TBN);

            // ao权重
            float weight = smoothstep(0, 0.2, length(randomVec.xy));

            // 计算随机法线半球后的向量
            float3 randomPos = viewPos + randomVec * _SampleKernelRadius;

            // 转换到屏幕坐标
            float3 rclipPos = mul((float3x3)unity_CameraProjection, randomPos);
            float2 rscreenPos = (rclipPos.xy / rclipPos.z) * 0.5 + 0.5;

            float randomDepth;
            float3 randomNormal;
            float4 rcdn = tex2D(_CameraDepthNormalsTexture, rscreenPos);
            DecodeDepthNormal(rcdn, randomDepth, randomNormal);

            // 判断累加ao值
            float range = abs(randomDepth - linear01Depth) > _RangeStrength ? 0.0 : 1.0;
            float selfCheck = randomDepth + _DepthBiasValue < linear01Depth ? 1.0 : 0.0;

            // 采样点的深度值和样本深度比对前后关系
            ao += range * selfCheck * weight;
        }

        ao = ao/sampleCount;
        ao = max(0.0, 1 - ao * _AOStrength);
        return float4(ao, ao, ao, 1);
    }


	//Blur
	float _BilaterFilterFactor;
	float2 _MainTex_TexelSize;
	float2 _BlurRadius;

	///基于法线的双边滤波(Bilateral Filter)
	//https://blog.csdn.net/puppet_master/article/details/83066572
	float3 GetNormal(float2 uv)
	{
		float4 cdn = tex2D(_CameraDepthNormalsTexture, uv);
		return DecodeViewNormalStereo(cdn);
	}

	half CompareNormal(float3 nor1,float3 nor2)
	{
		return smoothstep(_BilaterFilterFactor,1.0,dot(nor1,nor2));
	}

	fixed4 frag_Blur (v2f i) : SV_Target
	{
		//_MainTex_TexelSize -> https://forum.unity.com/threads/_maintex_texelsize-whats-the-meaning.110278/
		float2 delta = _MainTex_TexelSize.xy * _BlurRadius.xy;

		float2 uv = i.uv;
		float2 uv0a = i.uv - delta;
		float2 uv0b = i.uv + delta;
		float2 uv1a = i.uv - 2.0 * delta;
		float2 uv1b = i.uv + 2.0 * delta;
		float2 uv2a = i.uv - 3.0 * delta;
		float2 uv2b = i.uv + 3.0 * delta;

		float3 normal = GetNormal(uv);
		float3 normal0a = GetNormal(uv0a);
		float3 normal0b = GetNormal(uv0b);
		float3 normal1a = GetNormal(uv1a);
		float3 normal1b = GetNormal(uv1b);
		float3 normal2a = GetNormal(uv2a);
		float3 normal2b = GetNormal(uv2b);

		fixed4 col = tex2D(_MainTex, uv);
		fixed4 col0a = tex2D(_MainTex, uv0a);
		fixed4 col0b = tex2D(_MainTex, uv0b);
		fixed4 col1a = tex2D(_MainTex, uv1a);
		fixed4 col1b = tex2D(_MainTex, uv1b);
		fixed4 col2a = tex2D(_MainTex, uv2a);
		fixed4 col2b = tex2D(_MainTex, uv2b);

		half w = 0.37004405286;
		half w0a = CompareNormal(normal, normal0a) * 0.31718061674;
		half w0b = CompareNormal(normal, normal0b) * 0.31718061674;
		half w1a = CompareNormal(normal, normal1a) * 0.19823788546;
		half w1b = CompareNormal(normal, normal1b) * 0.19823788546;
		half w2a = CompareNormal(normal, normal2a) * 0.11453744493;
		half w2b = CompareNormal(normal, normal2b) * 0.11453744493;

		half3 result;
		result = w * col.rgb;
		result += w0a * col0a.rgb;
		result += w0b * col0b.rgb;
		result += w1a * col1a.rgb;
		result += w1b * col1b.rgb;
		result += w2a * col2a.rgb;
		result += w2b * col2b.rgb;

		result /= w + w0a + w0b + w1a + w1b + w2a + w2b;
		return fixed4(result, 1.0);
	}

    // 应用AO贴图
    sampler2D _AOTex;

    fixed4 frag_Composite(v2f i) : SV_Target{
        fixed4 col = tex2D(_MainTex, i.uv);
        fixed4 ao = tex2D(_AOTex, i.uv);
        col.rgb *= ao.r;
        return col;
    }
    ENDCG

    SubShader
    {
        Cull Off
        ZWrite Off
        ZTest Always

        // Pass 0: Generate AO
        Pass{
            CGPROGRAM
            #pragma vertex vertAo
            #pragma fragment fragAo
            ENDCG
        }

        // Pass 1: Bilateral Filter Blur
        Pass{
            CGPROGRAM
            #pragma vertex vertAo
            #pragma fragment frag_Blur
            ENDCG
        }

        // Pass 2: Composite AO
        Pass{
            CGPROGRAM
            #pragma vertex vertAo
            #pragma fragment frag_Composite
            ENDCG
        }
    }
}
其实法向半球的那个比较部分还不是特别理解,再去看看games202。
HBAO
先挖个坑
教程:大佬的笔记,看看能不能照着实现一下HBAO


 1500
1500

 被折叠的 条评论
为什么被折叠?
被折叠的 条评论
为什么被折叠?
 到【灌水乐园】发言


