


1.前言
在训练神经网络模型时,经常会遇到因为光照、车灯、各种环境灯的影响导致目标漏检,而收集、标定相应的素材非常困难。使用数据增强的手段扩增训练集是一种简单、有效的方法。
参考链接
2. 参考代码
缺点:通过两层for循环遍历计算的方法,会随着图片尺寸的增加而导致耗时骤增,从而导致训练速度低效。
#coding:utf-8
import cv2
import math
import numpy as np
import matplotlib.pyplot as plt
#读取原始图像
img = cv2.imread('000100000910000000098.jpg')

#获取图像行和列
rows, cols = img.shape[:2]

#设置中心点
centerX = rows / 2
centerY = cols / 2
print (centerX, centerY)
radius = min(centerX, centerY)
print (radius)

#设置光照强度
strength = 200

#图像光照特效
for i in range(rows):
    for j in range(cols):
        #计算当前点到光照中心距离(平面坐标系中两点之间的距离)
        distance = math.pow((centerY-j), 2) + math.pow((centerX-i), 2)
        #获取原始图像
        B =  img[i,j][0]
        G =  img[i,j][1]
        R = img[i,j][2]
        if (distance < radius*radius):
            #按照距离大小计算增强的光照值
            result = (int)(strength*( 1.0 - math.sqrt(distance) / radius ))
            B = img[i,j][0] + result
            G = img[i,j][1] + result
            R = img[i,j][2] + result
            #判断边界 防止越界
            B = min(255, max(0, B))
            G = min(255, max(0, G))
            R = min(255, max(0, R))
            img[i,j] = np.uint8((B, G, R))
        else:
            img[i,j] = np.uint8((B, G, R))

#显示图像
cv2.imwrite('test.jpg', img)
plt.imshow(img)
plt.show()
3.代码改进
改进思路是使用opencv实现并行化,提高代码执行速度。
该代码还有改进的空间,但对速度影响不大。
def light_enhance_improve(img, strength):
    rows, cols = img.shape[:2]
    centerX = rows / 2
    centerY = cols / 2
    radius = min(centerX, centerY)
    arr_rows = np.arange(rows).reshape(rows, 1)
    arr_cols = np.arange(cols).reshape(1, cols)
    arr = 1 - np.sqrt(((arr_cols - centerY) ** 2) + ((arr_rows - centerX) ** 2)) / radius
    arr_B = np.maximum(np.int16(strength[0] * arr), 0)
    arr_G = np.maximum(np.int16(strength[1] * arr), 0)
    arr_R = np.maximum(np.int16(strength[2] * arr), 0)
    img = np.int16(img)
    img[:,:,0]+=arr_B
    img[:,:,1]+=arr_G
    img[:,:,2]+=arr_R
    img = np.maximum(img, 0)
    img = np.minimum(img, 255)
    img = np.uint8(img)
    return img
4.整体代码
import numpy as np
import cv2
import time
import math


def get_time(f):
    def inner(*args, **kwargs):
        s_time = time.time()
        res = f(*args, **kwargs)
        e_time = time.time()
        print()
        print('{} function used time: {} (second)'.format(f.__name__, e_time - s_time))
        return res
    return inner


@get_time
def light_enhance_origin(img, strength):
    rows, cols = img.shape[:2]
    # 设置中心点
    centerX = rows / 2
    centerY = cols / 2
    radius = min(centerX, centerY)
    for i in range(rows):
        for j in range(cols):
            # 计算当前点到光照中心距离(平面坐标系中两点之间的距离)
            distance = math.pow((centerY - j), 2) + math.pow((centerX - i), 2)
            # 获取原始图像
            B = img[i, j][0]
            G = img[i, j][1]
            R = img[i, j][2]
            if (distance < radius * radius):
                # 按照距离大小计算增强的光照值
                result1= (int)(strength[0] * (1.0 - math.sqrt(distance) / radius))
                result2 = (int)(strength[1] * (1.0 - math.sqrt(distance) / radius))
                result3 = (int)(strength[2] * (1.0 - math.sqrt(distance) / radius))
                B = img[i, j][0] + result1
                G = img[i, j][1] + result2
                R = img[i, j][2] + result3
                # 判断边界 防止越界
                B = min(255, max(0, B))
                G = min(255, max(0, G))
                R = min(255, max(0, R))
                img[i, j] = np.uint8((B, G, R))
            else:
                img[i, j] = np.uint8((B, G, R))
    return img


@get_time
def light_enhance_improve(img, strength):
    rows, cols = img.shape[:2]
    centerX = rows / 2
    centerY = cols / 2
    radius = min(centerX, centerY)
    arr_rows = np.arange(rows).reshape(rows, 1)
    arr_cols = np.arange(cols).reshape(1, cols)
    arr = 1 - np.sqrt(((arr_cols - centerY) ** 2) + ((arr_rows - centerX) ** 2)) / radius
    arr_B = np.maximum(np.int16(strength[0] * arr), 0)
    arr_G = np.maximum(np.int16(strength[1] * arr), 0)
    arr_R = np.maximum(np.int16(strength[2] * arr), 0)
    img = np.int16(img)
    img[:,:,0]+=arr_B
    img[:,:,1]+=arr_G
    img[:,:,2]+=arr_R
    img = np.maximum(img, 0)
    img = np.minimum(img, 255)
    img = np.uint8(img)
    return img


if __name__ == '__main__':
    img_path = r'./2007_002094.jpg'
    img_ori = cv2.imdecode(np.fromfile(img_path, dtype=np.uint8), cv2.IMREAD_COLOR)
    cv2.imshow('img_ori', img_ori)
    cv2.waitKey(1)

    img_tmp = img_ori.copy()

    h,w,c = img_ori.shape
    cx = w //2
    cy = h // 2
    cw = w
    ch = h

    value_B = np.random.randint(255, 510)
    value_G = np.random.randint(255, 510)
    value_R = np.random.randint(255, 510)


    img_ori[cy - ch // 2:cy + ch // 2, cx - cw // 2:cx + cw // 2, :] = light_enhance_origin(
        img_ori[cy - ch // 2:cy + ch // 2, cx - cw // 2:cx + cw // 2, :], strength=[value_B, value_G, value_R])
    cv2.imshow('light_enhance_origin', img_ori)
    cv2.waitKey(1)

    img_tmp[cy - ch // 2:cy + ch // 2, cx - cw // 2:cx + cw // 2, :] = light_enhance_improve(
        img_tmp[cy - ch // 2:cy + ch // 2, cx - cw // 2:cx + cw // 2, :], strength=[value_B, value_G, value_R])
    cv2.imshow('light_enhance_improve', img_tmp)
    cv2.waitKey()
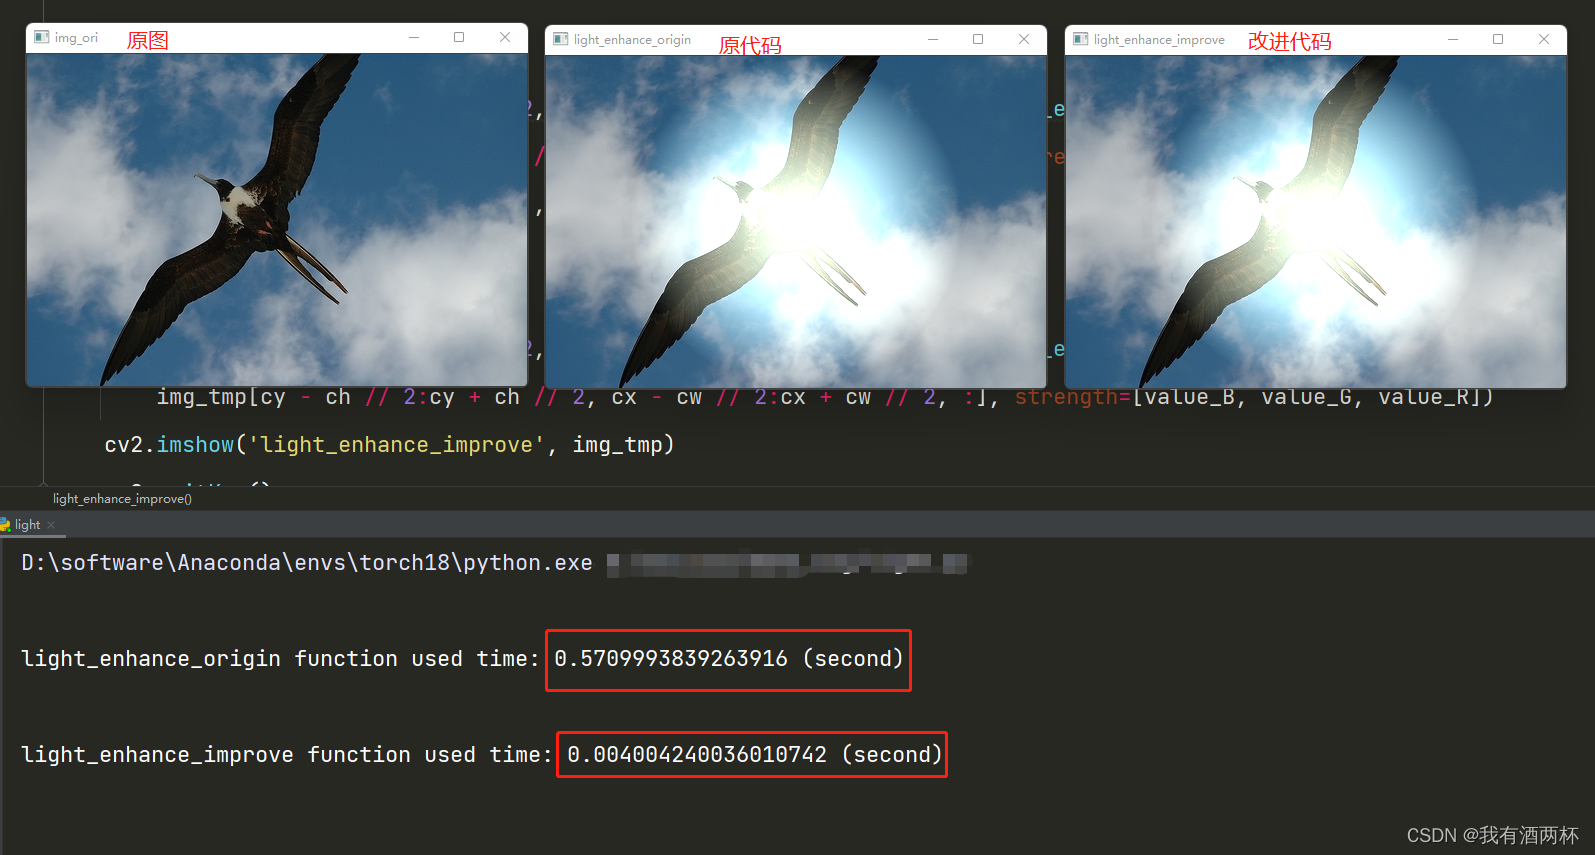
5.效果展示
两个代码在最终效果上一致,在耗时方面提高100多倍。
6.总结
改进点1:并行化,提高执行速度。
改进点2:改进后的代码,会随机生成各种颜色的模拟灯光,不再是单调的白色。


 1万+
1万+


 被折叠的 条评论
为什么被折叠?
被折叠的 条评论
为什么被折叠?
 到【灌水乐园】发言


