


参考
3D Gaussian Splatting 环境配置_diff-gaussian-rasterization-CSDN博客
Windows下3D Gaussian Splatting从0开始安装配置环境及训练教程_3d gaussian splatting安装教程-CSDN博客
3DGS(3D Guassian Splatting)部署验证+个人数据训练 - 知乎
目录
4. 下载3d gaussian splatting官方代码
5. 安装anaconda,并在conda promot中创建3D GS的运行环境
5.1 按github推荐的版本配置python 3.8和pytorch2.0.0cu118
1. 查看硬件环境
是否满足3dgs githubgraphdeco-inria/gaussian-splatting: Original reference implementation of "3D Gaussian Splatting for Real-Time Radiance Field Rendering"的要求。
(cmd中nvidia-smi查看GPU版本)
Geforce RTX 4060 Laptop GPU with 32 GB RAM.
但是我的VRAM是8GB,根据github Q&A对应问题解答,需要调节训练参数。
CPU是i7-13620H。
平台是WIN 11。
查看opengl版本,我的是4.6>要求的4.5(sibr_viewer要求的)如何检测显卡类型和OpenGL版本?_intelirisxegraphics opengl dsa-CSDN博客
比较难装的是submodules/diff-gaussian-rasterization和sibr_viewer。如果能装完前者,应该就能训练了。装完后者能对训练完的模型或训练中的模型进行可视化。
2. 安装VS community 2019
一定要在CUDA前安装VS。
最好别装vs2022,会报错。
项目首页 - VisualStudio2019社区版离线下载资源:Visual Studio 2019 社区版离线下载资源本仓库提供了一个名为 `vs_Community-2019.zip` 的资源文件,该文件包含了 Visual Studio 2019 社区版的离线下载内容 - GitCode下载后解压,安装。要选C++桌面开发,并在右侧选中msvc-x86-64和win11sdk.
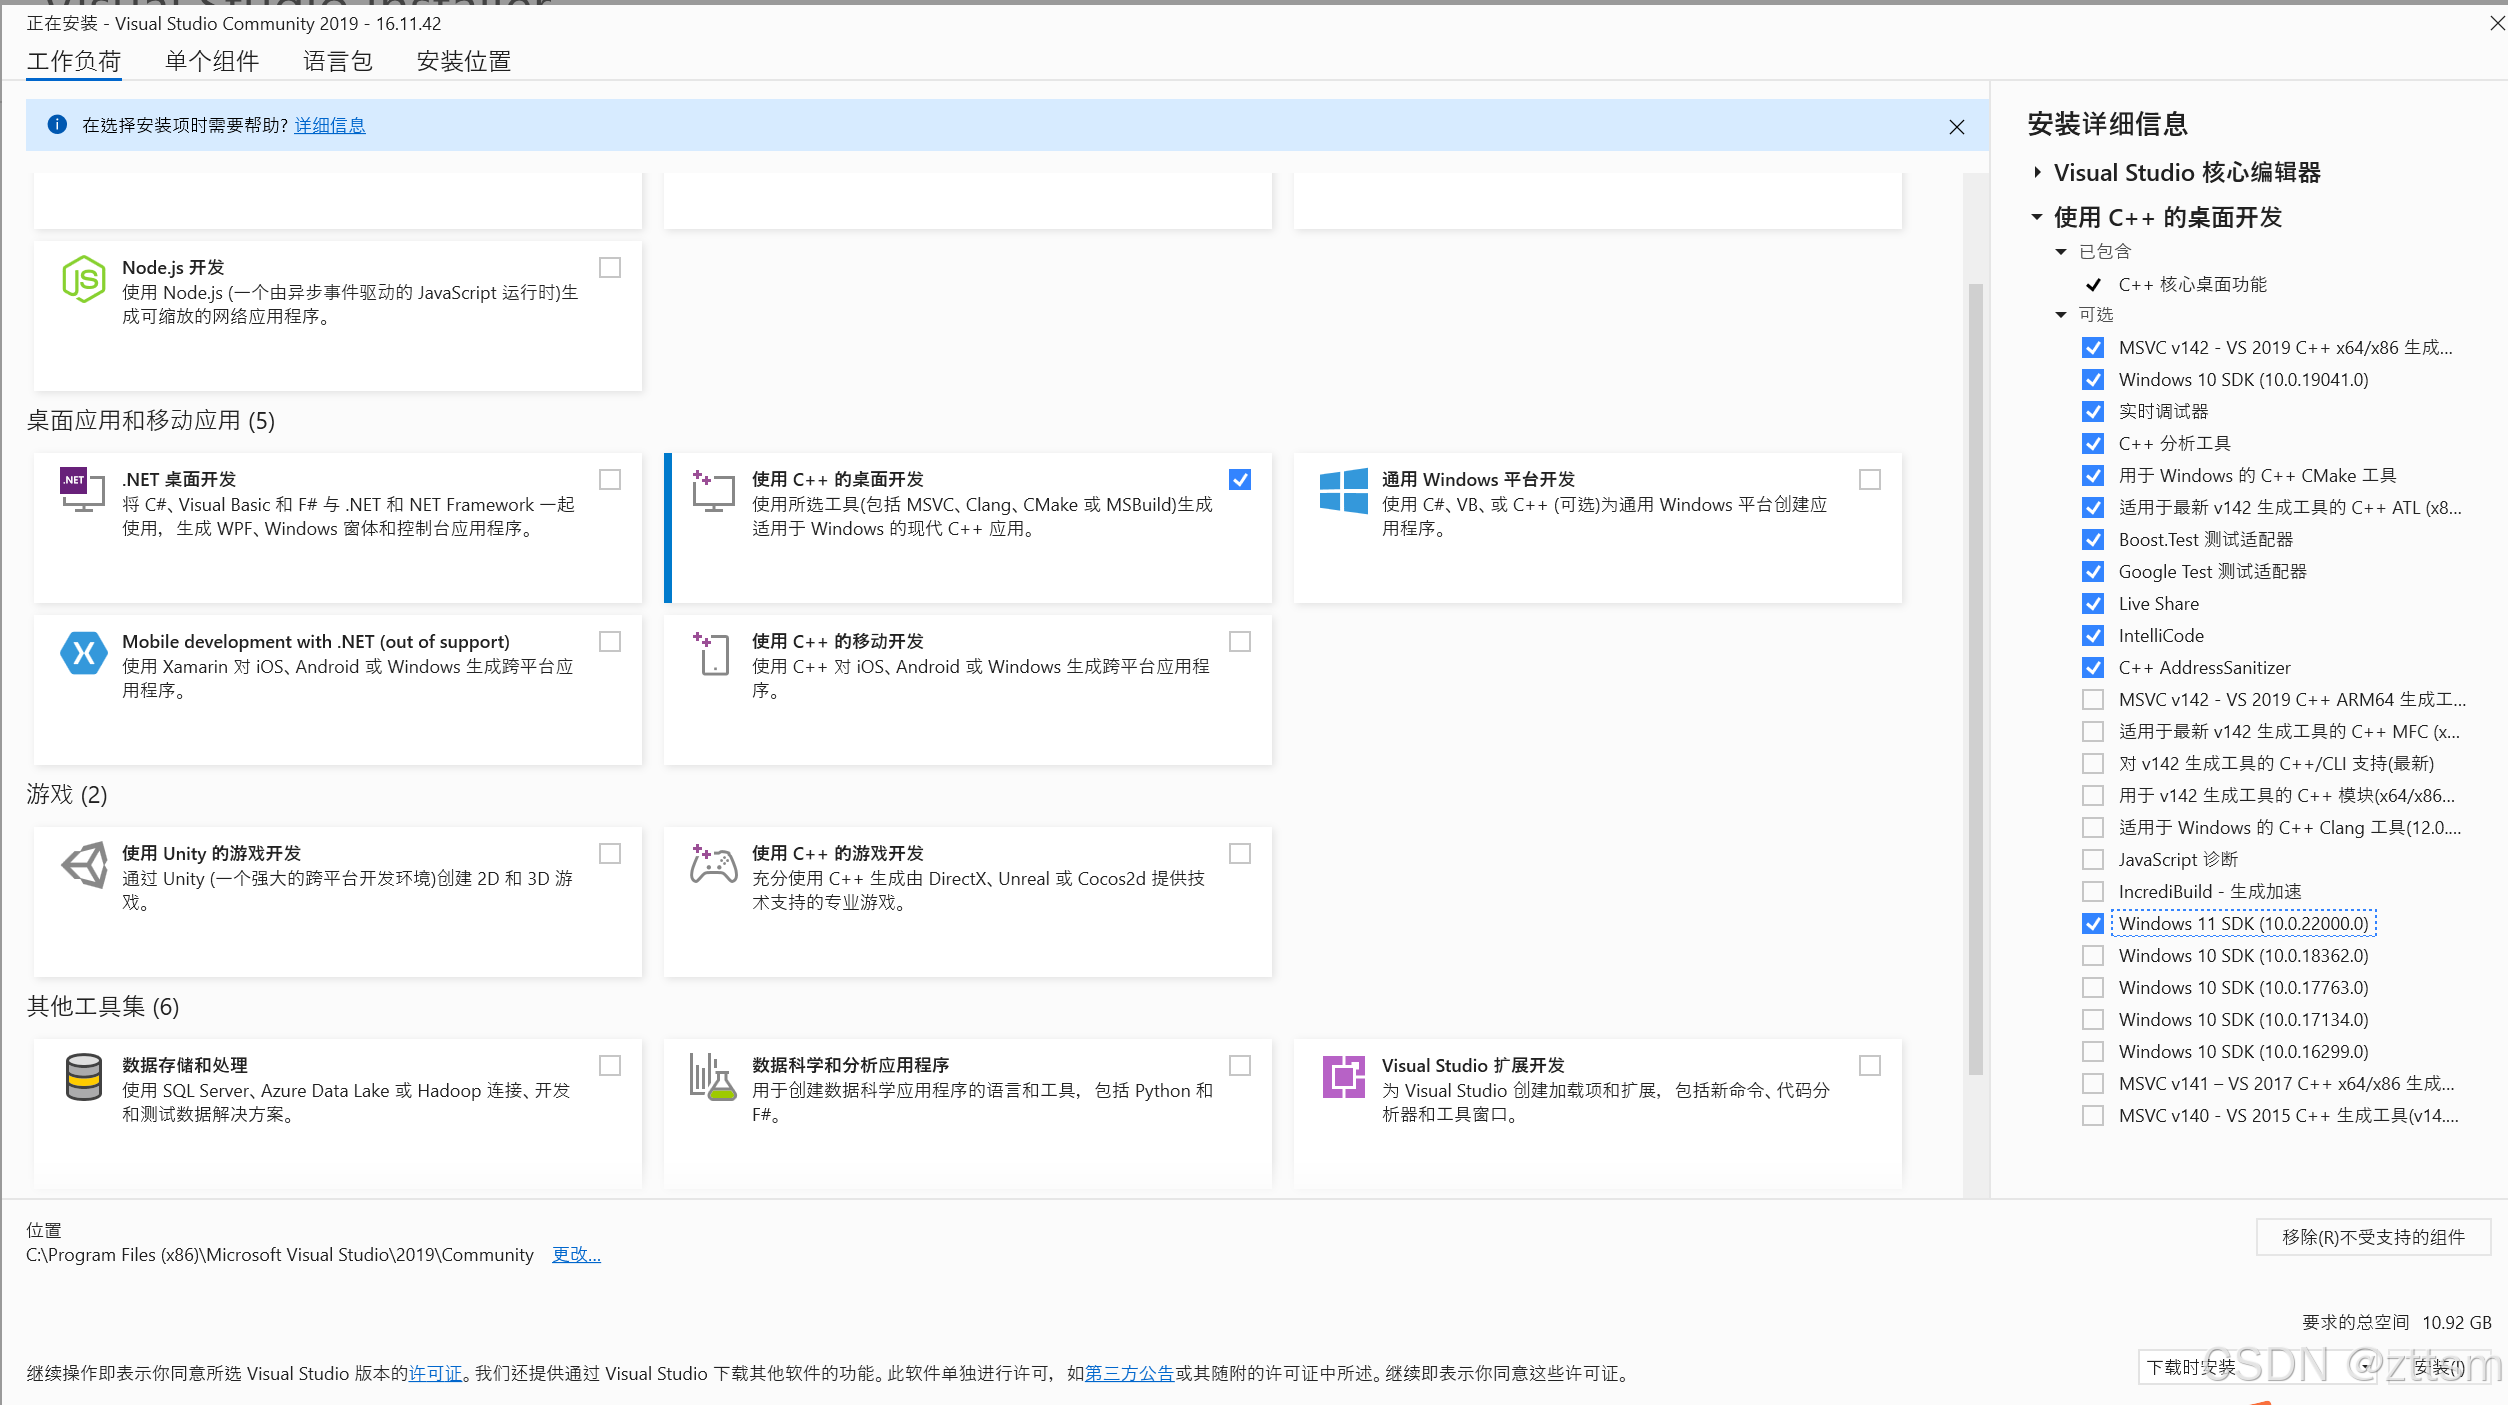
安装完成后,将cl.exe所在的路径C:\Program Files (x86)\Microsoft Visual Studio\2019\Community\VC\Tools\MSVC\14.29.30133\bin\Hostx64\x64添加到环境变量path中。
最后在cmd中输入cl,测试是否成功。

3. 按github推荐安装CUDA 11.8
有博客安装CUDA 20+也行,主要是pytorch版本要对应上。
CUDA Toolkit Archive | NVIDIA Developer
按电脑系统win11 x64选择对应11.8的版本后,选exe(local)下载。安装过程部分参考windows下CUDA的卸载以及安装_把电脑上的cuda卸载了会有影响么-CSDN博客。
注意要勾选“visual studio integration”,否则会在sibr_viewer编译时报错Windows CMake编译错误:No CUDA toolset found解决方法_no cuda toolset found.-CSDN博客
最后将安装路径C:\Program Files\NVIDIA GPU Computing Toolkit\CUDA\v11.8添加到“编辑系统环境变量”->系统变量->path->新建。
在win+r调出的cmd窗口中输入nvcc -V查看版本:
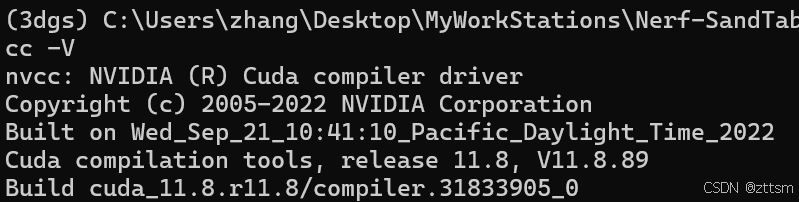
要注意,后续pytorch要安装cu118!
4. 下载3d gaussian splatting官方代码
(要预先安装git)
cmd中git clone https://github.com/graphdeco-inria/gaussian-splatting --recursive
如果网速太慢/打不开github,参考GitHub打不开的解决方案(超简单)-CSDN博客。
--recursive是防止下不全/遗漏文件,主要是下全submodules中三个文件,和SIBR_viewer文件。否则要自己手动下载对应zip并解压到对应路径下。
5. 安装anaconda,并在conda promot中创建3D GS的运行环境
5.1 按github推荐的版本配置python 3.8和pytorch2.0.0cu118
$conda create -n gausplat python=3.8
$conda activate gausplat
$conda install -c conda-forge vs2019_win-64
$pip install torch==2.0.0+cu118 torchvision torchaudio --index-url https://download.pytorch.org/whl/cu118
5.2 将三个子模块下载到对应路径下
如果第4步的git clone没下载三个子模块的代码,就直接手动下载github submodules中给出的代码zip到对应路径下解压并重命名;
注意gs_rasterization要用最新的9c5c202版本的否则报错I keep getting the following error when i train · Issue #1032 · graphdeco-inria/gaussian-splatting;并且需要再点击thirdparty/glm下载glm.zip至对应路径。
然后:
pip install submodules/diff-gaussian-rasterization

pip install submodules/simple-knn

pip install submodules/fused-ssim
 5.3 安装其他依赖包
pip install plyfile
pip install tqdm
pip install opencv-python
pip install joblib
6. 运行
视频转图像序列需要ffmpeg;
图像序列转稀疏点云,需要安装colmap。这两个包的安装参考Windows下3D Gaussian Splatting从0开始安装配置环境及训练教程_3d gaussian splatting安装教程-CSDN博客
6.1 提供的数据集
(1) MipNeRF360 scenes 原mipnerf360论文作者提供的地址mip-NeRF 360。
3DGS对其中的tanks&tamples 和 deep blending序列经colmap加工后的可直接作为训练输入的数据(651MB)地址https://repo-sam.inria.fr/fungraph/3d-gaussian-splatting/datasets/input/tandt_db.zip
(2)3D GS已经训练好的模型13.7GB,可以在SIBR_VIEWER中可视化。
https://repo-sam.inria.fr/fungraph/3d-gaussian-splatting/datasets/pretrained/models.zip
(3)渲染好的图像,可以直接用来指标评估和对比。
https://repo-sam.inria.fr/fungraph/3d-gaussian-splatting/evaluation/images.zip
6.2 训练
$python train.py -s <path to COLMAP or NeRF Synthetic dataset>
python train.py -s datasets\tandt_db\db\drjohnson

一些比较有用的后缀:
会自动调整任意分辨率的输入图像至宽度<=1600像素。如果想用自己的更高分辨率的图像,后缀指令-r 1。
用后缀-m your_save_path来设置训练好的模型的存储地址;如果不写,会默认在./output文件夹下自动随机生成一个唯一的文件名来存储。
--data_device默认是cuda,即将输入图像放在GPU端,如果计算资源够丰富是可行的;否则建议写cpu,这样能减少vram消耗。
--sh_degree默认是3,不要超过3,表示球谐函数的自由度。
--debug & --debug_from,如果光栅化有问题,可以开启debug模式,生成dump文件。debug比较慢,定义debug_from which iteration可以在这个训练迭代后开启debug。
--iterations迭代次数,默认30000.
6.3 评估
python train.py -s <path to COLMAP or NeRF Synthetic dataset> --eval # Train with train/test split
python render.py -m <path to trained model> # Generate renderings
python metrics.py -m <path to trained model> # Compute error metrics on renderings
如果想可视化或评估3DGS训练好的模型,还要用后缀-s指明对应的原图像地址:
python render.py -m <path to pre-trained model> -s <path to COLMAP dataset>
python metrics.py -m <path to pre-trained model>
针对3个序列的训练&评估,或用训练好的模型进行render后评估,或用渲染好的图像进行评估:
python full_eval.py -m360 <mipnerf360 folder> -tat <tanks and temples folder> -db <deep blending folder>
python full_eval.py -o <directory with pretrained models> --skip_training -m360 <mipnerf360 folder> -tat <tanks and temples folder> -db <deep blending folder>
python full_eval.py -m <directory with evaluation images>/garden ... --skip_training --skip_rendering
7 SIBR_Viewer
我先尝试直接下载提供的编译好的二值文件,https://repo-sam.inria.fr/fungraph/3d-gaussian-splatting/binaries/viewers.zip
但是在cmd cd 至gs路径下,运行指令:.\SIBR_viewers\bin\SIBR_gaussianViewer_app -m .\datasets\models\bicycle(datasets是我自定义的文件夹,以gs提供的训练好的场景models/bicycle为例,包括point_cloud, camera.jason, cfg_args)
会报错找不到cudart64_12.dll,因为我安装的是cuda11.8,但这个链接库版本要求是cuda12,所以找不到。按RuntimeError: Library cublas64_12.dll is not found or cannot be loaded-CSDN博客
后运行指令,会报错找不到gaussianxxx.dll的链接入口。
所以还是从源码编译。
7.1 首先安装cmake、7zip、doxgen
Windows下Cmake安装与卸载步骤_cmake卸载-CSDN博客
(版本是gs github要求的3.24。如果装完cmake,在cmd中输入cmake输出不是能识别的指令,就卸载重装,应该就行了。)
Windows 11 如何使用 7-Zip 双击解压文件 - 知乎
Windows环境下代码文档生成工具Doxygen使用详细教程-CSDN博客
7.2 cmake编译源码
在sibr_viewer中看是否下载了对应的源码。没有就手动下载。
然后按github教程,cmd 中运行
cd SIBR_viewers
cmake -Bbuild .
cmake --build build --target install --config RelWithDebInfo
会把编译好的可执行文件放在install/bin下,然后再运行指令:
.\SIBR_viewers\install\bin\SIBR_gaussianViewer_app_rwdi -m .\datasets\models\bicycle
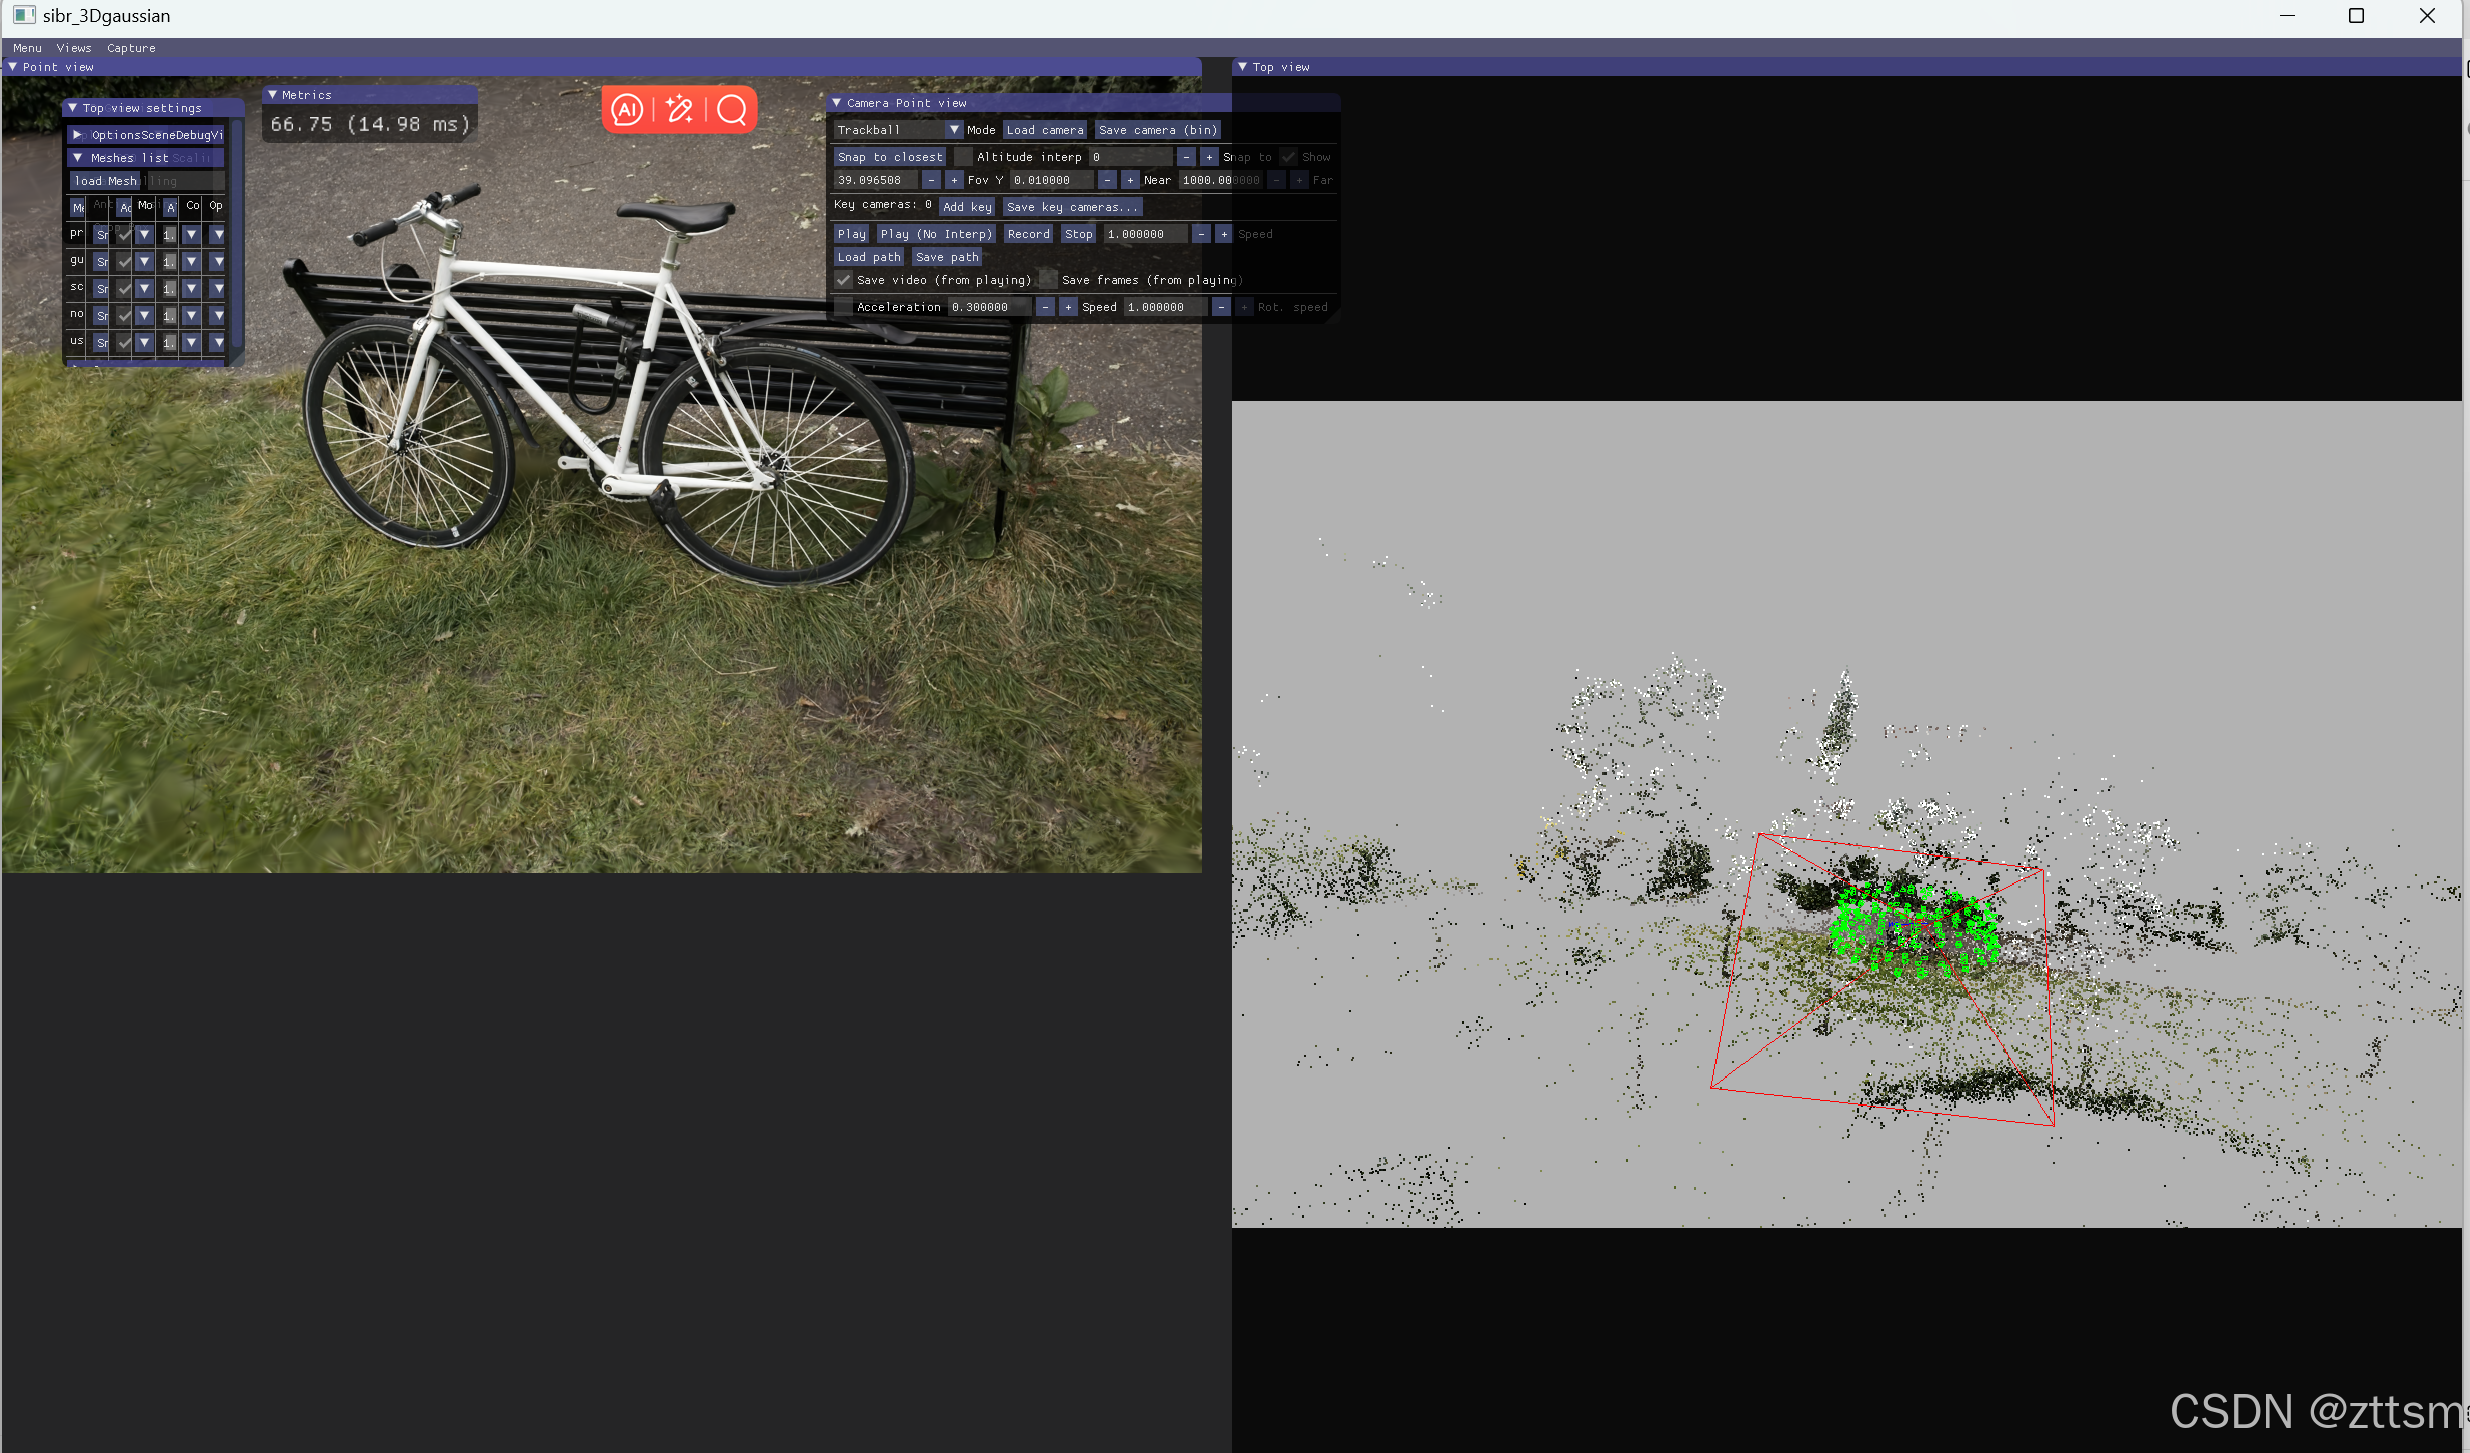
WSADEQ分别对应相机的平移:前后左右上下。
IKJLUO分别对应相机的旋转。
也可以在current point view浮动窗口中设置控制方式为trackball。
可见在我电脑上渲染帧率约60-70 fps(电脑滚烫)。用配置更高的gpu应该能达到论文中的100+fps。
在固定指令条views中,选topview会出现采集的相机位姿和点云。可见如果要制作数据集还是要围绕物体做近似半球采集。


 731
731

 被折叠的 条评论
为什么被折叠?
被折叠的 条评论
为什么被折叠?
 到【灌水乐园】发言


