


本文全部内容源自赵虚左老师的《百度Apollo智能驾驶课程》,如有侵权请联系,本文内容为作者手敲,禁止任何形式转载,谢谢。
第一章 Cyber RT概述与环境搭建
1.1Cyber RT简介
Apollo项目源于2017年7月首次推出,标志着汽车行业演进的一个巨大飞飞跃,开发者可以以Apollo技术平台为基础,使用一系列广泛的工具和软件模块来创新和构建自己的自动驾驶解决方案。Apollo Cyber RT是世界上第一个专为自动驾驶定制的高性能开源框架,它于2019年与Apollo 3.5开放平台同期发布。
Apollo Cyber RT是一个开源、高性能的运行框架,专为自动驾驶场景而设计。针对自动驾驶的高并发、低延迟、高吞吐量进行了大幅优化。
1.2Cyber RT安装
1.2.1准备工作
1.安装Ubuntu Linux
$ sudo apt-get update
$ sudo apt-get upgrade
2.安装NVIDIA GPU驱动(可选)
如果使用时需要控制无人车你就安装,否则不需要安装。
$ sudo apt-get update
$ sudo apt-add-repository multiverse
$ sudo apt-get update
$ sudo apt-get install nvidia-driver-455
3.安装docker
3.1安装
$ curl https://get.docker.com | sh
$ sudo systemctl start docker && sudo systemctl enable docker
3.2测试
$ sudo docker run hello-world
3.3优化
获取权限,不再使用sudo命令就可以运行:
$ sudo groupadd docker
$ sudo gpasswd -a $USER docker
$ newgrp docker
重启电脑!!!
测试,不使用sudo命令运行:
$ docker run hello-world
3.4开机自启动设置
$ sudo service docker start
$ sudo service docker status
4.安装NVIDIA Container Toolkit
$ distribution=$(. /etc/os-release;echo $ID$VERSION_ID)
$ curl -s -L https://nvidia.github.io/nvidia-docker/gpgkey | sudo apt-key add -
$ curl -s -L https://nvidia.github.io/nvidia-docker/$distribution/nvidia-docker.list | sudo tee /etc/apt/sources.list.d/nvidia-docker.list
$ sudo apt-get -y update
$ sudo apt-get install -y nvidia-docker2
$ sudo systemctl restart docker
1.2.2Cyber RT安装
1.下载源码(自选分支,我使用的版本为v6.0_edu)
$ git clone https://github.com/ApolloAuto/apollo.git
or
$ git clone https://gitee.com/ApolloAuto/apollo.git
2.执行脚本启动docker容器
本篇章只学习Cyber,因此启动命令如下:
$ ./docker/scripts/cyber_start.sh -g cn
3.进入docker容器
$ ./docker/scripts/cyber_into.sh
4.构建
如果报错了,那你就删除.cache缓存文件夹,继续编译,就可以通过了。
$ ./apollo.sh build cyber
1.2.3Cyber RT测试
1.修改配置文件
自行在VSCode中,打开Cyber文件夹下的setup.bash文件,修改日志显示开关为1。它将实现测试时日志的终端可视化输出:
export GLOG_alsologtostderr=1
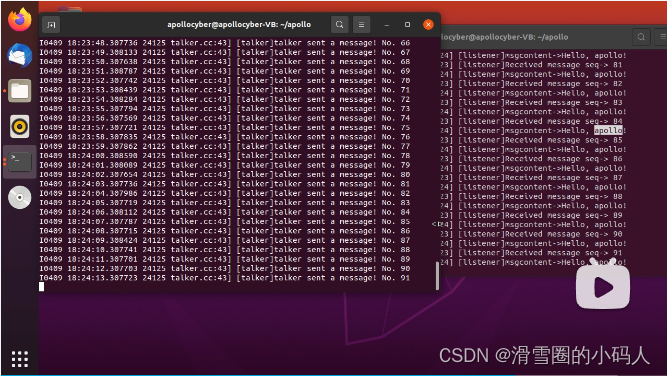
2.测试
分别进入两个docker,执行如下命令:
第一个终端:
$ source cyber/setup.bash
$ ./bazel-bin/cyber/examples/talker
第二个终端:
$ source cyber/setup.bash
$ ./bazel-bin/cyber/examples/listener
1.3Cyber RT集成开发环境搭建
本节内容将实现VSCode中调试Apollo Docker。
1.3.1 VSCode安装教程
1.下载网址
https://code.visualstudio.com/Download
2.安装命令
$ sudo dpkg -i xxx.deb
3.卸载命令
$ sudo dpkg --purge code
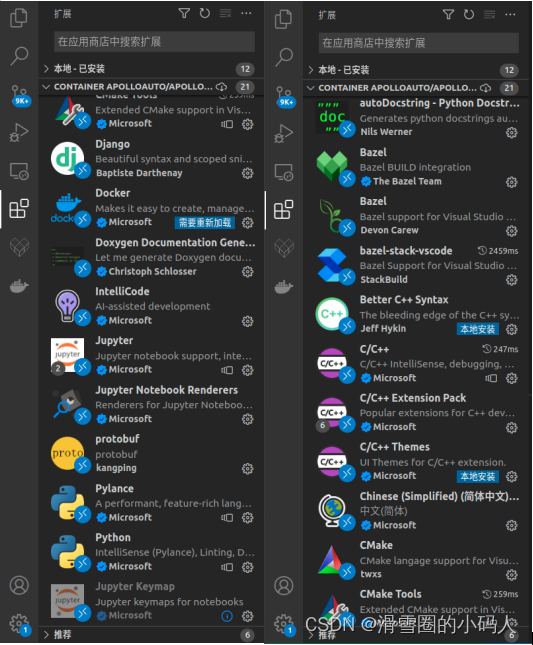
1.3.2 VSCode插件安装
照着我下面的图安装就OK。
1.3.3 VSCode连接Docker
在插件栏里找到鲸鱼图案的Docker,在Images中找到镜像,然后运行。
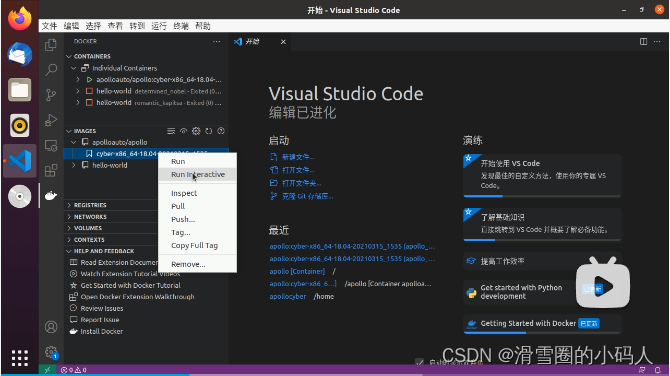
上一步结束后CONTAINERS里会出现容器,点击Attach Visual Studio Code
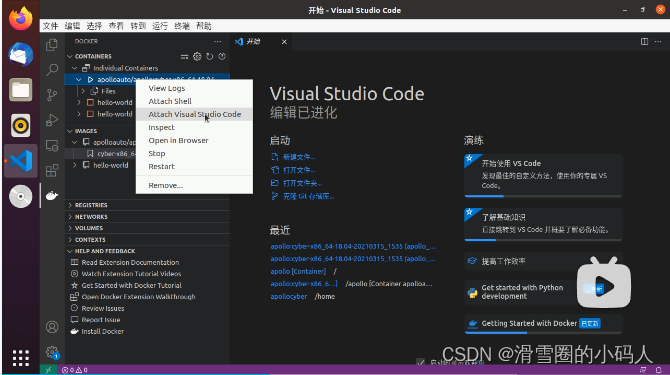
桌面将弹出镜像的VSCode界面,选择/apollo文件夹即可。
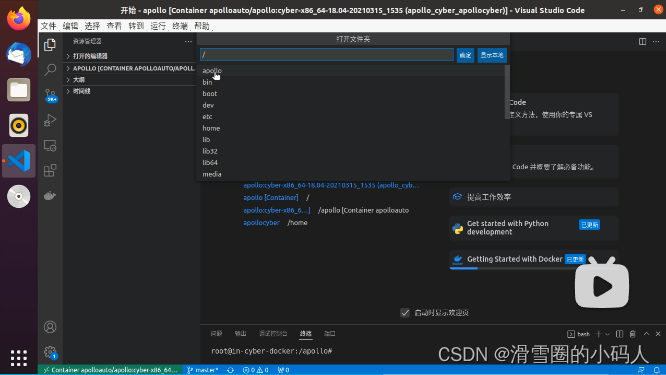
至此Apollo VSCode环境配置结束!
1.4Cyber RT快速体验
在/apollo/cyber下创建demo_cc和demo_py两个文件夹。
实现流程:
	1-源文件编写
	2-源文件配置
	3-编译
	4-执行
1.4.1C++实现HelloWorld
1.编写源文件
demo_cc目录下新建文件demo00_helloworld.cc:
#include "cyber/cyber.h"
int main(int argc, char const *argv[])
{

    apollo::cyber::Init(argv[0]);
    AINFO << "hello world !";
    return 0;
}
2.编写配置文件
demo_cc目录下新建文件BUILD:
cc_binary(
    name = "demo00_helloworld",
    srcs = ["demo00_helloworld.cc"],
    deps = ["//cyber"],
)
3.编译
容器终端输入命令:
$ bazel build cyber/demo_cc/...
4.执行
$ source cyber/setup.bash
$ ./bazel-bin/cyber/demo_cc/demo00_helloworld
1.4.2Python实现HelloWorld
1.编写源文件
demo_py目录下新建文件demo00_helloworld_py.py:
from cyber.python.cyber_py3 import cyber

if __name__ == "__main__":
        cyber.init()
        print("hello world(python)!")
2.编写配置文件
demo_py目录下新建文件BUILD:
py_binary(
    name = "demo00_helloworld_py",
    srcs = ["demo00_helloworld_py.py"],
    deps = ["//cyber/python/cyber_py3:cyber"],
)
3.编译
容器终端输入命令:
$ bazel build cyber/demo_py/...
4.执行
$ source cyber/setup.bash
$ ./bazel-bin/cyber/demo_py/demo00_helloworld_py
1.5预备知识----bazel
概念:Bazel是google研发的一款开源构建和测试工具,也是一种简单、易读的构建工具。Bazel支持多种编程语言的项目,并针对多个平台输出构建。
使用流程:
	1-新建project目录,project目录下新建文件WORKSPACE
	2-新建包,在包下新建BUILD文件
	3-包中编写源文件
	4-编辑BUILD文件
	5-编译
	6-执行
1.5.1 Bazel使用基本流程
1.C++实现
1.新建project目录
在cyber目录下创建/demo_base_bazel/pro01_helloworld,再在pro01_helloworld目录下创建WORKSPACE文件。
注意:在后续的编译环境中常常会涉及根目录的概念,它是相对于有WORKSPACE文件的,即WORKSPACE所在的层级为根目录层,这非常重要,一定要注意!
2.新建包目录
在pro01_helloworld目录下新建demo_pkg目录,该目录下创建BUILD文件。
3.新建源文件
在demo_pkg目录下新建C++源文件hello_world.cc,内容如下:
/*
            输出:hello bazel
*/

#include <iostream>
using namespace std;
int main(int argc, char const *argv[])
{

    cout << "hello bazel !" << endl;
    return 0;
}
4.编辑BUILD文件
cc_binary(
    name = "hello",
    srcs = ["hello_world.cc"],
)
5.编译
编译方式有两种:
5.1 包内容全部编译
$ bazel build //demo_pkg/...
5.2指定项目编译
$ bazel build //demo_pkg:hello
6.执行
$ ./bazel-bin/demo_pkg/hello
or
$ bazel run demo_pkg:hello
2.Python实现
1.新建project目录(已创建不需重复执行)
在cyber目录下创建/demo_base_bazel/pro01_helloworld,再在pro01_helloworld目录下创建WORKSPACE文件。
注意:在后续的编译环境中常常会涉及根目录的概念,它是相对于有WORKSPACE文件的,即WORKSPACE所在的层级为根目录层,这非常重要,一定要注意!
2.新建包目录
在pro01_helloworld目录下新建demo_pkg目录,该目录下创建BUILD文件。
3.新建源文件
在demo_pkg目录下新建Python源文件hello_world_py.py,内容如下:
#!/usr/bin/env python3

if __name__ == "__main__":
    print("hello world python!")
4.编辑BUILD文件
py_binary(
    name = "hello_world_py",
    srcs = ["hello_world_py.py"],
)
5.编译
编译方式有两种:
5.1 包内容全部编译
$ bazel build //demo_pkg/...
5.2指定项目编译
$ bazel build //demo_pkg:hello_world_py
6.执行
$ ./bazel-bin/demo_pkg/hello_world_py
or
$ bazel run demo_pkg:hello_world_py
1.5.2 Bazel使用之库依赖
本节内容介绍Bazel库依赖语法,包括同包库依赖,以及跨包库依赖。
1.5.2.1编写被依赖库实现
首先需要实现被依赖的库的相关文件
1.新建project目录
在demo_base_bazel目录下新建目录pro02_lib,再在pro02_lib目录下新建WORKSPACE文件。
2.新建包目录
在pro02_lib目录下新建demo_lib目录,该目录下新建BUILD文件
3.新建头文件与源文件
在demo_lib目录新建C++头文件hello_great.h,内容如下:
#ifndef LIB_HELLO_GREAT_H
#define LIB_HELLO_GREAT_H

#include <string>

std::string get_great(const std::string & name);

#endif
在demo_lib目录新建C++源文件hello_great.cc,内容如下:
#include "hello_great.h"

std::string get_great(const std::string & name)
{

    return "hello " + name ;
}
4.编辑BUILD文件,内容如下:
#方式1 过于粗暴
#package(default_visibility = ["//visibility:public"])  #声明包为公用的

cc_library(
    name = "hello_great_lib",
    srcs = ["hello_great.cc"],
    hdrs = ["hello_great.h"],
    #方式2 指定对应包名称
    visibility = ["//demo_main:__pkg__"], #对demo_main开放权限
)
5.编译
终端进入pro02_lib目录,执行:
$ bazel build //demo_lib/...
or
$ bazel build //demo_lib:hello_great
1.5.2.2同包下的库依赖
1.编写C++源文件
在demo_lib目录中新建hello_world.cc,包含hello_great.h并调用文件中的get_great函数,内容如下:
#include "hello_great.h"
#include <iostream>
using namespace std;
int main(int argc, char const *argv[])
{

    cout << get_great("bazel !!!!!!!!" ) << endl;
    return 0;
}
2.编辑BUILD文件
cc_binary(
    name = "hello_world",
    deps = [":hello_great_lib"], #当前文件夹:
    srcs = ["hello_world.cc"],
)
3.编译
终端进入pro02_lib目录,执行:
$ bazel build //demo_lib/...
or
$ bazel build //demo_lib:hello_world
4.执行
执行命令:
$ ./bazel-bin/demo_lib/hello_world
or
$ bazel run //demo_lib:hello_world
1.5.2.3跨包库依赖
1.新建包
基于上节,在pro02_lib下新建包:demo_main,包下新建BUILD文件。
2.新建C++源文件
在包demo_main中新建hello_world.cc文件,需要包含hello_great.h,并调用头文件中的get_great函数,内容如下:
// #include "hello_great.h"
#include "../demo_lib/hello_great.h"
#include <iostream>
using namespace std;
int main(int argc, char const *argv[])
{

    cout << get_great("bazel !!!!!!!!" ) << endl;
    return 0;
}
3.编辑BUILD文件
BUILD文件内容如下:
cc_binary(
    name = "hello_world",
    deps = ["//demo_lib:hello_great_lib"],
    srcs = ["hello_world.cc"],
)
4.修改hello_great_lib跨包库权限
#方式1 过于粗暴
#package(default_visibility = ["//visibility:public"])  #声明包为公用的

cc_library(
    name = "hello_great_lib",
    srcs = ["hello_great.cc"],
    hdrs = ["hello_great.h"],
    #方式2 指定对应包名称
    visibility = ["//demo_main:__pkg__"], #对demo_main开放权限
)
5.编译
$ bazel build //demo_main/...
6.执行
$ ./bazel-bin/demo_main/hello_world
1.6预备知识----protobuf
概念:protobuf全程Ptotocol buffers,是Google研发的一种跨语言、跨平台的序列化数据结构的方式,是一个灵活的、高效的用于序列化数据的协议。
特点:在序列化数据时常用的数据格式还有XML、JSON等,相比较而言,protobuf更小、效率更高且使用更为便捷,protobuf内置编译器,可以将protobuf文件编译成C++、Python、Java、C#、Go等多种语言代码,然后可以直接被对应语言使用,轻松实现对数据流的读或写操作而不需再做特殊解析。
实现流程:
	1-编写proto文件
	2-配置BUILD文件,编译生成对应的C++/Python文件
	3-在C++/Python中调用
1.6.1 proto使用之文件创建
16.1.1创建proto文件
在/apollo/cyber目录下新建文件夹demo_base_proto,文件夹下新建文件student.proto,并输入如下内容:
//使用的proto版本
syntax = "proto2";

//包声明
package apollo.cyber.demo_base_proto;

//消息声明
//关键字 message 相当于class
message Student {

    //字段 --- 名字、年龄、身高、书籍
    //字段格式 --- 字段规则、数据类型、字段名、编号
    required string name = 1;
    optional uint64 age = 2;
    optional double height = 3;
    repeated string books = 4;
}
字段规则:
- required ——调用时候,必须提供该字段的数值,否则该消息将被视为未初始化,不建议使用,当需要把字段修改为其他规则时,回村在兼容性问题
- optional ——调用时候该字段的数值可以设置也可以不设置,不设置时,会根据数据类型生成默认值
- repeated ——该规则字段可以以动态数组的方式存储多个数据
数据类型:
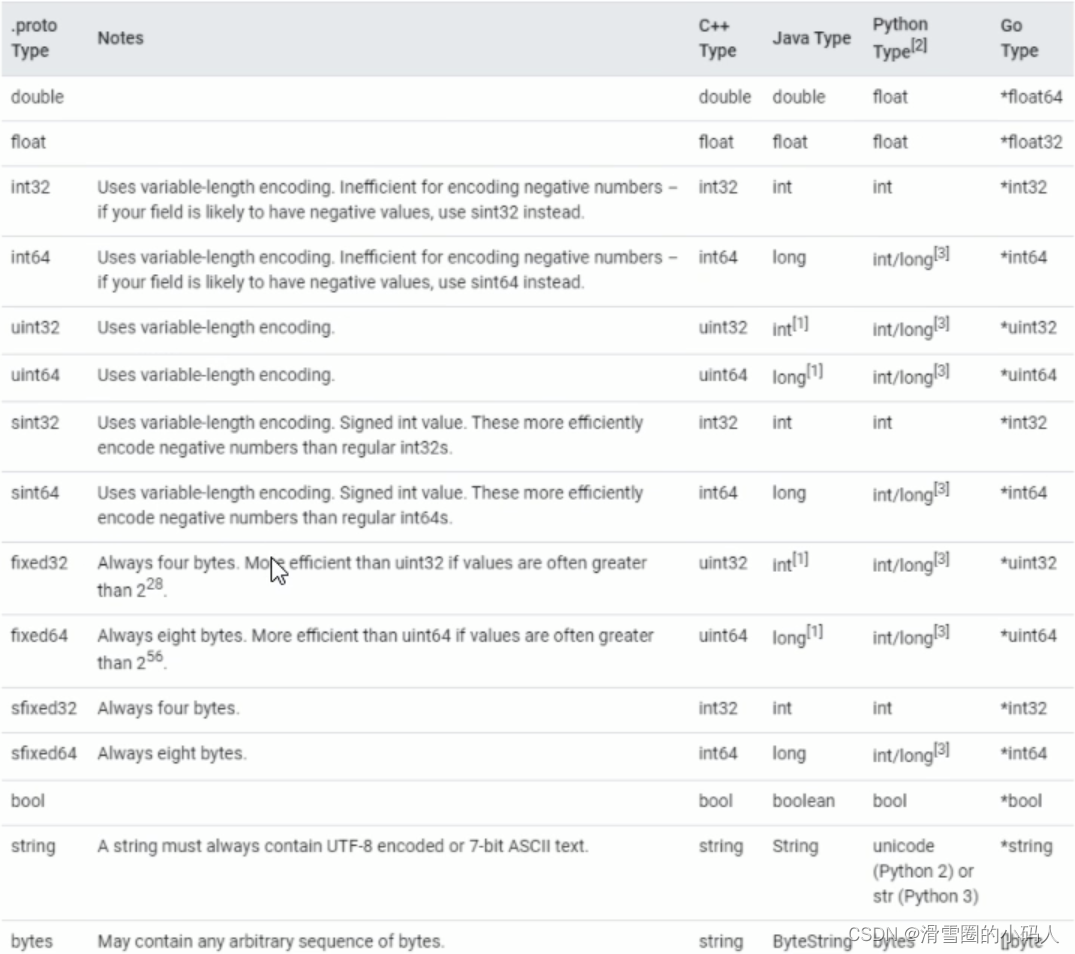
字段名称
字段名称就是变量名,其命名规则参考C++中的变量名命名规则即可
字段编号
每个字段都有一个编号,用于在消息的二进制格式中标识字段
16.1.2proto文件编译
1.编译BUILD文件
在demo_base_proto目录下新建BUILD文件,并输入下面内容:
#加载py_proto_library函数
#参数1:函数的源文件
#参数2:函数名
load("//tools:python_rules.bzl","py_proto_library")
package(default_visibility = ["//visibility:public"])
#需要生成proto库

proto_library(
    name = "student_proto",
    srcs = ["student.proto"],
)


#生成c++相关的源文件
cc_proto_library(
    name = "student_cc",
    deps = [":student_proto"],
)

#生成python相关的源文件
py_proto_library(
    name = "student_py",
    deps = [":student_proto"],
)
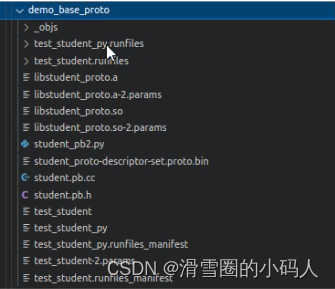
2.编译
终端进入/apollo目录,执行编译铭刻ing:
$ bazel build cyber/demo_base_proto/...
在/apollo/bazel-bin/cyber/demo_base/proto下将生成可以被C++和Python调用的中间文件。
1.6.2 proto读写之C++实现
实现流程:
	1-编写C++源文件
	2-配置BUILD文件
	3-编译
	4-执行
1.6.2.1编写C++源文件
在demo_base_proto目录下新建test_student.cc文件,输入内容如下:
/*
    操作 student 对象 , 实现数据的读写
    流程:
        1.包含头文件
        2.创建 student 对象
        3.向对象写数据
        4.读数据
*/

// 1.包含头文件
#include "cyber/demo_base_proto/student.pb.h"
// #include "../bazel-bin/cyber/demo_base_proto/student.pb.h"
using namespace std;

int main(int argc, char const *argv[])
{

        //2.创建 student 对象
        apollo::cyber::demo_base_proto::Student stu;

        //3.向对象写数据
        //一般情况调用的是set_xxx函数
        stu.set_name("huluwa");
        stu.set_age(7);
        stu.set_height(1.75);
        stu.add_books("yuwen");
        stu.add_books("shuxue");
        stu.add_books("yingyu");


        //4.读数据
        string name = stu.name();
        uint64_t age = stu.age();
        double height = stu.height();

        cout << "name: " << name << "; age: " << age << "; height: " << height << endl;
        for (int i = 0; i < stu.books_size(); i++)
        {

            string book = stu.books(i);
            cout << book << "-";
        }
        cout << endl;

    return 0;
}
1.6.2.2配置BUILD文件
BUILD文件追加如下内容:
#配置 C++ 调用proto的实现
cc_binary(
    name = "test_student",
    deps = [":student_cc"],
    srcs = ["test_student.cc"],
)
1.6.2.3编译
运行如下编译命令:
$ bazel build cyber/demo_base_proto/...
1.6.2.4执行
$ ./bazel-bin/cyber/demo_base_proto/test_student
1.6.3 proto读写之Python实现
实现流程:
	1-编写Python源文件
	2-配置BUILD文件
	3-编译
	4-执行
1.6.3.1编写Python源文件
在demo_base_proto目录下新建test_student_py.py文件,输入内容如下:
#!/usr/bin/env python3
""""
    操作 student 对象  实现数据的读写
    流程:
        1.导包
        2.创建 student 对象
        3.向对象写数据
        4.读数据
"""
#   1.导包
from cyber.demo_base_proto.student_pb2 import Student
if __name__ == "__main__":
        #2.创建 student 对象
        stu = Student( )

        #3.向对象写数据
        stu.name = "aotuman"
        stu.age = 8
        stu.height = 1.4
        stu.books.append("yuwen")
        stu.books.append("shuxue")
        stu.books.append("C++")

        #4.读数据
        print("name=%s; age=%d; height=%.2f" %(stu.name, stu.age, stu.height))
        for book in stu.books:
            print("book = %s" %book)
1.6.3.2配置BUILD文件
BUILD文件追加如下内容:
#配置 Python 调用proto的实现
py_binary(
    name = "test_student_py",
    deps = [":student_py"],
    srcs = ["test_student_py.py"],
)
1.6.3.3编译
运行如下编译命令:
$ bazel build cyber/demo_base_proto/...
1.6.3.4执行
$ ./bazel-bin/cyber/demo_base_proto/test_student_py
第二章 Cyber RT通信机制
本章主要介绍Cyber RT中最为核心实现:通信机制。所谓通信机制就是如何在不同的单元模块之间传输数据,比如:雷达、摄像头、GPS、地图、车辆控制、车辆参数、车辆目的地。这些消息是以河中方式在不同模块之间传输的,不同传输方式又有怎样的应用场景等等。
本章内容:
	1-话题通信
	2-服务通信
	3-参数使用
	4-组件使用
2.1 话题通信
1.概念
以发布订阅的方式实现不同节点之间的数据交互通信模式,例如雷达、GPS等。
2.作用
用于不断更新的、少逻辑处理的数据传输场景
3.需求
实现发布订阅模型,要求发布方可以周期性的循环发送学生消息,订阅方可以订阅到学生消息,并解析将结果输出在终端上。
4.流程
实现流程:
	1-编写消息在体(protobuf文件)并配置
	2-编写发布方并配置
	3-编写订阅方并配置
	4-编译并执行
2.1.1 C++实现
2.1.1.1发布方实现
demo_cc目录下新建C++文件demo01_talker.cc,输入如下内容:
/*
        需求:按照某个固定频率 0.5次/秒 循环发布学生信息
        实现:
                1.包含头文件;
                2.包含cyber框架;
                3.创建节点;
                4.创建发布者;
                5.组织并发布数据(实现发布逻辑);
                6.等待节点关闭,释放资源。

*/
//1.包含头文件;
#include "cyber/cyber.h"
#include "cyber/demo_base_proto/student.pb.h"

using apollo::cyber::demo_base_proto::Student;
int main(int argc, char const *argv[])
{


    // 2.包含cyber框架;
    apollo::cyber::Init(argv[0]);  //指当前文件

    // 3.创建节点;
   auto talker_node =  apollo::cyber::CreateNode("ergou");

    // 4.创建发布者;
    /*
        std::shared_ptr<apollo::cyber::Writer<MessageT>> CreateWriter<MessageT>(const std::__cxx11::string &channel_name)
    */
    auto talker = talker_node->CreateWriter<Student>("chatter") ;


    // 5.组织并发布数据(实现发布逻辑);
    // 5.1 循环
    // 5.2指定频率

    apollo::cyber::Rate rate(0.5); //1s 0.5次,即2秒1次
    uint64_t seq = 0;
    while(apollo::cyber::OK()){

        seq++;
        AINFO << "第" << seq << "条数据";

        //组织数据
        auto stu_ptr = std::make_shared<Student>();
        stu_ptr->set_name("huluwa");
        stu_ptr->set_age(seq);
        stu_ptr->set_height(1.4);
        stu_ptr->add_books("yuwen");
        stu_ptr->add_books("shuxue");
        stu_ptr->add_books("yingyu");

        //发布数据
        talker->Write(stu_ptr);

        //休眠
        rate.Sleep();
    }

    // 6.等待节点关闭,释放资源。
    apollo::cyber::WaitForShutdown();

    return 0;
}
配置BUILD文件,如下:
cc_binary(
    name = "demo01_talker",
    deps = [
        "//cyber",
        "//cyber/demo_base_proto:student_cc",
    ],
    srcs = ["demo01_talker.cc"],
)
2.1.1.2订阅方实现
demo_cc目录下新建C++文件demo02_listener.cc,输入如下内容:
/*
    需求:订阅发布方发布的数据并解析
    实现:
        1.包含头文件
        2.初始化cyber框架
        3.创建节点
        4.创建订阅者
        5.解析数据(数据的解析逻辑)
        6.等待节点关闭,释放资源
*/

//1.包含头文件
#include "cyber/cyber.h"
#include "cyber/demo_base_proto/student.pb.h"

using apollo::cyber::demo_base_proto::Student;
using namespace std;
void cb(const std::shared_ptr<Student>& stu)
{

    //解析学生数据并打印
    AINFO << "name: " << stu->name() ;
    AINFO << "age: " << stu->age() ;
    AINFO << "height: " << stu->height() ;
    for( int i = 0; i < stu->books_size(); i++ )
    {

        AINFO <<"books: " <<  stu->books(i) ;
        AINFO << "接受到了第"<<stu->age() << "条数据" ;
    }
    AINFO << "---------------------------------";

}

int main(int argc, char const *argv[])
{

    // 2.初始化cyber框架
    apollo::cyber::Init(argv[0]);
    // 3.创建节点
    auto listener_node = apollo::cyber::CreateNode("cuihua");
    // 4.创建订阅者
    auto listener = listener_node->CreateReader<Student>("chatter", cb);
    // 5.解析数据(数据的解析逻辑)

    // 6.等待节点关闭,释放资源
    apollo::cyber::WaitForShutdown();
    return 0;
}
配置BUILD文件,如下:
cc_binary(
    name = "demo02_listener",
    deps = [
        "//cyber",
        "//cyber/demo_base_proto:student_cc",
    ],
    srcs = ["demo02_listener.cc"],
)
2.1.1.3编译执行
编译:
$ bazel build cyber/demo_cc/…
执行(需要两个终端):
终端A执行发布方:
$ source cyber/setup.bash
$ ./bazel-bin/cyber/demo_cc/demo01_talker
终端B执行订阅方:
$ source cyber/setup.bash
$ ./bazel-bin/cyber/demo_cc/demo02_listener
2.1.2 Python实现
2.1.2.1发布方实现
demo_py目录下新建Python文件demo01_talker_py.py,输入如下内容:
#!/usr/bin/env/python3
"""
    需求:按照某个固定频率 0.5次/秒 循环发布学生信息
    实现:
            1.包含头文件
            2.包含cyber框架
            3.创建节点;
            4.创建发布者;
            5.组织并发布数据(实现发布逻辑)
            6.节点关闭,释放资源。
"""
    # 1.包含头文件
from cyber.python.cyber_py3 import cyber
from cyber.demo_base_proto.student_pb2 import Student
import time
#主逻辑
def talk():
    # 3.创建节点;
    talker_node = cyber.Node("cuihua")
    # 4.创建发布者;
    talker =  talker_node.create_writer("chatter", Student)
    # 5.组织并发布数据(实现发布逻辑)
    seq =0
    while not cyber.is_shutdown():
        seq +=1
        print("message NO.%d" %seq)
        #组织数据
        stu = Student()
        stu.name = "autuman"
        stu.age
最低0.47元/天 解锁文章


 722
722


 被折叠的 条评论
为什么被折叠?
被折叠的 条评论
为什么被折叠?
 到【灌水乐园】发言


