


文章目录
- PyTorch 训练一个分类器(五步:1加载数据、2定义网络、3定义Loss 和 Optimizer、4训练网络、5测试网络)
PyTorch 训练一个分类器(五步:1加载数据、2定义网络、3定义Loss 和 Optimizer、4训练网络、5测试网络)
时间:2019年6月22日14:51:16
0. 官网链接:TRAINING A CLASSIFIER
1. Loading and normalizing CIFAR10
import torch
import torchvision
import torchvision.transforms as transforms  #  用于transforms数据的包


transform = transforms.Compose(
            [transforms.ToTensor(),
             transforms.Normalize((0.5, 0.5, 0.5), (0.5, 0.5, 0.5))])

trainset = torchvision.datasets.CIFAR10(root='./data', train=True, download=False, transform=transform)  # 下载训练数据

trainloader = torch.utils.data.DataLoader(trainset, batch_size=4, shuffle=True, num_workers=2)  #  按照 batch_size 加载(组合)训练数据

testset = torchvision.datasets.CIFAR10(root='./data', train=False, download=False, transform=transform)  #  下载测试数据

testloader = torch.utils.data.DataLoader(testset, batch_size=4, shuffle=False, num_workers=2)  #  按照 batch_size 加载(组合)测试数据

classes = ('plane', 'car', 'bird', 'cat','deer', 'dog', 'frog', 'horse', 'ship', 'truck')  #  CIFAR10 的10个类别数据
import matplotlib.pyplot as plt
import numpy as np

# functions to show an image


def imshow(img):
    img = img / 2 + 0.5     # unnormalize; 将 [-1,1] 归一化到 [0,1]
    npimg = img.numpy()
    plt.imshow(np.transpose(npimg, (1, 2, 0))) # 将数据得到BRG 通道转换成了RGB通道用于plt显示使用。
    plt.show()


# get some random training images
dataiter = iter(trainloader)
images, labels = dataiter.next()  # 加载其中一个 batch 的四张图片。

print(images.size())  #  torch.Size([4, 3, 32, 32])  ;四张图片,RGB三通道,32*32的分辨率
print(labels)  # tensor([5, 0, 5, 1]);图片对应的 label 编号

print(torchvision.utils.make_grid(images).size())  # torch.Size([3, 36, 138]); 四张图片合并成一整图片

# show images
imshow(torchvision.utils.make_grid(images))  #
# print labels
print(' '.join('%5s' % classes[labels[j]] for j in range(4)))  #   dog plane dog car; label 编号对应的名称
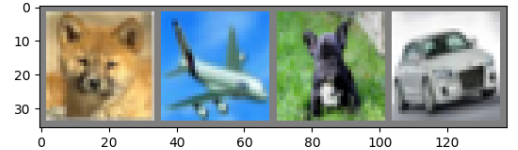
一个 batch 的图片显示如下:
2. Define a Convolutional Neural Network
- 直接使用之前的那个LeNet-5 10类分类网络。但需要将原来的单通道输入改成是三通道输入。
import torch.nn as nn
import torch.nn.functional as F

device = torch.device("cuda:0" if torch.cuda.is_available() else "cpu")  #  using GPU and CPU
print(device) # 0

class Net(nn.Module):
    def __init__(self):
        super(Net, self).__init__()
        self.conv1 = nn.Conv2d(3, 6, 5)  # 将第一个卷积的单通道(灰度图)输入改成是三通道(RGB彩图)输入
        self.pool = nn.MaxPool2d(2, 2)
        self.conv2 = nn.Conv2d(6, 16, 5)
        self.fc1 = nn.Linear(16 * 5 * 5, 120)
        self.fc2 = nn.Linear(120, 84)
        self.fc3 = nn.Linear(84, 10)

    def forward(self, x):
        x = self.pool(F.relu(self.conv1(x)))
        x = self.pool(F.relu(self.conv2(x)))
        x = x.view(-1, 16 * 5 * 5)
        x = F.relu(self.fc1(x))
        x = F.relu(self.fc2(x))
        x = self.fc3(x)
        return x

net = Net()
net.to(device)  # net to GPU
3. Define a Loss function and optimizer(梯度下降算法)
- use a Classification Cross-Entropy loss
- and SGD with momentum
import torch.optim as optim

criterion = nn.CrossEntropyLoss()
optimizer = optim.SGD(net.parameters(), lr=0.001, momentum=0.9)
4. Train the network
for epoch in range(2):  # 所有数据被使用的次数;loop over the dataset multiple times

    running_loss = 0.0  # 初始化
    for i, data in enumerate(trainloader, 0):
        # get the inputs; data is a list of [inputs, labels]
        # inputs, labels = data  # CPU 这里加载的是一个 batch(四张)图片
        inputs, labels = data[0].to(device), data[1].to(device)  # CPU or GPU

        # zero the parameter gradients
        optimizer.zero_grad()  # 使用一个 batch 的数据,optimizer 就优化一次。

        # forward + backward + optimize
        outputs = net(inputs)
        loss = criterion(outputs, labels)
        loss.backward()  # 这一步是计算出所有 parameter 的 gradient
        optimizer.step()  # 这一步是使用计算出的 gradient 来 optimizer parameter

        # print statistics
        running_loss += loss.item()
        if i % 2000 == 1999:    # print every 2000 mini-batches
            print('[%d, %5d] loss: %.3f' % (epoch + 1, i + 1, running_loss / 2000))
            running_loss = 0.0  # 每2000 个batch计算一个 Loss

print('Finished Training')
pytorch学习笔记(1)-optimizer.step()和scheduler.step():https://blog.csdn.net/qq_20622615/article/details/83150963
5. Test the network on the test data
1. 显示测试图片和标签,方法和显示训练图片完全相同
dataiter = iter(testloader)
images, labels = dataiter.next()
images, labels =images.to(device), labels.to(device)

# print images
imshow(torchvision.utils.make_grid(images))
print('GroundTruth: ', ' '.join('%5s' % classes[labels[j]] for j in range(4)))
# GroundTruth:    cat  ship  ship plane

outputs = net(images)  # 预测图片的结果,每个图片会输出十个值,最大的那个值所在的位置表示其类别
_, predicted = torch.max(outputs, 1)  # 1表示按行求取,即求取每一行的最大值的值(不使用), 和下标index(使用)

print('Predicted: ', ' '.join('%5s' % classes[predicted[j]] for j in range(4)))
# Predicted:    cat  ship  ship  ship
2. 测试所有的图片:
correct = 0  #  预测对的数量
total = 0  # 所有的数量
with torch.no_grad():
    for data in testloader:  # 每个 data 是四张图片
        # images, labels = data  # 4个图片的真实labels CPU
        images, labels = data[0].to(device), data[1].to(device)  #  CPU or GPU
        outputs = net(images)
        _, predicted = torch.max(outputs.data, 1)  # 4个图片的预测值
        total += labels.size(0)  # 0表示图片的数量4,1表示类别数量10
        correct += (predicted == labels).sum().item()  # 4张图片中被正确预测的图片数量

print('Accuracy of the network on the 10000 test images: %d %%' % (100 * correct / total))
# Accuracy of the network on the 10000 test images: 52 %
3. 统计10个类别中,每个类别预测的正确率
class_correct = list(0. for i in range(10))  # 存储每个类别预测正确的图片的数量
class_total = list(0. for i in range(10))  # 存储每个类别的图片的数量。
with torch.no_grad():
    for data in testloader:
        # images, labels = data  # CPU 一个batch、4张图片
        images, labels = data[0].to(device), data[1].to(device)  #  CPU or GPU
        outputs = net(images)  #  输出大小是[4, 10]
        _, predicted = torch.max(outputs, 1)  #  每行最大值的 index(下标就是类别编号),大小是[4, 1];predicted 中的值是index 0到9
        c = (predicted == labels).squeeze()  # 将(4,1)压缩成(4);c中的值是0 或 1 即是否预测对。
        for i in range(4):
            label = labels[i]  # 找到每张图片的真实 label,0到9的值
            class_correct[label] += c[i].item()  # c存储当前的四张图片是否预测正确的信息 0/1
            class_total[label] += 1  #

for i in range(10):
    print('Accuracy of %5s : %2d %%' % (classes[i], 100 * class_correct[i] /class_total[i]))

# Accuracy of plane : 53 %
# Accuracy of   car : 64 %
# Accuracy of  bird : 27 %
# Accuracy of   cat : 55 %
# Accuracy of  deer : 37 %
# Accuracy of   dog : 50 %
# Accuracy of  frog : 60 %
# Accuracy of horse : 57 %
# Accuracy of  ship : 70 %
# Accuracy of truck : 51 %
4. Training on GPU (只将网络和数据转移到cuda,plt 显示图片前须将数据转移到CPU上)
- 这里以 data/Tensor 为例,net 完全相同。
1. 转移到cuda上:
device = torch.device('cuda:0')
print(device)  # 'cuda:0'

data = data.to(device)  # 数据使用这种
net.to(device)  #  网络使用这种

# 或
data.to('cuda') # net.to('cuda')
# 或
data = data.cuda()
2. 转移到cpu上:
data = data.cpu()

# 或
data = data.to('cpu')
3. 最常用的方法(保证无论是否有cuda,程序都能运行):
device = torch.device("cuda:0" if torch.cuda.is_available() else "cpu")
# Assuming that we are on a CUDA machine, this should print a CUDA device:
print(device)  # cuda:0

net.to(device)  #  net to cuda
inputs, labels = data[0].to(device), data[1].to(device)  #  data to cuda
4. 多cuda的使用方法:
官网链接
1. OPTIONAL: DATA PARALLELISM
2. PyTorch中使用指定的GPU
3. torch.cuda.set_device(device)
1. GPU的数量:torch.cuda.device_count()
2. 关键代码:将模型分配到多个 cuda
model = Model(input_size, output_size)  #  模型实例化

model = nn.DataParallel(model)  # 模型分解
# model=nn.DataParallel(model,device_ids=[0,1,2]) # multi-GPU 指定具体的 cuda
model.to(device)  # 模型转到多个cuda
3. 将数据分配到多个 cuda
input = data.to(device) # 将数据转移到cuda
4. 官网的使用多(所有)GPU的方法
# import os
# os.environ["CUDA_VISIBLE_DEVICES"] = "0, 1, 2, 3"  # 设置程序最多能调用的GPU编号

device = torch.device("cuda" if torch.cuda.is_available() else "cpu")  # 保证有无cuda,程序都能运行。

model = Model(input_size, output_size)
if torch.cuda.device_count() > 1:
    print("Let's use", torch.cuda.device_count(), "GPUs!")
     # dim = 0 [30, xxx] -> [10, ...], [10, ...], [10, ...] on 3 GPUs
    model = nn.DataParallel(model)  # 模型分解

model.to(device)  #  模型转移到 cuda

for data in rand_loader:  # 加载一个 batch 的图片 。这些图片会尽可能的平均分配个多个GPU
    input = data.to(device)  # 将数据转移到 cuda
    output = model(input)
    print("Outside: input size", input.size(),  "output_size", output.size())
THE END


 2577
2577


 被折叠的 条评论
为什么被折叠?
被折叠的 条评论
为什么被折叠?
 到【灌水乐园】发言


