


目录
3.4.2 使用kernle_debug调试arm64 linux内核代码
1 介绍
由ARM架构专家开发的ARM DS-5开发工具链帮助工程师为ARM应用处理器(如Cortex™-A系列,Cortex-R实时处理器和其他ARM嵌入式处理器)开发强大且高度优化的嵌入式软件 。 DS-5工具链包括一流的ARM C / C ++编译器,强大的Linux / Android™/ RTOS调试器,ARM Streamline™系统性能分析器和实时系统仿真模型, 所有这些都方便地封装在基于Eclipse的用户友好的集成开发环境(IDE)中。DS-5为您提供了一套核心工具,以确保系统中最重要的软件能够高效可靠地运行。
本文主要介绍使用DS-5工具来对ARM64 linux内核进行单步调试。对于从事linux内核调试的工作和学习的朋友,使用模拟器单补调试,可以大大提高调试速度以及学习成本。当然使用也可以使用qemu来进行调试,不过DS-5可以更好的调试汇编代码,很方便的查看ARMv8芯片内部的寄存器的值。
2 开发环境
- Ubuntu 18.04.2 LTS
- DS-5_CE_v5.29.1
- Linux-5.2.11
3 准备工作
3.1 Ubuntu环境准备
本问使用的Ubuntu 18.04.2 LTS版本,可以从ubuntu官网下载安装镜像,ubuntu系统可以本地安装也可以通过虚拟机安装,笔者的环境是使用pc进行本地安装的,可以百度一下各种安装攻略,比较简单。Ubuntu安装完成以后,需要安装如下软件包
$ sudo apt-get install libncurses-5-dev libssl-dev build-essential openssl git由于接下来会编译linux内核,需要安装交叉编译链
$ sudo apt-get install gcc-aarch64-linux-gnu

$ aarch64-linux-gnu-gcc -v
Using built-in specs.
COLLECT_GCC=aarch64-linux-gnu-gcc
COLLECT_LTO_WRAPPER=/usr/lib/gcc-cross/aarch64-linux-gnu/7/lto-wrapper
Target: aarch64-linux-gnu
Configured with: ../src/configure -v --with-pkgversion='Ubuntu/Linaro 7.4.0-1ubuntu1~18.04.1' --with-bugurl=file:///usr/share/doc/gcc-7/README.Bugs --enable-languages=c,ada,c++,go,d,fortran,objc,obj-c++ --prefix=/usr --with-gcc-major-version-only --program-suffix=-7 --enable-shared --enable-linker-build-id --libexecdir=/usr/lib --without-included-gettext --enable-threads=posix --libdir=/usr/lib --enable-nls --with-sysroot=/ --enable-clocale=gnu --enable-libstdcxx-debug --enable-libstdcxx-time=yes --with-default-libstdcxx-abi=new --enable-gnu-unique-object --disable-libquadmath --disable-libquadmath-support --enable-plugin --enable-default-pie --with-system-zlib --enable-multiarch --enable-fix-cortex-a53-843419 --disable-werror --enable-checking=release --build=x86_64-linux-gnu --host=x86_64-linux-gnu --target=aarch64-linux-gnu --program-prefix=aarch64-linux-gnu- --includedir=/usr/aarch64-linux-gnu/include
Thread model: posix
gcc version 7.4.0 (Ubuntu/Linaro 7.4.0-1ubuntu1~18.04.1)
3.2 源代码准备
3.2.1 Linux代码准备
我们从Linux内核官方仓库下载内核代码到本地
$ git clone https://git.kernel.org/pub/scm/linux/kernel/git/stable/linux.git上述命令执行完成之后,会在本地当前目录创建一个名为linux的目录,其中包含一个.git目录,用来保存该仓库的版本记录。本文选择的内核版本是v5.2.11,所以需要checkout到这个分支
$ cd linux
$ git checkout v5.2.11
配置内核
$ make ARCH=arm64 CROSS_COMPILE=aarch64-linux-gnu- defconfig构建内核
$ make构建完成以后,生成以下镜像
arch/arm64/boot/Image
arch/arm64/boot/dts/arm/foundation-v8-gicv3-psci.dtb
3.2.2 bootwrapper代码准备
3.2.2.1 从官网克隆源码bootwrapper代码到本地
$ git clone git://git.kernel.org/pub/scm/linux/kernel/git/mark/boot-wrapper-aarch64.git3.2.2.2 配置并构建bootwrapper
$ cd boot-wrapper-aarch64
$ autoreconf -i
$ ./configure --enable-psci --enable-gicv3 --with-kernel-dir=$KERNEL_ROOT --with-dtb=foundation-v8-gicv3-psci.dtb --host=aarch64-linux-gnu --with-cmdline="rdinit=/linuxrc console=ttyAMA0"
- --enable-psci : 使能psci
- --enable-gicv3 : 使能gicv3
-
--with-kernel-dir:用于指定内核目录,就是3.2.1中内核的路径 --with-dtb:用于指定DTB文件,就是3.2.1中编译出来的foundation-v8-gicv3-psci.dtb- --host: 用于指定编译工具
- --with-cmdline: 用于制定内核启动参数
更多配置选项可以通过./configure --help获取
3.2.2.3 构建
$ make构建完成以后,在当前目录生成linux-system.axf,该文件将在接下来的ds-5中使用。
3.3 DS-5准备
3.3.1 下载安装DS-5
从ARM官网下载安装DS-5,下载地址如下:
https://developer.arm.com/tools-and-software/embedded/legacy-tools/ds-5-development-studio/downloadsARM DS-5使用需要购买license,一般做相关开发的公司会购买,作为个人爱好者也可以进行选择30天试用版本用来体验ARM DS-5强大的功能。另外,ARM对于社区提供了一个免费的版本DS-5 community edition,该版本是DS-5的简化版本,不过对于我们单步调试内核足够了,本文选择使用DS-5 community edition进行调试。
首先从ARM官网下载DS-5 community edition, 下载的地址如下:
https://developer.arm.com/tools-and-software/embedded/legacy-tools/ds-5-development-studio/editions/community-edition写本文的时候,下载的版本为v5.29.1,linux软件包名为ds5-ce-linux64-29rel1.tgz
在ubuntu下对ds5-ce-linux64-29rel1.tgz进行解压,并执行./install.sh进行安装,安装步骤安装提示进行就可以了,安装完成以后,在应用菜单中选择“Eclipse for DS-5 CE v5.19.1”进行打开。
打开后,DS-5启动界面如下
3.4 使用DS-5调试源码
3.4.1 建立源码工程
对3.2章节中的源码建立一个工程,首先打开Eclipse DS-5菜单,选择"File" --> "New" --> "Makefile Project with Existing Code"
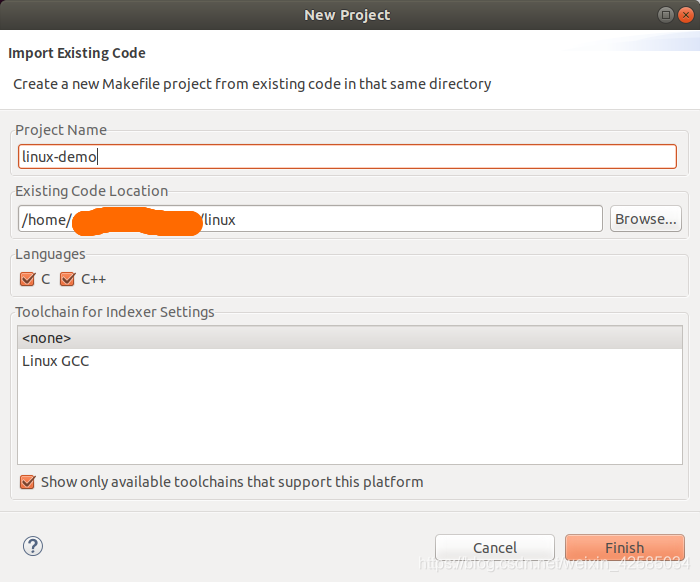
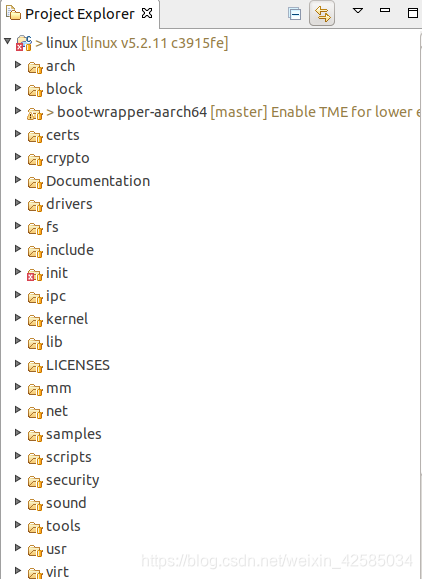
点击Finish建立源码工程,工程如下,我们将boot-wrapper-aarch64也放到linux源码中,方便查看
3.4.2 创建debug配置
首先创建一个debug配置,使用该配置连接Fixed Virtual Platform (FVP) 模拟平台。创建Debug Configurations时,您将内核设置为在FVP上加载。
依次点击菜单Run->Debug Configurations,打开调试配置界面以创建新连接:
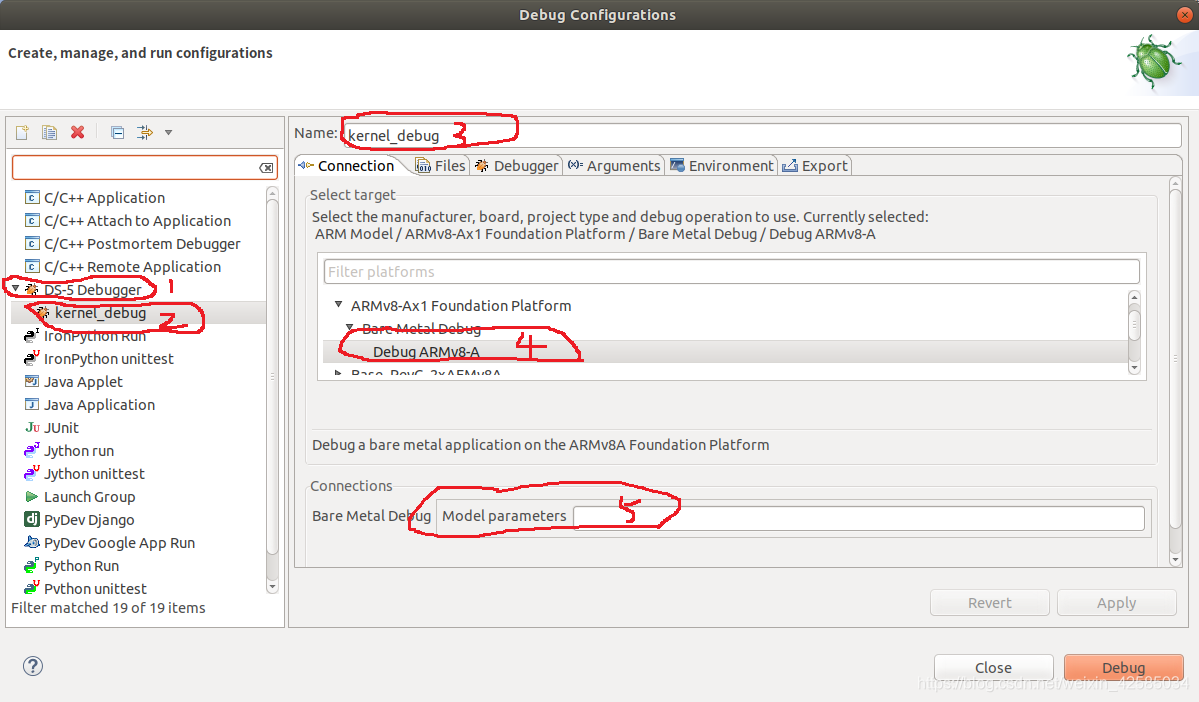
双击或右键点击上图左边栏红色1所示的DS-5 Debugger创建新连接,通过红色3设置新Debugger的名字为kernel_debug
3.4.2.1 配置Connection选项卡
在上图所示Connection选项卡中选择硬件模型Debug ARMv8-A(红色4),并修改上图所示的模型参数红色5,模型参数用于设定模拟器的参数,模拟器参数可以使用如下命令列举出来
$ ~/DS-5_CE_v5.29.1/bin/Foundation_Platform --help
ARM V8 Foundation Platformr0p0 (platform build 11.4.35)
Copyright 2017 ARM Limited.
All Rights Reserved.

Usage: Foundation_Platform [OPTIONS...]

Options:

  --help                 display this help message and quit
  --version              display the build version number and quit
  --quiet                suppress any non simulated output on stdout/stderr
  --quantum=N            Number of ticks to simulate per quantum
                         (default: 10000 )
  --min-sync-latency=N   Number of ticks to simulate before synchronizing
                         (default: 100)
  --cores=N              enable 1-4 coherent CPU instances
                         (default: 1 core)
  --bigendian            start cpus in big endian mode (default: little endian)
  --(no-)secure-memory   enable/disable security control of address map
                         (default: disabled)
  --(no-)gicv3           enable GICv3 or otherwise use legacy-compatible GICv2
                         (default: GICv3)
  --block-device=file    image file to use as persistent block storage
  --p9-root-dir=dir      shared directory between the host and the guest
  --read-only            mount block device image in read-only mode
  --image=file           ELF image to load
  --data=file@address    raw file to load at an address in secure memory
  --nsdata=file@address  raw file to load at an address in non-secure memory
  --(no-)semihost        enable/disable semihosting support (default: enabled)
  --semihost-cmd=cmd     a string used as the semihosting cmd-line
  --semihosting-heap_base=address
                         Virtual address of heap base. (default: 0)
  --semihosting-heap_limit=address
                         Virtual address of top of heap. (default: 0xFF000000)
  --semihosting-stack_base=address
                         Virtual address of base of descending stack. (default: 0xFFFF0000)
  --semihosting-stack_limit=address
                         Virtual address of stack limit. (default: 0xFF000000)
  --uart-start-port=P    attempt to listen on a free TCP port in the range
                         P..P+100 for each UART (default: 5000)
  --(no-)visualization   start a small webserver to visualize model state
                         (default: disabled)
  --network=(none|nat|bridged)
                         configure mode of network access (default: none)
  --network-nat-subnet=S subnet used for NAT networking
                         (default: 172.20.51.0/24)
  --network-nat-ports=M  optional comma separated list of NAT port mappings
                         in the form: host_port=model_port e.g. 8022=22
  --network-mac-address  MAC address to use for networking
                         (default: 00:02:f7:ef:f6:74)
  --network-bridge=dev   bridged network device name (default: ARM0)
  --switches=val         initial setting of switches in the system register
                         block (default:0)
  --use-real-time        Generic Timer system global counter updates in real
                         time at 100MHz
  --(no-)rate-limit      Rate limited to keep the simulation from spinning when
                         the CPU is in WFI state (default: disabled)
  --arm-v8.0             enable v8.0 version of the architecture
  --arm-v8.1             enable v8.1 version of the architecture
  --arm-v8.2             enable v8.2 version of the architecture
  --arm-v8.3             enable v8.3 version of the architecture
  --arm-v8.4             enable v8.4 version of the architecture (default)
  --(no-)sve             enable Scalable Vector Extension (default: enabled)
                         (requires v8.2 or later)
  --cadi-server          start CADI server allowing debuggers to connect to
                         targets in the simulation
  --print-port-number    print port number CADI server is listening to

More than one --image option may be given. Simulation will start from
the entry point in the final image

More than one --data or --nsdata option may be given
~/DS-5_CE_v5.29.1/bin/Foundation_Platform是安装DS-5版本后的安装目录,可以直接使用SDK中的命令启动内核
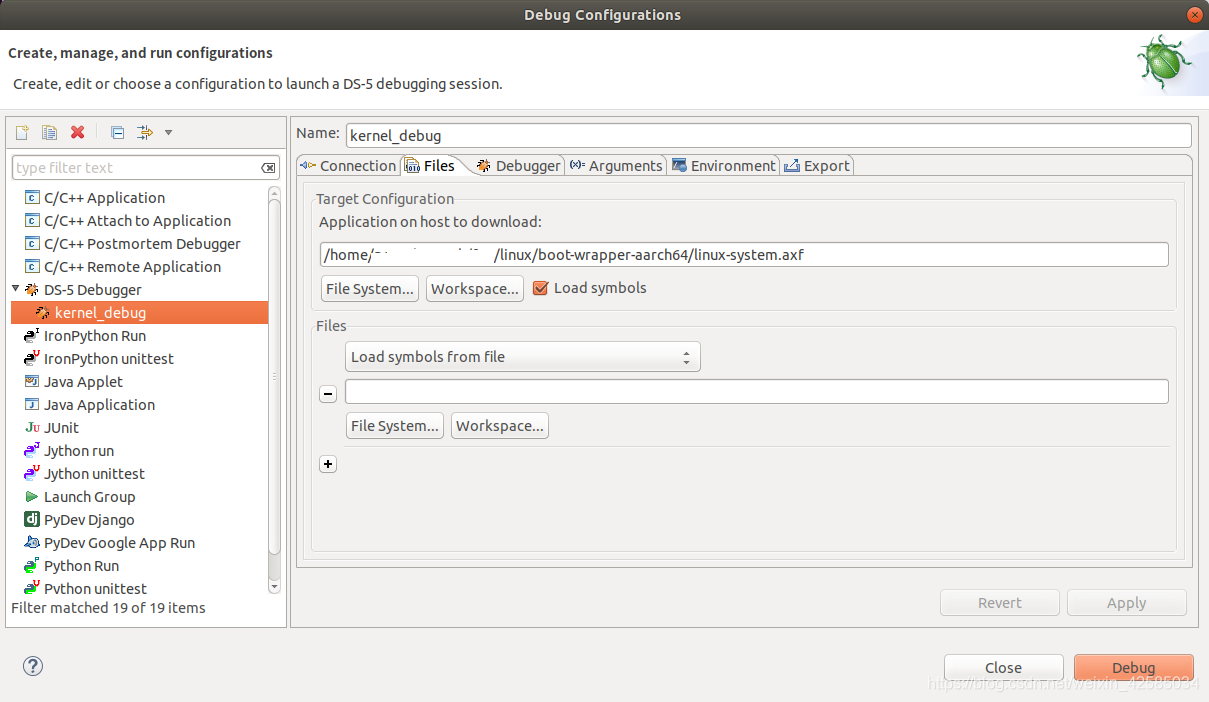
~/DS-5_CE_v5.29.1/bin/Foundation_Platform --image linux-system.axf3.4.2.2 配置Files选项卡
3.4.2.3 配置Debugger选项卡
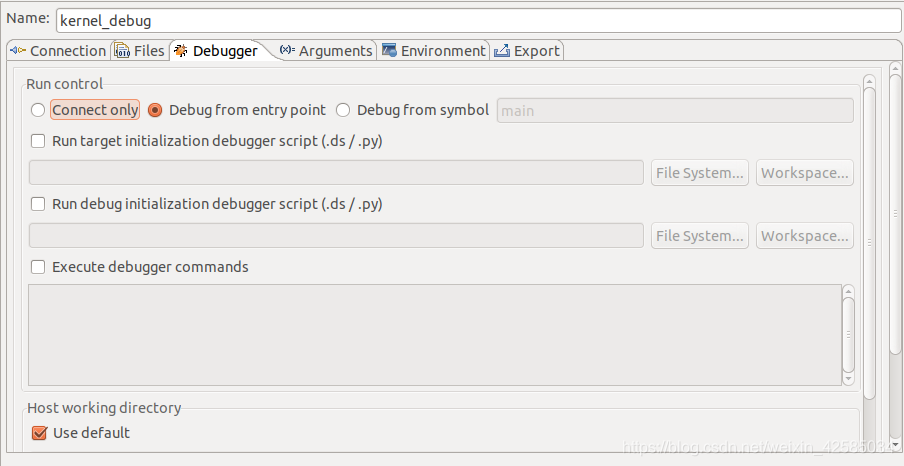
如图,选择 Debug from entry point
如果源代码不在工程目录下,则需要在Paths区域设置源码搜索路径,如boot-wrapper-aarch64和linux源码路径
到这里,debug配置已经配置ok,点击Apply按钮保存配置。
3.4.2 使用kernle_debug调试arm64 linux内核代码
操作了这么多步,终于开始调试了,有点小激动。首先点击调试配置界面中的Debug按钮或者右键点击调试连接名称选择Connect to Target开始调试。
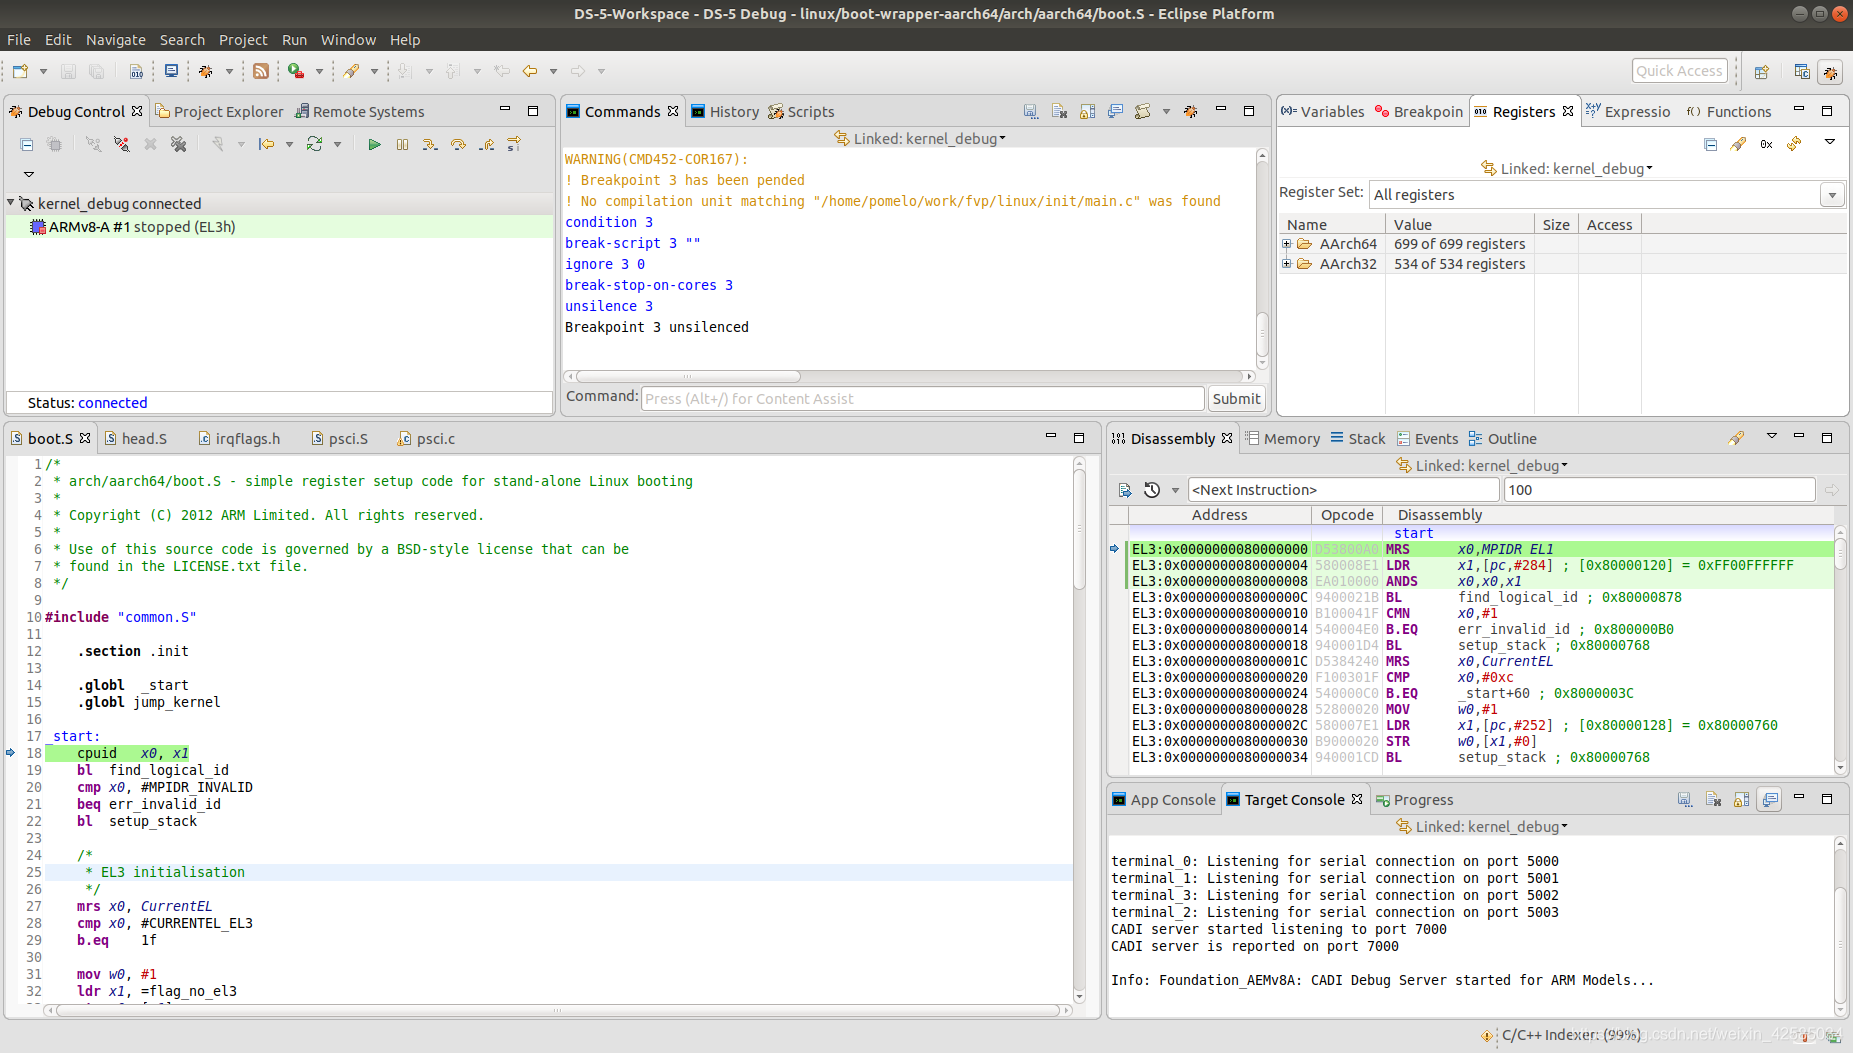
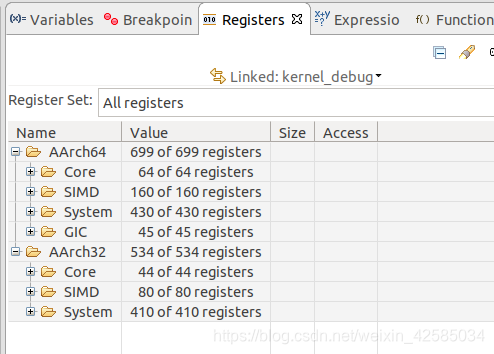
调试开始,断点在boot-wrapper-aarch64的入口_start处,如上图,接下来单步调试,可以在Registers选项卡中查看armv8的各种寄存器,十分的方便。
单步跟踪,直到走到boot-wrapper-aarch64的jump_kernel,在这里设置参数,并准备跳转的Linux内核
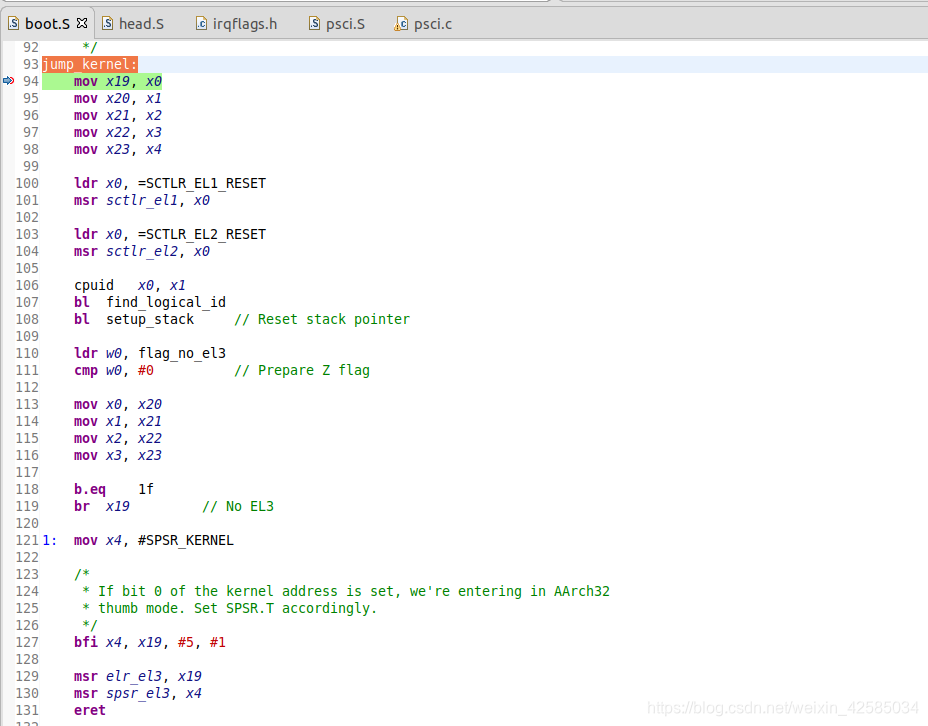
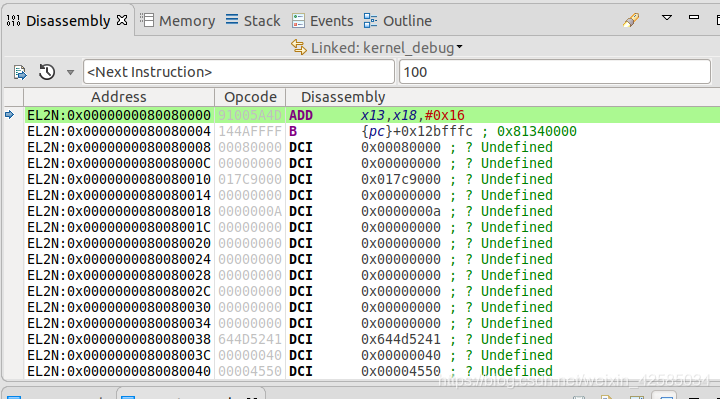
在最后,调用eret切换到el2并开始Linux内核运行,在这里碰到一个问题,在执行到eret以后,F5执行下一条指令,也就是跳转到linux内核执行,通过汇编我们看到我们已经跳转到linux中去了,但是代码并没有跳转到linux head.s中。
这个时候应该是没有找到linux的内核符号表,查了一些资料,网上说可能是处理在el3切换到el2后,符号表可能失效,因此需要再次加载符号表,加载命令如下:
add-symbol-file "/home/pomelo/work/fvp/linux/vmlinux"add-symbol命令用于加载符号表到指定的位置,格式为add-symbol-file filename [offset] [-s section address]...;其中,offset用于指定符号表中链接地址的偏移量。
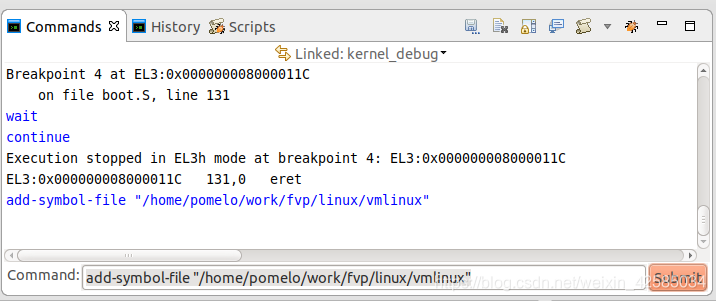
然后再往下调试,就可以在源码中进行单步调试了。
4 使用-O0的内核进行调试
Linux内核打开gcc的-O2选项优化导致,执行的路径与debug的显示也不对应,也会引起一些调试错误,所以最好选用-O0的内核版本。这里选择<<奔跑吧Linux内核>>书籍对应的内核代码进行调试,由于书本作者已经对内核进行了-O0处理,所有这里可以直接使用。
4.1 内核下载
git clone https://github.com/figozhang/runninglinuxkernel_4.0.git4.2 编译链设置
由于linux4.0的版本使用的是5.x的GCC工具,因此需要使用update-alternatives工具切换GCC版本。
首先安装5.x的GCC工具
sudo apt-get install gcc-5-aarch64-linux-gnu设置gcc-5版本
sudo update-alternatives --install /usr/bin/aarch64-linux-gnu-gcc aarch64-linux-gnu-gcc /usr/bin/aarch64-linux-gnu-gcc-5 5设置gcc-7版本
sudo update-alternatives --install /usr/bin/aarch64-linux-gnu-gcc aarch64-linux-gnu-gcc /usr/bin/aarch64-linux-gnu-gcc-7 7选择使用gcc-5版本
sudo update-alternatives --config aarch64-linux-gnu-gcc检查版本是否正确
aarch64-linux-gnu-gcc -v4.3 构建源码
build_ds5_arm64.sh4.4 使用DS-5进行调试
参考第3章建立Debug 配置,即可以开始内核单步调试。
不过中间也碰到一些坑,主要是CPU进行模式切换的时候,armv8从启动到内核运行,主要由EL3-->EL2-->EL1,在每次模式切换的时候,需要重新加载符号表。
1、设置断点
在el3切换到el2后,符号表可能失效,因此需要重新加载符号表,否则debug无法跟踪,由于fvp模拟器Linux内核加载地址为0x80080000,所以我们先通过命令行设置断点到0x80008000,如下:
thbreak EL2N:0x0000000080080000
当然也可以直接通过boot-wrapper-aarch64直接在boot.S的eret设置断点,然后跳到下一步就是内核入口地址
2、加载符号表
通过第一步,我们让程序运行到了内核入口,通过汇编可以看到我们正处于内核第一条指令,但是我们的源代码并没有跳到head.s的第一条代码中,这个时候就需要重新加载符号表。
linux的符号表为vmlinux,vmlinux文件中的调试符号有虚拟地址。因此,当加载vmlinux文件时,调试器假设操作系统已经启动并运行了MMU。但是也可以通过在加载符号文件时设置偏移量来在源代码级调试pre-MMU。
要计算偏移量,请计算代码的物理(P)和虚拟(V)地址之间的差异,通过readelf命令读取vmlinux中的链接地址,如下
$ readelf -h vmlinux
Entry point address: 0xffff800000080000
在arm64的内核,链接到虚拟地址0xffff800000080000,并加载到物理地址0x80080000,则偏移量为- 0xffff7fff80000000,即0x80080000 - 0xffff800000080000 (P-V)。
所以在此处输入如下命令加载内核符号,这样就成功和源代码关联上了,可以继续调试内核,非常方便。
add-symbol-file "X:\rlk\runninglinuxkernel_4.0\vmlinux" -0xFFFF7FFF80000000
下面总结一下需要的设置
EL3-->EL2
通过设置内核入口断点 thbreak EL2N:0x0000000080080000,或者在boot-wrapper-aarch64的boot.s中,位于jump_kernel中,在eret添加断点,然后在下一条指令添加符号表
add-symbol-file "X:\rlk\runninglinuxkernel_4.0\vmlinux" -0xFFFF7FFF80000000
EL2-->EL1
该阶段在linux内核的head.s中,位于el2_setup中,在eret添加断点,然后在下一条指令添加符号表
add-symbol-file "X:\rlk\runninglinuxkernel_4.0\vmlinux" -0xFFFF7FFF80000000
EL1开启mmu
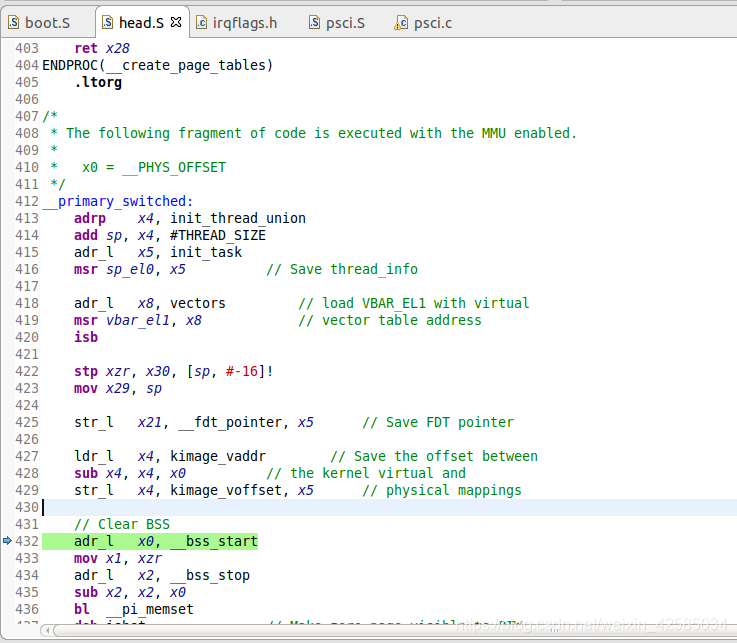
该阶段linux内核head.s中开启mmu,位于__turn_mmu_on中,在br x27添加断点,然后在下一条指令添加符号表,这个时候就不用添加偏移了,因为mmu开启以后已经是虚拟地址了,和符号表中地址是一致的
add-symbol-file "X:\rlk\runninglinuxkernel_4.0\vmlinux"
5 总结
ARM DS-5工具可以在没有硬件的情况下进行arm64 linux调试,极大的简化了arm64 linux内核学习的环境,运用好该利器,可以极大的提高内核研究的效率,处理内核调试,DS-5还有其他的功能还没有用过,后续研究以后再分享出来。
参考文章
https://prepd-sitecore.developer.arm.com/tools-and-software/embedded/legacy-tools/ds-5-development-studio/resources/ds-5-media-articles/2016/11/improved-linux-startup-debug-experience
https://developer.arm.com/tools-and-software/embedded/legacy-tools/ds-5-development-studio/resources/tutorials/linux-symmetric-multiprocessing-kernel-debug?_ga=2.225246426.1758774900.1571922464-196530733.1514205121
https://community.arm.com/cn/b/blog/posts/arm-ds-5-linux-kernel-booting


 1万+
1万+

 被折叠的 条评论
为什么被折叠?
被折叠的 条评论
为什么被折叠?
 到【灌水乐园】发言


