


一、重写鼠标事件与绘图事件的例子

#coding=utf-8

import sys
from PyQt5.QtWidgets import (QApplication, QLabel, QWidget)
from PyQt5.QtGui import QPainter, QColor, QPen
from PyQt5.QtCore import Qt

class Example(QWidget):
    distance_from_center = 0
    def __init__(self):
        super().__init__()
        self.initUI()
        self.setMouseTracking(True)
    def initUI(self):
        self.setGeometry(200, 200, 1000, 500)
        self.setWindowTitle('weilai_test9')
        self.label = QLabel(self)
        self.label.resize(500, 40)
        self.show()
        self.pos = None

    def mouseMoveEvent(self, event):
        distance_from_center = round(((event.y() - 250)**2 + (event.x() - 500)**2)**0.5)
        self.label.setText('坐标: ( x: %d ,y: %d )' % (event.x(), event.y()) + " 离中心点距离: " + str(distance_from_center))
        self.pos = event.pos()
        self.update()

    def paintEvent(self, event):
        if self.pos:
            q = QPainter(self)
            q.drawLine(0, 0, self.pos.x(), self.pos.y())

if __name__ == '__main__':
    app = QApplication(sys.argv)
    ex = Example()
    sys.exit(app.exec_())
在这个例子中我们实现了鼠标坐标(x,y)的获取,以及绘制一条线,这条线的起点坐标在(0,0),另外一个端点随鼠标移动而移动,同时我们还要计算鼠标坐标与中心点的距离(运用勾股定理进行计算)
self.setMouseTracking(True)
默认情况下禁用鼠标跟踪, 如果启用鼠标跟踪,即使没有按钮被按下,小部件也会接收鼠标移动事件。当然你也可以不写,只需要在执行的过程中按照鼠标左键也行。
def mouseMoveEvent(self, event):
        distance_from_center = round(((event.y() - 250)**2 + (event.x() - 500)**2)**0.5)
        self.label.setText('坐标: ( x: %d ,y: %d )' % (event.x(), event.y()) + " 离中心点距离: " + str(distance_from_center))
        self.pos = event.pos()
        self.update()
这个函数就是捕捉鼠标移动事件了,我们把得到的坐标已经一些相关的信息显示在label上。必须调用函数update()才能更新图形。
    def paintEvent(self, event):
        if self.pos:
            q = QPainter(self)
            q.drawLine(0, 0, self.pos.x(), self.pos.y())
绘图的话需要重写绘图事件,我们生成QPainter对象,然后调用drawLine()方法绘制一条线,需要四个参数,起点的坐标,终点的坐标。后面会详细的对绘图进行举例,这里只是为了配合鼠标移动事件,做一个例子。
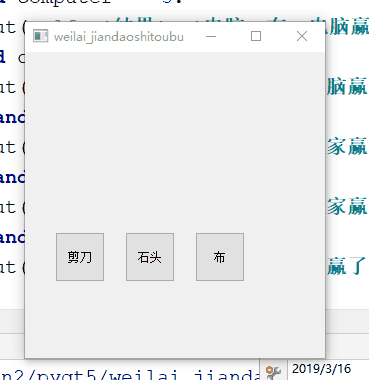
二、事件发送者—石头、剪刀、布的小游戏
#coding=utf-8

import sys
from PyQt5.QtWidgets import (QApplication, QMessageBox, QWidget, QPushButton)
from random import randint

class Example(QWidget):

    def __init__(self):
        super().__init__()
        self.initUI()
    def initUI(self):
        self.setGeometry(200, 200, 300, 300)
        self.setWindowTitle('weilai_jiandaoshitoubu')

        bt1 = QPushButton('剪刀',self)
        bt1.setGeometry(30,180,50,50)

        bt2 = QPushButton('石头',self)
        bt2.setGeometry(100,180,50,50)

        bt3 = QPushButton('布',self)
        bt3.setGeometry(170,180,50,50)

        bt1.clicked.connect(self.buttonclicked)
        bt2.clicked.connect(self.buttonclicked)
        bt3.clicked.connect(self.buttonclicked)

        self.show()

    def buttonclicked(self):
        computer = randint(1,3)
        player = 0
        sender = self.sender()
        if sender.text() == '剪刀':
            player = 1
        elif sender.text() == '石头':
            player = 2
        else:
            player = 3

        if player == computer:
            QMessageBox.about(self, '结果', '平手')
        elif player == 1 and computer == 2:
            QMessageBox.about(self, '结果', '电脑:石头,电脑赢了!')
        elif player == 2 and computer == 3:
            QMessageBox.about(self, '结果', '电脑:布,电脑赢了!')
        elif player == 3 and computer == 1:
            QMessageBox.about(self,'结果','电脑:剪刀,电脑赢了!')
        elif computer == 1 and player == 2:
            QMessageBox.about(self,'结果','电脑:剪刀,玩家赢了!')
        elif computer == 2 and player == 3:
            QMessageBox.about(self,'结果','电脑:石头,玩家赢了!')
        elif computer == 3 and player == 1:
            QMessageBox.about(self,'结果','电脑:布,玩家赢了!')

if __name__ == '__main__':
    app = QApplication(sys.argv)
    ex = Example()
    sys.exit(app.exec_())
我们在我们的例子中有三个按钮,分别代表石头、剪刀、布。 在buttonClicked()方法中,我们通过调用sender()方法来确定我们点击了哪个按钮。
bt1.clicked.connect(self.buttonclicked)
bt2.clicked.connect(self.buttonclicked)
bt3.clicked.connect(self.buttonclicked)
三个按钮的clicked信号都连接到同一个槽buttonclicked
def buttonclicked(self):
        computer = randint(1,3)
        player = 0
        sender = self.sender()
        if sender.text() == '剪刀':
            player = 1
        elif sender.text() == '石头':
            player = 2
        else:
            player = 3

        if player == computer:
            QMessageBox.about(self, '结果', '平手')
        elif player == 1 and computer == 2:
            QMessageBox.about(self, '结果', '电脑:石头,电脑赢了!')
        elif player == 2 and computer == 3:
            QMessageBox.about(self, '结果', '电脑:布,电脑赢了!')
        elif player == 3 and computer == 1:
            QMessageBox.about(self,'结果','电脑:剪刀,电脑赢了!')
        elif computer == 1 and player == 2:
            QMessageBox.about(self,'结果','电脑:剪刀,玩家赢了!')
        elif computer == 2 and player == 3:
            QMessageBox.about(self,'结果','电脑:石头,玩家赢了!')
        elif computer == 3 and player == 1:
            QMessageBox.about(self,'结果','电脑:布,玩家赢了!')
我们通过调用sender()方法来确定信号源,根据信号源确定玩家究竟选择了石头、剪刀、布中的哪一个。 从而与电脑随机给出的数字进行比较,判断输赢。
三、发出自定义信号
从QObject创建的对象可以发出信号。 以下示例显示了我们如何发出自定义信号。
#coding=utf-8

import sys
from PyQt5.QtWidgets import (QApplication, QWidget, QMessageBox)
from PyQt5.QtCore import (pyqtSignal, QObject)

class Signal(QObject):
    showmouse = pyqtSignal()

class Example(QWidget):

    def __init__(self):
        super().__init__()
        self.initUI()
    def initUI(self):
        self.setGeometry(200, 200, 300, 300)
        self.setWindowTitle('weilai_shubiao')

        self.s = Signal()
        self.s.showmouse.connect(self.about)

        self.show()
    def about(self):
        QMessageBox.about(self,'鼠标','你点鼠标了吧!')

    def mousePressEvent(self, e):
        self.s.showmouse.emit()

if __name__ == '__main__':
    app = QApplication(sys.argv)
    ex = Example()
    sys.exit(app.exec_())
在这个例子当中,当我们单击鼠标的时候,就会弹出对话框告知我们单击了鼠标。执行结果如下:

我们创建一个名为showmouse的新信号。 该信号在鼠标按压事件期间发出。 该信号连接到QMainWindow的about()的槽。
class Signal(QObject):
    showmouse = pyqtSignal()
使用pyqtSignal()作为外部Signal类的类属性创建一个信号。
self.s = Signal()
self.s.showmouse.connect(self.about)
自定义showmouse信号连接到QMainWindow的about()的槽。
def mousePressEvent(self, e):
    self.s.showmouse.emit()
当我们用鼠标指针点击窗口时,会发出showmouse信号,调用相应的槽函数。
————————————————————————————————————————————————————————
参考链接:https://zhuanlan.zhihu.com/p/28415799


 230
230


 被折叠的 条评论
为什么被折叠?
被折叠的 条评论
为什么被折叠?
 到【灌水乐园】发言


