


文章目录
简介
有的py代码过于complex,想要看懂思路逻辑也不是辣么简单,所以想把代码做成流程图的形式
还在更新的
cdfmlr/pyflowchart
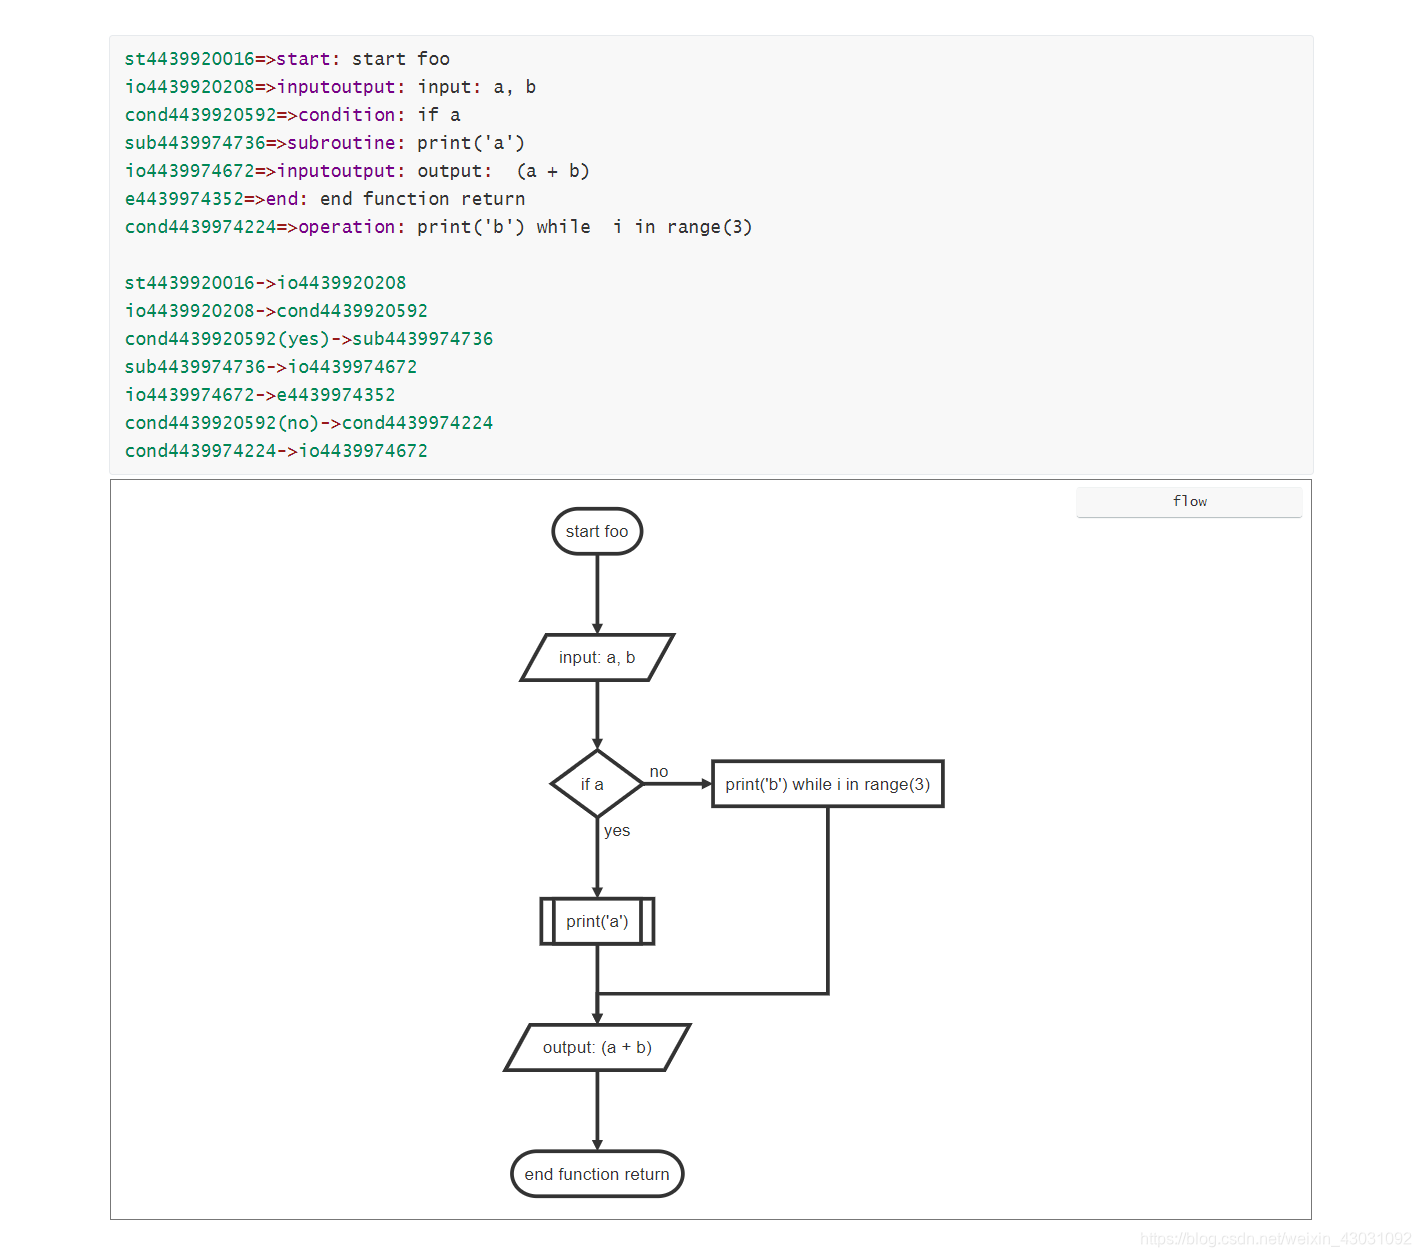
基于flowchart.js,把 Python 代码转化成这种 flowchart 语言,然后借助 flowchart.js.org、Typora、 francoislaberge/diagrams 等工具来生成流程图,可以在VS Code中安装Markdown Preview Mermaid Support插件就可以用内置md预览器生成流程图
上个月还在更新Python 代码一键转流程图中有详细介绍,主要支持 macOS 和 centOS,win下的问题已经和作者交流过加入了detect_decode(file_content: bytes)来解决编码问题
安装
自行安装python
$ pip install pyflowchart
使用
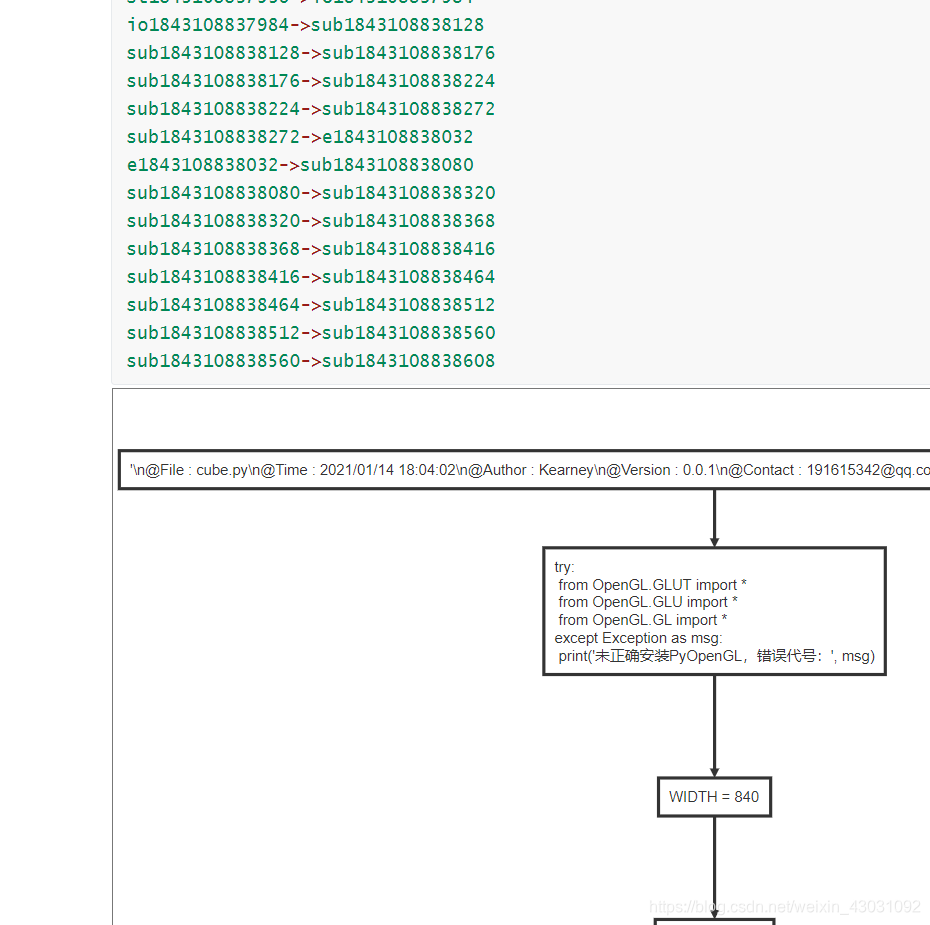
假设你写了个代码cube.py(附录中有),其它代码同理
$ python -m pyflowchart cube.py
然后正常运行就会输出代码对应的 flowchart 代码,然后复制它,见文末附录
然后打开Typora,粘贴到flow代码块中.其它或者支持flowchart的工具也是可以的:
打不开的…flowchart.js.org/
需要npm的francoislaberge/diagrams
r惊奇的发现我最近都是一条路顺着写完的code…
停服不更新的
需要pygame
Vatsha/code_to_flowchart:2019停止更新
需要pyagme…改了一下部分error还是无法run-.-有兴趣再fix吧
需要graphviz
code2flow
把 Python 或者 JavaScript 代码转换为流程图。2017停止维护
pycallgraph
把Python 应用的流程(调用图)进行可视化。2018停止维护
Python 流程图 — 一键转化代码为流程图中有详细使用描述
附录
cube.py
#!/usr/bin/env python3
# -*- encoding: utf-8 -*-
'''
@File    :  cube.py
@Time    :  2021/01/14 18:04:02
@Author  :  Kearney
@Version :  0.0.1
@Contact :  191615342@qq.com
@License :  GPL 3.0
@Desc    :  自动旋转的立方体
'''
try:
    from OpenGL.GLUT import *
    from OpenGL.GLU import *
    from OpenGL.GL import *
except Exception as msg:
    print("未正确安装PyOpenGL,错误代号:", msg)

WIDTH = 840
HEIGHT = 640


def drawColorCube():
    """绘制一个六色的正方体"""
    glBegin(GL_QUADS)  # 绘制多个四边形
    glColor3f(1.0, 0.0, 0.0)  # 红色
    # 绘制立体的六个面
    glVertex3f(1.0, 1.0, -1.0)
    glVertex3f(-1.0, 1.0, -1.0)
    glVertex3f(-1.0, 1.0, 1.0)
    glVertex3f(1.0, 1.0, 1.0)

    glColor3ub(255, 150, 0)
    glVertex3f(1.0, -1.0, 1.0)
    glVertex3f(-1.0, -1.0, 1.0)
    glVertex3f(-1.0, -1.0, -1.0)
    glVertex3f(1.0, -1.0, -1.0)

    glColor3f(0.0, 0.0, 1.0)  # 蓝色
    glVertex3f(1.0, 1.0, 1.0)
    glVertex3f(-1.0, 1.0, 1.0)
    glVertex3f(-1.0, -1.0, 1.0)
    glVertex3f(1.0, -1.0, 1.0)

    glColor3f(0.0, 1.0, 0.0)  # 绿色
    glVertex3f(1.0, -1.0, -1.0)
    glVertex3f(-1.0, -1.0, -1.0)
    glVertex3f(-1.0, 1.0, -1.0)
    glVertex3f(1.0, 1.0, -1.0)

    glColor3f(1.0, 1.0, 0.0)  # 金黄色
    glVertex3f(-1.0, 1.0, 1.0)
    glVertex3f(-1.0, 1.0, -1.0)
    glVertex3f(-1.0, -1.0, -1.0)
    glVertex3f(-1.0, -1.0, 1.0)

    glColor3f(1.0, 1.0, 1.0)  # 白色
    glVertex3f(1.0, 1.0, -1.0)
    glVertex3f(1.0, 1.0, 1.0)
    glVertex3f(1.0, -1.0, 1.0)
    glVertex3f(1.0, -1.0, -1.0)
    glEnd()


def init():
    global WIDTH, HEIGHT
    # 设置深度缓存
    # glClearDepth(1.0)
    # 设置深度测试类型
    # glDepthFunc(GL_LESS)
    # 允许深度测试
    glEnable(GL_DEPTH_TEST)

    # 设置观察矩阵
    glMatrixMode(GL_PROJECTION)
    glLoadIdentity()
    gluPerspective(45.0, float(WIDTH) / float(HEIGHT), 1, 10)  # 设置屏幕宽高比
    glMatrixMode(GL_MODELVIEW)
    # 移动位置
    glTranslatef(1.5, 0.0, -7.0)


def update():
    glClear(GL_COLOR_BUFFER_BIT | GL_DEPTH_BUFFER_BIT)

    # 绕x、y轴旋转0.005度
    glRotate(0.005, 1.0, 1.0, 0.0)

    drawColorCube()
    glutSwapBuffers()  # 交换缓存


glutInit()
glutInitDisplayMode(GLUT_DOUBLE | GLUT_RGB)
glutInitWindowSize(WIDTH, HEIGHT)
glutCreateWindow('PyOpenGL cube')
init()
glutDisplayFunc(update)
glutIdleFunc(update)  # 设置程序空闲时调用的函数
glutMainLoop()
flowchart code
op1843108635504=>operation: '\n@File    :  cube.py\n@Time    :  2021/01/14 18:04:02\n@Author  :  Kearney\n@Version :  0.0.1\n@Contact :  191615342@qq.com\n@License :  GPL 3.0\n@Desc    :  自动旋转的立方体  \n'
op1843108635552=>operation: try:
    from OpenGL.GLUT import *
    from OpenGL.GLU import *
    from OpenGL.GL import *
except Exception as msg:
    print('未正确安装PyOpenGL,错误代号:', msg)
op1843108635600=>operation: WIDTH = 840
op1843108635648=>operation: HEIGHT = 640
st1843108635744=>start: start drawColorCube
io1843108635792=>inputoutput: input:
op1843108638000=>operation: '绘制一个六色的正方体'
sub1843108638048=>subroutine: glBegin(GL_QUADS)
sub1843108638096=>subroutine: glColor3f(1.0, 0.0, 0.0)
sub1843108638144=>subroutine: glVertex3f(1.0, 1.0, (- 1.0))
sub1843108638192=>subroutine: glVertex3f((- 1.0), 1.0, (- 1.0))
sub1843108638240=>subroutine: glVertex3f((- 1.0), 1.0, 1.0)
sub1843108638288=>subroutine: glVertex3f(1.0, 1.0, 1.0)
sub1843108638336=>subroutine: glColor3ub(255, 150, 0)
sub1843108638384=>subroutine: glVertex3f(1.0, (- 1.0), 1.0)
sub1843108638432=>subroutine: glVertex3f((- 1.0), (- 1.0), 1.0)
sub1843108830032=>subroutine: glVertex3f((- 1.0), (- 1.0), (- 1.0))
sub1843108830080=>subroutine: glVertex3f(1.0, (- 1.0), (- 1.0))
sub1843108830128=>subroutine: glColor3f(0.0, 0.0, 1.0)
sub1843108830176=>subroutine: glVertex3f(1.0, 1.0, 1.0)
sub1843108830224=>subroutine: glVertex3f((- 1.0), 1.0, 1.0)
sub1843108830272=>subroutine: glVertex3f((- 1.0), (- 1.0), 1.0)
sub1843108830320=>subroutine: glVertex3f(1.0, (- 1.0), 1.0)
sub1843108830368=>subroutine: glColor3f(0.0, 1.0, 0.0)
sub1843108830416=>subroutine: glVertex3f(1.0, (- 1.0), (- 1.0))
sub1843108830464=>subroutine: glVertex3f((- 1.0), (- 1.0), (- 1.0))
sub1843108830512=>subroutine: glVertex3f((- 1.0), 1.0, (- 1.0))
sub1843108830560=>subroutine: glVertex3f(1.0, 1.0, (- 1.0))
sub1843108830608=>subroutine: glColor3f(1.0, 1.0, 0.0)
sub1843108830656=>subroutine: glVertex3f((- 1.0), 1.0, 1.0)
sub1843108830704=>subroutine: glVertex3f((- 1.0), 1.0, (- 1.0))
sub1843108830752=>subroutine: glVertex3f((- 1.0), (- 1.0), (- 1.0))
sub1843108830800=>subroutine: glVertex3f((- 1.0), (- 1.0), 1.0)
sub1843108830848=>subroutine: glColor3f(1.0, 1.0, 1.0)
sub1843108830896=>subroutine: glVertex3f(1.0, 1.0, (- 1.0))
sub1843108830944=>subroutine: glVertex3f(1.0, 1.0, 1.0)
sub1843108830992=>subroutine: glVertex3f(1.0, (- 1.0), 1.0)
sub1843108831040=>subroutine: glVertex3f(1.0, (- 1.0), (- 1.0))
sub1843108831088=>subroutine: glEnd()
e1843108635840=>end: end drawColorCube
st1843108831136=>start: start init
io1843108831184=>inputoutput: input:
op1843108837600=>operation: global WIDTH, HEIGHT
sub1843108837648=>subroutine: glEnable(GL_DEPTH_TEST)
sub1843108837696=>subroutine: glMatrixMode(GL_PROJECTION)
sub1843108837744=>subroutine: glLoadIdentity()
sub1843108837792=>subroutine: gluPerspective(45.0, (float(WIDTH) / float(HEIGHT)), 1, 10)
sub1843108837840=>subroutine: glMatrixMode(GL_MODELVIEW)
sub1843108837888=>subroutine: glTranslatef(1.5, 0.0, (- 7.0))
e1843108831296=>end: end init
st1843108837936=>start: start update
io1843108837984=>inputoutput: input:
sub1843108838128=>subroutine: glClear((GL_COLOR_BUFFER_BIT | GL_DEPTH_BUFFER_BIT))
sub1843108838176=>subroutine: glRotate(0.005, 1.0, 1.0, 0.0)
sub1843108838224=>subroutine: drawColorCube()
sub1843108838272=>subroutine: glutSwapBuffers()
e1843108838032=>end: end update
sub1843108838080=>subroutine: glutInit()
sub1843108838320=>subroutine: glutInitDisplayMode((GLUT_DOUBLE | GLUT_RGB))
sub1843108838368=>subroutine: glutInitWindowSize(WIDTH, HEIGHT)
sub1843108838416=>subroutine: glutCreateWindow('PyOpenGL cube')
sub1843108838464=>subroutine: init()
sub1843108838512=>subroutine: glutDisplayFunc(update)
sub1843108838560=>subroutine: glutIdleFunc(update)
sub1843108838608=>subroutine: glutMainLoop()

op1843108635504->op1843108635552
op1843108635552->op1843108635600
op1843108635600->op1843108635648
op1843108635648->st1843108635744
st1843108635744->io1843108635792
io1843108635792->op1843108638000
op1843108638000->sub1843108638048
sub1843108638048->sub1843108638096
sub1843108638096->sub1843108638144
sub1843108638144->sub1843108638192
sub1843108638192->sub1843108638240
sub1843108638240->sub1843108638288
sub1843108638288->sub1843108638336
sub1843108638336->sub1843108638384
sub1843108638384->sub1843108638432
sub1843108638432->sub1843108830032
sub1843108830032->sub1843108830080
sub1843108830080->sub1843108830128
sub1843108830128->sub1843108830176
sub1843108830176->sub1843108830224
sub1843108830224->sub1843108830272
sub1843108830272->sub1843108830320
sub1843108830320->sub1843108830368
sub1843108830368->sub1843108830416
sub1843108830416->sub1843108830464
sub1843108830464->sub1843108830512
sub1843108830512->sub1843108830560
sub1843108830560->sub1843108830608
sub1843108830608->sub1843108830656
sub1843108830656->sub1843108830704
sub1843108830704->sub1843108830752
sub1843108830752->sub1843108830800
sub1843108830800->sub1843108830848
sub1843108830848->sub1843108830896
sub1843108830896->sub1843108830944
sub1843108830944->sub1843108830992
sub1843108830992->sub1843108831040
sub1843108831040->sub1843108831088
sub1843108831088->e1843108635840
e1843108635840->st1843108831136
st1843108831136->io1843108831184
io1843108831184->op1843108837600
op1843108837600->sub1843108837648
sub1843108837648->sub1843108837696
sub1843108837696->sub1843108837744
sub1843108837744->sub1843108837792
sub1843108837792->sub1843108837840
sub1843108837840->sub1843108837888
sub1843108837888->e1843108831296
e1843108831296->st1843108837936
st1843108837936->io1843108837984
io1843108837984->sub1843108838128
sub1843108838128->sub1843108838176
sub1843108838176->sub1843108838224
sub1843108838224->sub1843108838272
sub1843108838272->e1843108838032
e1843108838032->sub1843108838080
sub1843108838080->sub1843108838320
sub1843108838320->sub1843108838368
sub1843108838368->sub1843108838416
sub1843108838416->sub1843108838464
sub1843108838464->sub1843108838512
sub1843108838512->sub1843108838560
sub1843108838560->sub1843108838608
参考
- Python 代码一键转流程图
- [Python 流程图
- — 一键转化代码为流程图](https://blog.csdn.net/u010751000/article/details/106988825)
- 干货:分享几款代码转流程图软件
- cdfmlr/pyflowchart


 1392
1392

 被折叠的 条评论
为什么被折叠?
被折叠的 条评论
为什么被折叠?
 到【灌水乐园】发言


