


接django简单网页(并连接sqlit3数据库)–(一)由于之后又遇到坑了,解决问题找了半天,唉,多看弹幕呀同志们
和之前一样这里还是参考这个老师的视频进行的,不过由于其版本问题所以出现了些问题,以下是我成功运行后的总结
文章目录
首先先放一张文件目录结构图,对照看,理清每个文件的位置
一.为sqlit3链接对应交互存储接口
在django简单网页(并连接sqlit3数据库)–(一)中,已经准备好了models.py中的表结构,并且添加迁移进了 自定义的sqlit3文件数据库中的 firstWEB_cal 表内,如下图(里面我已经运行添加等有数据了哈,没运行的话就是空的)

接下来我们就需要向里面添加我们准备的数据了
1.1 准备(计算交互页面)
这个页面的作用用于接受输入的两个数字
名称: cal.html (还是放在templates文件夹里面)
<!DOCTYPE html>
<html lang="en">
<head>
    <meta charset="UTF-8">
    <title>计算页面</title>
</head>
<body>
<form method="POST" action = "/cal">
    {% csrf_token %}
    数字1<input type="number" name="valueA">
    数字2<input type="number" name="valueB">
    <input type="submit" name="相加并返回计算结果">
</form>
</form>
</body>
</html>
下面这个页面的作用是将接受的两个数字的和的结果显示返回
名称: result.html
<!DOCTYPE html>
<html lang="en">
<head>
    <meta charset="UTF-8">
    <title>结果输出页面</title>
</head>
<body>
<h1>最终结果为:</h1><h2>{{ data }}</h2>
</body>
</html>
1.2 views.py准备处理程序
用于处理得到的数字的,将其相加,并连接sqlit3数据库,传入对应值
这里需要特别注意的:是从models中引入cal表的结构的时候,是使用的相对路径,所以前面是加一个点!
from .models import cal
from django.http import HttpResponse
from django.shortcuts import render

from .models import cal


# Create your views here.
def index(request):
    return render(request, '自定义.html')
    # return HttpResponse('ok')

def calpage(request):
    return render(request, 'cal.html')
    # return HttpResponse('ok')

def deal_date1(request):
    v_a = request.POST["valueA"]
    v_b = request.POST["valueB"]
    print("成功2")
    print(v_a,v_b)
    result = int(v_a) + int(v_b)

    cal.objects.create(value_a = v_a,value_b = v_b,result = result)

    return render(request,'result.html',context= {'data':result}) #data对应到resquest.html的data内部
1.3 urls.py添加路由
这一步主要是告诉django网页(html)对应的处理程序应该连接哪里
"""django_cs URL Configuration

The `urlpatterns` list routes URLs to views. For more information please see:
    https://docs.djangoproject.com/en/3.0/topics/http/urls/
Examples:
Function views
    1. Add an import:  from my_app import views
    2. Add a URL to urlpatterns:  path('', views.home, name='home')
Class-based views
    1. Add an import:  from other_app.views import Home
    2. Add a URL to urlpatterns:  path('', Home.as_view(), name='home')
Including another URLconf
    1. Import the include() function: from django.urls import include, path
    2. Add a URL to urlpatterns:  path('blog/', include('blog.urls'))
"""
from django.contrib import admin
from django.urls import path
from firstWEB import views
from django.conf.urls import url
urlpatterns = [
    path('admin/', admin.site.urls),
    url(r'^index/', views.index),
    url(r'^calpage/',views.calpage),
    url(r'^cal', views.deal_date1),#注意这里是没有 / 的
]
二.测试并设计返回数据库数据信息网页
2.1 测试
点击左上角运行按钮后,进入回环地址,并在后方加上我们在urls.py设置的节点名称

这里输入 250 和 251 并提交,系统返回如下

然后我们在pycharm内刷新 firstWEB_cal表就可以看到添加成功的数据了

2.2 views.py添加数据库返回函数
calList函数: 用于取出存入数据库的值并且将值发生到之后要建立的list.html的列表上,进行显示,
注意:这里context后市跟的字典形式,因为之后的list.html是根据的data字符索引,来确定的值的来源的
def calList(request):
    data = cal.objects.all() #获取定义的cal表全部的信息
    for i in data: #这里打印了所有已储存的表的信息
        print(i.value_a,i.value_b,i.result)

    return render(request,'list.html',context ={"data":data}) #这里是一个字典的返回
下面随便再在views.py中加个清库函数吧
添加前记得加个httpresponse包的引入
from django.http import HttpResponse
def del_data(request):
    cal.objects.all().delete()
    print("已进行清库操作!")
    return HttpResponse("已进行清库操作")
2.3 创建list.html
这里list的作用为接收上一步发来的表的数据并在网页进行显示
这里是通过for循环的方式进行的,注意带数据单元格中tr标签中对应的参数数量和for循环中的变量 一 一 对应
<!DOCTYPE html>
<html lang="en">
<head>
    <meta charset="UTF-8">
    <title>自定义表返回页面</title>
</head>
<body>
<table border="1">
    <thead>
    <tr>
        <th>valueA</th>
        <th>valueB</th>
        <th>result</th>
    </tr>

    </thead>

     {% for data in data %}
    <tr>
        <th>{{ data.value_a }}</th>
        <th>{{ data.value_b }}</th>
        <th>{{ data.result }}</th>
    </tr>
    {% endfor %}


</table>
<form action="del" method="POST">
        {% csrf_token %}
        <input type="submit" value="清库">

    </form>
</body>
</html>
2.4 添加urls.py添加链接
不多说,和之前一样将之前添加的函数的链接放到里面
  url(r'^list', views.calList),
  url(r'^del', views.del_data),
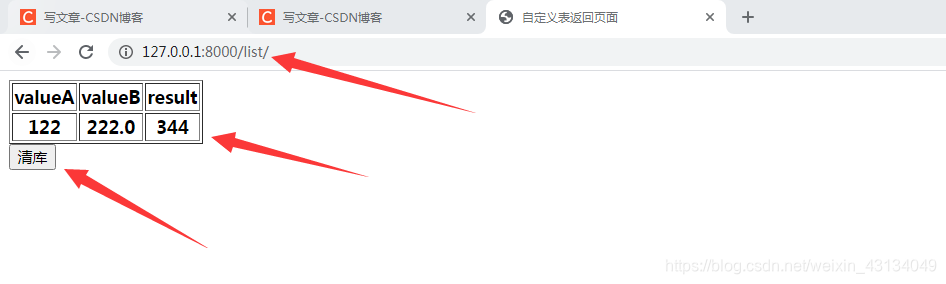
2.5测试示意
注意网页的地址


 1332
1332


 被折叠的 条评论
为什么被折叠?
被折叠的 条评论
为什么被折叠?
 到【灌水乐园】发言


