


python Flask框架,调用MobileNetV2图像分类模型,实现前端上传图像分类
今天博主介绍一个图像分类的小项目
基于flask 和mobileNetV2模型的前端图像分类项目
环境配置如下:
python版本==3.7.6
安装库的版本如下:
tensorflow 2.11.0
Flask 2.2.5
gevent 1.4.0
Werkzeug 2.2.3
numpy 1.21.6
Pillow 9.5.0
keras 2.12.0
下面我们开始介绍项目:
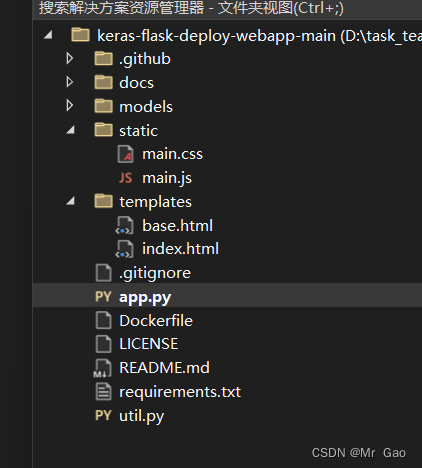
这个是我们的项目文件结构图:
app.py:
import os
import sys

# Flask
from flask import Flask, redirect, url_for, request, render_template, Response, jsonify, redirect
from werkzeug.utils import secure_filename
from gevent.pywsgi import WSGIServer

# TensorFlow and tf.keras
import tensorflow as tf
from tensorflow import keras

from tensorflow.keras.applications.imagenet_utils import preprocess_input, decode_predictions
from tensorflow.keras.models import load_model
from tensorflow.keras.preprocessing import image

# Some utilites
import numpy as np
from util import base64_to_pil


# Declare a flask app
app = Flask(__name__)


# You can use pretrained model from Keras
# Check https://keras.io/applications/
# or https://www.tensorflow.org/api_docs/python/tf/keras/applications

from tensorflow.keras.applications.mobilenet_v2 import MobileNetV2


model = MobileNetV2(weights='imagenet')


print('Model loaded. Check http://127.0.0.1:5000/')


# Model saved with Keras model.save()
MODEL_PATH = 'models/your_model.h5'

# Load your own trained model
# model = load_model(MODEL_PATH)
# model._make_predict_function()          # Necessary
# print('Model loaded. Start serving...')


def model_predict(img, model):
   # print(img.shape())
    print(img.size)
    img = img.resize((224, 224))

    # Preprocessing the image
    x = image.img_to_array(img)
    x=x[:,:,0:3]
    # x = np.true_divide(x, 255)
    print("fds",x.shape)
    x = np.expand_dims(x, axis=0)
    print("fds",x.shape)
    # Be careful how your trained model deals with the input
    # otherwise, it won't make correct prediction!
    x = preprocess_input(x, mode='tf')
    print(x.size)
    preds = model.predict(x)

    return preds


@app.route('/', methods=['GET'])
def index():
    # Main page
    return render_template('index.html')


@app.route('/predict', methods=['GET', 'POST'])
def predict():
    if request.method == 'POST':
        # Get the image from post request
        img = base64_to_pil(request.json)

        # Save the image to ./uploads
        # img.save("./uploads/image.png")

        # Make prediction
        preds = model_predict(img, model)

        # Process your result for human
        pred_proba = "{:.3f}".format(np.amax(preds))    # Max probability
        pred_class = decode_predictions(preds, top=1)   # ImageNet Decode

        result = str(pred_class[0][0][1])               # Convert to string
        result = result.replace('_', ' ').capitalize()

        # Serialize the result, you can add additional fields
        return jsonify(result=result, probability=pred_proba)

    return None


if __name__ == '__main__':
    # app.run(port=5002, threaded=False)

    # Serve the app with gevent
    http_server = WSGIServer(('0.0.0.0', 5000), app)
    http_server.serve_forever()
util.py:
"""Utilities
"""
import re
import base64

import numpy as np

from PIL import Image
from io import BytesIO


def base64_to_pil(img_base64):
    """
    Convert base64 image data to PIL image
    """
    image_data = re.sub('^data:image/.+;base64,', '', img_base64)
    pil_image = Image.open(BytesIO(base64.b64decode(image_data)))
    return pil_image


def np_to_base64(img_np):
    """
    Convert numpy image (RGB) to base64 string
    """
    img = Image.fromarray(img_np.astype('uint8'), 'RGB')
    buffered = BytesIO()
    img.save(buffered, format="PNG")
    return u"data:image/png;base64," + base64.b64encode(buffered.getvalue()).decode("ascii")
base.html
<!DOCTYPE html>
<html>
  <head>
    <meta charset="utf-8" />
    <meta http-equiv="X-UA-Compatible" content="IE=edge" />
    <title>Demo</title>
    <meta name="viewport" content="width=device-width, initial-scale=1" />
    <link rel="stylesheet" type="text/css" href="{{ url_for('static',filename='main.css') }}" />
  </head>

  <!-- GitHub Corner -->
  <a href="https://github.com/imfing/keras-flask-deploy-webapp" class="github-corner" aria-label="View source on GitHub"><svg width="60" height="60" viewBox="0 0 250 250" style="fill:#151513; color:#fff; position: absolute; top: 0; border: 0; right: 0;" aria-hidden="true"><path d="M0,0 L115,115 L130,115 L142,142 L250,250 L250,0 Z"></path><path d="M128.3,109.0 C113.8,99.7 119.0,89.6 119.0,89.6 C122.0,82.7 120.5,78.6 120.5,78.6 C119.2,72.0 123.4,76.3 123.4,76.3 C127.3,80.9 125.5,87.3 125.5,87.3 C122.9,97.6 130.6,101.9 134.4,103.2" fill="currentColor" style="transform-origin: 130px 106px;" class="octo-arm"></path><path d="M115.0,115.0 C114.9,115.1 118.7,116.5 119.8,115.4 L133.7,101.6 C136.9,99.2 139.9,98.4 142.2,98.6 C133.8,88.0 127.5,74.4 143.8,58.0 C148.5,53.4 154.0,51.2 159.7,51.0 C160.3,49.4 163.2,43.6 171.4,40.1 C171.4,40.1 176.1,42.5 178.8,56.2 C183.1,58.6 187.2,61.8 190.9,65.4 C194.5,69.0 197.7,73.2 200.1,77.6 C213.8,80.2 216.3,84.9 216.3,84.9 C212.7,93.1 206.9,96.0 205.4,96.6 C205.1,102.4 203.0,107.8 198.3,112.5 C181.9,128.9 168.3,122.5 157.7,114.1 C157.9,116.9 156.7,120.9 152.7,124.9 L141.0,136.5 C139.8,137.7 141.6,141.9 141.8,141.8 Z" fill="currentColor" class="octo-body"></path></svg></a><style>.github-corner:hover .octo-arm{animation:octocat-wave 560ms ease-in-out}@keyframes octocat-wave{0%,100%{transform:rotate(0)}20%,60%{transform:rotate(-25deg)}40%,80%{transform:rotate(10deg)}}@media (max-width:500px){.github-corner:hover .octo-arm{animation:none}.github-corner .octo-arm{animation:octocat-wave 560ms ease-in-out}}</style>

  <body>
    {% block content %}{% endblock %}
  </body>

  <footer>
    <script src="{{ url_for('static',filename='main.js') }}"></script>
  </footer>
</html>
index.html
{% extends "base.html" %} {% block content %}

<div class="main">
  <div class="title">
    <h3>Image Classifier</h3>
    <!-- <p>
      <small>A web app demo</small>
    </p> -->
  </div>

  <div class="panel">
    <input id="file-upload" class="hidden" type="file" accept="image/x-png,image/gif,image/jpeg" />
    <label for="file-upload" id="file-drag" class="upload-box">
      <div id="upload-caption">Drop image here or click to select</div>
      <img id="image-preview" class="hidden" />
    </label>
  </div>
  <div style="margin-bottom: 2rem;">
    <input type="button" value="Submit" class="button" onclick="submitImage();" />
    <input type="button" value="Clear" class="button" onclick="clearImage();" />
  </div>

  <div id="image-box">
    <img id="image-display" />
    <div id="pred-result" class="hidden"></div>
    <svg id="loader" class="hidden" viewBox="0 0 32 32" width="32" height="32">
      <circle id="spinner" cx="16" cy="16" r="14" fill="none"></circle>
    </svg>
  </div>
</div>

{% endblock %}
main.css
body {
  font-family: -apple-system, BlinkMacSystemFont, Segoe UI, Roboto, Oxygen,
    Ubuntu, Cantarell, Fira Sans, Droid Sans, Helvetica Neue, sans-serif;
  -webkit-font-smoothing: antialiased;
  background-color: #f8f8f8;
}

/* Global button style */
.button {
  font-family: inherit;
  text-align: center;
  cursor: pointer;
  border: none;
  text-decoration: none;
  outline: none;
  color: #ffffff;
  background-color: rgb(0, 120, 212);
  padding: 0.5rem 1.2rem;
  border-radius: 2px;
  font-size: 1rem;
  min-width: 6rem;
}

.button:hover {
  background-color: rgb(16, 110, 190);
}

.button.disabled {
  pointer-events: none;
  background-color: #cccccc;
  color: #666666;
}

/* Main section */

.main {
  box-sizing: border-box;
  display: flex;
  flex-direction: column;
  align-items: center;
}

.main .title h3 {
  font-size: 2.3rem;
  font-weight: 300;
  margin: 0.8rem 0;
}

.hidden {
  display: none;
}

.reveal {
  opacity: 0;
}

.reveal:hover {
  opacity: 0.2;
}

/* Upload box */
.upload-box {
  font-size: 0.8rem;
  color: #666666;
  cursor: pointer;
  width: 16rem;
  height: 10rem;
  background: #fff;
  border: 0.1rem dashed #838388;
  border-radius: 0.4rem;
  display: flex;
  justify-content: center;
  align-items: center;
  flex-direction: column;
  margin: 1rem 0 2rem 0;
}

.upload-box.dragover {
  /* background-color: grey; */
  color: #eeeeee;
  border: 0.1rem solid rgb(0, 120, 212);
  box-shadow: inset 0 0 0 0.1rem rgb(0, 120, 212);
}

.upload-box:hover {
  border-color: rgb(0, 120, 212);
}

.upload-box #image-preview {
  max-width: 14rem;
  max-height: 8rem;
  box-shadow: 0 4px 4px 0 rgba(0, 0, 0, 0.2), 0 6px 10px 0 rgba(0, 0, 0, 0.19);
}

#image-result {
  box-shadow: 0 4px 8px 0 rgba(0, 0, 0, 0.2), 0 6px 20px 0 rgba(0, 0, 0, 0.19);
  max-height: 20rem;
}

#image-box {
  position: relative;
  width: auto;
  float: left;
  margin-bottom: 2rem;
}

#image-display {
  box-shadow: 0 4px 8px 0 rgba(0, 0, 0, 0.2), 0 6px 20px 0 rgba(0, 0, 0, 0.19);
  max-height: 20rem;
}

#image-display.loading {
  filter: brightness(30%);
}

#pred-result {
  color: white;
  font-size: 1.5rem;
  position: absolute;
  top: 50%;
  left: 50%;
  transform: translate(-50%, -50%);
}

#loader {
  position: absolute;
  top: 50%;
  left: 50%;
  transform: translate(-50%, -50%);
  z-index: 10;
  margin: 0 auto;
}

/* Animation */
#spinner {
  box-sizing: border-box;
  stroke: #cccccc;
  stroke-width: 3px;
  transform-origin: 50%;
  animation: line 1.6s cubic-bezier(0.4, 0, 0.2, 1) infinite,
    rotate 1.6s linear infinite;
}
@keyframes rotate {
  from {
    transform: rotate(0);
  }
  to {
    transform: rotate(450deg);
  }
}
@keyframes line {
  0% {
    stroke-dasharray: 2, 85.964;
    transform: rotate(0);
  }
  50% {
    stroke-dasharray: 65.973, 21.9911;
    stroke-dashoffset: 0;
  }
  100% {
    stroke-dasharray: 2, 85.964;
    stroke-dashoffset: -65.973;
    transform: rotate(90deg);
  }
}
main.js
//========================================================================
// Drag and drop image handling
//========================================================================

var fileDrag = document.getElementById("file-drag");
var fileSelect = document.getElementById("file-upload");

// Add event listeners
fileDrag.addEventListener("dragover", fileDragHover, false);
fileDrag.addEventListener("dragleave", fileDragHover, false);
fileDrag.addEventListener("drop", fileSelectHandler, false);
fileSelect.addEventListener("change", fileSelectHandler, false);

function fileDragHover(e) {
  // prevent default behaviour
  e.preventDefault();
  e.stopPropagation();

  fileDrag.className = e.type === "dragover" ? "upload-box dragover" : "upload-box";
}

function fileSelectHandler(e) {
  // handle file selecting
  var files = e.target.files || e.dataTransfer.files;
  fileDragHover(e);
  for (var i = 0, f; (f = files[i]); i++) {
    previewFile(f);
  }
}

//========================================================================
// Web page elements for functions to use
//========================================================================

var imagePreview = document.getElementById("image-preview");
var imageDisplay = document.getElementById("image-display");
var uploadCaption = document.getElementById("upload-caption");
var predResult = document.getElementById("pred-result");
var loader = document.getElementById("loader");

//========================================================================
// Main button events
//========================================================================

function submitImage() {
  // action for the submit button
  console.log("submit");

  if (!imageDisplay.src || !imageDisplay.src.startsWith("data")) {
    window.alert("Please select an image before submit.");
    return;
  }

  loader.classList.remove("hidden");
  imageDisplay.classList.add("loading");

  // call the predict function of the backend
  predictImage(imageDisplay.src);
}

function clearImage() {
  // reset selected files
  fileSelect.value = "";

  // remove image sources and hide them
  imagePreview.src = "";
  imageDisplay.src = "";
  predResult.innerHTML = "";

  hide(imagePreview);
  hide(imageDisplay);
  hide(loader);
  hide(predResult);
  show(uploadCaption);

  imageDisplay.classList.remove("loading");
}

function previewFile(file) {
  // show the preview of the image
  console.log(file.name);
  var fileName = encodeURI(file.name);

  var reader = new FileReader();
  reader.readAsDataURL(file);
  reader.onloadend = () => {
    imagePreview.src = URL.createObjectURL(file);

    show(imagePreview);
    hide(uploadCaption);

    // reset
    predResult.innerHTML = "";
    imageDisplay.classList.remove("loading");

    displayImage(reader.result, "image-display");
  };
}

//========================================================================
// Helper functions
//========================================================================

function predictImage(image) {
  fetch("/predict", {
    method: "POST",
    headers: {
      "Content-Type": "application/json"
    },
    body: JSON.stringify(image)
  })
    .then(resp => {
      if (resp.ok)
        resp.json().then(data => {
          displayResult(data);
        });
    })
    .catch(err => {
      console.log("An error occured", err.message);
      window.alert("Oops! Something went wrong.");
    });
}

function displayImage(image, id) {
  // display image on given id <img> element
  let display = document.getElementById(id);
  display.src = image;
  show(display);
}

function displayResult(data) {
  // display the result
  // imageDisplay.classList.remove("loading");
  hide(loader);
  predResult.innerHTML = data.result;
  show(predResult);
}

function hide(el) {
  // hide an element
  el.classList.add("hidden");
}

function show(el) {
  // show an element
  el.classList.remove("hidden");
}
其他的东西其实用不到了。主要是这个六个文件。
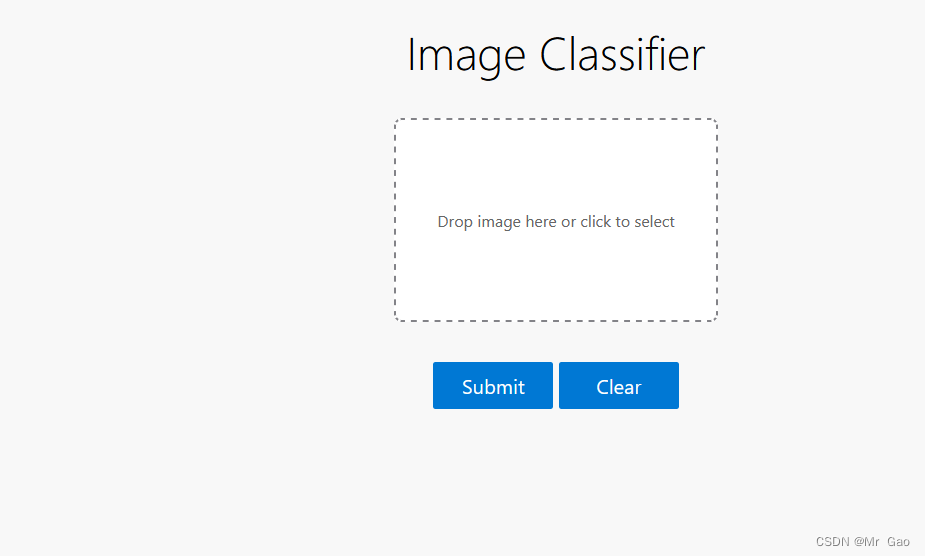
下面看一下代码运行情况:
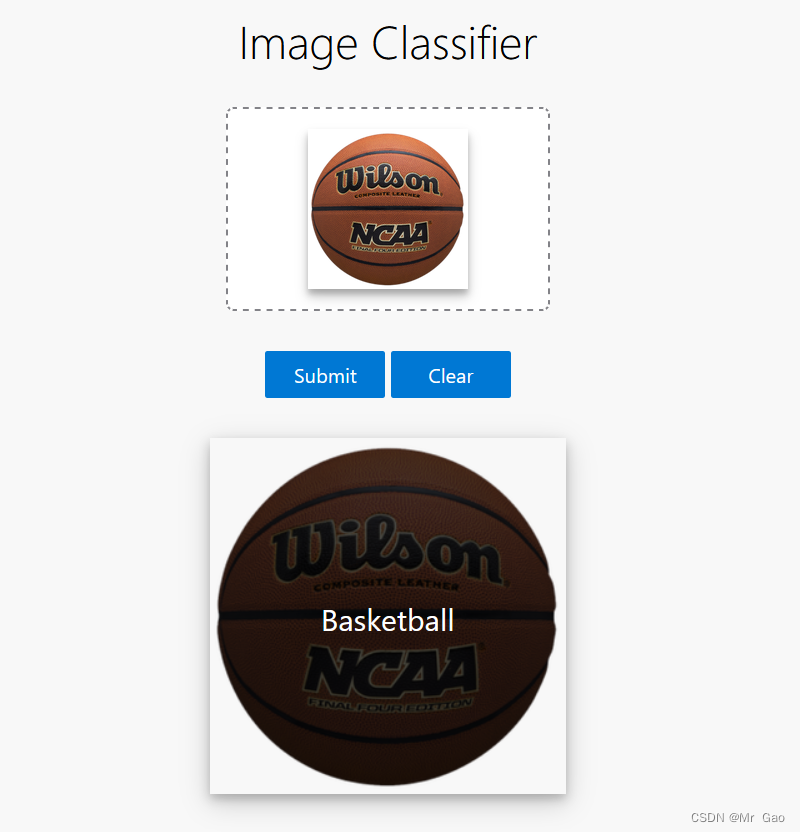
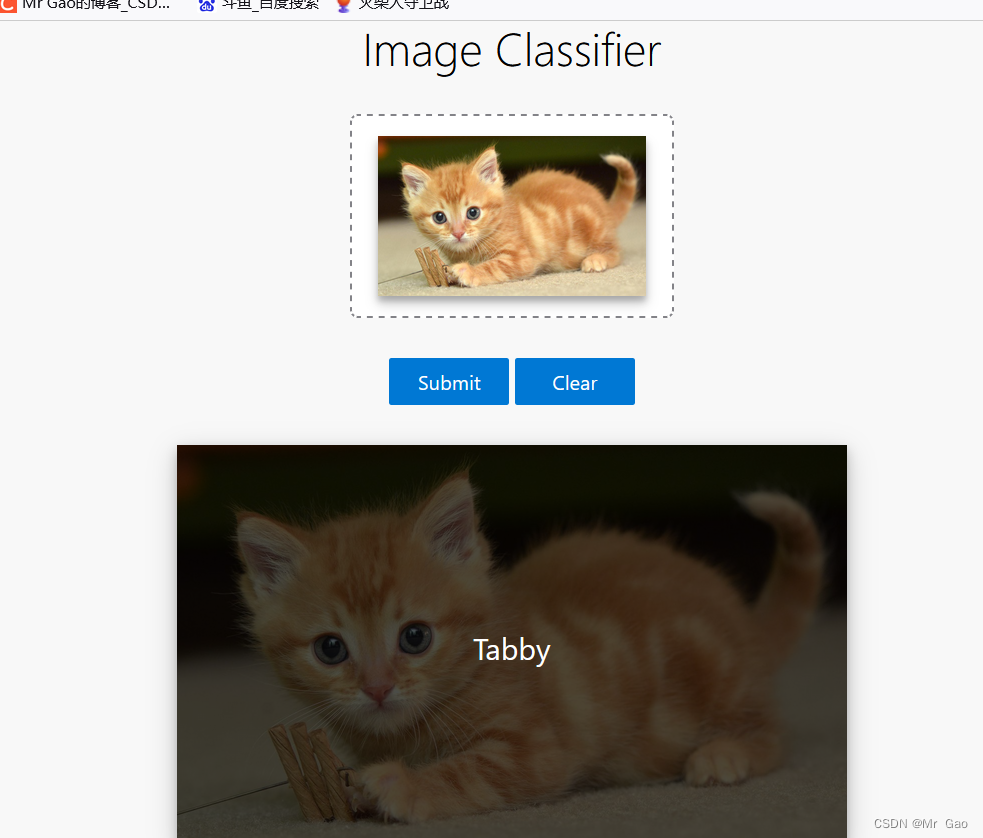
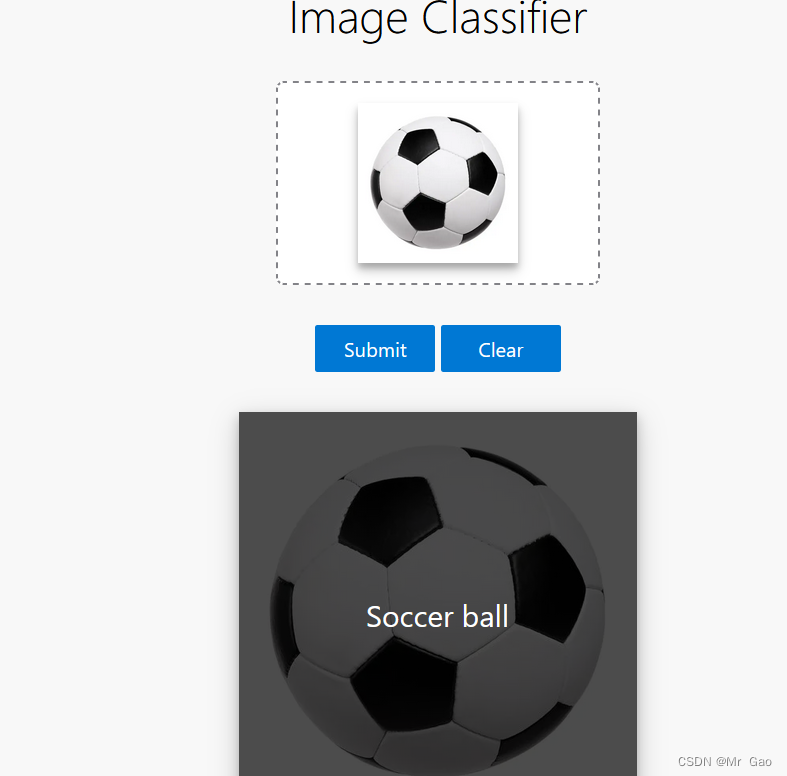

全部都预测对了
Labrador retriever是拉布拉多寻回犬
Tabby是斑猫的意思
感兴趣的可以学习一下这个项目。


 668
668


 被折叠的 条评论
为什么被折叠?
被折叠的 条评论
为什么被折叠?
 到【灌水乐园】发言


