


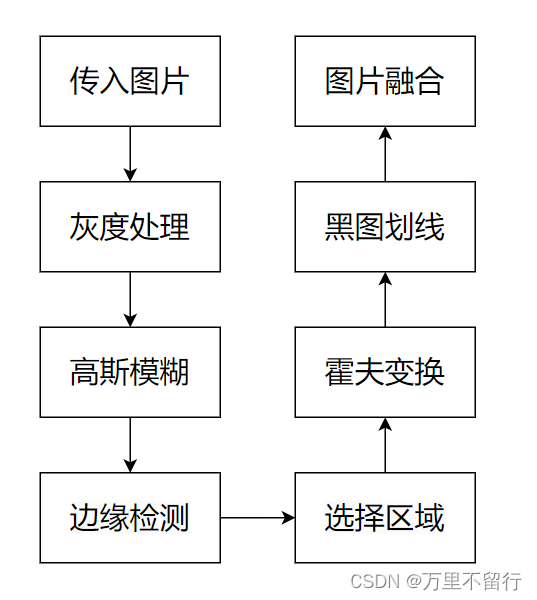
最近在研究高速直线识别,搜了一圈看了很多文章,确定了以下的主要流程。
霍夫变换
lines = cv2.HoughLinesP(image,rho,theta,threshold,lines,minLineLength,maxLineGap)#概率霍夫变换
image:必须是二值图像,推荐使用canny边缘检测的结果图像。
rho:线段以像素为单位的距离紧固带,double类型,推荐使用2.0 距离分辨率,表示以像素为单位的距离精度,参数越高线段越多。
theta:线段以弧度为单位的角度精度,推荐使用numpy.pi/180。
threshod:累加平面的阈值参数,int类型,超过设定的阈值才会被检测出线段,值越大,基本上意味着检出的线段越长,检出的线段个数越少。根据情况推荐先试用100在逐步调整。
lines:可选参数,用于存储检测到的直线的输出数组。返回即为存储图中所有直线的数组。
minLineLength:线段以像素为单位的最小长度,低于这个长度的线段将不会显示,根据应用场景设置。
maxLineGap:同一方向上两条线段判定为一条线段的最大允许间隔,小于这个最大值,都认为是一条线段。
def hough_lines(img, rho, theta, threshold,
                min_line_len, max_line_gap):  #进行霍夫变换


    lines = cv2.HoughLinesP(img, rho, theta, threshold, np.array([]),
                            minLineLength=min_line_len,
                            maxLineGap=max_line_gap)  #概率霍夫变换
    line_img = np.zeros((img.shape[0], img.shape[1], 3), dtype=np.uint8) #整一个黑底图片,展示画的线
    #print(lines)
    draw_lines(line_img, lines) #将底图和直线数组传入draw_lines进行画线
    return line_img #返回画好的图片
整体代码
# coding:utf-8

import cv2
import numpy as np
import os
import numpy

def gauss_blur(img):  #高斯滤波
    blur_ksize = 5  # Gaussian blur kernel size
    blur_gray = cv2.GaussianBlur(gray, (blur_ksize, blur_ksize), 0, 0)
    return blur_gray

def canny_edgedet(blur_gray): #canny 边缘检测
    # Define our parameters for Canny and apply
    low_threshold = 250
    high_threshold = 320
    edges = cv2.Canny(blur_gray, low_threshold, high_threshold)
    return edges

def ROI_filtering(edges):  #选择需要的区域
    # Next we'll create a masked edges image using cv2.fillPoly()
    mask = np.zeros_like(edges)
    ignore_mask_color = 255

    # This time we are defining a four sided polygon to mask
    #imshape = image.shape
    vertices = np.array([[(30, 300), (220, 200), (400, 80), (860, 300)]], dtype=np.int32)
    cv2.fillPoly(mask, vertices, ignore_mask_color)
    masked_edges = cv2.bitwise_and(edges, mask)
    return masked_edges

def draw_lines(img, lines, color=[255, 0, 0], thickness=2):  #画线
    x1_list = []
    lines_list = lines.tolist()

    #按照线段start x1坐标进行删除重复坐标
    #print(lines_list)
    # for line in lines_list:
    #     x1_list.append(line[0][0])
    # #print(x1_list)
    # for lin in lines_list:
    #     for i in x1_list:
    #         if abs(int(line[0][0]) - i) <= 30 and abs(int(line[0][0]) - i) != 0:
    #             #print(lin)
    #             lines_list.remove(lin)
    # #print(lines_list)
    # print(len(lines_list))

    #延长直线

    for line in lines_list:
        x1 = int(line[0][0])  # 以(x0, y0)为起点,将线段延长
        y1 = int(line[0][1])
        x2 = int(line[0][2])
        y2 = int(line[0][3])

        # 延长直线
        #定义起点和终点
        start_point = (x2,y2)
        end_point = (x1,y1)

        #计算线条的方向和长度
        direction = np.subtract(end_point, start_point)
        length = np.linalg.norm(direction)

        #设置延长线的长度因子
        extension_factor = 200

        #计算延长线的起点
        extended_start_point = tuple(np.subtract(start_point, extension_factor * direction / length).astype(int))
        # 计算延长线的终点
        extended_end_point = tuple(np.add(end_point, extension_factor * direction / length).astype(int))

        #画线
        cv2.line(img, extended_start_point, extended_end_point, color, thickness)
        #cv2.line(img, (x1, y1), (x2, y2), color, thickness)

    #print('type(lines_list)',type(lines_list))
    # for line in lines_list:
    #     for x3, y3, x4, y4 in line:
    #         x1_list.append(x3)
    # for line in lines_list:
    #     for x1, y1, x2, y2 in line:
    #         print(type(line))
    #         print(x1_list)
    #         for i in x1_list:
    #             #print(abs(int(x1) - i))
    #             if abs(int(x1) - i) <= 120:
    #                 pass
    #                 #numpy.delete(lines, line, axis=None)
    # print(lines)
    #                 #cv2.line(img, (x1, y1), (x2, y2), color, thickness)

def hough_lines(img, rho, theta, threshold,
                min_line_len, max_line_gap):  #进行霍夫变换

    # cv2.HoughLinesP(image,rho,theta,threshold,lines,minLineLength,maxLineGap)
    # image:必须是二值图像,推荐使用canny边缘检测的结果图像
    # rho:线段以像素为单位的距离紧固带,double类型,推荐使用1.0 距离分辨率,表示以像素为单位的距离精度
    # theta:线段以弧度为单位的角度精度,推荐使用numpy.pi/180
    # threshod:累加平面的阈值参数,int类型,超过设定的阈值才会被检测出线段,值越大,基本上意味着检出的线段越长,检出的线段个数越少。根据情况推荐先试用100
    # lines:可选参数,用于存储检测到的直线的输出数组。
    # minLineLength:线段以像素为单位的最小长度,根据应用场景设置
    # maxLineGap:同一方向上两条线段判定为一条线段的最大允许间隔,小于这个最大值,都认为是一条线段

    lines = cv2.HoughLinesP(img, rho, theta, threshold, np.array([]),
                            minLineLength=min_line_len,
                            maxLineGap=max_line_gap)  #概率霍夫变换
    line_img = np.zeros((img.shape[0], img.shape[1], 3), dtype=np.uint8)
    #print(lines)
    draw_lines(line_img, lines)
    return line_img

def weighted_img(img, initial_img, α=0.7, β=1., λ=0.):

    return cv2.addWeighted(img, α, initial_img, β, λ)   #将画线图和原图重合

if __name__=='__main__':
    img_path = './img/1c.png' #图片位置
    img = cv2.imread(img_path) #读取原图
    gray = cv2.cvtColor(img, cv2.COLOR_BGR2GRAY) #将原图转换成灰度图
    blur_gray = gauss_blur(gray) #高斯滤波
    canny_img = canny_edgedet(blur_gray)

    # cv2.imshow('img',masked_edges)  #canny边缘检测和非极大值抑制
    # cv2.waitKey(0)
    # cv2.destroyAllWindows()

    # 霍夫变换的参数,这个是我测试最符合我的参数,详细作用看第97行
    rho = 3
    theta = np.pi / 180
    threshold = 180
    min_line_length = 80
    max_line_gap = 2000

    line_img = hough_lines(canny_img, rho, theta, threshold,
                           min_line_length, max_line_gap)

    mix = weighted_img(line_img, img, α=0.7, β=1., λ=0.)


    cv2.imshow('img', mix)
    cv2.waitKey(0)
    cv2.destroyAllWindows()
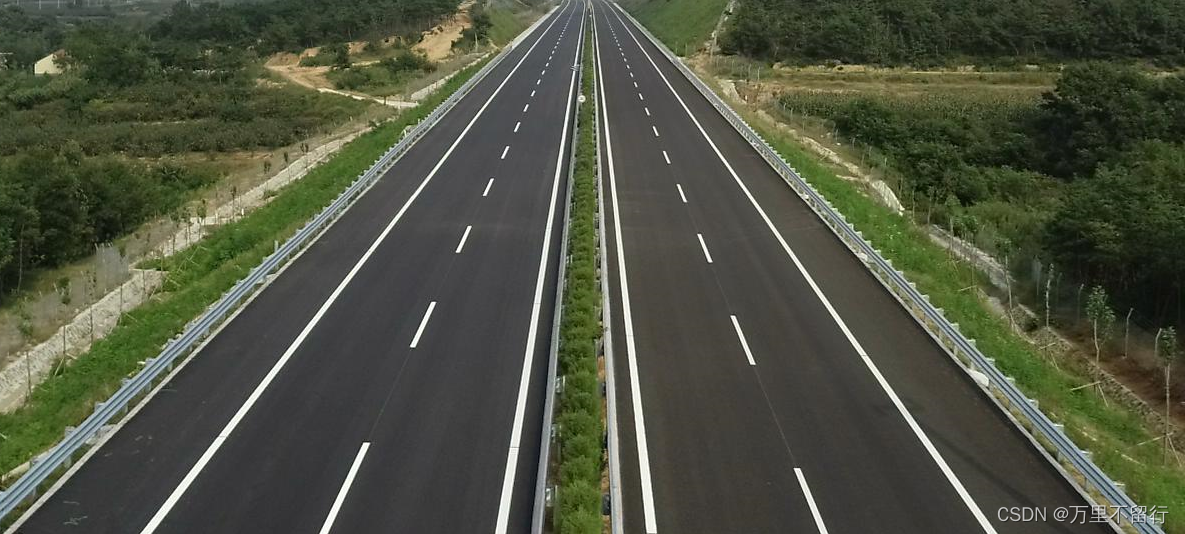
这是原图
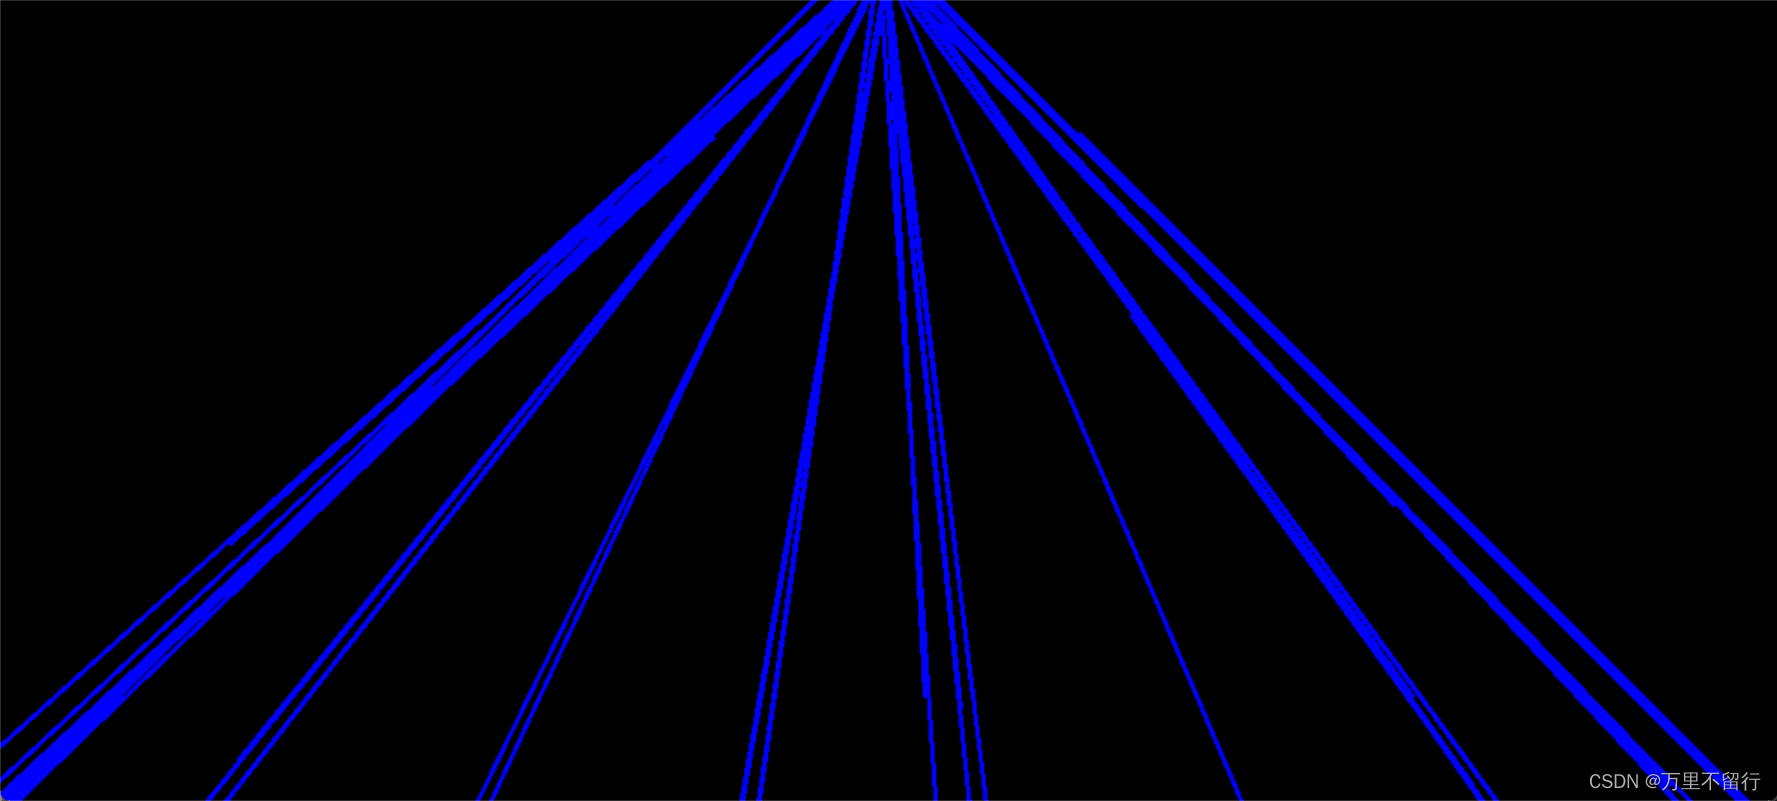
这是画线图
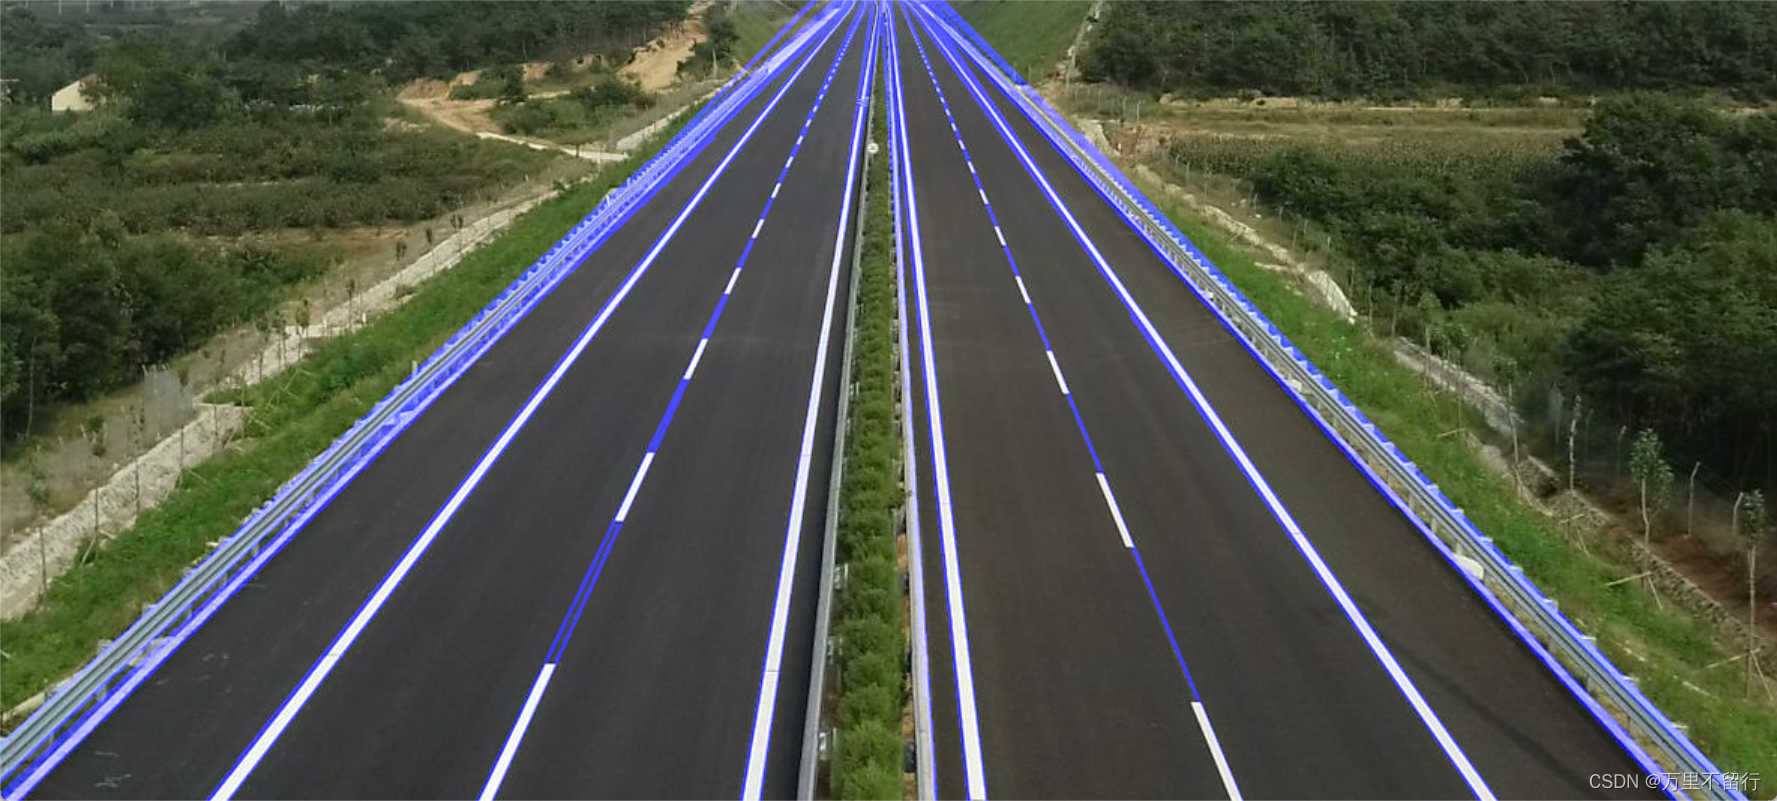
这是最终效果
有待改进:
1、目前没有直线拟合函数,用过很多都有问题,还需突破。
2、与YOLOv5识别进行结合,检测车辆越线别车或非法变道、占用应急车道等违法违规行为。
参考文章:
视觉无人机高速公路违章检测之——车道线检测
OpenCV-Python 霍夫直线检测-HoughLinesP函数参数


 2371
2371


 被折叠的 条评论
为什么被折叠?
被折叠的 条评论
为什么被折叠?
 到【灌水乐园】发言


