


1.RDT前言
我们知道在一个虚拟化环境中,宿主机的资源(包括CPU cache和内存带宽)都是共享的。但是如果有一个消耗cache的应用快速消耗了L3缓存,或者一个应用消耗了系统大量内存带宽,那么如何保证其他虚拟机应用呢?如何限制这些“可恶”的邻居呢?
针对上诉问题,以前都是通过控制虚拟机逻辑资源来实现,但是调整的粒度实在太粗,针对处理器缓存这样敏感而稀缺的资源,几乎是无能为力的。为此英特尔推出了RDT技术,希望可以解决这个问题。
2.RDT技术组成
RDT技术有其实有5个功能模块,分别是
Cache Monitoring Technology (CMT)缓存监测技术、
Cache Allocation Technology (CAT)缓存分配技术、
Memory Bandwidth Monitoring (MBM)内存带宽监测技术、
Memory Bandwidth Allocation (MBA)内存带宽分配技术、
Code and Data Prioritization (CDP)代码和数据分区技术。
5个模块可以分为监控和控制两大类,CMT和MBM为监控技术,而CAT、MBA和CDP为控制技术。
RDT允许OS或VMM来监控线程,应用或VM使用的cache/内存带宽空间。通过分析cache/内存带宽使用率,OS或VMM可以优化调度策略提高效能,使得高级优化技术可以实现
3.为什么需要RDT
配合这几个技术,OS能够知道应用使用了多少CACHE空间,内存带宽,从而给虚拟机的虚拟处理器分配真实的CPU资源。结合CMT和CAT,缓存可做到实时监测和使用,能够让处理器的资源向虚拟机中最重要、最紧迫的任务分配。CDP可以限制数据在LLC中的存储,从而将空间节省出来给代码存储。
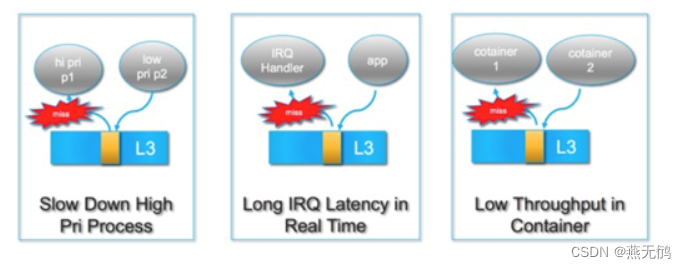
我们用更加直观的图来说明一下:
在一个系统里面运行多个应用,会出现应用线程之间LLC争用导致中断响应时间变长、性能吞吐量变小、高优先级进程资源被挤压等
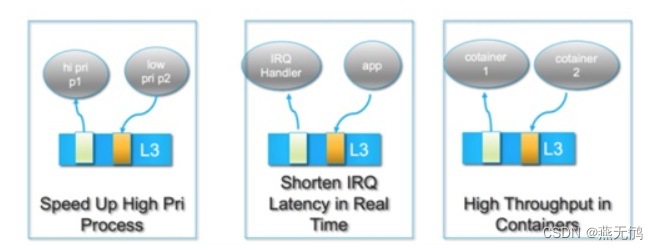
使用RDT后可以将LLC资源进行分配隔离,相互之间不会在出现争用
4.RDT具体功能
下面我们来看下RDT的一个具体功能。以下方截图来说明,如下:

我们可以发现cores 0-5关联到了RMID 47-42,进 行了每个核监控。提供了CMT/MBM数据,从数据中发现core
5.RDT关键术语
下面介绍两个RDT引入的两个关键术语RMID和CLOS。
5.1 RMID
OS或VMM会给每个应用或虚拟机标记一个软件定义的ID,叫做RMID(Resource Monitoring ID),通过RMID可以同时监控运行在多处理器上相互独立的线程,注意这里是指应用线程而是不是硬件的core,这个是由根本差异的。每个处理器可用的RMIDs数量是不一样的,这个可以通过CPUID指令获取得到,RMID数量不一样意味着可以监控独立线程的数量会有差异,如果一个系统上运行过多的线程可能会导致不能监控到所有线程的资源使用。
此外线程可以被独立监控,也可以按组的方式进行监控,多个线程可以标记为相同的RMID。同一个虚拟机下的所有线程可以标记为相同的RMID,同样一个应用下的所有线程可以标记为相同的RMID。绑定RMID到线程的动作由OS/VMM来完成。
5.2 RMID深入
每个core上存在一个MSR (IA32_PQR_ASSOC),可以关联一个RMID(而一个RMID对应一个线程),该RMID就记录在这个MSR上,然后通过硬件监控资源使用率。其中CLOS用于资源分配后面再说。
因为RMID关联到了core,而应用线程关联到RMID。这样就开始监控线程的资源使用率了。那么监控的数据如何获取?
也是通过寄存器来实现,通过MSR (IA32_QM_EVTSEL) 选择寄存器中设置RMID和Event ID。
在软件设置了合理的RMID+Event ID后,硬件会查看指定的数据,并通过MSR (IA32_QM_CTR)返回。
其中E/U 位表示Error和Unavailable,当数据合法时不会设置这两个位。那么数据就可以被软件使用。
Intel官方文档中提示,后续RMID的含义会扩展,包含更多的资源监控。
5.3 RMID对OS的需求
这个里有个问题,就是如果线程发生调度到其他core,那么硬件core上的MSR (IA32_PQR_ASSOC)上所记录的RMID对应的线程并没有运行在本core上了,就会导致数据不准确了。所以希望OS/VMM支持,将RMID加入到应用线程状态结构体中,这样在线程切换的时候MSR (IA32_PQR_ASSOC)中RMID能自动更新,确保跟踪的正确性
5.4 CLOS
CAT中引入了一个中间结构叫做CLOS(Class of Service),可以理解为资源控制标签。此外每个CLOS定义了CBM(capacity bitmasks),CLOS和CBM一起,确定有多少cache可以被这个CLOS使用。
一个应用可用的cache是通过一组MSR(IA32_L3_MASK_n,其中n表示CLOS数量)来指定的。
然后资源空间掩码(CBM)来标记相对可用空间、重复读和隔离情况。如下图中CLOS 比CLOS使用更少的cache,可以理解为更低的优先级。
6.RDT实战
前面讲述的是理论偏多,我们知道了RDT能干啥,接下去看下如何使用吧。
RDT使用分为两种方式,一种是直接将RMID绑定到硬件线程,然后将应用绑定到这些线程,第二种是使能OS/VMM调度(需要内核支持),在进程切换时候会自动将RMID进行更新,能够支持线程迁移。
我们使用Intel开源的工具来实现,不需要内核支持。通过这个软件包可以使用CAT,CMT,MBM,CDP功能。
工具软件下载链接如下:
https://github.com/01org/intel-cmt-cat
解压后,执行make && make install即可,如果找不到动态链接库,那么需要指定下动态库位置如下:export LD_LIBRARY_PATH=/usr/local/lib
RDT工具软件包的主要工具是pqos,pqos运行在用户层,通过标准Linux接口来访问MSR寄存器。因为msr文件接口是被保护的,所以需要root权限运行。支持在每个core或线程上提供CMT和MBM,其中MBM包括本地和异地内。
6.1 CMT/MBM使用
监控core0-11的所有事件(本地内存带宽,异地内存带宽,LLC空间使用率)
pqos -m all:0-11
监控core0,2,6的LLC
pqos -m llc:0,2,6
监控core0-2的本地内存带宽,core3-5的异地内存带宽。
pqos -m “mbl:0-2;mbr:3,4,5”
监控core组的事件
pqos -m “all:[0-11];llc:[12,13,14];mbl:[15-17,20]”
监控虚拟机使用
假设一个主机运行3个虚拟机,每个虚拟机分配core如下:
VM0 - cores 0-2
VM1 - cores 3-5
VM2 - cores 6-8
监控每个虚拟机事件,可以如下运行
pqos -m “all:[0-2],[3-5],[6-8];”
输出入下,每一行表示一个虚拟机资源使用情况,我们可以方便看到每个虚拟机资源使用情况。
CORE IPC MISSES LLC[KB] MBL[MB/s] MBR[MB/s]
0-2 0.69 3k 1120.0 0.0 0.0
3-5 1.62 10k 3520.0 0.0 0.0
6-8 0.49 1k 1040.0 0.0 0.0
显示当前资源分配配置
pqos -s
6.2 CAT使用
设置COS 1到前4个cache ways,设置cos 2到接下去8个cache ways.
pqos -e “llc:1=0x000f;llc:2=0x0ff0;”
设置COS1到所有SOCKETS,COS2到SOCKET 0和1,COS3到SOCKET 2和3.
pqos -e “llc:1=0x000f;llc@0,1:2=0x0ff0;llc@2-3:3=0x3c”
设置core0,2,6,10到COS1,core1到COS 2.
pqos -a “llc:1=0,2,6-10;llc:2=1;”
使用/禁用L3 CDP
pqos -R l3cdp-on
pqos -R l3cdp-off
使用L3CDP设置,设置cos 1代码和数据位。
pqos -e “llc:1d=0xfff;llc:1c=0xfff00;”
6.3 CAT使用案例
宿主机运行3个虚拟机,每个虚拟机分配3个core和不同优先级如下:
VM0 - cores 0-2 (P5)
VM1 - cores 3-5 (P2)
VM2 - cores 6-8 (P1)
VM0有最高优先级分配独立的8个LLC way. VM1分配6个,VM2分配4个,其中VM1和VM2共享2个way.
首先设置3个CLOS掩码位如下:
pqos -e “llc:1=0x00ff;llc:2=0x3f00;llc:3=0xf000;”
然后将CLOS关联到VM运行的cores上。从而可以限制VM的cache使用。
pqos -a “llc:1=0-2;llc:2=3-5;llc:3=6-8;”
6.4 MBA使用
设置COS 1可使用50%,设置COS 2可使用70%:
pqos -e “mba:1=50;mba:2=70;”
设置COS 1运行在所有SOCEKTS上,COS 2运行在SOCEKT 0和1上,COS3运行在SOCKET 2和3上:
pqos -e “mba:1=80;mba@0,1:2=64;mba@2-3:3=85”
注意平台,如果在BDW平台上测试,应该是不能使用的。
6.5 Kernel方式使用RDT
上面是传统的通过MSR方式来使用RDT,还可以通过操作系统内核的方式来使用RDT,这也是我们业务上常用的方式,不过需要内核支持
a)确认kernel和CPU均支持CAT
cat /proc/cpuinfo | grep cat_l3
b)开启resctrl
系统不会自动开启resctrl的用户接口,需要手工开启:
mount -t resctrl resctrl /sys/fs/resctrl
c)创建LLC策略
创建一个新的LLC分配策略#mkdir /sys/fs/resctrl/ptest
d)配置LLC策略
修改LLC分配策略,这里分配测L3 cache策略是1个cache way.
echo "L3:0=1” > /sys/fs/resctrl/ptest/schemata
e)绑定进程
绑定一个LLC策略到进程,假定PID=10101:
echo 10101 > /sys/fs/resctrl/ptest/tasks
这样就将10101的进程LLC资源限制在了1个cache way上而不能使用更多。
下面列出了传统MSR方式和Kernel方式使用RDT的差异:
支持CMT 调度级别 系统依赖
Kernel 否 进程 需要内核支持
MSR 是 Core 需要pqos工具
使用实例
监控内存带宽和cache:
$ pqos -m all:[0-7],[8-17]
TIME 2019-01-03 01:38:02
    CORE   IPC   MISSES     LLC[KB]   MBL[MB/s]   MBR[MB/s]
     0-7  0.95     193k      9432.0         6.3         5.7
    8-17  0.41     134k      7416.0         4.9         4.1
控制内存带宽和cache,需要先打标 -a,而后分配 -e:
# cat config_rdt.sh

HP_COS=4
LP_COS=5

HP_CORES="0-7"
LP_CORES="8-17"

LP_CAT_CONFIG=$1
LP_MBA_CONFIG=$2

pqos -R

mask=$(((1<<${LP_CAT_CONFIG})-1))

pqos -a "llc:${HP_COS}=${HP_CORES}"
pqos -a "llc:${LP_COS}=${LP_CORES}"

pqos -e "llc:${LP_COS}=${mask}"
pqos -e "mba:${LP_COS}=${LP_MBA_CONFIG}"
help:
# pqos -h
NOTE:  Mixed use of MSR and kernel interfaces to manage
       CAT or CMT & MBM may lead to unexpected behavior.
Usage: pqos [-h] [--help] [-v] [--verbose] [-V] [--super-verbose]
          [-l FILE] [--log-file=FILE] [-I] [--iface-os]
       pqos [-s] [--show]
       pqos [-d] [--display] [-D] [--display-verbose]
       pqos [-m EVTCORES] [--mon-core=EVTCORES] | [-p [EVTPIDS]] [--mon-pid[=EVTPIDS]]
          [-t SECONDS] [--mon-time=SECONDS]
          [-i N] [--mon-interval=N]
          [-T] [--mon-top]
          [-o FILE] [--mon-file=FILE]
          [-u TYPE] [--mon-file-type=TYPE]
          [-r] [--mon-reset]
       pqos [-e CLASSDEF] [--alloc-class=CLASSDEF]
          [-a CLASS2ID] [--alloc-assoc=CLASS2ID]
       pqos [-R] [--alloc-reset]
       pqos [-H] [--profile-list] | [-c PROFILE] [--profile-set=PROFILE]
       pqos [-f FILE] [--config-file=FILE]
Description:
  -h, --help                  help page
  -v, --verbose               verbose mode
  -V, --super-verbose         super-verbose mode
  -s, --show                  show current PQoS configuration
  -d, --display               display supported capabilities
  -D, --display-verbose       display supported capabilities in verbose mode
  -f FILE, --config-file=FILE load commands from selected file
  -l FILE, --log-file=FILE    log messages into selected file
  -e CLASSDEF, --alloc-class=CLASSDEF
          define allocation classes.
          CLASSDEF format is 'TYPE:ID=DEFINITION;'.
          To specify specific resources 'TYPE[@RESOURCE_ID]:ID=DEFINITION;'.
          Examples: 'llc:0=0xffff;llc:1=0x00ff;llc@0-1:2=0xff00',
                    'llc:0d=0xfff;llc:0c=0xfff00',
                    'l2:2=0x3f;l2@2:1=0xf',
                    'l2:2d=0xf;l2:2c=0xc',
                    'mba:1=30;mba@1:3=80'.
  -a CLASS2ID, --alloc-assoc=CLASS2ID
          associate cores/tasks with an allocation class.
          CLASS2ID format is 'TYPE:ID=CORE_LIST/TASK_LIST'.
          Example 'llc:0=0,2,4,6-10;llc:1=1'.
          Example 'core:0=0,2,4,6-10;core:1=1'.
          Example 'pid:0=3543,7643,4556;pid:1=7644'.
  -R [CONFIG[,CONFIG]], --alloc-reset[=CONFIG[,CONFIG]]
          reset allocation configuration (L2/L3 CAT & MBA)
          CONFIG can be: l3cdp-on, l3cdp-off, l3cdp-any,
                         l2cdp-on, l2cdp-off, l2cdp-any,
                         mbaCtrl-on, mbaCtrl-off, mbaCtrl-any
          (default l3cdp-any,l2cdp-any,mbaCtrl-any).
  -m EVTCORES, --mon-core=EVTCORES
          select cores and events for monitoring.
          EVTCORES format is 'EVENT:CORE_LIST'.
          Example: "all:0,2,4-10;llc:1,3;mbr:11-12".
          Cores can be grouped by enclosing them in square brackets,
          example: "llc:[0-3];all:[4,5,6];mbr:[0-3],7,8".
  -p [EVTPIDS], --mon-pid[=EVTPIDS]
          select top 10 most active (CPU utilizing) process ids to monitor
          or select process ids and events to monitor.
          EVTPIDS format is 'EVENT:PID_LIST'.
          Examples: 'llc:22,25673' or 'all:892,4588-4592'
          Process' IDs can be grouped by enclosing them in square brackets,
          Examples: 'llc:[22,25673]' or 'all:892,[4588-4592]'
          Note:
               Requires Linux and kernel versions 4.10 and newer.
               The -I option must be used for PID monitoring.
               Processes and cores cannot be monitored together.
  -o FILE, --mon-file=FILE    output monitored data in a FILE
  -u TYPE, --mon-file-type=TYPE
          select output file format type for monitored data.
          TYPE is one of: text (default), xml or csv.
  -i N, --mon-interval=N      set sampling interval to Nx100ms,
                              default 10 = 10 x 100ms = 1s.
  -T, --mon-top               top like monitoring output
  -t SECONDS, --mon-time=SECONDS
          set monitoring time in seconds. Use 'inf' or 'infinite'
          for infinite monitoring. CTRL+C stops monitoring.
  -r, --mon-reset             monitoring reset, claim all RMID's
  -H, --profile-list          list supported allocation profiles
  -c PROFILE, --profile-set=PROFILE
          select a PROFILE of predefined allocation classes.
          Use -H to list available profiles.
  -I, --iface-os
          set the library interface to use the kernel
          implementation. If not set the default implementation is
          to program the MSR's directly.
show:L3CA, L3Cache总共可以有11位可以设置,表示设置cache的大小,0x7ff表示Cache全部可以使用,0x3只能使用cache中最低位的2个分区。
# ./config_rdt.sh 2 10
Allocation reset successful
Allocation configuration altered.
Allocation configuration altered.
SOCKET 0 L3CA COS5 => MASK 0x3
SOCKET 1 L3CA COS5 => MASK 0x3
Allocation configuration altered.
SOCKET 0 MBA COS5 => 10% requested, 10% applied
SOCKET 1 MBA COS5 => 10% requested, 10% applied
Allocation configuration altered.

# pqos -s
NOTE:  Mixed use of MSR and kernel interfaces to manage
       CAT or CMT & MBM may lead to unexpected behavior.
L3CA/MBA COS definitions for Socket 0:
    L3CA COS0 => MASK 0x7ff
    L3CA COS1 => MASK 0x7ff
    L3CA COS2 => MASK 0x7ff
    L3CA COS3 => MASK 0x7ff
    L3CA COS4 => MASK 0x7ff
    L3CA COS5 => MASK 0x3
    L3CA COS6 => MASK 0x7ff
    L3CA COS7 => MASK 0x7ff
    L3CA COS8 => MASK 0x7ff
    L3CA COS9 => MASK 0x7ff
    L3CA COS10 => MASK 0x7ff
    L3CA COS11 => MASK 0x7ff
    L3CA COS12 => MASK 0x7ff
    L3CA COS13 => MASK 0x7ff
    L3CA COS14 => MASK 0x7ff
    L3CA COS15 => MASK 0x7ff
    MBA COS0 => 100% available
    MBA COS1 => 100% available
    MBA COS2 => 100% available
    MBA COS3 => 100% available
    MBA COS4 => 100% available
    MBA COS5 => 10% available
    MBA COS6 => 100% available
    MBA COS7 => 100% available
L3CA/MBA COS definitions for Socket 1:
    L3CA COS0 => MASK 0x7ff
    L3CA COS1 => MASK 0x7ff
    L3CA COS2 => MASK 0x7ff
    L3CA COS3 => MASK 0x7ff
    L3CA COS4 => MASK 0x7ff
    L3CA COS5 => MASK 0x3
    L3CA COS6 => MASK 0x7ff
    L3CA COS7 => MASK 0x7ff
    L3CA COS8 => MASK 0x7ff
    L3CA COS9 => MASK 0x7ff
    L3CA COS10 => MASK 0x7ff
    L3CA COS11 => MASK 0x7ff
    L3CA COS12 => MASK 0x7ff
    L3CA COS13 => MASK 0x7ff
    L3CA COS14 => MASK 0x7ff
    L3CA COS15 => MASK 0x7ff
    MBA COS0 => 100% available
    MBA COS1 => 100% available
    MBA COS2 => 100% available
    MBA COS3 => 100% available
    MBA COS4 => 100% available
    MBA COS5 => 10% available
    MBA COS6 => 100% available
    MBA COS7 => 100% available
Core information for socket 0:
    Core 0, L2ID 0, L3ID 0 => COS4, RMID0
    Core 1, L2ID 1, L3ID 0 => COS4, RMID0
    Core 2, L2ID 2, L3ID 0 => COS4, RMID0
    Core 3, L2ID 3, L3ID 0 => COS4, RMID0
    Core 4, L2ID 4, L3ID 0 => COS4, RMID0
    Core 5, L2ID 8, L3ID 0 => COS4, RMID0
    Core 6, L2ID 9, L3ID 0 => COS4, RMID0
    Core 7, L2ID 10, L3ID 0 => COS4, RMID0
    Core 8, L2ID 11, L3ID 0 => COS5, RMID0
    Core 9, L2ID 16, L3ID 0 => COS5, RMID0
    Core 10, L2ID 17, L3ID 0 => COS5, RMID0
    Core 11, L2ID 18, L3ID 0 => COS5, RMID0
    Core 12, L2ID 19, L3ID 0 => COS5, RMID0
    Core 13, L2ID 20, L3ID 0 => COS5, RMID0
    Core 14, L2ID 24, L3ID 0 => COS5, RMID0
    Core 15, L2ID 25, L3ID 0 => COS5, RMID0
    Core 16, L2ID 26, L3ID 0 => COS5, RMID0
    Core 17, L2ID 27, L3ID 0 => COS5, RMID0
    Core 36, L2ID 0, L3ID 0 => COS0, RMID0
    Core 37, L2ID 1, L3ID 0 => COS0, RMID0
    Core 38, L2ID 2, L3ID 0 => COS0, RMID0
    Core 39, L2ID 3, L3ID 0 => COS0, RMID0
    Core 40, L2ID 4, L3ID 0 => COS0, RMID0
    Core 41, L2ID 8, L3ID 0 => COS0, RMID0
    Core 42, L2ID 9, L3ID 0 => COS0, RMID0
    Core 43, L2ID 10, L3ID 0 => COS0, RMID0
    Core 44, L2ID 11, L3ID 0 => COS0, RMID0
    Core 45, L2ID 16, L3ID 0 => COS0, RMID0
    Core 46, L2ID 17, L3ID 0 => COS0, RMID0
    Core 47, L2ID 18, L3ID 0 => COS0, RMID0
    Core 48, L2ID 19, L3ID 0 => COS0, RMID0
    Core 49, L2ID 20, L3ID 0 => COS0, RMID0
    Core 50, L2ID 24, L3ID 0 => COS0, RMID0
    Core 51, L2ID 25, L3ID 0 => COS0, RMID0
    Core 52, L2ID 26, L3ID 0 => COS0, RMID0
    Core 53, L2ID 27, L3ID 0 => COS0, RMID0
Core information for socket 1:
    Core 18, L2ID 32, L3ID 1 => COS0, RMID0
    Core 19, L2ID 33, L3ID 1 => COS0, RMID0
    Core 20, L2ID 34, L3ID 1 => COS0, RMID0
    Core 21, L2ID 35, L3ID 1 => COS0, RMID0
    Core 22, L2ID 36, L3ID 1 => COS0, RMID0
    Core 23, L2ID 40, L3ID 1 => COS0, RMID0
    Core 24, L2ID 41, L3ID 1 => COS0, RMID0
    Core 25, L2ID 42, L3ID 1 => COS0, RMID0
    Core 26, L2ID 43, L3ID 1 => COS0, RMID0
    Core 27, L2ID 48, L3ID 1 => COS0, RMID0
    Core 28, L2ID 49, L3ID 1 => COS0, RMID0
    Core 29, L2ID 50, L3ID 1 => COS0, RMID0
    Core 30, L2ID 51, L3ID 1 => COS0, RMID0
    Core 31, L2ID 52, L3ID 1 => COS0, RMID0
    Core 32, L2ID 56, L3ID 1 => COS0, RMID0
    Core 33, L2ID 57, L3ID 1 => COS0, RMID0
    Core 34, L2ID 58, L3ID 1 => COS0, RMID0
    Core 35, L2ID 59, L3ID 1 => COS0, RMID0
    Core 54, L2ID 32, L3ID 1 => COS0, RMID0
    Core 55, L2ID 33, L3ID 1 => COS0, RMID0
    Core 56, L2ID 34, L3ID 1 => COS0, RMID0
    Core 57, L2ID 35, L3ID 1 => COS0, RMID0
    Core 58, L2ID 36, L3ID 1 => COS0, RMID0
    Core 59, L2ID 40, L3ID 1 => COS0, RMID0
    Core 60, L2ID 41, L3ID 1 => COS0, RMID0
    Core 61, L2ID 42, L3ID 1 => COS0, RMID0
    Core 62, L2ID 43, L3ID 1 => COS0, RMID0
    Core 63, L2ID 48, L3ID 1 => COS0, RMID0
    Core 64, L2ID 49, L3ID 1 => COS0, RMID0
    Core 65, L2ID 50, L3ID 1 => COS0, RMID0
    Core 66, L2ID 51, L3ID 1 => COS0, RMID0
    Core 67, L2ID 52, L3ID 1 => COS0, RMID0
    Core 68, L2ID 56, L3ID 1 => COS0, RMID0
    Core 69, L2ID 57, L3ID 1 => COS0, RMID0
    Core 70, L2ID 58, L3ID 1 => COS0, RMID0
    Core 71, L2ID 59, L3ID 1 => COS0, RMID0
PS:pcm,https://github.com/opcm/pcm
-
pcm : basic processor monitoring utility (instructions per cycle,
core frequency (including Intel® Turbo Boost Technology), memory and
Intel® Quick Path Interconnect bandwidth, local and remote memory
bandwidth, cache misses, core and CPU package sleep C-state
residency, core and CPU package thermal headroom, cache utilization,
CPU and memory energy consumption) -
pcm-memory : monitor memory bandwidth (per-channel and per-DRAM DIMM
rank) -
pcm-latency : monitor L1 cache miss and DDR/PMM memory latency
-
pcm-pcie : monitor PCIe bandwidth per-socket
-
pcm-iio : monitor PCIe bandwidth per PCIe device
-
pcm-numa : monitor local and remote memory accesses
-
pcm-power :monitor sleep and energy states of processor, Intel® Quick Path
Interconnect, DRAM memory, reasons of CPU frequency throttling and
other energy-related metrics -
pcm-tsx: monitor performance metrics for Intel® Transactional Synchronization Extensions
-
pcm-core and pmu-query: query and monitor arbitrary processor core
events
reference:
https://www.intel.cn/content/www/cn/zh/architecture-and-technology/resource-director-technology.html
https://github.com/intel/intel-cmt-cat/
https://blog.csdn.net/notbaron/article/details/75813942


 4964
4964


 被折叠的 条评论
为什么被折叠?
被折叠的 条评论
为什么被折叠?
 到【灌水乐园】发言


