


前言
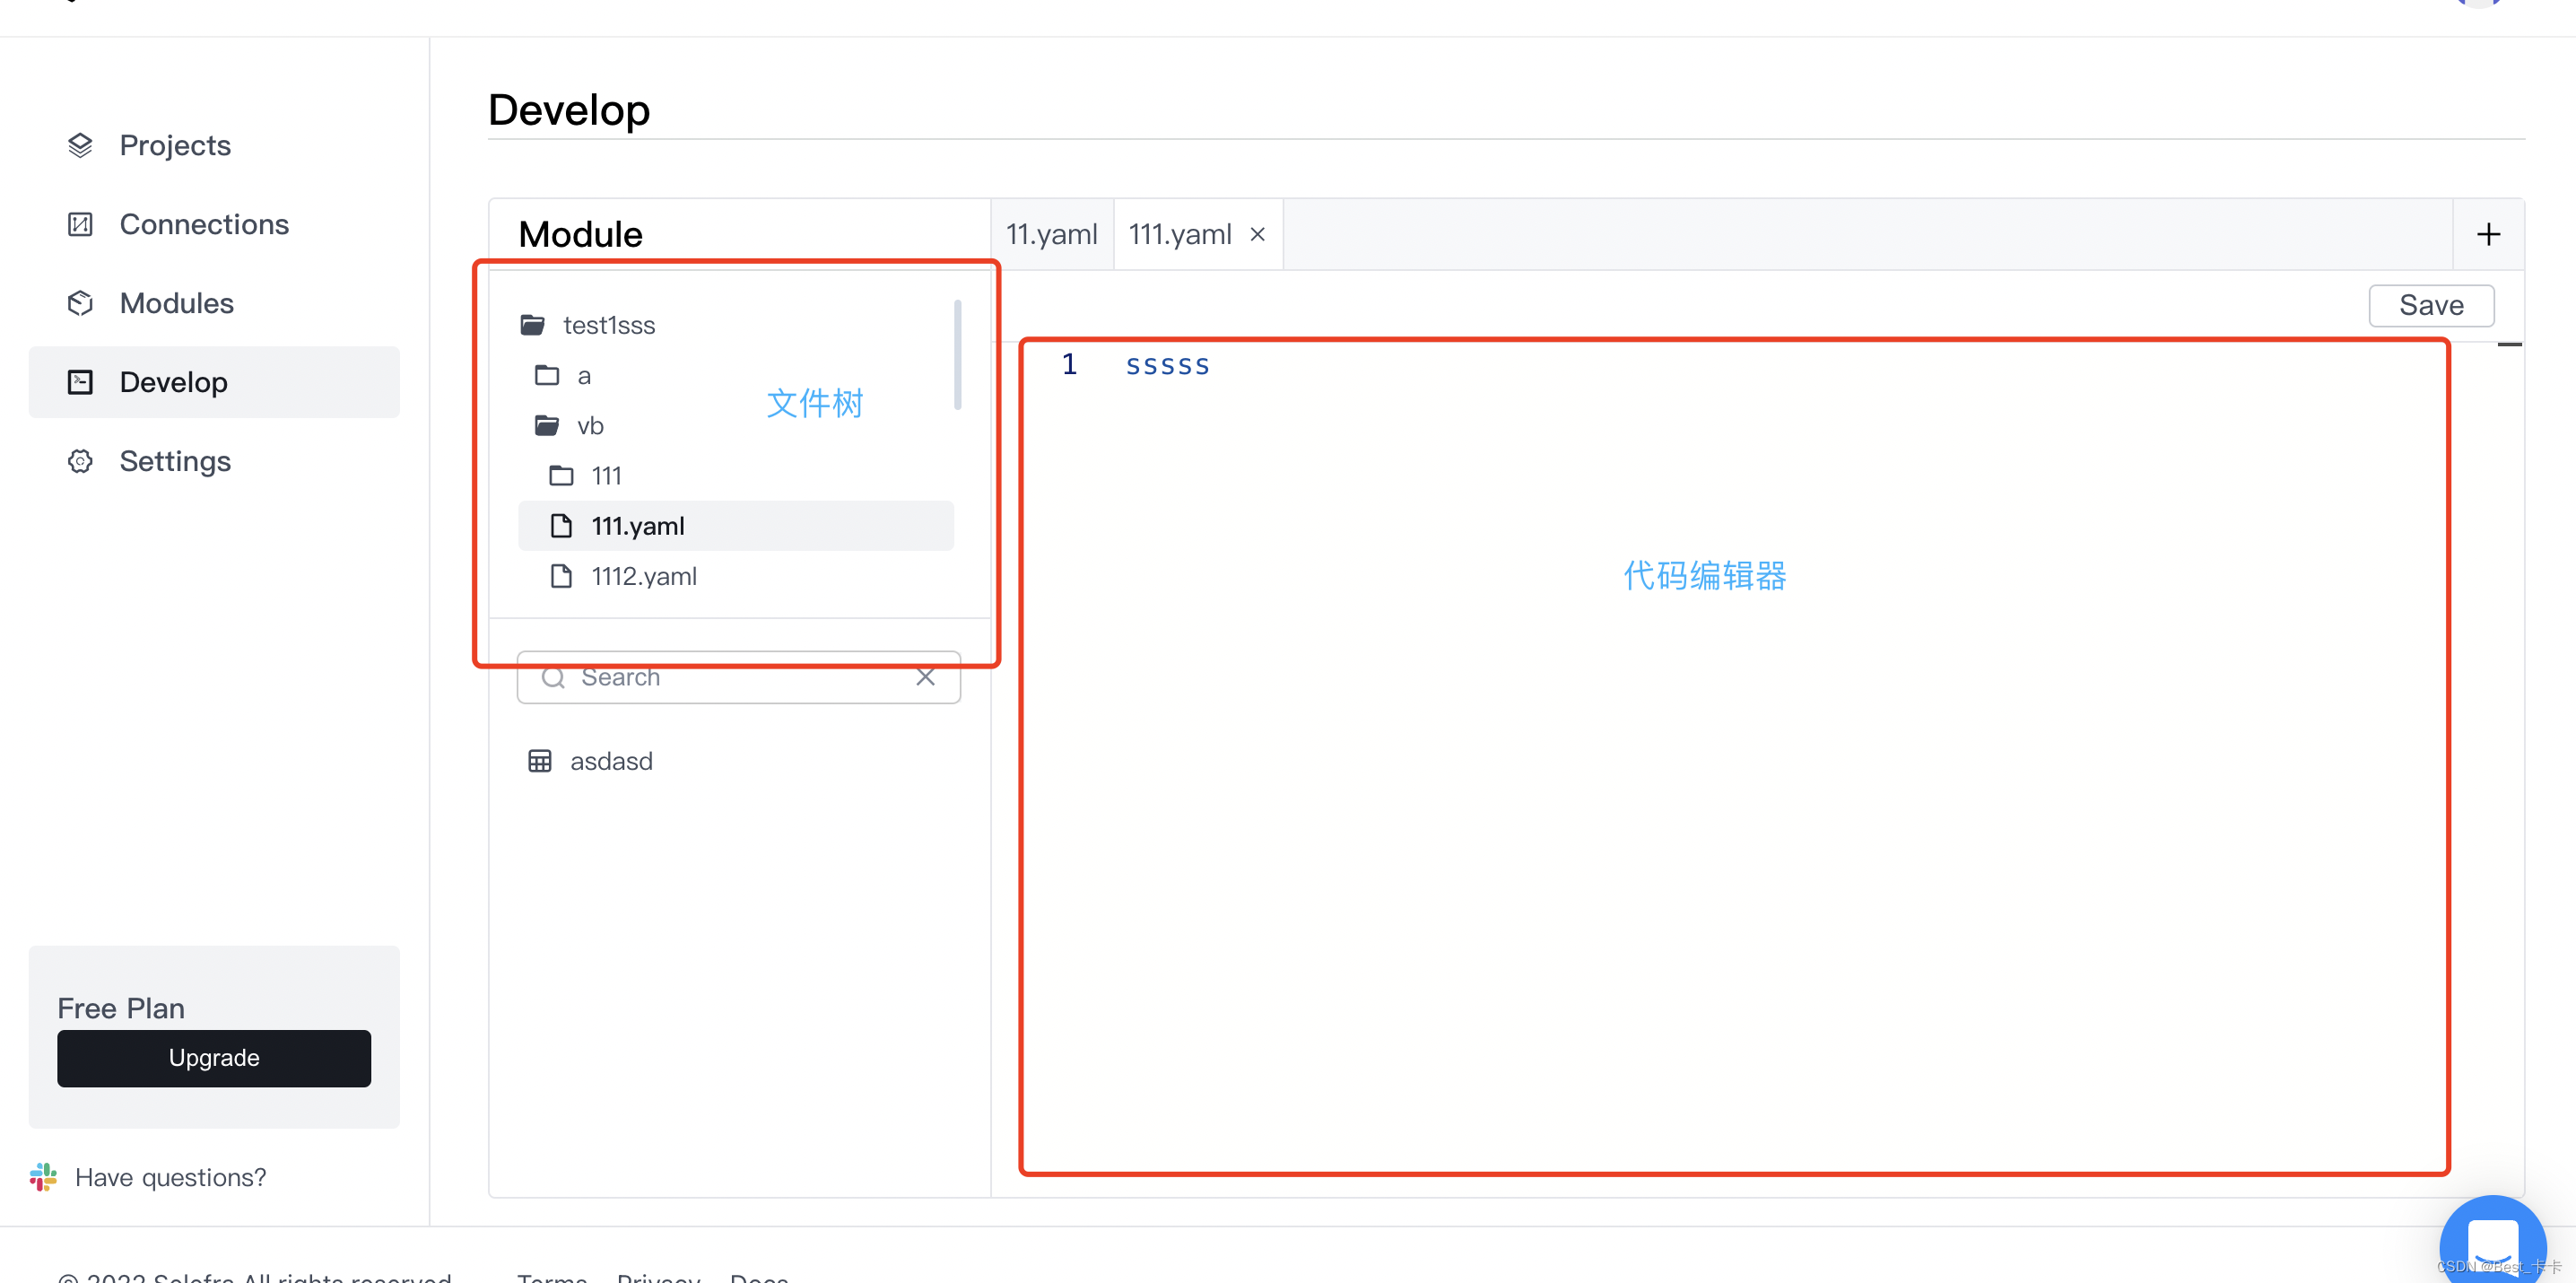
最近在做一个网页代码编辑器(类似vscode)(vue3.0+vite+ts),
如下图所示
本文记录下怎么实现的多级文件树
实现方式
- 思路
封装组件、组件自身递归实现
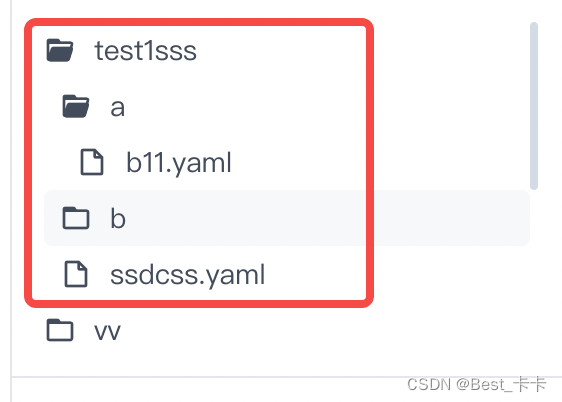
- 先来一份mock多级文件树数据
 // 这块模拟渲染数据(后端返回或者自己递归)
// child为null证明是个文件,为[]代表空文件夹,为[{...}]代表文件夹
// current_path当前文件名;depth层级;relative_path:文件所在路径;
	const moduleList = ref<any>([
     {
       child: [
         {
           child: [{
             child: null,
             current_path: 'b11.yaml',
             depth: 3,
             length: 0,
             relative_path: 'test1sss/a/b11.yaml',
           }],
           current_path: 'a',
           depth: 2,
           length: 2,
           relative_path: 'test1sss/a',
         },
         {
           child: [],
           current_path: 'b',
           depth: 2,
           length: 0,
           relative_path: 'test1sss/b',
         },
         {
           child: null,
           current_path: 'ssdcss.yaml',
           depth: 2,
           length: 0,
           relative_path: 'test1sss/ssdcss.yaml',
         },
       ],
       current_path: 'test1sss',
       depth: 1,
       length: 3,
       relative_path: 'test1sss',
     },
   ])
然后我们把它渲染成这样的
- 子组件封装tree.vue
   <template>
     <div id="treedetail">
       <div
         class="theTreedetail"
         :class="fileActive?.current_path===list.current_path&&!list.child&&'theTreedetailActive'"
         :style="indent"
         @click="btn(list)"
       >
         <div class="theTreedetailFile">
           <i
             v-if="list.child"
             class="iconfont"
             :class="flag?'icon-a-Property1folder1':'icon-a-Property1folder2'"
           />
           <i
             v-else
             class="iconfont icon-a-Property1file"
           />
           <div class="titlecss">
             {{ title }}
           </div>
         </div>
       </div>
       <div v-if="flag&&list.child">
         <treedetail
           v-for="(item,index) in list.child"
           :key="index"
           :fulist="list.child"
           :title="(item as any)?.current_path"
           :list="(item as any)"
           :num="(item as any)?.depth"
           :file-active="fileActive"
           @treeClick="treeClick"
           @refresh="refresh"
         />
       </div>
     </div>
   </template>
	1、通过v-if="flag&&list.child判断是否有子级,有的话重复遍历当前组件
	// eslint-disable-next-line import/no-self-import
   import treedetail from './tree.vue'
   2、fulist:传入的list or child列表,title:当前文件名,list:父级对象,
   	num:当前层级(用来动态style样式),
   	file-active:当前选择的那个文件
   	@treeClick="treeClick" :当前点击哪一项,用于向父级传参
   	@refresh="refresh"  当进行(删除 添加 重命名)等操作后,通知父级进行遍历
<script setup lang="ts">
import { computed, ref, watch } from 'vue';
// eslint-disable-next-line import/no-self-import
import treedetail from './tree.vue'

const emits = defineEmits(['treeClick', 'refresh']);
const refresh = () => {
 emits('refresh');
}
const treeClick = (row:any) => {
   // 继续向父级传递
 emits('treeClick', row);
}
const props = defineProps({
 title: {
   type: String,
   default: '文件名称',
 },
 fulist: {
   type: Object,
   default: () => ({}),
 },
 list: {
   type: Object,
   default: () => ({}),
 },
 num: {
   type: Number,
   default: 1,
 },
 fileActive: {
   type: Object,
   default: () => ({}),
 },
});
const flag = ref<any>(false)
// 点击事件向父级传参
const btn = async (row:any) => {
 flag.value = !flag.value
 emits('treeClick', row);
}
// const indent = computed(() => ` transform: translate(${(props.num - 1) * 20}px); width:calc(100% - ${(props.num - 1) * 20}px)`);
// padding 做层级关系视觉显示
const indent = computed(() => ` padding-left:${(props.num - 1) * 8}px;`);
</script>
<style lang="scss">
.thefilterStatus{
 padding: 4px !important;
 width: 210px !important;
 .select{
     .selectItem{
       margin: 4px 0;
       padding: 0px 16px;
       display: flex;
       align-items: center;
       justify-content: space-between;
       height: 40px;
       cursor: pointer;
       &:hover{
         background: #F2F3F5;
         // color: #0058F0;
       }
     }
     .selectItemClick{
       background: #F2F3F5;
       color: #0058F0;
     }
   }
}
</style>
<style scoped lang="scss">
.theTreedetail{
 position: relative;
 width: 100%;
 height: 28px;
 box-sizing: border-box;
 display: flex;
 flex-direction: row;
 align-items: center;
 padding: 2px 8px;
 gap: 8px;
 height: 28px;
 border-radius: 4px;
 font-family: 'Inter';
 font-style: normal;
 font-weight: 400;
 font-size: 14px;
 line-height: 24px;
 display: flex;
 align-items: center;
 color: #434C5B;
 .titlecss{
   flex: 1;
   white-space: nowrap; //不换行
   text-overflow: ellipsis;//超出部分使用省略号
   overflow: hidden; //超出部分隐藏
   word-break: break-all;//设置英文,数字不换行
 }
 &:hover{
   background: #F7F8FA;
   .icon-daimagengduo{
     display: block;
   }
 }
 .theTreedetailFile{
   height: 100%;
   overflow: hidden;
   flex: 1;
   display: flex;
   align-items: center;
   position: relative;
   gap: 9px;
 }
 .icon-daimagengduo{
   display: none;
   cursor: pointer;
 }
}
.theTreedetailActive{
 background: #F2F3F5;
 // color: #434C5B;
 font-weight: 500;
 color: #171B23;
}
</style>
- 父组件使用
<div
      v-show="moduleList&&moduleList.length!==0"
        class="ModuleList"
      >
        <div class="theTreedetail1">
          <treedetail
            v-for="(item,index) in moduleList"
            :key="index"
            :fulist="moduleList"
            :title="(item as any)?.current_path"
            :list="(item as any)"
            :num="item.depth"
            :file-active="fileActive"
            @treeClick="treeClick"
            @dataDelete="dataDelete"
            @refresh="refresh"
          />
        </div>
      </div>
import treedetail from './tree.vue'
const moduleList = ref<any>([
 {
   child: [
     {
       child: [{
         child: null,
         current_path: 'b11.yaml',
         depth: 3,
         length: 0,
         relative_path: 'test1sss/a/b11.yaml',
       }],
       current_path: 'a',
       depth: 2,
       length: 2,
       relative_path: 'test1sss/a',
     },
     {
       child: [],
       current_path: 'b',
       depth: 2,
       length: 0,
       relative_path: 'test1sss/b',
     },
     {
       child: null,
       current_path: 'ssdcss.yaml',
       depth: 2,
       length: 0,
       relative_path: 'test1sss/ssdcss.yaml',
     },
   ],
   current_path: 'test1sss',
   depth: 1,
   length: 3,
   relative_path: 'test1sss',
 },
])
// 接受子组件的重新渲染
const refresh = () => {
 getAllModuleList()
}
// 接受子组件文件的点击事件
const treeClick = async (row:any) => {
 console.log('treeClick', row)
 if (!row.child) {
  // 如果点击的是文件的话 进行向代码编辑器传值
  fileActive.value = {
       name: row.current_path,
       current_path: row.current_path,
       id: row.relative_path,
       language: 'yaml',
       value: 'test数据',
       save: true,
     }
 }
}
- 总结
整体是遍历组件的形式实现的;我不知道会不会影响性能,再有
最低层(比如层级5有个文件)受到事件触发,通过一层一层父组件传递,
然后才接受到;我觉得是可以进行状态管理优化处理下的
特此记录下


 1万+
1万+


 被折叠的 条评论
为什么被折叠?
被折叠的 条评论
为什么被折叠?
 到【灌水乐园】发言


