


前言
在前面基础知识(摄像机,渲染器,轨道控制器,坐标轴,场景适配,渲染循环、几何体、材质、光等)有了基础了解后,还需要对着色器(坐标)有一定的学习了解
然后就可以做智慧城市的项目了
技术:vite+js
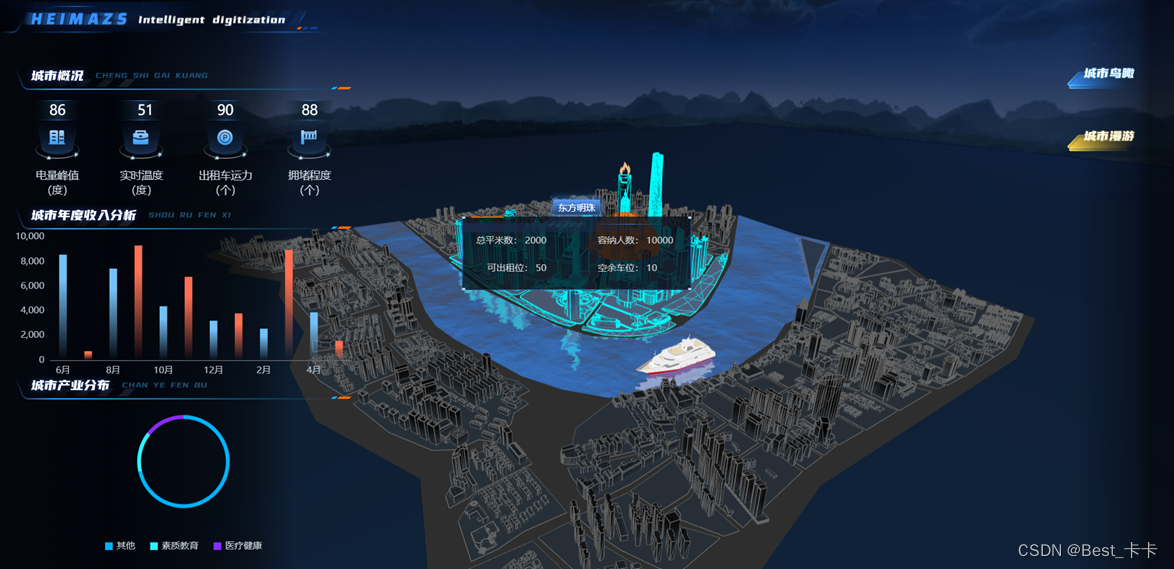
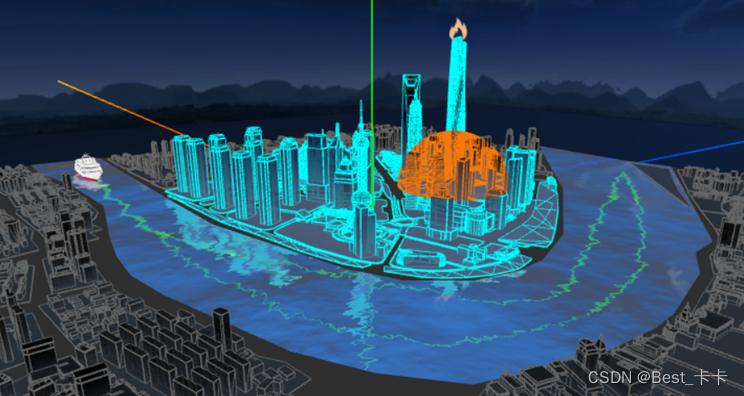
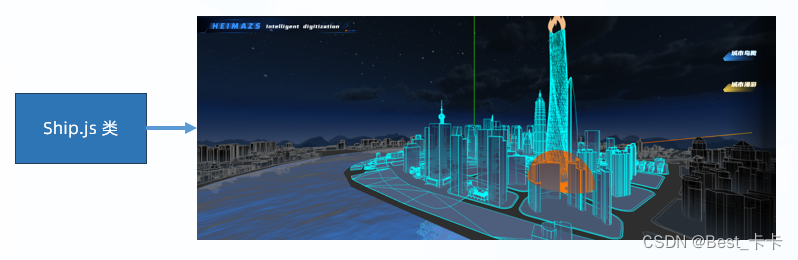
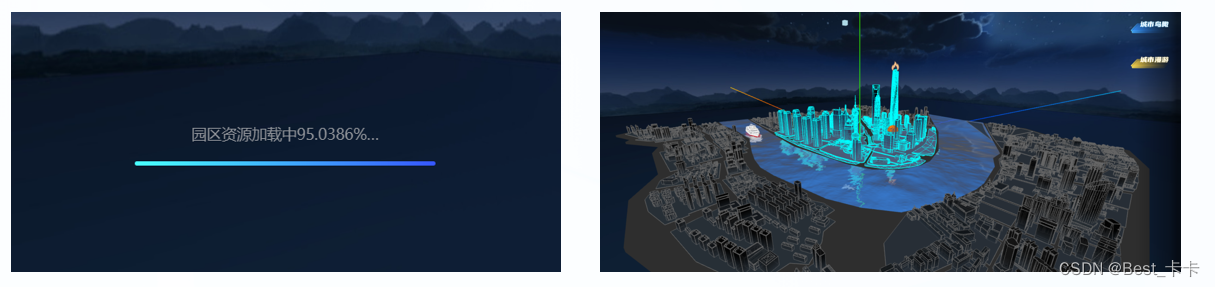
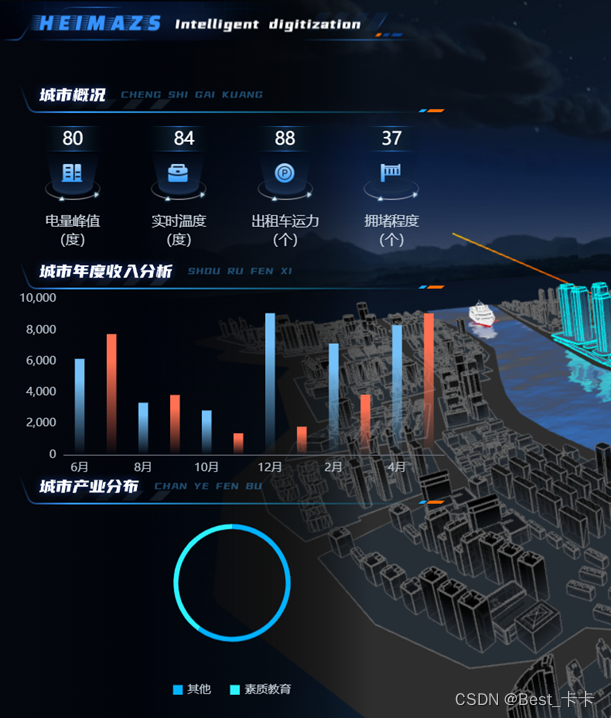
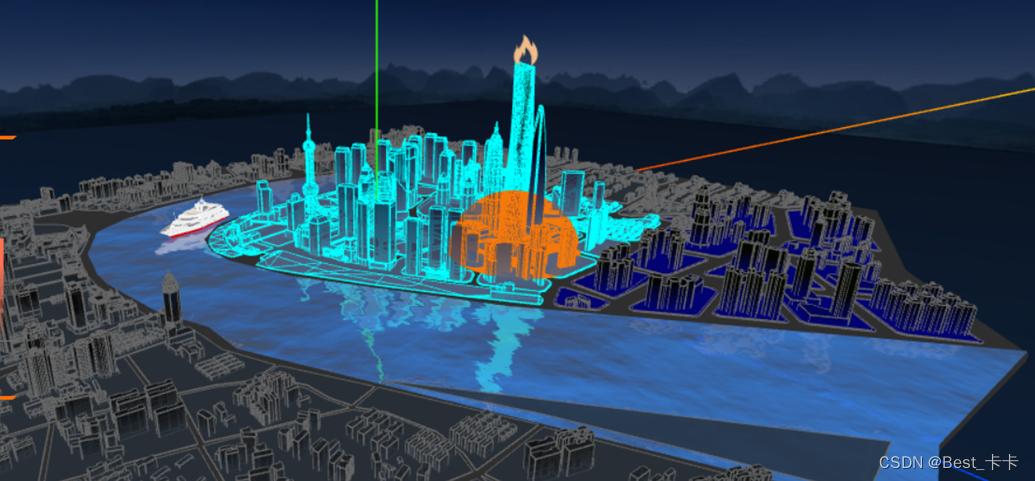
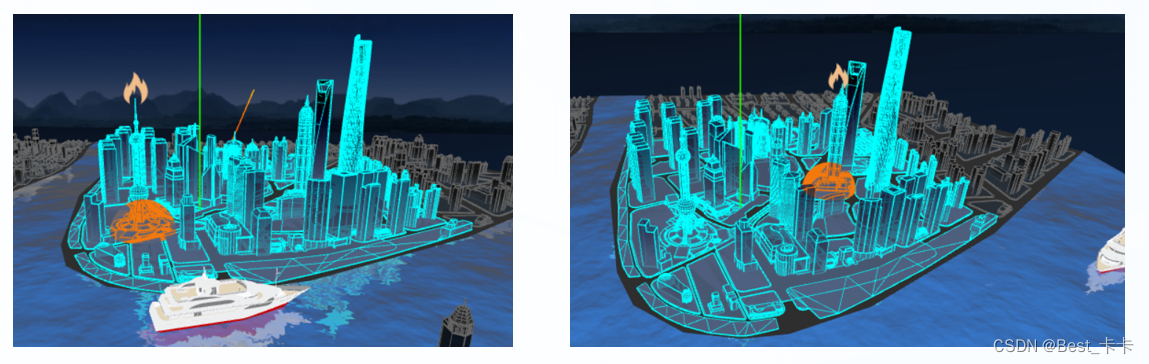
以下是项目预览
1697009690667050
页面下面附有git项目地址,自取
1. 需求
实现智慧城市,对城市数据实时监控,对建筑动效标注和预览
	1、城市模型处理(材质颜色、边线效果、着色器白膜效果、水波纹倒影效果、建筑物点击信息查看、产业分布查看)
	2、游船(游船移动路线、轮船漫游)
	3、火灾和火灾影响范围
	4、天空(背景、鸟瞰路线)
	5、城市加载优化
模型:
	3D 部分:天空背景,城市模型,游船模型,火灾报警,鸟瞰模式,漫游模式
	2D 部分:图表统计,城市概况,城市收入,产业分布(与 3D 交互)
项目准备
entry/index.js初始化three.js渲染
import * as THREE from 'three'
import { OrbitControls } from 'three/examples/jsm/controls/OrbitControls'
import { CSS2DRenderer } from 'three/examples/jsm/renderers/CSS2DRenderer'
let scene, camera, renderer, control, css2Renderer

// 初始化 3d 基本环境
function init() {
  scene = new THREE.Scene()
  camera = new THREE.PerspectiveCamera(75, window.innerWidth / window.innerHeight, 0.1, 10000);
  camera.position.set(-148, 55, -101)

  // 创建渲染器
  renderer = new THREE.WebGLRenderer({ antialias: true })
  renderer.setSize(window.innerWidth, window.innerHeight)

  // 创建2D渲染器
  css2Renderer = new CSS2DRenderer()
  css2Renderer.setSize(window.innerWidth, window.innerHeight)
  css2Renderer.domElement.style.position = 'absolute'
  css2Renderer.domElement.style.top = '0px'
  css2Renderer.domElement.style.pointerEvents = 'none'

  // DOM 添加到页面
  const canvas = document.getElementById('canvas')
  canvas.appendChild(renderer.domElement)
  canvas.appendChild(css2Renderer.domElement)

  // 轨道控制器
  control = new OrbitControls(camera, renderer.domElement)
  control.update()

  // 坐标轴
  const axesHelper = new THREE.AxesHelper(1500)
  scene.add(axesHelper)
}

// 渲染循环
function renderLoop() {
  // 这里不再调用轨道控制器 update 方法,会影响摄像机 lookAt
  renderer.render(scene, camera)
  css2Renderer.render(scene, camera)
  requestAnimationFrame(renderLoop)
}

// 灯光
function createLight() {
  // 基础光-环境光
  const ambientLight = new THREE.AmbientLight('#fff', 3)
  scene.add(ambientLight)
}

// 适配
window.addEventListener('resize', function () {
  camera.aspect = window.innerWidth / window.innerHeight;
  camera.updateProjectionMatrix();
  renderer.setSize(window.innerWidth, window.innerHeight);
  css2Renderer.setSize(window.innerWidth, window.innerHeight);
})

// 启动
window.addEventListener('DOMContentLoaded', function () {
  init()
  createLight()

  renderLoop()
})
utils/eventbus.js 封装eventBus做组件交互
// 发布订阅模式(注入名字和函数)进行调度
export class EventBus {
  constructor() {
    this.eventMap = {}
  }
  static getInstance() {
    if (!this.instance) {
      this.instance = new EventBus()
    }
    return this.instance
  }
  on(eventName, fn) {
    if (!this.eventMap[eventName]) {
      this.eventMap[eventName] = []
    }
    this.eventMap[eventName].push(fn)
  }
  emit(eventName, ...args) {
    if (!this.eventMap[eventName]) return
    this.eventMap[eventName].forEach((fn) => {
      fn(...args)
    })
  }
}
index.html页面静态
<!Doctype html>
<html lang="en">

<head>
  <meta charset="utf-8" />
  <meta name="viewport"
    content="width=device-width, initial-scale=1, minimum-scale=1, maximum-scale=1, user-scalable=no" />
  <title>智慧城市</title>
  <link href="/style.css" rel="stylesheet" type="text/css" />
</head>

<body>
  <div id="app">
    <div class="index-wrapper">
      <div class="header">
        <img class="logo" src="/image/park-logo.png" alt="" />
      </div>
      <div class="page-container" ref="container">
        <div class="model-container">
          <div id="loading" class="loading">
            <p id="processing" class="text">园区资源加载中<span id="processing-number"></span>…</p>
            <div id="loading-bar" class="loading-bar"></div>
          </div>
          <div id="canvas" class="canvas"></div>
          <div id="all-charts" class="all-charts" >
            <div class="section-one">
              <img class="img-header" src="/image/city-gaikuang.png" alt="" />
              <div class="icons-container" >
                <div class="item">
                  <div class="icons-item building-icon">
                    <span id="building-number" class="number">
                      28
                    </span>
                  </div>
                  <span class="title">电量峰值</span>
                  <span class="unity">(度)</span>
                </div>
                <div class="item">
                  <div class="icons-item enterprise-icon">
                    <span id="enterprise-number" class="number">
                      6
                    </span>
                  </div>
                  <span class="title"> 实时温度</span>
                  <span class="unity">(度)</span>
                </div>
                <div class="item">
                  <div class="icons-item car-icon">
                    <span id="car-number" class="number">
                      1530
                    </span>
                  </div>
                  <span class="title">出租车运力</span>
                  <span class="unity">(个)</span>
                </div>
                <div class="item">
                  <div class="icons-item rod-icon">
                    <span id="rod-number" class="number">
                      48
                    </span>
                  </div>
                  <span class="title">拥堵程度</span>
                  <span class="unity">(个)</span>
                </div>
              </div>
            </div>
            <div class="section-two">
              <img class="img-header" src="/image/city-shouru.png" alt="" />
              <div id="bar-chart" class="bar-chart" ></div>
            </div>
            <div class="section-three">
              <img class="img-header" src="/image/city-chanye.png" alt="" />
              <div id="pie-chart" class="pie-chart" ></div>
            </div>
          </div>

          <div id="right-btns" class="right-btns" style="pointer-events: all;">
            <div>
              <img id="mode-topView" class="mode-topView" src="/image/city-niaokan.png"
                style="pointer-events: all;" alt="">
            </div>
            <div>
              <img id="mode-roaming" class="mode-roaming" src="/image/city-manyou.png"
                style="pointer-events: all;" alt="">
            </div>
          </div>

        </div>
      </div>
      <div id="tag-1" class="building-name" style="display: none;">东方明珠</div>
      <div id="tag-2" class="building-info" style="display: none;">
        <div>总平米数: 2000</div>
        <div>容纳人数: 10000</div>
        <div>可出租位: 50</div>
        <div>空余车位: 10</div>
      </div>

      <div id="tag-3" class="building-fire" style="display: none;">
        <div>着火大楼: 东方明珠</div>
        <div>着火楼层: 18层</div>
        <div>疏散人数: 1800人</div>
      </div>
    </div>
    <script type="module" src="/main.js"></script>
</body>

</html>
// 样式
import './styles/all.less'
// Three.js 3D 入口
import '@/entry'
all.less
#app {
  width: 100%;
  height: 100%;
}

html {
  height: 100%;
}

body {
  margin: 0;
  display: flex;
  place-items: center;
  min-width: 320px;
  height: 100%;
}

p {
  margin-bottom: 0;
}


.index-wrapper {
  position: relative;
  height: 100%;
  background-color: black;

  .header {
    position: fixed;
    top: 0;
    display: flex;
    flex-direction: row;
    justify-content: space-between;
    align-items: center;
    height: 50px;
    width: 100%;
    margin-bottom: 30px;
    z-index: 10;

    .logo {
      width: 460px;
    }

    .btn-list {
      img {
        width: 96px;
        margin-right: 24px;
        cursor: pointer;
      }
    }
  }

  .page-container {
    width: 100%;
    height: 100%;
    overflow-x: hidden;
    display: flex;
    flex-direction: row;
    scroll-behavior: smooth;
  }
}


.model-container {
  position: relative;
  height: 100%;
  background-color: black;
  width: 100%;
  flex-shrink: 0;
}

.loading {
  position: absolute;
  left: 50%;
  top: 40%;
  transform: translateX(-50%);
  text-align: center;

  .text {
    font-size: 14px;
    color: #909399;
    margin-bottom: 16px;
  }

  .loading-process {
    width: 280px;
    height: 4px;
    background: rgba(255, 255, 255, 0.16);
    border-radius: 20px;
    overflow: hidden;
  }


  .loading-bar {
    transform: scaleX(0.3);
    transform-origin: top left;
    width: 280px;
    height: 4px;
    background: linear-gradient(90deg, #48ffff 0%, #3656ff 100%);
    border-radius: 20px;
    overflow: hidden;
  }

}

.all-charts {
  position: absolute;
  top: 0;
  left: 0;
  bottom: 0;
  width: 480px;
  padding: 88px 20px 0;
  display: flex;
  flex-direction: column;
  background: linear-gradient(to left, rgba(0, 6, 15, 0.00) 0%, rgba(0, 6, 15, 0.00) 20%, rgba(0, 0, 0, 0.40) 30%, rgba(0, 0, 0, 0.60) 40%, rgba(1, 4, 11, 1) 70%, #04070d 100%);

  img {
    width: 100%;
  }
}


.right-btns {
  position: absolute;
  top: 0;
  right: 0;
  bottom: 0;
  padding: 88px 20px 0;
  display: flex;
  flex-direction: column;
  background: linear-gradient(to right, rgba(0, 6, 15, 0.00) 0%, rgba(0, 6, 15, 0.00) 20%, rgba(0, 0, 0, 0.40) 70%, rgba(0, 0, 0, 0.60) 80%);

  div {
    margin-bottom: 48px;
    margin-right: 24px;

  }

  img {
    width: 96px;
    cursor: pointer;

  }
}

.section-one {
  flex-basis: 25%;

  .icons-container {
    display: flex;
    justify-content: space-between;

    .item {
      text-align: center;
      display: flex;
      flex-direction: column;
      flex: 1;
      padding: 10px 0;

      .icons-item {
        position: relative;
        height: 80px;

        .number {
          position: absolute;
          left: 50%;
          transform: translateX(-50%);
          font-size: 18px;
          font-family: FontquanXinYiGuanHeiTi, FontquanXinYiGuanHeiTi-Regular;
          color: #ffffff;
        }
      }

      .building-icon {
        background: url('./assets/building-icon.png') no-repeat 50% 0 / contain;
      }

      .enterprise-icon {
        background: url('./assets/enterprise-icon.png') no-repeat 50% 0 / contain;
      }

      .rod-icon {
        background: url('./assets/rod-icon.png') no-repeat 50% 0 / contain;
      }

      .car-icon {
        background: url('./assets/car-icon.png') no-repeat 50% 0 / contain;
      }

      .title,
      .unity {
        font-size: 14px;
        color: #cdd7e1;
      }

      .title {
        margin-top: 8px;
      }
    }
  }
}

.section-two {
  flex-basis: 35%;
  display: flex;
  flex-direction: column;

  .bar-chart {
    width: 100%;
    // height: 100%;
    flex: 1;
  }
}

.section-three {
  flex-basis: 40%;
  display: flex;
  flex-direction: column;

  .pie-chart {
    position: relative;
    margin: 0 auto;
    padding-bottom: 20px;
    width: 80%;
    // height: 100%;
    flex: 1;
  }
}

.bar-chart-titile {
  display: flex;
  margin-top: 20px;
  justify-content: space-between;
  font-size: 14px;
  color: #c6d1db;

  .bar-icon {
    display: inline-block;
    width: 12px;
    vertical-align: middle;
  }

  .blue-bar-icon {
    background: linear-gradient(to right, #74c0f8, rgba(116, 192, 248, 0));
  }

  .red-bar-icon {
    background: linear-gradient(to right, #ff7152, rgba(255, 113, 82, 0));
  }
}

.building-name {
  text-align: center;
  color: #fff;
  font-size: 10px;
  background-size: 100% 100%;
  background-image: url('./icon/text_select.png');
  background-repeat: no-repeat;
  padding: 16px;
}

.building-info {
  display: flex;
  width: 300px;
  justify-content: space-between;
  align-items: flex-end;
  flex-wrap: wrap;
  text-align: center;
  color: #ccc;
  font-size: 10px;
  padding: 12px;
  background-size: 100% 100%;
  // text.png
  background-image: url('./icon/modal-bg.png');
  background-repeat: no-repeat;
  margin-top: 60px;
}

.building-info div {
  width: 40%;
  position: relative;
  margin: 10px 0;
}

// 左边
.building-info div:nth-child(odd) {
  text-align: right;
  padding-right: 12px;
}

.building-info div:nth-child(odd)::after {
  position: absolute;
  content: '';
  width: 10px;
  background-color: lightblue;
  border-radius: 10px;
  top: 33%;
  right: 0;
}

// 右边
.building-info div:nth-child(even) {
  text-align: left;
  // padding-left: 12px;
}

.building-info div:nth-child(even)::before {
  position: absolute;
  content: '';
  width: 10px;
  background-color: #00FFFF;
  border-radius: 10px;
  top: 33%;
  left: 0;
}

.building-fire {
  color: #ccc;
  font-size: 10px;
  padding: 12px 28px;
  background-size: 100% 100%;
  background-image: url('./icon/modal-bg.png');
  background-repeat: no-repeat;
}

.building-fire div {
  position: relative;
}

.building-fire div::before {
  position: absolute;
  content: '';
  width: 10px;
  background-color: red;
  border-radius: 10px;
  top: 33%;
  left: -20px;
}
style.css
* {
  margin: 0;
  padding: 0;
  box-sizing: border-box;
}

body {
  position: relative;
}
2.模型加载
分析
要加载的模型有city.fbx和ship.gfb,需要两个load加载器
准备专门加载各种模型文件的通用函数,并加载城市和游船模型对象
传入模型文件路径,以及封装成功回调函数

load是异步的
可以通过model.length === pathList.length 来判断是否模型文件都加载完成,完成加载执行suc(model)
import { FBXLoader } from 'three/examples/jsm/loaders/FBXLoader.js'
import { GLTFLoader } from 'three/examples/jsm/loaders/GLTFLoader'
import * as THREE from 'three'

/**
 * 专门加载模型文件=>模型对象
 * @param {*} pathList 模型文件路径数组
 * @param {*} suc 接收成功结果回调函数
 */
export function loadManager(pathList, suc) {
  // 定义加载器对象
  const gltfLoader = new GLTFLoader(manager)
  const fbxLoader = new FBXLoader(manager)

  pathList.forEach(path => {
    if (path.indexOf('fbx') > -1) {
      fbxLoader.load(path, obj => {
        // 数据结构
        model.push({
          model: obj,
          url: path
        });
        (model.length === pathList.length) && suc(model)
      })
    } else if (path.indexOf('gltf') > -1) {
      gltfLoader.load(path, gltf => {
        model.push({
          model: gltf.scene,
          url: path
        });
        · && suc(model)
      })
    }
  })
}
3.城市加载
分析
创建一个基类(城市、天空、轮船都可以继承基类)
基类:场景、模型、相机、轨道控制器
封装城市类,用于加载并管理城市相关细节和功能
实现:
1.创建 BaseModel.js 基础模型类
2.创建 City.js 城市类并继承 BaseModel
3.判断模型名字并加载模型到网页中
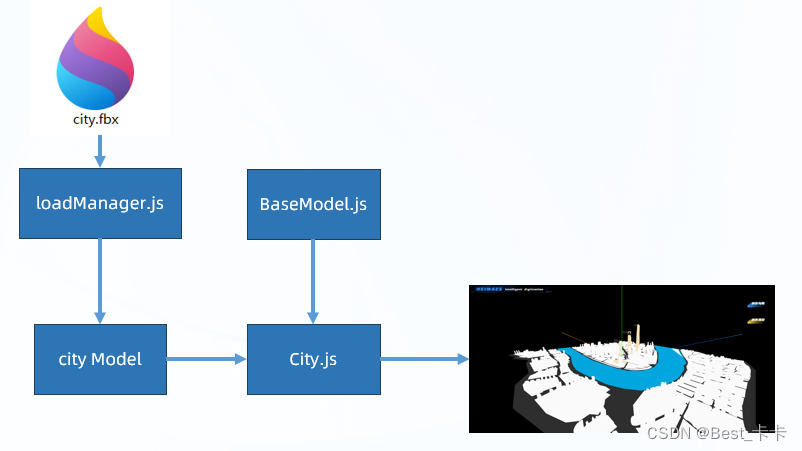
在 src/model/BaseModel.js 准备基类属性和代码
// 基础模型
export class BaseModel {
  constructor(model, scene, camera, control) {
    this.model = model
    this.scene = scene
    this.camera = camera
    this.control = control

    // 子类无需定义 constructor,所以没有地方调用 init 方法,因此在这里调用子类的 init
    this.init()
  }
}
在 src/model/City.js 新建
// 城市类
import { BaseModel } from "./BaseModel";
import * as THREE from 'three'

export class City extends BaseModel {
  init() {
    this.scene.add(this.model)
  }
}
4.城市修改-材质颜色
分析
城市3d模型加载后做些微处理、修改城市模型材质,确认对应物体
实现:在city.js中加入initEffect方法
1.找到模型对象名字
2.隐藏自带的建筑名字
3.排除地面和河水,设置四周和中心模型对象材质
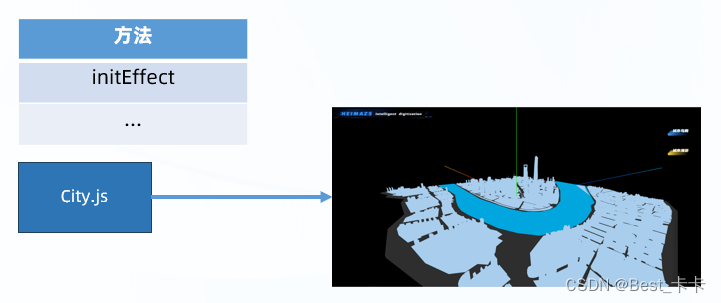
// 初始化城市效果
  initEffect() {
    // 中心城市建筑材质
    const centerMaterial = new THREE.MeshBasicMaterial({
      color: 0xA8CDED,
      transparent: true
    })
    // 外围城市建筑材质
    const periphery = new THREE.MeshBasicMaterial({
      color: 0xA8CDED,
      transparent: true
    })

    this.model.traverse(model => {
      if (model.name === 'Text') {
        // 隐藏默认建筑名字
        model.visible = false
        return
      }

      // 排除地板和河水物体
      if (model.name !== 'Shanghai-09-Floor' && model.name !== 'Shanghai-08-River') {
        // 修改城市建筑模型材质
        if (model.name == 'Shanghai-02' || model.name == 'Shanghai-03' || model.name == 'Shanghai-04' || model.name == 'Shanghai-05' || model.name == 'Shanghai-06' || model.name == 'Shanghai-07') {
          // 周围建筑
          model.material = periphery

        } else {
          // 中心建筑
          model.material = centerMaterial

        }
      }


    })
  }
5.城市修改-边线效果
分析
使用three.js提供的边缘几何体为城市模型物体描边边缘几何体
实现
1.创建 EdgesLine.js 边缘几何类
2.基于 three.js 添加边缘线条
3.在 City.js 城市类中引入调用
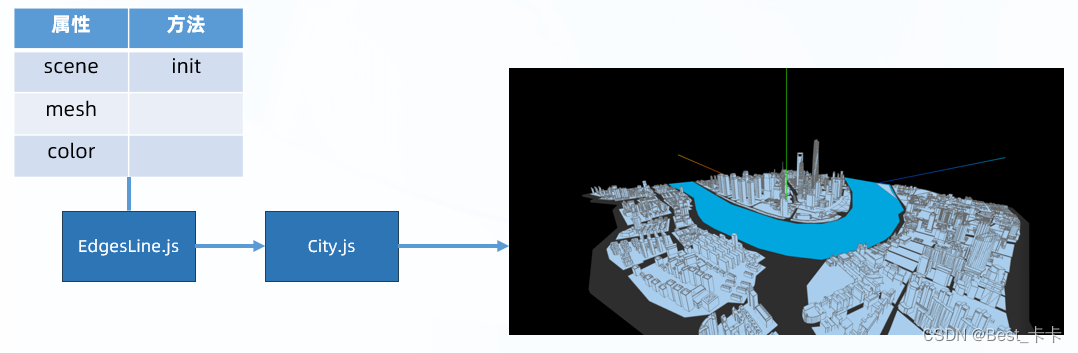
在 src/effect/EdgesLine.js 新建
// 边缘边线效果
import * as THREE from 'three'
export class EdgesLine {
  constructor(scene, mesh, color){
    this.scene = scene
    this.mesh = mesh // 需要添加边线的小物体模型对象
    this.color = color // 边线颜色

    this.init()
  }
  init() {
    const edgesGeometry = new THREE.EdgesGeometry(this.mesh.geometry)
    const material = new THREE.LineBasicMaterial({ color: this.color })
    const line = new THREE.LineSegments(edgesGeometry, material)
    // 把目标小物体模型对象(位置,旋转角度,缩放)赋予给边线物体
    line.position.copy(this.mesh.position)
    line.rotation.copy(this.mesh.rotation)
    line.scale.copy(this.mesh.scale)
    this.scene.add(line)
  }
}
在 City.js 中调用
// 修改城市建筑模型材质
        if (model.name == 'Shanghai-02' || model.name == 'Shanghai-03' || model.name == 'Shanghai-04' || model.name == 'Shanghai-05' || model.name == 'Shanghai-06' || model.name == 'Shanghai-07') {
          // 周围建筑
          model.material = periphery
          new EdgesLine(this.scene, model, new THREE.Color('#666666'))

        } else {
          // 中心建筑
          model.material = centerMaterial
          new EdgesLine(this.scene, model, new THREE.Color('#00ffff'))

        }
6.城市修改-着色器
分析
我们要做的是为城市模型添加渐变颜色白膜效果
实现:
1.基于材质对象的 onBeforeCompile 方法修改内置材质
2.查找并使用白膜效果的着色器代码

在src/shader/modifyCityMaterial.js新建
import * as THREE from "three"

// 使用着色器代码 - 修改城市默认细节
export function modifyCityDefaultMaterial(mesh, isCenter) {
  // 中心城市物体
  if (isCenter) {
    // 给现有材质追加着色器内代码
    mesh.material.onBeforeCompile = (shader) => {
      // 替换片元着色器内代码字符串
      // 对混色 dithering_fragment 部分准备改写
      // 注意:打印 shader.fragmentShader 发现是类 c 语法,引入了各种插件和实现过程代码(这里对 c 语法做出替换,从而让颜色改变)
      shader.fragmentShader = shader.fragmentShader.replace(
        "#include <dithering_fragment>",
        `
          #include <dithering_fragment>
          //#end#
      `
      )
      // 给物体内着色器代码进行修改和替换,添加过渡颜色
      addGradColor(shader, mesh)
    }
  } else {
    // 周围建筑
    mesh.material.onBeforeCompile = (shader) => {
      shader.fragmentShader = shader.fragmentShader.replace(
        "#include <dithering_fragment>",
        `
          #include <dithering_fragment>
          //#end#
      `
      )
      addLowGradColor(shader, mesh)
    }
  }
}
export function addGradColor(shader, mesh) {
  // 计算当前几何物体,边缘图形:链接:https://threejs.org/docs/index.html#api/zh/core/BufferGeometry.computeBoundingBox
  mesh.geometry.computeBoundingBox()

  // 就能拿到这个物体的坐标值
  let { min, max } = mesh.geometry.boundingBox
  let uHeight = max.z - min.z
  let uMaxX = max.x
  let uMinX = min.x

  // 向 shader 中传入全局参数
  shader.uniforms.uTopColor = {
    value: new THREE.Color("#1B2569")
  };
  shader.uniforms.uHeight = {
    value: uHeight
  };
  shader.uniforms.uMaxX = {
    value: uMaxX
  }
  shader.uniforms.uMinX = {
    value: uMinX
  }

  // 顶点着色器代码替换
  shader.vertexShader = shader.vertexShader.replace(
    // common 包含着色器公共模块(包含常用的数学工具函数以及一些常量定义什么的)
    "#include <common>",
    `
      #include <common>
      varying vec3 vPosition;
      `
  )
  shader.vertexShader = shader.vertexShader.replace(
    // 顶点着色器开始的位置
    "#include <begin_vertex>",
    `
      #include <begin_vertex>
      vPosition = position;
  `
  )

  // 片元着色器代码替换
  shader.fragmentShader = shader.fragmentShader.replace(
    "#include <common>",
    `
      #include <common>

      uniform vec3 uTopColor;
      uniform float uHeight;
      varying vec3 vPosition;
    `
  )
  shader.fragmentShader = shader.fragmentShader.replace(
    "//#end#",
    `
      vec4 distGradColor = gl_FragColor;
      // 设置渐变色比例
      float gradMix = (vPosition.z+uHeight/2.0)/uHeight;
      // 设置渐变效果 mix(a,b,r) = (1-r)*a + br
      vec3 gradMixColor = mix(distGradColor.xyz,uTopColor,gradMix);
      // 片元赋色
      gl_FragColor = vec4(gradMixColor,0.8);
        //#end#
      `
  )
}
export function addLowGradColor(shader, mesh) {
  mesh.geometry.computeBoundingBox()

  let { min, max } = mesh.geometry.boundingBox
  let uHeight = max.z - min.z
  let uMaxX = max.x
  let uMinX = min.x

  shader.uniforms.uTopColor = {
    value: new THREE.Color("#000"),
  }
  shader.uniforms.uHeight = {
    value: uHeight,
  }

  shader.uniforms.uMaxX = {
    value: uMaxX
  }

  shader.uniforms.uMinX = {
    value: uMinX
  }

  shader.vertexShader = shader.vertexShader.replace(
    "#include <common>",
    `
      #include <common>
      varying vec3 vPosition;
      `
  );

  shader.vertexShader = shader.vertexShader.replace(
    "#include <begin_vertex>",
    `
      #include <begin_vertex>
      vPosition = position;
  `
  )

  shader.fragmentShader = shader.fragmentShader.replace(
    "#include <common>",
    `
      #include <common>

      uniform vec3 uTopColor;
      uniform float uHeight;
      varying vec3 vPosition;

        `
  )
  shader.fragmentShader = shader.fragmentShader.replace(
    "//#end#",
    `
      vec4 distGradColor = vec4(0.4,0.5,0.6,1.0);

      float gradMix = (vPosition.z+uHeight/2.0)/uHeight;
      vec3 gradMixColor = mix(distGradColor.xyz,uTopColor,gradMix);
      gl_FragColor = vec4(gradMixColor,0.8);
        //#end#

      `
  )
}

// 饼状图->点击选择城市效果
export function modifySelectCityMaterial(mesh) {
  mesh.material.onBeforeCompile = (shader) => {
    shader.fragmentShader = shader.fragmentShader.replace(
      "#include <dithering_fragment>",
      `
        #include <dithering_fragment>
        //#end#
    `
    );
    addGradColor(shader, mesh);
  };
}
在 City.js 中判断引入并使用
import { modifyCityDefaultMaterial } from '@/shader/modifyCityMaterial'
···
// 修改城市建筑模型材质
 if (model.name == 'Shanghai-02' || model.name == 'Shanghai-03' || model.name == 'Shanghai-04' || model.name == 'Shanghai-05' || model.name == 'Shanghai-06' || model.name == 'Shanghai-07') {
    // 周围建筑
    model.material = periphery
    new EdgesLine(this.scene, model, new THREE.Color('#666666'))
    // 对物体追加混合的着色器代码(渐变色白膜效果)
    modifyCityDefaultMaterial(model, false)
  } else {
    // 中心建筑
    model.material = centerMaterial
    new EdgesLine(this.scene, model, new THREE.Color('#00ffff'))
    modifyCityDefaultMaterial(model, true)
  }
7.城市-添加水面效果
分析
实现水面效果
1.使用 three.js 提供附加组件 Water 实现
2.隐藏模型里自带的水物,使用 CityWater 显示
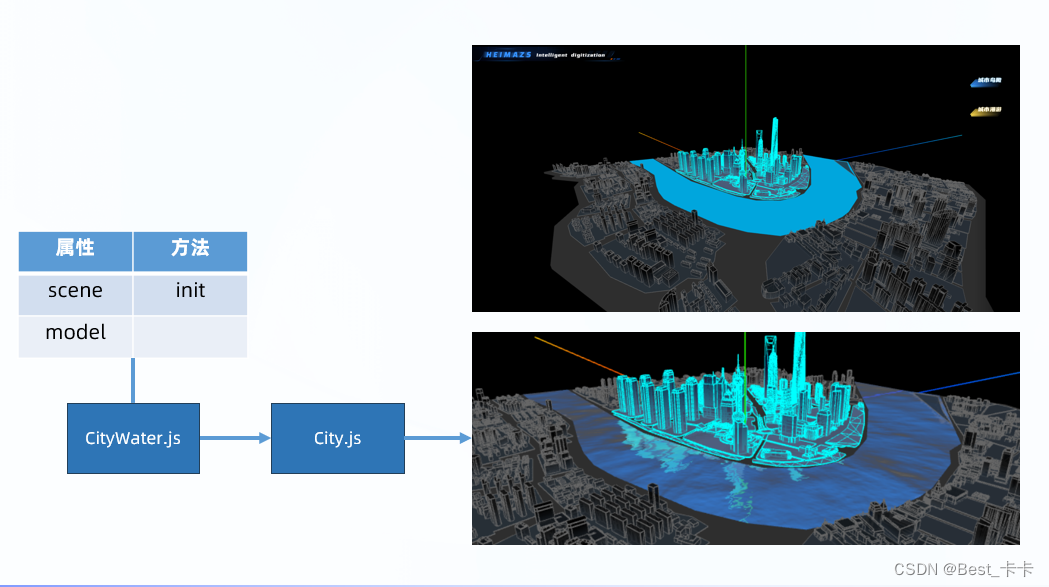
新建 src/effect/CityWater.js 实现水物体效果
import * as THREE from 'three'
import { Water } from 'three/examples/jsm/objects/Water'

export class CityWater {
  constructor(model, scene) {
    this.scene = scene
    this.model = model

    this.init()
  }
  init() {
    const modelGeo = this.model.geometry // 先保存原来水模型的几何图形对象
    // 新的水模型
    this.model = new Water(
      modelGeo,
      {
        textureWidth: 512, // 水贴图的宽度
        textureHeight: 512, // 水贴图的高度(值越大细节越多)
        waterNormals: new THREE.TextureLoader().load('textures/waternormals.jpg', function (texture) { // 水模型的法线贴图(不同像素点有不同反光效果)
          // 纹理图片 UV 环绕到目标物体身上的重复方式
          // wrapS这个值定义了纹理贴图在水平方向上将如何包裹,在UV映射中对应于U
          // wrapT这个值定义了纹理贴图在垂直方向上将如何包裹,在UV映射中对应于V
          // 使用RepeatWrapping,纹理将简单地重复到无穷大
          texture.wrapS = texture.wrapT = THREE.RepeatWrapping;
        }),
        sunDirection: new THREE.Vector3(), // 阳光方向
        sunColor: 0xffffff, // 阳光颜色
        waterColor: new THREE.Color("#1e90ff"), // 水颜色
        distortionScale: 4, // 水倒影分散度(值大越分散)
      }
    )
    this.model.rotation.x = -Math.PI / 2 // 默认模型是垂直于 x 轴,所以翻转
    this.scene.add(this.model) // 物体模型添加到场景中
  }
  // 给水波纹做动画
  onTick(t) {
    // t的值:渲染循环启动过了多少毫秒时间
    // time 全局参数是 Water 内置好的,我们只需要不断传入新的偏移单位数值即可实现水波纹动态效果
    this.model.material.uniforms['time'].value = t / 1000
  }
}
在 City.js 判断并引入使用
// 针对水物体单独处理
  if (model.name === 'Shanghai-08-River') {
    // 把原本水物体隐藏
    model.visible = false
    // 创建更加真实的水面效果物体
    const theWater = new CityWater(model, this.scene)
    // 把水波纹物体传入到动效管理类当中
    EffectManager.getInstance().addObj(theWater)
  }
8.添加游船物体
实现
实现游船物体
1.创建 Ship 类,加载和管理游船模型对象
2.设置游船默认位置,旋转角度和缩放大小

在 src/model/Ship.js 新建
// 游船类
import * as THREE from 'three'
import { BaseModel } from './BaseModel'
export class Ship extends BaseModel {
  init() {
    this.scene.add(this.model)
  }
}
在 src/entry/index.js 使用
loadManager(['fbx/city.fbx', 'gltf/ship.glb'], modelList => {
    modelList.forEach(async obj => {
      if (obj.url === 'fbx/city.fbx') {
        const city = new City(obj.model, scene, camera, control)
      } else if (obj.url === 'gltf/ship.glb') {
        const ship = new Ship(obj.model, scene, camera, control)
      }
    })
  })
在 entry/index.js 加载模型回调函数中
const ship = new Ship(obj.model, scene, camera, control)
    ship.model.position.set(150, 0, -80)
    ship.model.rotation.set(0, -Math.PI / 2, 0)
    ship.model.scale.set(100, 100, 100) // 游船物体很小要与大城市模型匹配需要放大
9.项目-天空背景
分析
1.创建 Sky 天空背景类,加载和管理天空背景
2.实例化天空,传入必须要的贴图参数

新建 src/environment/Sky.js
// 天空背景类
import * as THREE from 'three'
export class Sky {
  constructor(scene) {
    this.scene = scene
  }
  // 创建并设置天空背景 pathList贴图数组
  setBack(publicPath, pathList) {
    (new THREE.CubeTextureLoader()).setPath(publicPath).load(pathList, (texture) => {
      this.scene.background = texture
    })
  }
}
在 entry/index.js 中使用
// 初始化天空背景 // 传入6个面的贴图
(new Sky(scene)).setBack('textures/sky/', [
'px.jpg',
'nx.jpg',
'py.jpg',
'ny.jpg',
'pz.jpg',
'nz.jpg'
])
10.城市-火灾标记
分析
创建火灾标记精灵物体
实现:(加载、位置)
1.创建 Fire 火灾标记类,加载和管理火灾标记
2.引入计算物体中心和宽高深的函数,确定火灾标记位置
3.在 City 类中实例化创建火灾标记
回顾
// 区别:
// CSS3D:始终不面向摄像机,场景缩放时跟随着变大/变小,不被模型遮挡,通过 DOM 事件点击
// CSS2D:始终面向摄像机,  场景缩放时不跟随变化,     不被模型遮挡,通过 DOM 事件点击
 精灵体:始终面向摄像机,  场景缩放时跟随着变大/变小,被模型遮挡,  通过光射投影交互
// 平面体:始终不面向摄像机,场景缩放时跟随着变大/变小,被模型遮挡,  通过光射投影交互
讲解
新建 src/effect/Fire.js
// 火灾标记类
import * as THREE from 'three'
export class Fire {
  constructor(scene, center, size) {
    this.scene = scene
    this.center = center // 建筑物中心点三维向量对象
    this.size = size // 建筑物大小的三维向量对象

    this.init()
  }
  // 初始化火灾标记
  init() {
    const texture = new THREE.TextureLoader().load('icon/fire.png')
    texture.colorSpace = THREE.SRGBColorSpace
    const spriteMaterial = new THREE.SpriteMaterial({
      map: texture
    })
    const sprite = new THREE.Sprite(spriteMaterial)
    // +3 让精灵物体中心点不在建筑物顶点,再往上移动一些单位
    sprite.position.set(this.center.x, this.center.y + this.size.y / 2 + 3, this.center.z)
    sprite.scale.set(10, 10, 10)
    this.scene.add(sprite)

    this.model = sprite
  }
}
在 City.js 中 init 方法中调用,并新建 initFire 实例方法
// 随机为01-shanghaizhongxindasha设置火灾标记 后续可以通过接口获取那个建筑火灾了
this.initFire('01-shanghaizhongxindasha')
// 创建火灾标记
// buildName 就是建模师模型中的小物体名字
initFire(buildName) {
    const build = this.model.getObjectByName(buildName)
    const { center, size } = getBoxCenter(build)

    const fire = new Fire(this.scene, center, size)
}
在 utils/getBoxCenter.js新建getBoxCenter函数获取物体中心点坐标
import * as THREE from 'three'

/**
 * 获取模型中心点和高度差
 * @param {*} mesh 目标模型对象
 * @returns { center: 中心点坐标, uHeight: 高度差值 }
 */
 // 基于 three.js 的 Box3 可以计算出目标物体的中心点坐标和宽高深大小
export const getBoxCenter = mesh => {
  let box = new THREE.Box3()
  // expandByObject:包裹在包围盒中的3d对象
  box.expandByObject(mesh)
  // 计算包围盒的中心点三维坐标对象
  let center = new THREE.Vector3()
  box.getCenter(center)

  // 计算物体宽,高,深(x,y,z)的值
  var size = new THREE.Vector3()
  box.getSize(size)

  return {
    center,
    size
  }
}
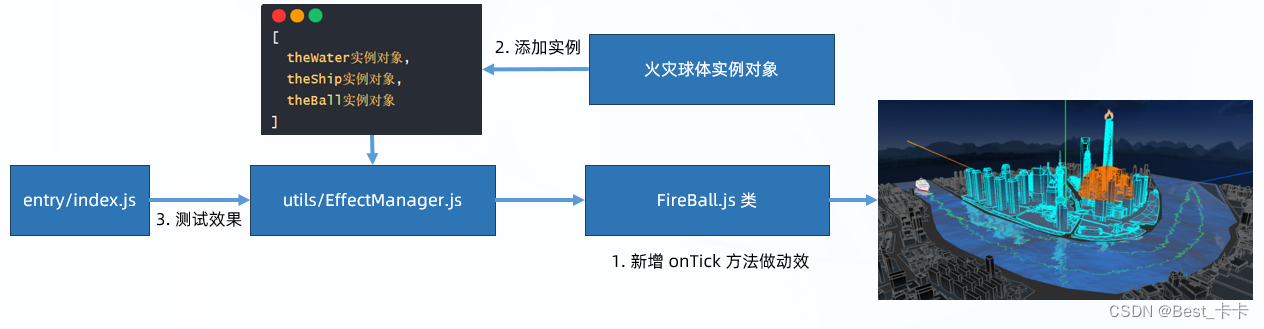
11.城市-火灾影响范围
分析
在建筑底部添加火灾影响范围球体标记
实现:
1.创建 FireBall 火灾球体类(半球体),标记火灾影响范围
2.在 City 类中实例化火灾球体,并传入参数
新建 src/effect/FireBall.js 火灾影响范围球体类
// 火灾影响范围-球体标记类
import * as THREE from 'three'
export class FireBall {
  constructor(scene, center) {
    this.scene = scene
    this.center = center

    this.init()
  }
  init() {
    // 半球体物体
    const geometry = new THREE.SphereGeometry(
      25,
      32,
      16,
      0,
      Math.PI * 2, // 水平方向扫描角度
      0,
      Math.PI / 2, // 垂直方向扫描角度(一半)-半球体
    )
    const material = new THREE.MeshBasicMaterial({
      color: new THREE.Color('#f4790d'),
      side: THREE.DoubleSide,
      depthTest: false // 关闭深度测试(透视效果)- 多个像素点同时渲染
    })
    const sphere = new THREE.Mesh(geometry, material)
    sphere.position.set(this.center.x, 0, this.center.z)
    this.scene.add(sphere)
    this.nowMesh = sphere
    this.nowMesh.scale.set(0, 0, 0) // 缩小成不显示,后续做动效再出现
  }
}
在 City.js 中引入并在 initFire 方法中使用
const ball = new FireBall(this.scene, center)
12.城市-建筑物信息
分析
1.创建 BuildInfo 建筑信息类,基于 CSS2D 渲染器,标记建筑物信息
2.在 City 类中实例化使用并传入参数
参数:场景、建筑中心坐标、数据、标题函数、信息函数
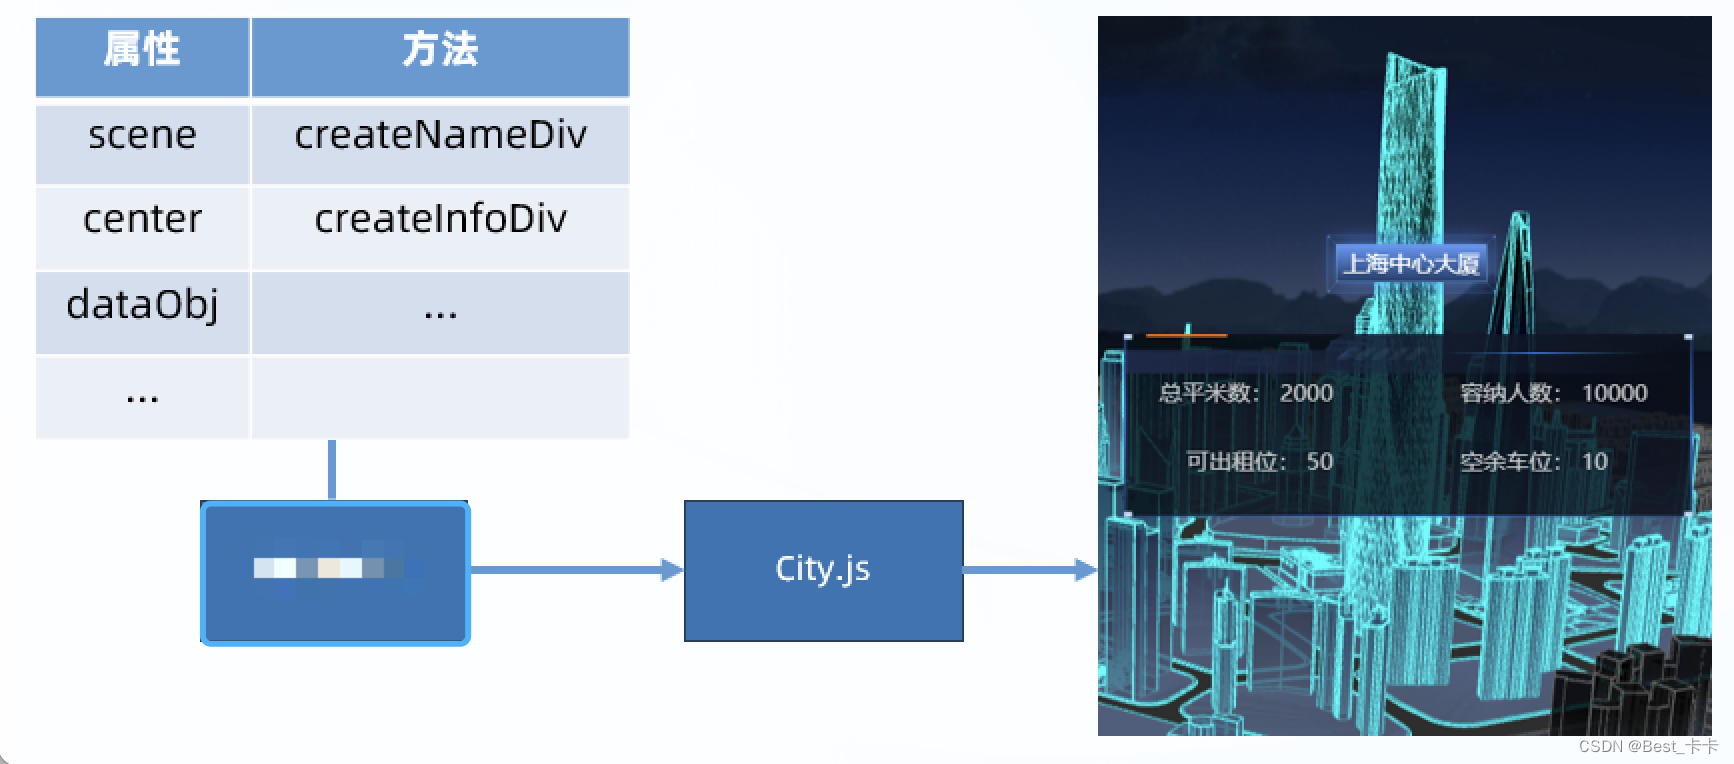
新建 src/dom/BuildInfo.js 类
// 2D 物体 - 建筑信息
import { CSS2DObject } from 'three/examples/jsm/renderers/CSS2DRenderer';
export class BuildInfo {
  constructor(scene, center, dataObj) {
    this.scene = scene
    this.center = center
    this.dataObj = dataObj

    this.list = [] // 保存名字和信息的 2 个 2D 物体

    this.createNameDiv()
    this.createInfoDiv()
  }
  // 建筑名字的 2D 物体
  createNameDiv() {
    const nameDiv = document.querySelector('#tag-1')
    nameDiv.innerHTML = this.dataObj.name // 建筑名字
    // 标签虽然有 display:none; 但是转化成 2D 物体后会在 2D 渲染器中直接显示
    const nameObject = new CSS2DObject(nameDiv)
    nameObject.position.set(this.center.x, this.center.y + 10, this.center.z)
    this.scene.add(nameObject)
    this.list.push(nameObject)
  }
  // 建筑信息的 2D 物体
  createInfoDiv() {
    const infoDiv = document.querySelector('#tag-2')
    infoDiv.style.pointerEvents = 'all'
    const { squareMeters, accommodate, officesRemain, parkingRemain } = this.dataObj
    const textHtml = `
    <div>总平米数: ${squareMeters}</div>
    <div>容纳人数: ${accommodate}</div>
    <div>可出租位: ${officesRemain}</div>
    <div>空余车位: ${parkingRemain}</div>
      `
    infoDiv.innerHTML = textHtml

    const infoObject = new CSS2DObject(infoDiv)
    infoObject.position.set(this.center.x, this.center.y + 5, this.center.z)
    this.scene.add(infoObject)
    this.list.push(infoObject)
  }
}
在 model/City.js init 中定义数据结构
this.buildNameObj = { // 模型名字和建筑显示名字对应关系
      '01-shanghaizhongxindasha': '上海中心大厦',
      "02-huanqiujinrongzhongxin": "环球金融中心",
      "03-jinmaodasha": "金茂大厦",
      "04-dongfangmingzhu": "东方明珠",
    }
在 model/City.js initFire 中调用
// 只有单独设置有名字的物体,才能被获取到并绑定事件
new BuildInfo(this.scene, center,  {
        "squareMeters": "200",
        "name": this.buildNameObj[buildName],
        "officesRemain": "200",
        "accommodate": "500",
        "parkingRemain": "88",
        "cameraPosition": {
            "x": "-27.60404773326758",
            "y": "77.6723594934777",
            "z": "190.86129619259177"
        }
    })
13.项目-水波纹动效
分析
添加水波纹动函数并在渲染循环中不断调度
1、设置EffectManager动效类:
{
	list:保存将来要做动效的实例对象
	addObj: 添加要做动效的实例对象
	tickForEach:将来渲染循环传过来的毫秒级时间数值的动效
}
2、渲染循环中不断调度实例对象的onTick动效函数
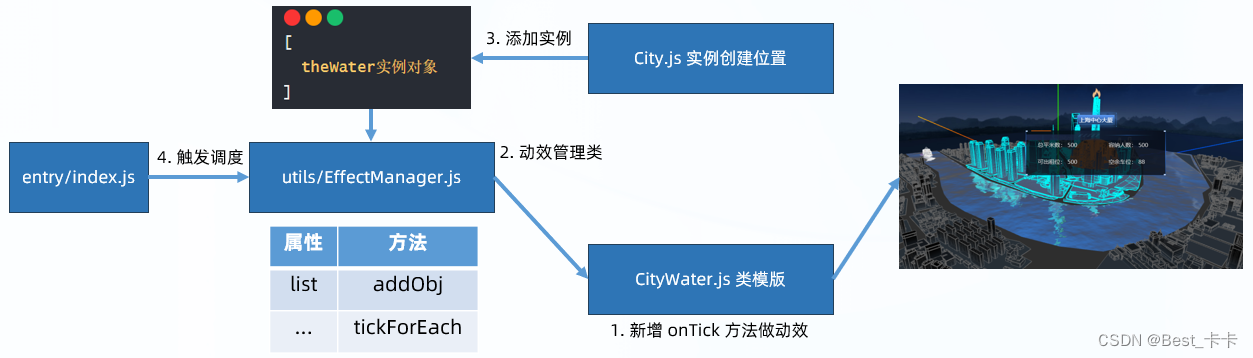
实现:
1.水面效果类中,添加 onTick 方法做动效
// 给水波纹做动画
// Water 做动效改变全局参数 time 到着色器代码中,不断影响水物体的像素点位移,从而有波纹效果
  onTick(t) {
    // t的值:渲染循环启动过了多少毫秒时间
    // time 全局参数是 Water 内置好的,我们只需要不断传入新的偏移单位数值即可实现水波纹动态效果
    this.model.material.uniforms['time'].value = t / 1000
  }
2.创建 EffectManager 动效管理类,管理项目中所有动效实例对象
// 整个项目-动效管理类
// 思路:要做动效的实例对象加入到这里,后续会不断分别调度每个实例对象内置的 onTick 方法
export class EffectManager {
  constructor() {
    this.list = [] // 保存将来要做动效的实例对象
  }
  static getInstance() {
    if (!this.instance) {
      this.instance = new EffectManager()
    }

    return this.instance
  }
  // 添加要做动效的实例对象
  addObj(obj) {
    this.list.push(obj)
  }
  tickForEach(t) {
    // t: 将来渲染循环传过来的毫秒级时间数值
    this.list.forEach(obj => {
      obj.onTick(t)
    })
  }

}
3.添加实例物体到动态管理类中
// 针对水物体单独处理
  if (model.name === 'Shanghai-08-River') {
    // 把原本水物体隐藏
    model.visible = false
    // 创建更加真实的水面效果物体
    const theWater = new CityWater(model, this.scene)
    // 把水波纹物体传入到动效管理类当中
    EffectManager.getInstance().addObj(theWater)
  }
4.渲染循环中不断调度,动效管理类中实例对象们的 onTick 方法,做动效
// 动效是依赖渲染循环,不断重新调度并设置不同变量值来实现动效
// 渲染循环
function renderLoop(t) {
  // 这里不再调用轨道控制器 update 方法,会影响摄像机 lookAt
  renderer.render(scene, camera)
  css2Renderer.render(scene, camera)
  // 开始做动效->遍历所有要做动效的实例物体内置的 onTick 方法
  EffectManager.getInstance().tickForEach(t)
  requestAnimationFrame(renderLoop)
}
14.城市-游船移动效果
分析
游船移动:路径、方向、动画
物体移动路径规划,可以借助三维样条曲线 CatmullRomCurve3 设置几个关键点,就能得到一组很多坐标点数据,让物体不断修改坐标位置实现移动效果
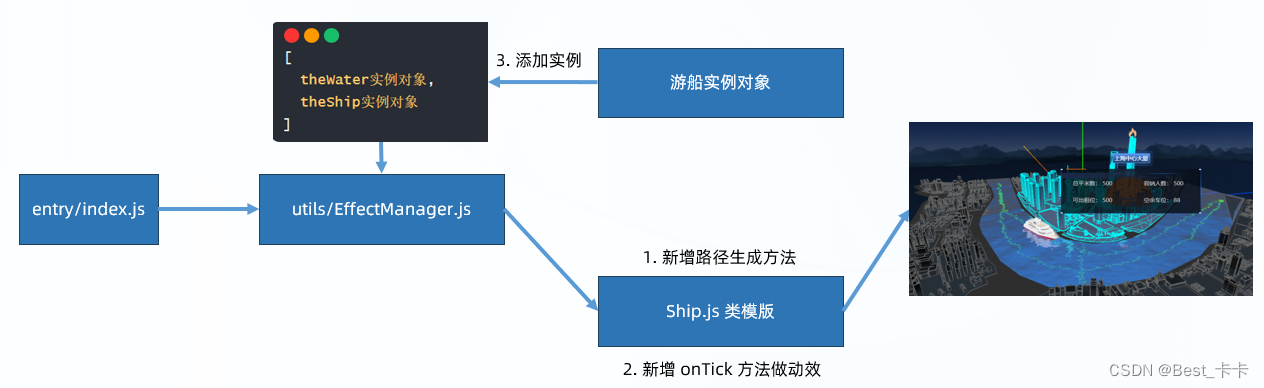
实现:
在 Ship.js 的 init 中新增属性和调用方法
this.pointIndex = 0 // 保存当前游船所在位置坐标的索引

this.generatorMovePath() // 生成游船移动的路径

this.isMoveCamera = false // 开关属性(控制摄像机是否跟随游船移动)

this.onModelAttach() // 鼠标事件
1.游船 Ship 类,新增路径生成方法
// 生成游船行进的路线坐标点集合
  generatorMovePath() {
    // 设置平滑的三维样条曲线路线坐标点,CatmullRomCurve3
    // 设置关键的几个点坐标,其他的构造函数内会帮我们计算
    // CatmullRomCurve3(points:Vector3点数组,closed – 该曲线是否闭合,默认值为false,curveType – 曲线的类型,tension – 曲线的张力,默认为0.5)
    const shipPath = new THREE.CatmullRomCurve3([
      new THREE.Vector3(134.356097129589, 2.0112688541412354, -78.91746888546072),
      new THREE.Vector3(13.132075955743915, 2.0112688541412425, -69.85260460470285),
      new THREE.Vector3(13.132075955743915, 2.0112688541412425, -69.85260460470285),
      new THREE.Vector3(-80.28995611104816, 2.0112688541412282, -12.640254617216172),
      new THREE.Vector3(-71.5470123066941, 2.0112688541412354, 25.641138454485144),
      new THREE.Vector3(-71.5470123066941, 2.0112688541412354, 25.641138454485144),
      new THREE.Vector3(-17.5179164111899, 2.0112688541412354, 139.95062075065943),
      new THREE.Vector3(-67.10547001341894, 2.0112688541412354, 64.30494908329582),
      new THREE.Vector3(-87.03568940230136, 2.0112688541412354, 20.40776369519459),
      new THREE.Vector3(-88.0509634357777, 2.0112688541412425, -32.429601593890354),
      new THREE.Vector3(-70.27457116256328, 2.0112688541412425, -50.370253013515836),
      new THREE.Vector3(-39.206573479212764, 2.0112688541412425, -64.28841112963838),
      new THREE.Vector3(47.33347662423566, 2.0112688541412354, -73.13885409538068),
      new THREE.Vector3(134.356097129589, 2.0112688541412354, -78.91746888546072),
    ])
    // getSpacedPoints 等间距的坐标点
    this.pointArr = shipPath.getSpacedPoints(3500)
    // 要将曲线划分为的分段数 每次移动一个点控制船的速度

    // 把坐标点 => 几何图形 => 线段物体显示一下(辅助我们理解)
    const geometry = new THREE.BufferGeometry().setFromPoints(this.pointArr)
    const material = new THREE.LineBasicMaterial({ color: 0x00ff00, side: THREE.DoubleSide})
    const line = new THREE.Line(geometry, material)
    // this.scene.add(line)
  }
2.游船 Ship 类,新增 onTick 方法做动效
// 游船行进方法-切换坐标点位置
  onTick() {
    if (this.pointIndex < this.pointArr.length - 1) {
      const { x, y, z } = this.pointArr[this.pointIndex + 1]

      // 游船移动:
      // 取出坐标设置给模型对象
      this.model.position.copy(this.pointArr[this.pointIndex])
      // 确保船头朝向下一个坐标点位置(前进船头效果)
      // 让物体朝着自己 z 轴正方向作为前面
      this.model.lookAt(this.pointArr[this.pointIndex + 1])
      this.pointIndex += 1
    } else {
      // 索引回到 0,重新继续做坐标的取值然后做动画效果
      this.pointIndex = 0
    }
  }
3.添加游船实例物体到动态管理类中,在 entery/index.js
// 让游船物体也做动效
    EffectManager.getInstance().addObj(ship)
15.城市-查看建筑信息
分析
建筑信息点击显示
three.js 的 3D 物体点击 - 光线投射代码封装起来,需要交互的物体对象和要执行的回调函数传入并映射 Map 数据结构,有交互时回调对应的函数执行
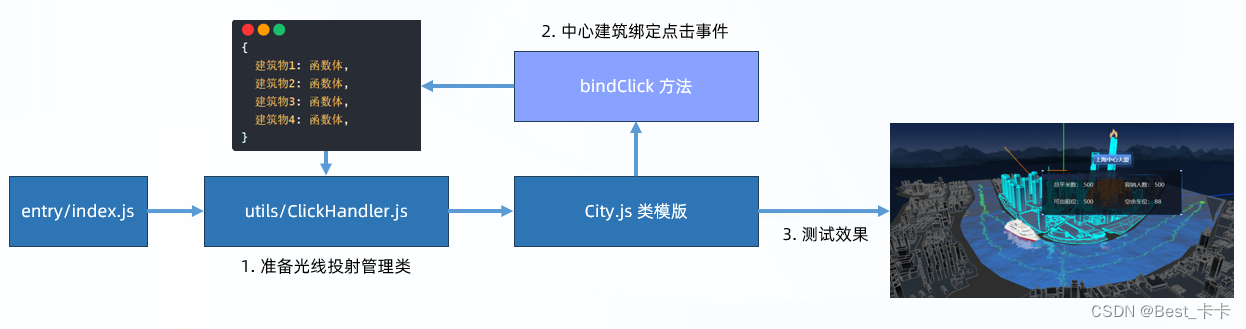
步骤:
1.准备 ClickHandler 类,管理项目的光线投射,在 enter/index.js 中注册
utils/ClickHander.js
// 单击事件管理类
import * as THREE from 'three'
export class ClickHandler {
  static getInstance() {
    if (!this.instance) {
      this.instance = new ClickHandler()
    }
    return this.instance
  }
  init(camera) {
    this.camera = camera
    this.list = [] // 光线投射交互计算的物体
    this.map = new Map() // key 可以是 three.js 物体(与点击要执行的回调函数产生一对一关系)

    // 光线投射
    const rayCaster = new THREE.Raycaster()
    const pointer = new THREE.Vector2()

    window.addEventListener('click', e => {
      e.stopPropagation()
      // 鼠标所在uv坐标
      pointer.x = (e.clientX / window.innerWidth) * 2 - 1
      pointer.y = -(e.clientY / window.innerHeight) * 2 + 1

      rayCaster.setFromCamera(pointer, this.camera)
      // 获取当前鼠标点击位置所在的物体集合
      const resultList = rayCaster.intersectObjects(this.list, false)

      // 默认只触发第一个收集到的物体(后面物体不触发交互)
      if (resultList.length > 0) {
        const targetObj = resultList[0]
        const fn = this.map.get(targetObj.object)
        // 回调绑定点击事件函数体,并回传当前触发的这个 three.js 物体
        fn(targetObj.object)
      }
    })
  }
  // 传入要点击物体和函数体
  addMesh(mesh, fn) {
    this.list.push(mesh)
    this.map.set(mesh, fn)
  }
}
在 entry/index.js 中
// 光线投射注册
ClickHandler.getInstance().init(camera);
2.City 类中,新增 bindClick 方法给中心建筑绑定事件和显示信息标签逻辑
// 中心 4 个建筑绑定点击事件
  bindClick() {
    Object.keys(this.buildNameObj).forEach(key => {
      const build = this.model.getObjectByName(key)
      ClickHandler.getInstance().addMesh(build, (object) => {
        // object: 3d 物体
        const { center } = getBoxCenter(object)
        new BuildInfo(this.scene, center, this.dataObj.buildingsIntroduce[object.name])
      })
    })
  }
16.城市-建筑信息隐藏
分析
点击信息标签隐藏
隐藏 2D / 3D 物体,使用 visible 属性
步骤:
1.修改 BuildInfo 类,新增 list 属性保存标签物体
this.list = [] // 保存名字和信息的 2 个 2D 物体
2.新增 clear 方法,隐藏所有标签物体
// 隐藏信息物体
clear() {
	this.list.forEach(obj => obj.visible = false)
}
3.给原生 DOM 绑定点击事件,触发 clear 方法
// DOM 点击事件 => 隐藏此建筑物的信息标签
infoDiv.addEventListener('click', (e) => {
  e.stopPropagation()
  this.clear.call(this)
})
17.城市-火灾影响动画
分析
完成火灾影响动画
思路:哪个物体要做动效,就新增 onTick 实例方法,把物体加入到动效管理类中,等待渲染循环不断调度触发 onTick 实现物体动效
实现:
1.新增 FireBall 类中 onTick 方法做火灾影响动效(缩放效果)
// 动效
  onTick() {
    if (this.nowScale < 1) {
      this.nowScale += 0.001 // 增加放大的比例
      this.nowMesh.scale.set(this.nowScale, this.nowScale, this.nowScale)
    } else {
      this.nowScale = 0
    }
  }
2.添加火灾球体实例,到动效管理类中
// 注册动效管理
EffectManager.getInstance().addObj(ball)
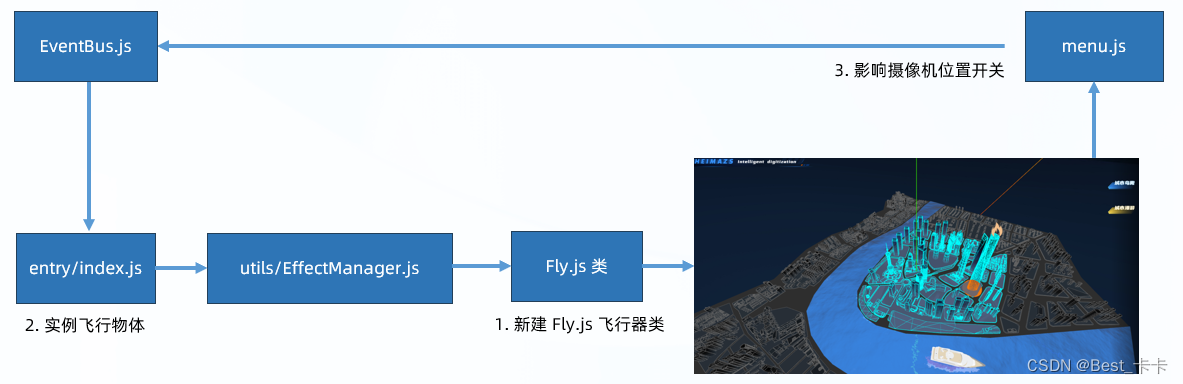
18.天空-鸟瞰效果
分析
点击dom标签,在天空设置路径移动一个飞行物体(暂定正方体),摄像机跟随移动完成城市鸟瞰浏览效果
实现:
1.新增 Fly 飞行器类,生成运动路径
// 飞行器
import { BaseModel } from './BaseModel'
import * as THREE from 'three'
export class Fly extends BaseModel {
  init() {
    this.scene.add(this.model)
    this.pointIndex = 0 // 数组下标,用于换取坐标数组里,某个坐标对象
    this.isCameraMove = false // 控制摄像机是否跟随切换位置的开关

    this.generateMovePath()
  }
  // 飞行器运动的路径
  generateMovePath() {
    // EllipseCurve 椭圆曲线
    const AirFly_PATH = new THREE.EllipseCurve(
      0, 0, // 椭圆中心坐标
      110, 110, // x和y轴向上椭圆的半径
      0, -2 * Math.PI, // 开始角度和扫描角度
      false, // 是否按照顺时针来绘制
      0 // 以弧度表示,椭圆从X轴正方向逆时针的旋转角度
    );
    let tempArr = AirFly_PATH.getPoints(3500)

    // 把坐标向 y 轴移动 120 单位(模仿在天空的效果)
    let result = []
    for (var i = 0; i < tempArr.length; i++) {
      // z 轴的坐标位置,是几何图形未旋转之前,垂直于世界坐标系 y 轴的坐标点
      let item = new THREE.Vector3(tempArr[i].x, 120, tempArr[i].y)
      result.push(item)
    }
    this.pointsArr = result
  }
  // 动效-不断切换最新的最标点
  onTick() {
    if (this.pointIndex < this.pointsArr.length - 1) {
      // 重要:如果其他东西也要跟着我的坐标来动
      if (this.isCameraMove) {
        // 更改摄像机位置
        this.camera.position.copy(this.pointsArr[this.pointIndex])
        // 让摄像机中心观察点往上偏移一点
        this.camera.lookAt(0, 10, 0)
      }
      this.model.position.copy(this.pointsArr[this.pointIndex]);
      this.pointIndex += 1; //调节速度
    } else {
      this.pointIndex = 0
    }
  }
}
2.实例化飞行器,实现环绕飞行动效,在 entry/index.js 模型加载的回调函数内
// 生成飞行器对象
    const meshObj = new THREE.Mesh(new THREE.BoxGeometry(5, 5, 5), new THREE.MeshBasicMaterial({ color: 'lightblue' }))
    meshObj.visible = false

    const fly = new Fly(meshObj, scene, camera, control)
    // 注册动效
    EffectManager.getInstance().addObj(fly)
    // 注册事件-控制摄像机是否移动鸟瞰
    EventBus.getInstance().on('mode-topView', (isOpen) => {
      fly.control.enabled = !isOpen // 鸟瞰时轨道控制器禁止交互
      fly.isCameraMove = isOpen // 控制摄像机是否跟随飞行器切换坐标点位置
    })
3.菜单点击切换开关,控制摄像机位置是否跟着移动,实现鸟瞰浏览
新增 src/dom/menu.js
import { EventBus } from '@/utils/EventBus';

// 右上角 2 个按钮
let modeArr = [
  {
    mode: 'mode-topView', // id 名字,也作为 EventBus 中自定义事件名字
    isOpen: false // 当前按钮状态-true开始,false关闭中
  },
  {
    mode: 'mode-roaming',
    isOpen: false
  },
]

for (var i = 0; i < modeArr.length; i++) {
  let item = modeArr[i]
  // 获取右上角按钮绑定原生点击事件
  document.getElementById(item.mode).onclick = function () {
    item.isOpen = !item.isOpen // 控制打开状态等
    // 触发这个名字在发布订阅对象里,下属数组里所有方法触发,并传递第二个参数过去
    EventBus.getInstance().emit(item.mode, item.isOpen)
  }
}
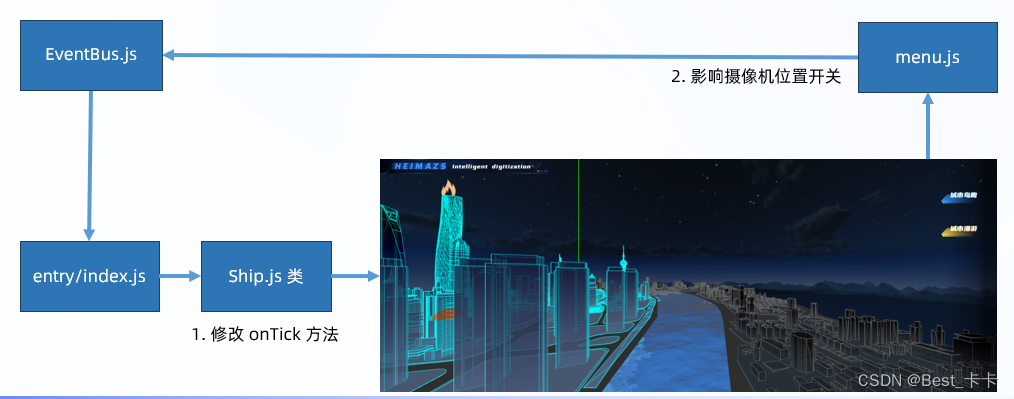
19.游船-漫游模式
分析
摄像机跟随游船移动(同理)
等待 DOM 点击修改开关属性,控制摄像机和游船一起改变坐标位置
实现:
1.修改 Ship 游船类,onTick 方法影响摄像机移动
// 游船行进方法-切换坐标点位置
  onTick() {
    if (this.pointIndex < this.pointArr.length - 1) {
      const { x, y, z } = this.pointArr[this.pointIndex + 1]
      if (this.isMoveCamera) { // 移动摄像机
        if (!this.isMouseTouching) { // 鼠标没有被按下时,才设置摄像机的 lookAt
          // 如果处于漫游模式+鼠标被按下,证明自己要旋转摄像机,那就不能让摄像的 lookAt 执行影响旋转效果
          this.camera.lookAt(x, y + 20, z)
        }

        this.camera.position.set(x, y + 20, z)
      }

      // 游船移动:
      // 取出坐标设置给模型对象
      this.model.position.copy(this.pointArr[this.pointIndex])
      // 确保船头朝向下一个坐标点位置(前进船头效果)
      // 让物体朝着自己 z 轴正方向作为前面
      this.model.lookAt(this.pointArr[this.pointIndex + 1])
      this.pointIndex += 1
    } else {
      // 索引回到 0,重新继续做坐标的取值然后做动画效果
      this.pointIndex = 0
    }
  }
2.通过 EventBus 设置摄像机开关模式, 在 entry/index.js
// 订阅改变摄像机跟随游船移动的事件
    EventBus.getInstance().on('mode-roaming', isOpen => {
      ship.control.enabled = !isOpen // 关闭/开启轨道控制器
      ship.isMoveCamera = isOpen // 摄像机跟随移动
    })
20.游船-漫游模式-旋转相机
分析
游船的时候,按下鼠标左右移动镜头查看建筑物
思路:点击鼠标后,鼠标移动的点方向上控制相机旋转
实现:
1.Ship 类新增 onModelAttach 方法,绑定/移除鼠标按下,移动,抬起事件
在 init 方法中
init() {
    this.scene.add(this.model)
    this.pointIndex = 0 // 保存当前游船所在位置坐标的索引

    this.generatorMovePath() // 生成游船移动的路径

    this.isMoveCamera = false // 开关属性(控制摄像机是否跟随游船移动)

    this.onModelAttach() // 鼠标事件
  }
// 绑定/移除鼠标事件
  onModelAttach() {
    // 点击漫游模式 - 绑定/移除鼠标相关事件
    EventBus.getInstance().on('mode-roaming', isOpen => {
      if (isOpen) {
        window.addEventListener('mousedown', this.mousedownFn)
        window.addEventListener('mousemove', this.mousemoveFn)
        window.addEventListener('mouseup', this.mouseupFn)
      } else {
        window.removeEventListener('mousedown', this.mousedownFn)
        window.removeEventListener('mousemove', this.mousemoveFn)
        window.removeEventListener('mouseup', this.mouseupFn)
      }
    })
  }
2.按下和抬起控制 isMouseTouching 属性值 true / false
3.鼠标移动时,旋转摄像机
// 鼠标按下
  mousedownFn = () => {
    this.isMouseTouching = true // 鼠标已经按下
  }
  // 鼠标移动
  mousemoveFn = (e) => {
    if (this.isMouseTouching) { // 只有按下时进入此逻辑代码
      // 旋转核心思想:在原有的旋转角度基础上,新增移动的偏移量,乘以 0.01 让旋转弧度降低
      // rotateY() 在上一次旋转的角度上继续新增你传入的弧度数值
      // rotation.y = 直接赋予一个旋转的最终弧度数值
      this.camera.rotateY((this.prePos - e.clientX) * 0.01)
    }

    this.prePos = e.clientX
  }
  // 鼠标抬起
  mouseupFn = () => {
    this.isMouseTouching = false
    this.prePos = undefined // 清空上一次记录的坐标点位置
  }
4.修改 onTick 方法,鼠标移动旋转摄像机时,摄像机 lookAt 方法不执行
// 游船行进方法-切换坐标点位置
  onTick() {
    if (this.pointIndex < this.pointArr.length - 1) {
      const { x, y, z } = this.pointArr[this.pointIndex + 1]
      if (this.isMoveCamera) { // 移动摄像机
        if (!this.isMouseTouching) { // 鼠标没有被按下时,才设置摄像机的 lookAt
          // 如果处于漫游模式+鼠标被按下,证明自己要旋转摄像机,那就不能让摄像的 lookAt 执行影响旋转效果
          this.camera.lookAt(x, y + 20, z)
        }

        this.camera.position.set(x, y + 20, z)
      }

      // 游船移动:
      // 取出坐标设置给模型对象
      this.model.position.copy(this.pointArr[this.pointIndex])
      // 确保船头朝向下一个坐标点位置(前进船头效果)
      // 让物体朝着自己 z 轴正方向作为前面
      this.model.lookAt(this.pointArr[this.pointIndex + 1])
      this.pointIndex += 1
    } else {
      // 索引回到 0,重新继续做坐标的取值然后做动画效果
      this.pointIndex = 0
    }
  }
21.城市-模型加载进度
分析
实现模型加载进度条
步骤:
1.基于 three.js 提供的 LoadingManager 管理类,管理模型加载进度
2.实例化管理器对象,传入加载器构造函数中
3.监听进度管理器事件,并实现数字和进度条变化效果
import { FBXLoader } from 'three/examples/jsm/loaders/FBXLoader.js'
import { GLTFLoader } from 'three/examples/jsm/loaders/GLTFLoader'
import * as THREE from 'three'
import gsap from 'gsap'

const manager = new THREE.LoadingManager()

/**
 * 专门加载模型文件=>模型对象
 * @param {*} pathList 模型文件路径数组
 * @param {*} suc 接收成功结果回调函数
 */
export function loadManager(pathList, suc) {
  // 定义加载器对象
  const gltfLoader = new GLTFLoader(manager)
  const fbxLoader = new FBXLoader(manager)
  // 保存加载成功模型对象数组
  const model = []

  let preValue = 0 // 上一次进度值
  // 加载器对象关联属性和回调函数
  manager.onProgress = (url, loadedNum, totalNum) => {
    // url: 当前被加载完成的模型路径
    // loadedNum: 当前加载完成的个数
    // totalNum: 总共要加载的个数
    // * 100 目的:为了让 0.5 进度变成 50 后续添加 % 后缀
    // 当前已经加载的进度数字
    let progressRatio = Math.floor(loadedNum / totalNum * 100)

    gsap.fromTo('#processing-number', {
      innerText: preValue // 暂时先传入一个数字(后面再去加 % 字符串)
    }, {
      innerText: progressRatio,
      onUpdate() {
        // 详细控制显示的内容
        // 取出当前正在做动画的目标对象的属性值(进度数字)
        const num = gsap.getProperty(this.targets()[0], 'innerText')
        this.targets()[0].innerText = num + '%'
        preValue = progressRatio // 把当前最新的加载进度值,赋予到外面变量上

        if (num === 100) {
          // loader 加载器工作完毕
          suc(model)
          document.querySelector('.loading').style.display = 'none'
        }
      }
    })


    // 对进度条再来做一个动画
    // scaleX 范围是 0 - 1 做横向的缩放
    gsap.fromTo('#loading-bar', {
      scaleX: preValue / 100
    }, {
      scaleX: progressRatio / 100
    })
  }


  pathList.forEach(path => {
    if (path.indexOf('fbx') > -1) {
      fbxLoader.load(path, obj => {
        // 数据结构
        model.push({
          model: obj,
          url: path
        });
        // (model.length === pathList.length) && suc(model)
      })
    } else if (path.indexOf('gltf') > -1) {
      gltfLoader.load(path, gltf => {
        model.push({
          model: gltf.scene,
          url: path
        });
        // (model.length === pathList.length) && suc(model)
      })
    }
  })
}
22.项目-模拟城市数据接口
目标
模mock接口

注意:这里采用 apifox 配合 mock 模拟数据使用
步骤:
1.启动 mock 环境,得到接口地址使用模拟数据
2.获取并使用 DataManager 数据管理类并请求
import { EventBus } from '@/utils/EventBus'
import axios from 'axios'

axios.defaults.baseURL = 'http://127.0.0.1:4523/m1/2896102-0-default'

export class DataManager {
  static getInstance() {
    if (!this.instance) {
      this.instance = new DataManager()
    }
    return this.instance
  }
  // 获取数据
  getData() {
    return new Promise((resolve, reject) => {
      axios.get("/city").then(response => {
        resolve(response.data)
      })
    })
  }
  // 模拟轮询请求服务器
  refreshData() {
    // 15 秒刷新一次数据
    setInterval(async () => {
      let data = await this.getData()
      EventBus.getInstance().emit('refreshHomeCount', data)
    }, 15000)
  }
}
3.请求接口并设置点击时显示不同建筑的真实数据
模拟json文件在资源里有,下载后导入apifox即可
23.项目-ECharts集成
目标
集成 ECharts 实现 2D 图表
1.获取并使用 charts/index.js 集成图表相关内容
import * as echarts from 'echarts'
import { EventBus } from '@/utils/eventBus'
import { DataManager } from '@/utils/DataManager'
import gsap from 'gsap'

window.addEventListener('DOMContentLoaded', () => {
  // 创建柱状图
  const myBarChart = echarts.init(document.getElementById('bar-chart'))
  // 创建饼状图
  const myPieChart = echarts.init(document.getElementById('pie-chart'))

  // 开始初始化 ECharts 图表
  initChart()

  async function initChart() {
    // 获取默认数据
    let dataJson = await DataManager.getInstance().getData()

    // 解构需要的数据
    const {
      parkIncome: { yIncome },
      parkIndustry,
      base,
    } = dataJson

    // ECharts 配置项
    const barOption = {
      tooltip: {
        trigger: 'axis',
        axisPointer: {
          type: 'shadow',
        },
      },
      grid: {
        // 让图表占满容器
        top: '10px',
        left: '0px',
        right: '0px',
        bottom: '0px',
        containLabel: true,
      },
      xAxis: [
        {
          type: 'category',
          axisTick: {
            alignWithLabel: true,
            show: false,
          },
          data: [
            "6月",
            "7月",
            "8月",
            "9月",
            "10月",
            "11月",
            "12月",
            "1月",
            "2月",
            "3月",
            "4月",
            "5月"
          ],
        },
      ],
      yAxis: [
        {
          type: 'value',
          splitLine: {
            show: false,
          },
        },
      ],
      series: [
        {
          name: '居民收入情况',
          type: 'bar',
          barWidth: '10px',
          data: yIncome.map((item, index) => {
            const color =
              index % 2 === 0
                ? new echarts.graphic.LinearGradient(0, 0, 0, 1, [
                  { offset: 0.23, color: '#74c0f8' },
                  { offset: 1, color: 'rgba(116,192,248,0.00)' },
                ])
                : new echarts.graphic.LinearGradient(0, 0, 0, 1, [
                  { offset: 0.23, color: '#ff7152' },
                  { offset: 1, color: 'rgba(255,113,82,0.00)' },
                ]);
            return { value: item, itemStyle: { color } };
          }),
        },
      ],
      textStyle: {
        color: '#B4C0CC',
      },
    };

    const pieOption = {
      color: [
        '#00B2FF', '#2CF2FF', '#892CFF', '#FF624D', '#FFCF54', '#86ECA2'],
      legend: {
        itemGap: 20,
        bottom: '0',
        icon: 'rect',
        itemHeight: 10, // 图例icon高度
        itemWidth: 10, // 图例icon宽度
        textStyle: {
          color: '#c6d1db',
        },
      },
      tooltip: {
        trigger: 'item'
      },
      series: [
        {
          name: '产业分布',
          type: 'pie',
          radius: ['55%', '60%'], // 设置内圈与外圈的半径使其呈现为环形
          center: ['50%', '40%'], // 圆心位置, 用于调整整个图的位置
          tooltip: {
            trigger: 'item',
            formatter: (params) => {
              return `${params.seriesName}</br><div style='display:flex;justify-content: space-between;'><div>${params.marker}${params.name}</div><div>${params.percent}%</div></div>`;

            }
          },
          label: {
            show: false,
            position: 'center',
          },
          data: parkIndustry,
        },
      ],
    };

    // 给图表设置配置项
    myBarChart.setOption(barOption);
    myPieChart.setOption(pieOption);

    // 饼状图-点击事件
    myPieChart.on('click', function (param) {
      // 0 素质教育
      // 1 医疗健康
      // 2 生活服务
      // 3 商业娱乐
      // 4 其他
      if (param.dataIndex == 0) {
        EventBus.getInstance().emit('pieClick', "Shanghai-02")
      } else if (param.dataIndex == 1) {
        EventBus.getInstance().emit('pieClick', "Shanghai-03")
      } else if (param.dataIndex == 2) {
        EventBus.getInstance().emit('pieClick', "Shanghai-04")
      } else if (param.dataIndex == 3) {
        EventBus.getInstance().emit('pieClick', "Shanghai-05")
      } else if (param.dataIndex == 4) {
        EventBus.getInstance().emit('pieClick', "Shanghai-06")
      }
      // 07 模型暂时没用上
    });

    // ECharts 适配
    window.addEventListener('resize', function () {
      myPieChart.resize();
      myBarChart.resize();
    });
  }

  // 更新左上角-城市概况数据
  EventBus.getInstance().on('refreshHomeCount', (data) => {
    console.log('监听')
    animateValue(data)
  })

  // 数据动画更新效果
  async function animateValue(data) {
    if (data && data.base) {
      const { buildingTotal, chargePoleTotal, enterpriseTotal, parkingTotal } = data.base
      gsap.to('#building-number', {
        duration: 1,
        innerText: function () { return buildingTotal.toFixed(0) },
        transformOrigin: 'center bottom',
        onUpdate: function () {
          let n = (gsap.getProperty(this.targets()[0], "innerText"));
          this.targets()[0].innerText = n.toFixed(0)
        },
      })
      gsap.to('#enterprise-number', {
        duration: 1,
        innerText: function () { return chargePoleTotal.toFixed(0) },
        transformOrigin: 'center bottom',
        onUpdate: function () {
          let n = (gsap.getProperty(this.targets()[0], "innerText"));
          this.targets()[0].innerText = n.toFixed(0)
        },
      })
      gsap.to('#car-number', {
        duration: 1,
        innerText: function () { return enterpriseTotal.toFixed(0) },
        transformOrigin: 'center bottom',
        onUpdate: function () {
          let n = (gsap.getProperty(this.targets()[0], "innerText"));
          this.targets()[0].innerText = n.toFixed(0)
        },
      })
      gsap.to('#rod-number', {
        duration: 1,
        innerText: function () { return parkingTotal.toFixed(0) },
        transformOrigin: 'center bottom',
        onUpdate: function () {
          let n = (gsap.getProperty(this.targets()[0], "innerText"));
          this.targets()[0].innerText = n.toFixed(0)
        },
      })
    }
  }
})
2.在 enter/index.js 注册定时轮询数据接口 - 不断更新城市概况
// 注册轮询的事件,负责间隔 15 秒更新城市概况的数据
DataManager.getInstance().refreshData()
24.城市-产业分布查看
分析
点击饼状图,对应建筑物高亮
实现:
	1.饼状图点击事件,并基于 EventBus 传递对应模型名字
	2.在 enter/index.js 注册事件,控制对应模型材质
	注意:要保留模型原本材质,在点击其他产业时,上一个模型恢复原本材质
	把物体本身材质对象保存,回复时把材质对象覆盖回去
// 监听自定义饼状图事件,让模型高亮
        city.lastOriginMat = [] // 上一次高亮物体本来的材质
        EventBus.getInstance().on('pieClick', buildName => {
          // 如果有上一个物体,先把上一个物体的材质恢复一下
          let index = 0
          if (city.lastClick && city.lastOriginMat.length > 0) {
            city.lastClick.traverse(model => {
              model.material = city.lastOriginMat[index++]
            })
          }

          // 设置当前点击的物体的高亮材质
          const targetBuild = city.model.getObjectByName(buildName)
          targetBuild.traverse(model => {
            if (model.type === 'Mesh') {
              city.lastOriginMat.push(model.material) // 保留小物体中每个细节物体的材质对象
              model.material = new THREE.MeshBasicMaterial({
                color: 0x0000ff
              })
              modifySelectCityMaterial(model) // 再给选中的小物体边线再设置上去
            }
          })
          city.lastClick = targetBuild // 上一次点击的小物体对象
        })
25.项目-火灾标记切换
分析
实现:
1.根据接口返回的建筑名字,动态创建火灾标记和范围影响球体
2.15 秒后火灾标记清空(接口轮询时间15秒)
在 Fire.js 新增 clear 方法
clear() {
this.scene.remove(this.model)
}
在 FireBall.js 新增 clear 方法
clear() {
    this.nowMesh.geometry.dispose()
    this.nowMesh.material.dispose()
    this.scene.remove(this.nowMesh)
  }
在 EffectManager.js 中新增删除做动效物体
// 移除指定物体,不参与动效
  removeObj(obj) {
    const index = this.list.findIndex(target => target === obj)
    this.list.splice(index, 1)
  }
在 City.js 中新建时,暂停 15 秒后消失
// 创建火灾标记
  // buildName 就是建模师模型中的小物体名字
  initFire(buildName) {
    const build = this.model.getObjectByName(buildName)
    const { center, size } = getBoxCenter(build)

    const fire = new Fire(this.scene, center, size)
    const ball = new FireBall(this.scene, center)

    // 注册动效管理
    EffectManager.getInstance().addObj(ball)

    // 过了 15 秒以后清除标记
    setTimeout(() => {
      fire.clear()
      ball.clear()

      // 移除动效
      EffectManager.getInstance().removeObj(ball)
    }, 15000)
  }


 963
963


 被折叠的 条评论
为什么被折叠?
被折叠的 条评论
为什么被折叠?
 到【灌水乐园】发言


