PyTorch学习笔记(9)--神经网络:线性层

PyTorch学习笔记(9)–神经网络:线性层

    本博文是PyTorch的学习笔记,第9次内容记录,主要介绍神经网络线性层的基本使用。

1.什么是线性层

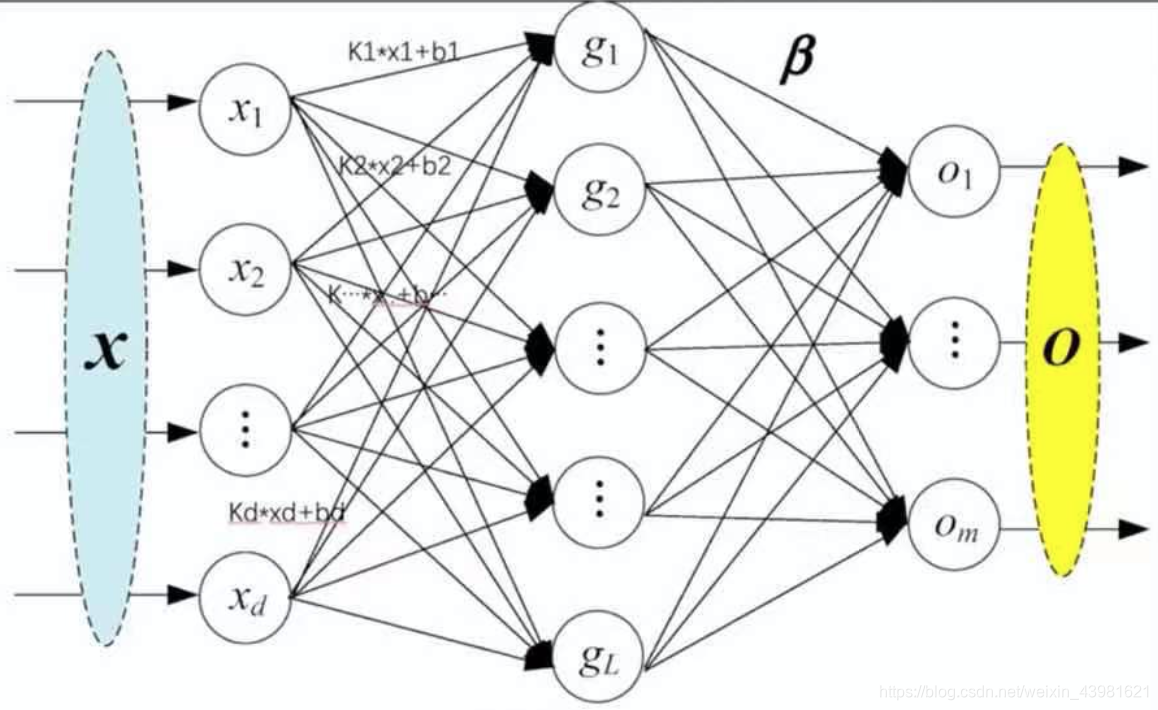
    线性层又叫全连接层,其中每个神经元与上一层所有神经元相连,一个简单的线性层如下图所示:
在这里插入图片描述

2.线性层

2.1线性激活函数相关参数

    在PyTorch官网中,详细介绍了线性层的详细情况,线性函数为:torch.nn.Linear(in_features, out_features, bias=True, device=None, dtype=None),其中重要的3个参数in_features、out_features、bias说明如下:
- in_features:每个输入(x)样本的特征的大小
- out_features:每个输出(y)样本的特征的大小
- bias:如果设置为False,则图层不会学习附加偏差。默认值是True,表示增加学习偏置。
    在上图中,in_features=d,out_features=L。

2.2线性层应用举例1

    现以CIFAR10图片数据集为数据集,线性层实现代码如下:

# coding :UTF-8
# 文件功能: 代码实现神经网络--线性层功能
# 开发人员: dpp
# 开发时间: 2021/8/17 10:28 下午
# 文件名称: nn_linear.py
# 开发工具: PyCharm

import torch
import torchvision
from torch import nn
from torch.nn import Linear
from torch.utils.data import DataLoader

dataset = torchvision.datasets.CIFAR10("CIFAR10", train=False,
                                       transform=torchvision.transforms.ToTensor(),
                                       download=True)

dataloader = DataLoader(dataset, batch_size=64)

class Test(nn.Module):
    def __init__(self):
        super(Test, self).__init__()
        self.linear1 = Linear(196608, 10)

    def forward(self, input):
        output = self.linear1(input)
        return output

test = Test()

for data in dataloader:
    imgs, targets = data
    print(imgs.shape)  # torch.Size([64, 3, 32, 32])
    output = torch.reshape(imgs, (1, 1, 1, -1))
    print(output.shape)  # torch.Size([1, 1, 1, 196608])
    output = test(output)
    print(output.shape)  # torch.Size([1, 1, 1, 10])

    上述的代码中Test类中实现线性函数self.linear1 = Linear(196608, 10),其中输入特征的大小为196608,输出特征的大小为10。output = torch.reshape(imgs, (1, 1, 1, -1))代码的功能是实现输入尺寸的重塑造,也就是将输入矩阵拉直。上述代码输出结果如下:

torch.Size([64, 3, 32, 32])
torch.Size([1, 1, 1, 196608])
torch.Size([1, 1, 1, 10])
torch.Size([64, 3, 32, 32])
torch.Size([1, 1, 1, 196608])
torch.Size([1, 1, 1, 10])
torch.Size([64, 3, 32, 32])
torch.Size([1, 1, 1, 196608])
torch.Size([1, 1, 1, 10])
...

2.3线性层应用举例2

    除了使用reshape函数实现输入尺寸的修改,torch中还提供了flatten()函数实现将输入矩阵拉直。代码如下所示:

# coding :UTF-8
# 文件功能: 代码实现神经网络--线性层功能
# 开发人员: dpp
# 开发时间: 2021/8/17 10:28 下午
# 文件名称: nn_linear.py
# 开发工具: PyCharm

import torch
import torchvision
from torch import nn
from torch.nn import Linear
from torch.utils.data import DataLoader

dataset = torchvision.datasets.CIFAR10("CIFAR10", train=False,
                                       transform=torchvision.transforms.ToTensor(),
                                       download=True)

dataloader = DataLoader(dataset, batch_size=64)

class Test(nn.Module):
    def __init__(self):
        super(Test, self).__init__()
        self.linear1 = Linear(196608, 10)

    def forward(self, input):
        output = self.linear1(input)
        return output

test = Test()

for data in dataloader:
    imgs, targets = data
    print(imgs.shape)  # torch.Size([64, 3, 32, 32])
    output = torch.flatten(imgs) # flatten()函数拉直输入数据
    print(output.shape)  # torch.Size([1, 1, 1, 196608])
    output = test(output)
    print(output.shape)  # torch.Size([1, 1, 1, 10])

    输出结果如下:

torch.Size([64, 3, 32, 32])
torch.Size([196608])
torch.Size([10])
torch.Size([64, 3, 32, 32])
torch.Size([196608])
torch.Size([10])
torch.Size([64, 3, 32, 32])
torch.Size([196608])
torch.Size([10])

3.学习小结

    在本文中总结了神经网络的线性层的基本使用方法,并通过构建一个类Test分别介绍了Linear()函数和flatten()函数的使用方法,在下一篇博文,将搭建一个简单的网络模型,并结合Sequential的使用。

  • 14
    点赞
  • 35
    收藏
    觉得还不错? 一键收藏
  • 2
    评论

“相关推荐”对你有帮助么?

  • 非常没帮助
  • 没帮助
  • 一般
  • 有帮助
  • 非常有帮助
提交
评论 2
添加红包

请填写红包祝福语或标题

红包个数最小为10个

红包金额最低5元

当前余额3.43前往充值 >
需支付:10.00
成就一亿技术人!
领取后你会自动成为博主和红包主的粉丝 规则
hope_wisdom
发出的红包
实付
使用余额支付
点击重新获取
扫码支付
钱包余额 0

抵扣说明:

1.余额是钱包充值的虚拟货币,按照1:1的比例进行支付金额的抵扣。
2.余额无法直接购买下载,可以购买VIP、付费专栏及课程。

余额充值