


1.调色板的主要组成
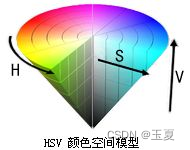
通常调色板主要基于HSV颜色空间实现,其中HSV(Hue, Saturation, Value)分别表示:
色相(Hue):表示色彩信息,即所处的光谱颜色的位置。该参数用一角度量来表示,取值范围为0°~360°,在Unity中的取值范围为0~1。
饱和度(Saturation):取值范围为0.0~1.0。
灰度(Value):取值范围为0.0(黑色)~1.0(白色)。
HSV颜色空间模型,如下图所示:
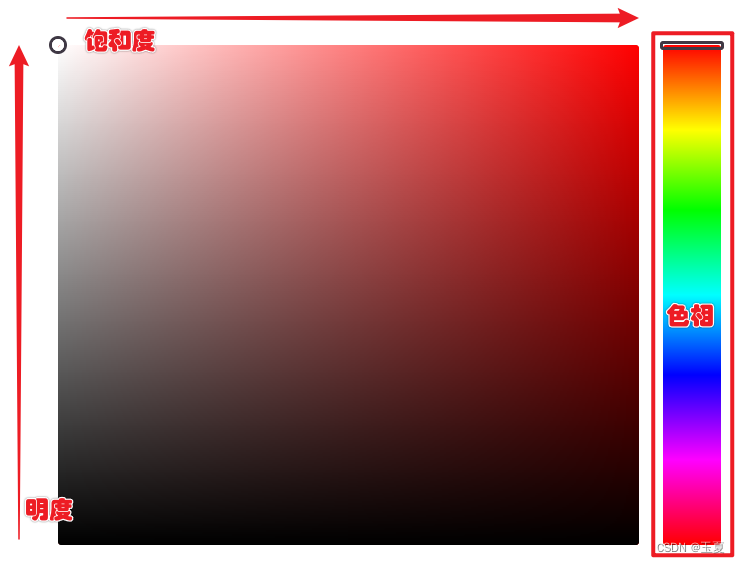
一般HSV颜色空间的实现,如下图所示:
2.色相的实现
主要通过逐像素更改rawImage的颜色实现,代码如下
/// <summary>
    /// 初始化Texture
    /// </summary>
    private void HandleTextureColor()
    {
        tex2d = new Texture2D(TextureWdith, TextureHeight, TextureFormat.RGB24, true);
        List<Color> listColor = new List<Color>();
        for (int x = 0; x <= TextureWdith; x++)
        {
            for (int y = 0; y < TextureHeight; y++)
            {
                Color pixColor = Color.HSVToRGB((float)x / (float)TextureWdith, 1, 1);
                tex2d.SetPixel(x, y, pixColor);
            }
        }
        tex2d.Apply();
        rawImage.texture = tex2d;
        rawImage.texture.wrapMode = TextureWrapMode.Clamp;
    }
通过Slider值获取对应的颜色,代码如下
/// <summary>
/// 获取颜色
/// </summary>
/// <param name="value"></param>
/// <returns></returns>
public Color GetColorBySliderValue(float value)
{
float clampValue = Mathf.Clamp(value, 0.001f, 0.999f);
Color getColor = tex2d.GetPixel((int)((TextureWdith - 1) * clampValue), 0);
return getColor;
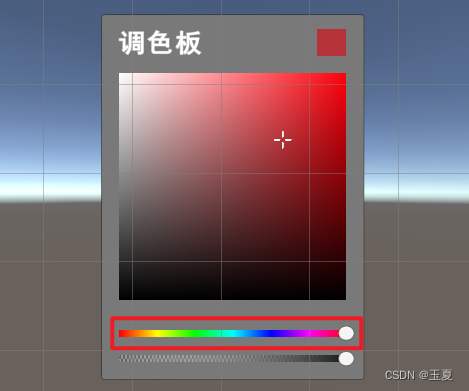
}整体脚本以及效果如下:
using System.Collections.Generic;
using UnityEngine;
using UnityEngine.UI;

public class ColorHue : MonoBehaviour
{
    private RawImage rawImage;
    private Texture2D tex2d;

    private int TextureWdith = 270;
    private int TextureHeight = 8;

    private void Awake()
    {
        rawImage = gameObject.GetComponent<RawImage>();
        HandleTextureColor();
    }

    /// <summary>
    /// 初始化Texture
    /// </summary>
    private void HandleTextureColor()
    {
        tex2d = new Texture2D(TextureWdith, TextureHeight, TextureFormat.RGB24, true);
        List<Color> listColor = new List<Color>();
        for (int x = 0; x <= TextureWdith; x++)
        {
            for (int y = 0; y < TextureHeight; y++)
            {
                Color pixColor = Color.HSVToRGB((float)x / (float)TextureWdith, 1, 1);
                tex2d.SetPixel(x, y, pixColor);
            }
        }
        tex2d.Apply();
        rawImage.texture = tex2d;
        rawImage.texture.wrapMode = TextureWrapMode.Clamp;
    }

    /// <summary>
    /// 获取颜色
    /// </summary>
    /// <param name="value"></param>
    /// <returns></returns>
    public Color GetColorBySliderValue(float value)
    {
        float clampValue = Mathf.Clamp(value, 0.001f, 0.999f);
        Color getColor = tex2d.GetPixel((int)((TextureWdith - 1) * clampValue), 0);
        return getColor;
    }
}
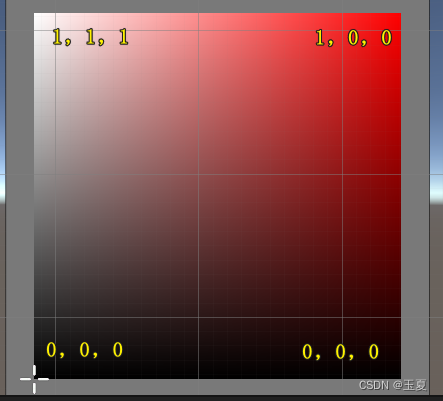
3.颜色板的实现
以色相选择红色为例,颜色板左上角应为白色,右上角为红色,底部为黑色,对应RGB数值如下图所示:
颜色的生成依旧根据逐像素修改RawImage实现,首先计算texture顶端每一像素的颜色,以红色为例公式如下图:

而后根据texture顶端的每一像素,计算该像素所在列的所有像素,公式如下图所示:

代码如下所示:
       //设置板子的颜色
        public void SetColorPanel(Color endColor)
        {
            //计算texture最顶端各个像素点的颜色
            Color value = (endColor - Color.white) / (TexPixelLength - 1);
            for (int i = 0; i < TexPixelLength; i++)
            {
                arrayColor[i, TexPixelHeight - 1] = Color.white + value * i;
            }
            //根据texture最顶端各个像素的颜色,计算每列像素的颜色
            for (int i = 0; i < TexPixelLength; i++)
            {
                value = (arrayColor[i, TexPixelHeight - 1] - Color.black) / (TexPixelHeight - 1);
                for (int j = 0; j < TexPixelHeight; j++)
                {
                    arrayColor[i, j] = Color.black + value * j;
                }
            }

            List<Color> listColor = new List<Color>();
            for (int i = 0; i < TexPixelHeight; i++)
            {
                for (int j = 0; j < TexPixelLength; j++)
                {
                    listColor.Add(arrayColor[j, i]);
                }
            }
            Color[] CalcArray = listColor.ToArray();
            //给颜色板子填入颜色,并且应用
            tex2d.SetPixels(CalcArray);
            tex2d.Apply();
        }
整体脚本如下:
using System.Collections.Generic;
using UnityEngine;
using UnityEngine.EventSystems;
using UnityEngine.UI;

namespace CSharp.UI.ColorBoard
{
    public class ColorBoard : MonoBehaviour, IPointerClickHandler, IDragHandler
    {
        //显示颜色的Texture
        private Texture2D tex2d;
        private RawImage rawImage;

        private int TexPixelLength = 256;
        private int TexPixelHeight = 256;

        public Slider sliderA;
        public ColorHue colorHSV;

        private Color[,] arrayColor;
        private RectTransform rectTrans;
        [Header("光标")]
        public RectTransform circleRect;

        public delegate void ColorChangeDelegate(Color color);
        public event ColorChangeDelegate OnColorChanged;

        private void Awake()
        {
            rawImage = GetComponent<RawImage>();
            rectTrans = GetComponent<RectTransform>();
            circleRect = transform.Find("光标").GetComponent<RectTransform>();

            TexPixelLength = (int)rectTrans.sizeDelta.x;
            TexPixelHeight = (int)rectTrans.sizeDelta.y;

            arrayColor = new Color[TexPixelLength, TexPixelHeight];
            tex2d = new Texture2D(TexPixelLength, TexPixelHeight, TextureFormat.RGB24, true);
            rawImage.texture = tex2d;
            rawImage.texture.wrapMode = TextureWrapMode.Clamp;
            //初始化为红色
            SetColorPanel(Color.red);

            sliderA.onValueChanged.AddListener(OnRGBValueChanged);
        }


        //颜色发生变化的监听
        private void OnRGBValueChanged(float value)
        {
            Color endColor = colorHSV.GetColorBySliderValue(value);
            SetColorPanel(endColor);
            var color = GetColorByPosition(circleRect.anchoredPosition);
            OnColorChanged?.Invoke(color);
        }

        //设置板子的颜色
        public void SetColorPanel(Color endColor)
        {
            //计算texture最顶端各个像素点的颜色
            Color value = (endColor - Color.white) / (TexPixelLength - 1);
            for (int i = 0; i < TexPixelLength; i++)
            {
                arrayColor[i, TexPixelHeight - 1] = Color.white + value * i;
            }
            //根据texture最顶端各个像素的颜色,计算每列像素的颜色
            for (int i = 0; i < TexPixelLength; i++)
            {
                value = (arrayColor[i, TexPixelHeight - 1] - Color.black) / (TexPixelHeight - 1);
                for (int j = 0; j < TexPixelHeight; j++)
                {
                    arrayColor[i, j] = Color.black + value * j;
                }
            }

            List<Color> listColor = new List<Color>();
            for (int i = 0; i < TexPixelHeight; i++)
            {
                for (int j = 0; j < TexPixelLength; j++)
                {
                    listColor.Add(arrayColor[j, i]);
                }
            }
            Color[] CalcArray = listColor.ToArray();
            //给颜色板子填入颜色,并且应用
            tex2d.SetPixels(CalcArray);
            tex2d.Apply();
        }


        /// <summary>
        /// 通过坐标获取颜色
        /// </summary>
        /// <param name="pos"></param>
        /// <returns></returns>
        public Color GetColorByPosition(Vector2 pos)
        {
            Texture2D tempTex2d = (Texture2D)rawImage.texture;
            Color getColor = tempTex2d.GetPixel((int)pos.x, (int)pos.y);
            return getColor;
        }

        /// <summary>
        /// 限制光标位置
        /// </summary>
        /// <param name="touchPos"></param>
        /// <returns></returns>
        public Vector2 GetClampPosition(Vector2 touchPos)
        {
            Vector2 vector2 = new Vector2(touchPos.x, touchPos.y);
            vector2.x = Mathf.Clamp(vector2.x, 0.001f, rectTrans.sizeDelta.x);
            vector2.y = Mathf.Clamp(vector2.y, 0.001f, rectTrans.sizeDelta.y);
            return vector2;
        }

        public void OnPointerClick(PointerEventData eventData)
        {
            Vector3 wordPos;
            if (RectTransformUtility.ScreenPointToWorldPointInRectangle(rectTrans, eventData.position, eventData.pressEventCamera, out wordPos))
                circleRect.position = wordPos;
            circleRect.anchoredPosition = GetClampPosition(circleRect.anchoredPosition);
            //获取当前光标位置的颜色
            var color = GetColorByPosition(circleRect.anchoredPosition);
            OnColorChanged?.Invoke(color);
        }

        public void OnDrag(PointerEventData eventData)
        {
            Vector3 wordPos;

            if (RectTransformUtility.ScreenPointToWorldPointInRectangle(rectTrans, eventData.position, eventData.pressEventCamera, out wordPos))
                circleRect.position = wordPos;
            circleRect.anchoredPosition = GetClampPosition(circleRect.anchoredPosition);
            //获取当前光标位置的颜色
            var color = GetColorByPosition(circleRect.anchoredPosition);
            OnColorChanged?.Invoke(color);
        }
    }
}
4.透明度以及颜色更改的实现
主要包括颜色更改事件的订阅,颜色透明度的更改,整体代码如下:
using System.Collections;
using System.Collections.Generic;
using ;
using CSharp.UI.ColorBoard;
using UnityEngine;
using UnityEngine.UI;

public class UIColorDemo : MonoBehaviour
{
    private Image curColorImage;

    private ColorBoard colorBoard;

    private Slider alphaSlider;

    private void Start()
    {
        curColorImage = transform.Find("Image").GetComponent<Image>();
        colorBoard = transform.Find("当前颜色板").GetComponent<ColorBoard>();
        alphaSlider = transform.Find("透明度").GetComponent<Slider>();

        curColorImage.color = Color.black;

        //订阅事件
        colorBoard.OnColorChanged += ChangeCurImageColor;
        alphaSlider.onValueChanged.AddListener(ChangeCurImageAlpha);

    }

    private void ChangeCurImageColor(Color color)
    {
        var rawColor = curColorImage.color;
        curColorImage.color = new Color(color.r, color.g, color.b, rawColor.a);
        //PortAndLineManager.Instance.lineMatColor = curColorImage.color;
    }

    private void ChangeCurImageAlpha(float value)
    {
        var rawColor = curColorImage.color;
        curColorImage.color = new Color(rawColor.r, rawColor.g, rawColor.b, value);
    }
}
5.效果展示
整体效果如下:


 2157
2157

 被折叠的 条评论
为什么被折叠?
被折叠的 条评论
为什么被折叠?
 到【灌水乐园】发言


