


目录
Unity ShaderLab 模板缓存(Stencil Buffer)
传送门相机位置和视锥计算
根据玩家相机位置计算对应传送门相机的位置,将传送门相机所渲染的图像叠加(Stencil)在玩家所看向的传送门。
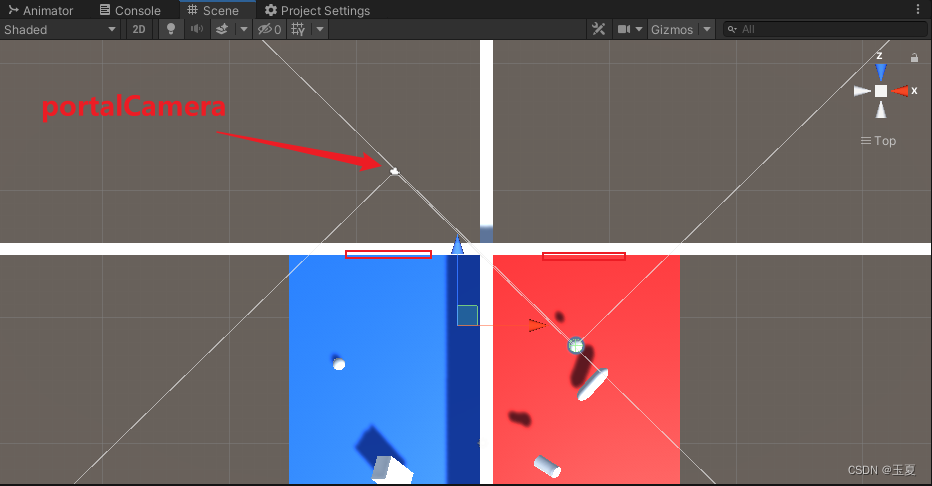
获得正确的传送门相机位置后,需要计算portalCamera的视锥矩阵,剔除如上图中蓝色方向传送门后的墙壁等其他物体,此处需要线性代数相关的数学知识。
private void RenderCamera(Transform inTransform, Transform outTransform)
    {

        //计算portalCamera的正确位置
        Vector3 relativePos = inTransform.InverseTransformPoint(transform.position);
        relativePos = Quaternion.Euler(0.0f, 180.0f, 0.0f) * relativePos;
        portalCamera.transform.position = outTransform.TransformPoint(relativePos);

        Quaternion relativeRot = Quaternion.Inverse(inTransform.rotation) * transform.rotation;
        relativeRot = Quaternion.Euler(0.0f, 180.0f, 0.0f) * relativeRot;
        portalCamera.transform.rotation = outTransform.rotation * relativeRot;

        //计算portalCamera的视锥矩阵,剔除portal背后的墙面等物体
        Plane p = new Plane(-outTransform.forward, outTransform.position);
        Vector4 clipPlane = new Vector4(p.normal.x, p.normal.y, p.normal.z, p.distance);
        Vector4 clipPlaneCameraSpace =
            Matrix4x4.Transpose(Matrix4x4.Inverse(portalCamera.worldToCameraMatrix)) * clipPlane;

        var newMatrix = mainCamera.CalculateObliqueMatrix(clipPlaneCameraSpace);
        portalCamera.projectionMatrix = newMatrix;

        portalCamera.Render();
    }
Unity ShaderLab 模板缓存(Stencil Buffer)
主要通过Stencil Buffer编写Shader完成对传送门画面的渲染。
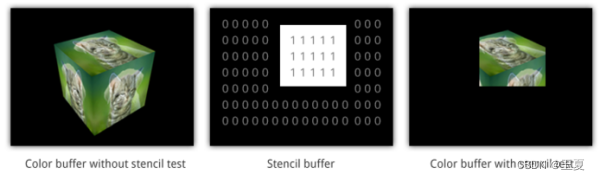
首先,什么是模板缓存?
在渲染完成的一帧画面上的每个像素都存有一个模板值(0-255)。例如,我们设定中间区域的模板值为1,然后只渲染模板为1的区域。
编写Shader 只有与_MaskID相同的模板值才会渲染
Shader "Portals/PortalRender"
{
    Properties
    {
        _MainTex ("Texture", 2D) = "white" {}
		_MaskID("Mask ID", Int) = 1
    }
    SubShader
    {
		Tags
		{
			"RenderType" = "Opaque"
			"Queue" = "Geometry+2"
		}

        Pass
        {
			Stencil
			{
                // 设置参考值
				Ref [_MaskID]
                // 通过模板测试的条件
				Comp equal
			}

            CGPROGRAM
            #pragma vertex vert
            #pragma fragment frag

            #include "UnityCG.cginc"

            struct appdata
            {
                float4 vertex : POSITION;
                float2 uv : TEXCOORD0;
            };

            struct v2f
            {
                float2 uv : TEXCOORD0;
                float4 vertex : SV_POSITION;
            };

            v2f vert (appdata v)
            {
                v2f o;
                o.vertex = UnityObjectToClipPos(v.vertex);
                o.uv = v.uv;
                return o;
            }

            uniform sampler2D _MainTex;

            fixed4 frag (v2f i) : SV_Target
            {
                fixed4 col = tex2D(_MainTex, i.uv);
                return col;
            }
            ENDCG
        }
    }
}
根据参考值替换原像素
Shader "Portals/PortalMask"
{
    Properties
    {
		_Colour("Base Colour", Color) = (1, 1, 1, 1)
		_MaskID("Mask ID", Int) = 1
    }
    SubShader
    {
        Tags
		{
			"RenderType" = "Opaque"
			"Queue" = "Geometry"
		}

        Pass
        {
			Stencil
			{
				 // 设置参考值
				Ref [_MaskID]
				 // 通过模板测试的条件
				Comp Always
				 // 表示通过模板测试和Z测试的像素,替换原像素
				Pass replace
			}

		CGPROGRAM
			#pragma vertex vert
			#pragma fragment frag

			#include "UnityCG.cginc"

			struct appdata
			{
				float4 vertex : POSITION;
				float2 uv : TEXCOORD0;
			};

			struct v2f
			{
				float2 uv : TEXCOORD0;
				float4 vertex : SV_POSITION;
			};

			v2f vert(appdata v)
			{
				v2f o;
				o.vertex = UnityObjectToClipPos(v.vertex);
				o.uv = v.uv;
				return o;
			}

			uniform float4 _Colour;

			fixed4 frag(v2f i) : SV_Target
			{
				return _Colour;
			}
		ENDCG
        }
    }
}
传送门简单实现
完善BasicPortalCamera脚本
using System.Collections;
using System.Collections.Generic;
using UnityEngine;

public class BasicPortalCamera : MonoBehaviour
{
    [SerializeField]
    private Transform[] portals;

    [SerializeField]
    private Camera portalCamera;

    [SerializeField]
    private Material portalMaterial;

    private RenderTexture tempTexture;

    private Camera mainCamera;

    private const int maskID1 = 1;
    private const int maskID2 = 2;

    private void Awake()
    {
        mainCamera = GetComponent<Camera>();
        tempTexture = new RenderTexture(Screen.width, Screen.height, 24);

        portalCamera.targetTexture = tempTexture;
    }

    private void Start()
    {
        //设置_MaskID,设置Stencil参考值
        portals[0].GetComponent<Renderer>().material.SetInt("_MaskID", maskID1);
        //设置_MaskID,设置Stencil参考值
        portals[1].GetComponent<Renderer>().material.SetInt("_MaskID", maskID2);
    }

    private void OnRenderImage(RenderTexture src, RenderTexture dst)
    {
        if (portals[0].GetComponent<Renderer>().isVisible)
        {
            RenderCamera(portals[0].transform, portals[1].transform);
            //设置_MaskID,设置Stencil参考值
            portalMaterial.SetInt("_MaskID", maskID1);
            //将tempTexture绘制到src中,同时符合portalMaterial的Shader效果
            Graphics.Blit(tempTexture, src, portalMaterial);
        }
        if (portals[1].GetComponent<Renderer>().isVisible)
        {
            RenderCamera(portals[1].transform, portals[0].transform);
            //设置_MaskID,设置Stencil参考值
            portalMaterial.SetInt("_MaskID", maskID2);
            //将tempTexture绘制到src中,同时符合portalMaterial的Shader效果
            Graphics.Blit(tempTexture, src, portalMaterial);
        }

        Graphics.Blit(src, dst);
    }

    private void RenderCamera(Transform inTransform, Transform outTransform)
    {

        //计算portalCamera的正确位置
        Vector3 relativePos = inTransform.InverseTransformPoint(transform.position);
        relativePos = Quaternion.Euler(0.0f, 180.0f, 0.0f) * relativePos;
        portalCamera.transform.position = outTransform.TransformPoint(relativePos);

        Quaternion relativeRot = Quaternion.Inverse(inTransform.rotation) * transform.rotation;
        relativeRot = Quaternion.Euler(0.0f, 180.0f, 0.0f) * relativeRot;
        portalCamera.transform.rotation = outTransform.rotation * relativeRot;

        //计算portalCamera的视锥矩阵,剔除portal背后的墙面等物体
        Plane p = new Plane(-outTransform.forward, outTransform.position);
        Vector4 clipPlane = new Vector4(p.normal.x, p.normal.y, p.normal.z, p.distance);
        Vector4 clipPlaneCameraSpace =
            Matrix4x4.Transpose(Matrix4x4.Inverse(portalCamera.worldToCameraMatrix)) * clipPlane;

        var newMatrix = mainCamera.CalculateObliqueMatrix(clipPlaneCameraSpace);
        portalCamera.projectionMatrix = newMatrix;

        portalCamera.Render();
    }

}
简单搭建测试场景
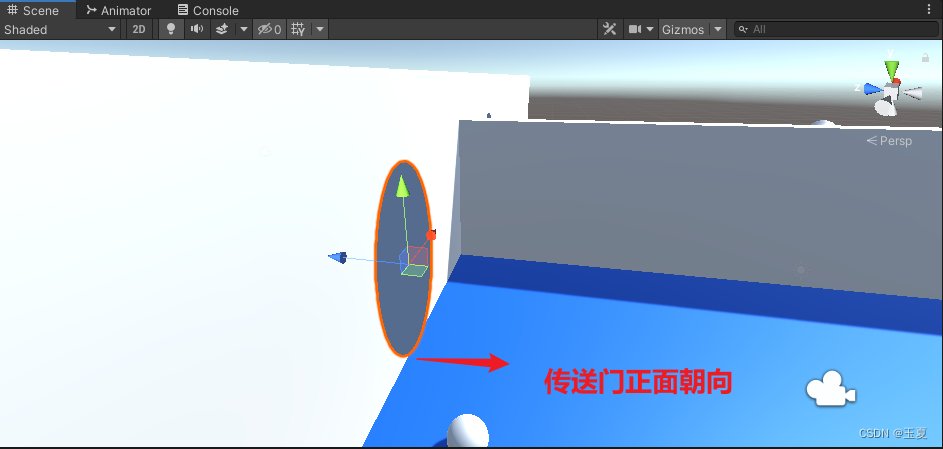
创建两个椭圆形(Cube也可以)调整到合适的大小,并赋予其PortalMask材质,当作两个传送门,如图。
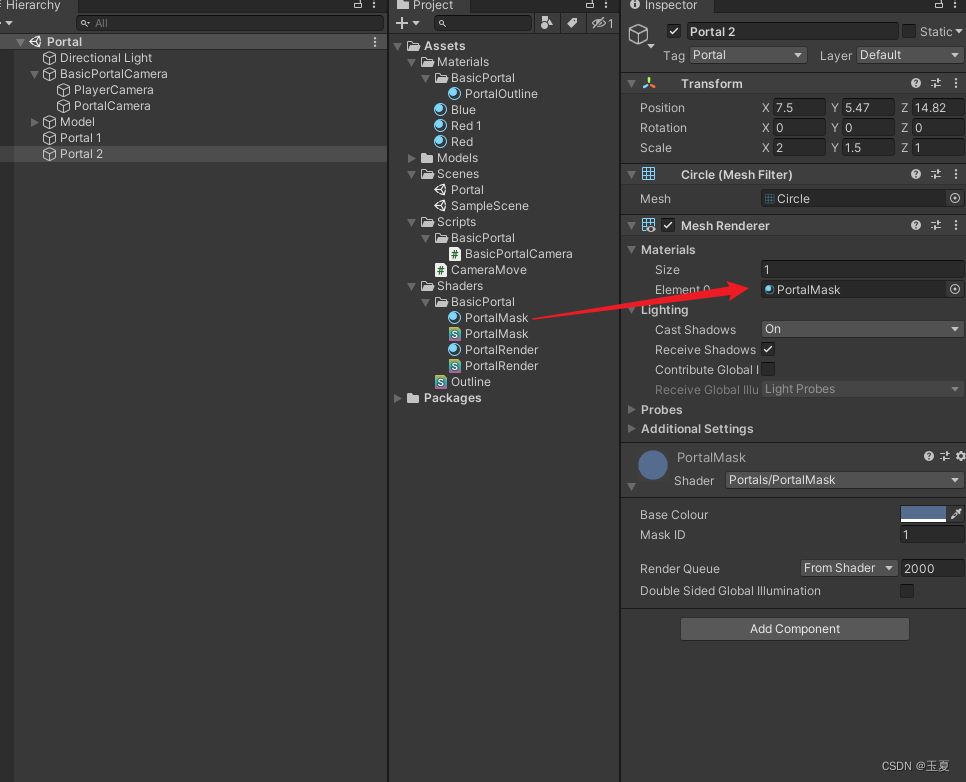
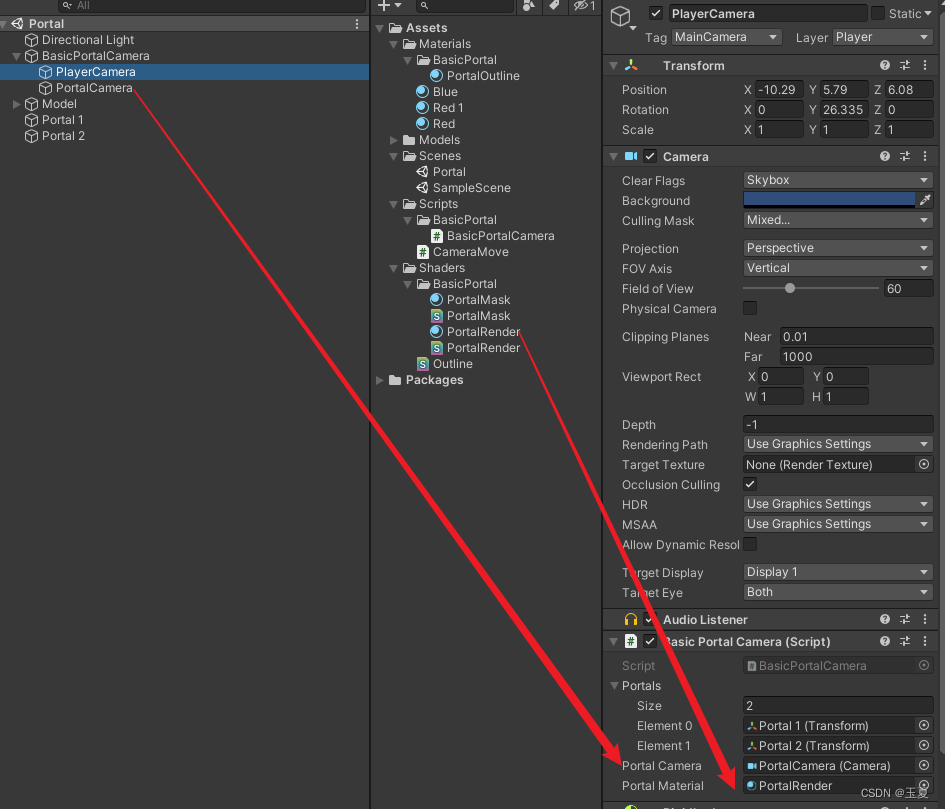
创建两个相机命名为PlayerCamera和PortalCamera,将PlayerCamera设置为主相机。并禁用PortalCamera的Camera组件,PortalCamera的渲染由BasicPortalCamera脚本控制。分别创建使用不同Shader的材质,如图。
注意
在进行视锥矩阵计算时,使用的-outTransform.forward,因此传送门放置的正方向与模型的z轴方向相反,如图。
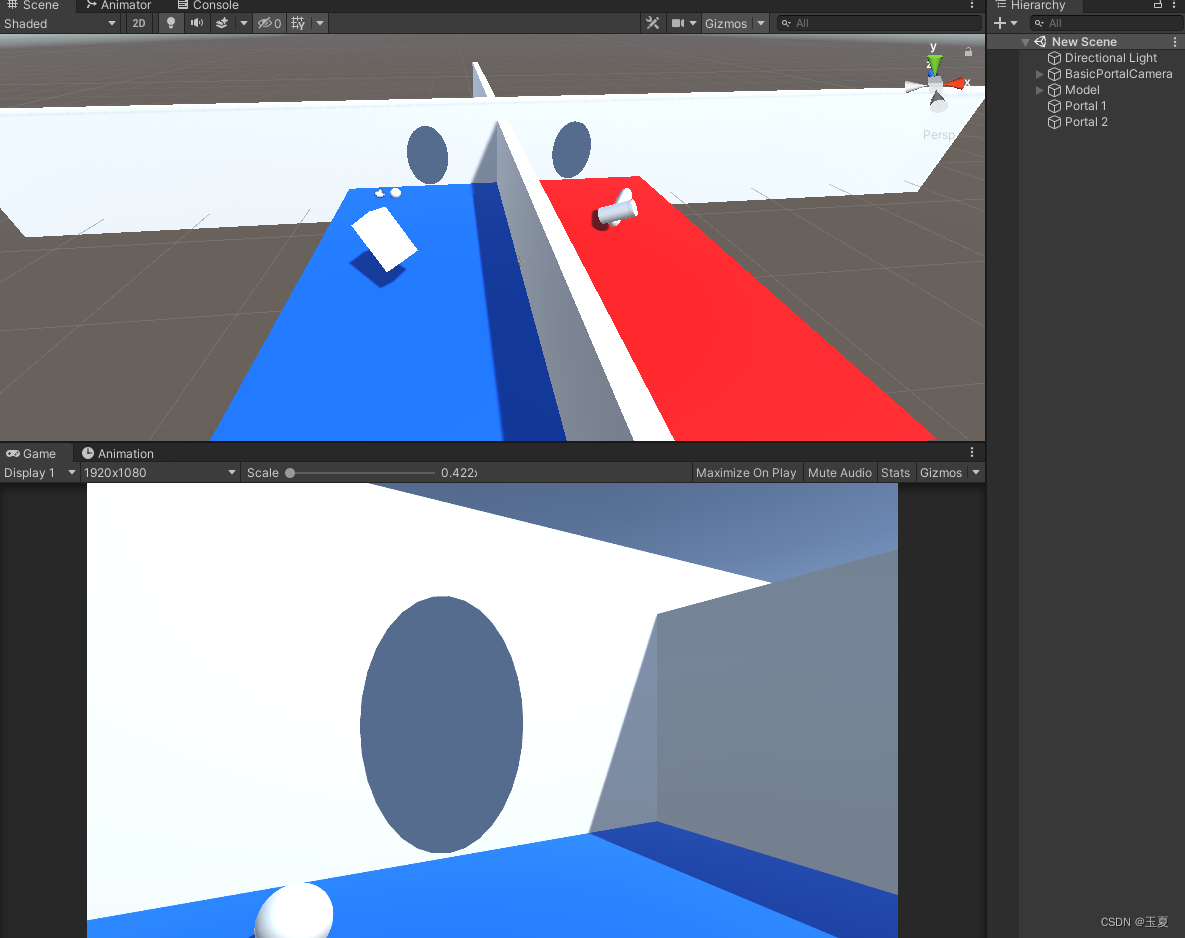
运行效果
运行效果如下
后续
完成传送门内画面的多次迭代渲染、物品的传送等功能。
写了这么多点个赞吧,同学。
学习文章地址


 493
493

 被折叠的 条评论
为什么被折叠?
被折叠的 条评论
为什么被折叠?
 到【灌水乐园】发言


