跑通作业框架
1.修改数据存放路径
修改 /src/lidar_localization/config/front_end/config.yaml 中的data_path
2.启动front_end.launch
roslaunch lidar_localization front_end.launch
3.播放bag
rosbag play kitti_2011_10_03_drive_0027_synced.bag
使用evo统计误差
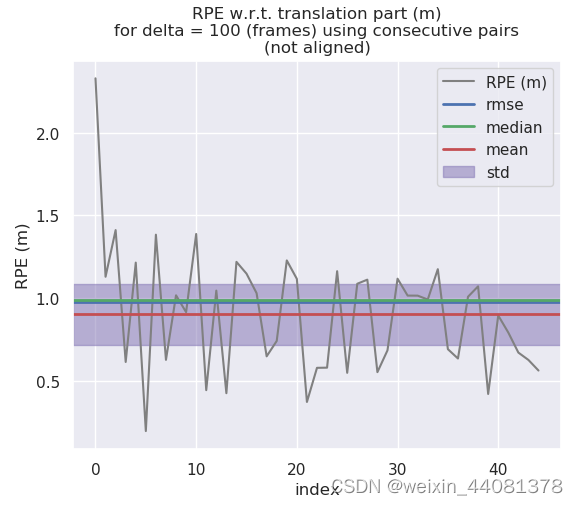
修改config.yaml 中的匹配方式为NDT,用evo评价轨迹精度
evo_rpe kitti ground_truth.txt laser_odom.txt -r trans_part --delta 100 --plot --plot_mode xyz


实现ICP-SVD
实现的整体思路比较简单,按照ICP的流程图和代码提示逐步实现即可。不调整任何参数的效果:


首先是ScanMatch函数实现:
bool ICPSVDRegistration::ScanMatch(
    const CloudData::CLOUD_PTR& input_source,
    const Eigen::Matrix4f& predict_pose,
    CloudData::CLOUD_PTR& result_cloud_ptr,
    Eigen::Matrix4f& result_pose
) {
    input_source_ = input_source;

    // pre-process input source:
    CloudData::CLOUD_PTR transformed_input_source(new CloudData::CLOUD());
    pcl::transformPointCloud(*input_source_, *transformed_input_source, predict_pose);

    // init estimation:
    transformation_.setIdentity();

    //
    // TODO: first option -- implement all computing logic on your own
    //
    // do estimation:
    int curr_iter = 0;
    while (curr_iter < max_iter_) {
        // TODO: apply current estimation:
        CloudData::CLOUD_PTR current_input_source(new CloudData::CLOUD());
        pcl::transformPointCloud(*transformed_input_source, *current_input_source, transformation_);
        // TODO: get correspondence:
        std::vector<Eigen::Vector3f> xs_;
        std::vector<Eigen::Vector3f> ys_;
        // TODO: do not have enough correspondence -- break:
        if( GetCorrespondence(current_input_source,xs_,ys_) < 3) break;
        // TODO: update current transform:
        Eigen::Matrix4f current_transform;
        GetTransform(xs_,ys_,current_transform);
        // TODO: whether the transformation update is significant:
        if( !IsSignificant(current_transform,trans_eps_)) break;
        // TODO: update transformation:
        transformation_ = current_transform * transformation_;
        ++curr_iter;
    }

    // set output:
    result_pose = transformation_ * predict_pose;

    // 归一化
    Eigen::Quaternionf q(result_pose.block<3,3>(0,0));
    q.normalize();
    result_pose.block<3,3>(0,0) = q.toRotationMatrix();
    pcl::transformPointCloud(*input_source_, *result_cloud_ptr, result_pose);

    return true;
}
主体部分调用对应函数即可,函数结尾部分添加了归一化处理,这是因为旋转矩阵的特点是单位正交阵,如果不进行处理会产生比较大的尺度漂移问题:

GetCorrespondence函数实现:
size_t ICPSVDRegistration::GetCorrespondence(
    const CloudData::CLOUD_PTR &input_source,
    std::vector<Eigen::Vector3f> &xs,
    std::vector<Eigen::Vector3f> &ys
) {
    const float MAX_CORR_DIST_SQR = max_corr_dist_ * max_corr_dist_;

    size_t num_corr = 0;

    // TODO: set up point correspondence
    //SetInputTarget(input_source);

    for(auto i = 0; i < input_source->points.size(); i++){
        std::vector<int> indices(1);
        std::vector<float> distances(1);

        input_target_kdtree_->nearestKSearch(input_source->at(i), 1, indices, distances);

        if(distances.at(0) > MAX_CORR_DIST_SQR) continue;

        Eigen::Vector3f x(  input_target_->at(indices.at(0)).x,
                            input_target_->at(indices.at(0)).y,
                            input_target_->at(indices.at(0)).z );

        Eigen::Vector3f y(  input_source->at(i).x ,
                            input_source->at(i).y ,
                            input_source->at(i).z );

        xs.push_back(x);
        ys.push_back(y);
        num_corr++;
    }
    return num_corr;
}
函数功能是进行点云的配准,通过nearestKSearch方法找到最邻近关键点,这里只用找一个点,第二项参数设置成1即可。
indices 和 distances分别存储目标点索引和距离。
nearestKSearch方法示例: link
GetTransform函数实现:
首先求均值,构建H矩阵:
    for(auto i = 0; i < N; i++){
        A.block<3,1>(0,i) = xs[i];
        B.block<3,1>(0,i) = ys[i];
    }
    mu_x  = A.rowwise().mean();
    mu_y  = B.rowwise().mean();
    A.colwise() -= mu_x;
    B.colwise() -= mu_y;
    Eigen::Matrix3f H,R;
    Eigen::Vector3f t;
    H = B * A.transpose();
 然后进行SVD分解:

 Eigen::JacobiSVD<Eigen::MatrixXf>svd(H,Eigen::ComputeFullU | Eigen::ComputeFullV);
 R=svd.matrixV() * svd.matrixU().transpose();
R求解后算出平移t即可。

t=mu_x -R*mu_y;
完整代码
void ICPSVDRegistration::GetTransform(
    const std::vector<Eigen::Vector3f> &xs,
    const std::vector<Eigen::Vector3f> &ys,
    Eigen::Matrix4f &transformation_
) {
    const size_t N = xs.size();

    // TODO: find centroids of mu_x and mu_y:
    Eigen::Vector3f mu_x(0,0,0);
    Eigen::Vector3f mu_y(0,0,0);
    Eigen::MatrixXf A(3,N);
    Eigen::MatrixXf B(3,N);

    for(auto i = 0; i < N; i++){
        A.block<3,1>(0,i) = xs[i];
        B.block<3,1>(0,i) = ys[i];
    }
    mu_x  = A.rowwise().mean();
    mu_y  = B.rowwise().mean();

    A.colwise() -= mu_x;
    B.colwise() -= mu_y;
    // TODO: build H:
    Eigen::Matrix3f H,R;
    Eigen::Vector3f t;
    H = B * A.transpose();
    Eigen::JacobiSVD<Eigen::MatrixXf>svd(H,Eigen::ComputeFullU | Eigen::ComputeFullV);
    // TODO: solve R:
    R=svd.matrixV() * svd.matrixU().transpose();
    // TODO: solve t:
    t=mu_x -R*mu_y;
    // TODO: set output:
    transformation_.setZero();
    transformation_.block<3,3>(0,0)=R;
    transformation_.block<3,1>(0,3)=t;
    transformation_(3,3)=1;
}
使用evo评估精度:

 ##参数调整
点云滤波中,frame_filter设置成1.3,体素滤波器是一种下采样的滤波器,采用体素格中接近中心点的点替代体素内的所有点云,调大可以降低里程计耗时,但是会随时一定的精度,调小则相反。
更改为2.3后evo评估轨迹精度:
 单纯调整此参数精度下降不明显。2.3时mean 0.966518,1.3时 0.905212


 2741
2741


 被折叠的 条评论
为什么被折叠?


