


本文使用的开发板为野火鲁班猫1S
零、总体流程
- 通过gpsd接收(NEMA+pps)获得精准的绝对时间
- 通过chronyd将上步的时间源同步系统时钟
在没有gps、gps解算失效、有网的时候,就是正常地采用ntp协议,网络时钟服务器同步系统时钟 - 这一步按ptp4l采用什么时间戳(软硬)来划分
A、软件时间戳,给ptp报文打上的是系统时间的时间戳,不需要用phc2sys
B、硬件时间戳,给ptp报文打上的是网卡时钟的时间戳,需要提前用phc2sys把系统时钟同步网卡或者网络接口的时钟 - 通过ptp4l配置PTP Master
一、gpsd配置
-
利用普通GPIO接收pps信息,查看关于pps-gpio的驱动是否可用
code /boot/config-$(uname -r)
1、若CONFIG_PPS_CLIENT_GPIO is not set,需要编译安装pps-gpio驱动模块,具体操作可查看我的上一篇文章,设备树插件如下:/dts-v1/; /plugin/; #include <dt-bindings/gpio/gpio.h> #include <dt-bindings/pinctrl/rockchip.h> &{/} { pps_test: pps_test{ status = "okay"; compatible = "pps-gpio"; gpios = <&gpio3 RK_PB0 GPIO_ACTIVE_HIGH>; // 根据使用的板卡确认引脚 assert-rising-edge; // 好像没作用 pinctrl-names = "default"; pinctrl-0 = <&pps_test_pin>; }; }; &{/pinctrl} { pps_test { pps_test_pin: pps_test_pin { rockchip,pins = <3 RK_PB0 RK_FUNC_GPIO &pcfg_pull_none>; // GPIO功能 浮空输入 }; }; };2、编译好驱动模块后,加载模块
sudo insmod pps-gpio.ko,正常会产生设备/dev/pps0
3、安装pps工具,sudo apt-get install pps-tools;测试pps,sudo ppstest /dev/pps0

-
利用串口接收NEMA信息
注意点:
1、打开串口使能
2、赋予串口权限,sudo chmod 666 /dev/tty*
3、配置串口波特率等,可使用sudo minicom -s -
手动开启gpsd
# 安装gpsd
sudo apt-get install gpsd gpsd-clients
# 清除gpsd
sudo killall -9 gpsd
# Tmp
systemctl stop gpsd
systemctl disable gpsd
systemctl stop gspd.socket
# 手动开启gpsd
sudo gpsd -n /dev/ttyS5 /dev/pps0
# 验证
gpsmon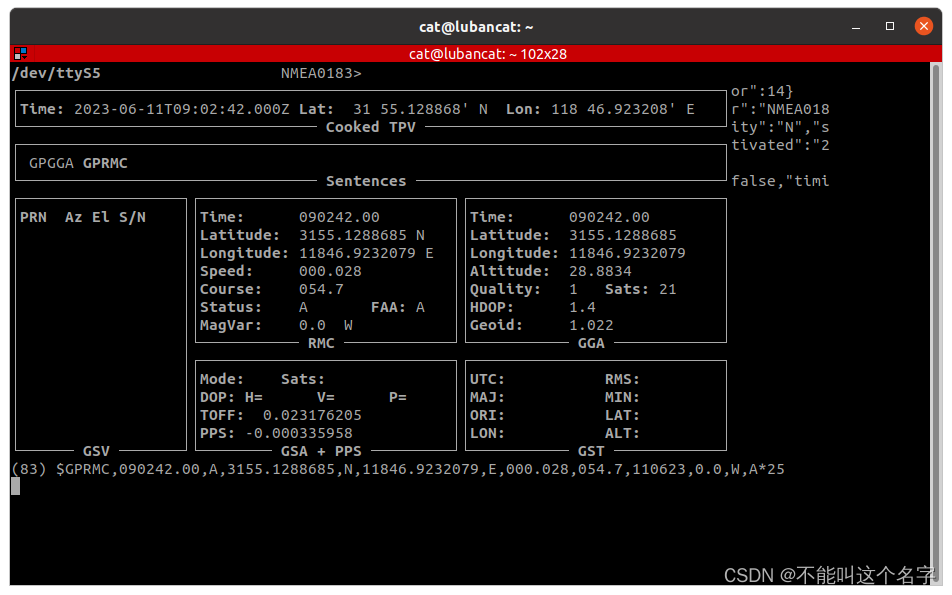
二、chronyd配置
- 修改配置文件
sudo vim /etc/chrony/chrony.conf # 在最后添加 # 参考 https://gpsd.gitlab.io/gpsd/gpsd-time-service-howto.html refclock SOCK /run/chrony.ttyS5.sock refid GPS precision 1e-1 offset 0.9999 refclock SOCK /run/chrony.pps0.sock refid PPS precision 1e-7 # 或 refclock SHM 0 refid GPS precision 1e-1 offset 0.9999 delay 0.2 refclock SHM 1 refid PPS precision 1e-7 - 开启
# 安装chrony(包含chronyd、chronyc)
sudo apt-get install chrony
# 清除
sudo killall -9 gpsd chronyd
# gpsd需要在chronyd后启动
sudo chronyd -f /etc/chrony/chrony.conf
sudo gpsd -n /dev/ttyS5 /dev/pps0
# 查看时间同步源情况
chronyc sources
chronyc tracking
三、phc2sys配置
- 系统时钟同步ptp硬件时钟,参数
-rr;ptp硬件时钟同步系统时钟,参数-r - 经过测试开启之后,硬件时钟时间源就是CST,不开启为UTC
- 此处有个疑问,ptp硬件时钟一开机就有时间吗,初始时间哪来的,一直没搜到答案。是否和RTC一样,断电前系统时间同步PTP硬件时钟为UTC
# 方便安装	linuxptp(ptp4l+phy2sys)  老版本
sudo apt-get install linuxptp
# 源代码安装  新版本  下载网址http://sourceforge.net/projects/linuxptp/files/latest/download
# 进入源代码路径下,make -jx(编译),sudo make install(安装=复制到local)

# 手动开启,这两种具体区别还不清楚
sudo phc2sys -s eth0 -rr -w -m
sudo phc2sys -s CLOCK_REALTIME -c eth0  -w -m
# -s 主时钟接口,CLOCK_REALTIME为系统时钟
# -c 从时钟接口
# -w 等待ptp4l
# -m 打印输出
四、ptp4l配置
- 修改配置文件
# 参考 https://blog.csdn.net/qq_24972557/article/details/115049024 sudo vim /etc/linuxptp/ptp4l.conf sudo systemctl restart chrony - 开启ptp4l
# 清除
sudo killall -9 gpsd chronyd ptp4l
# 依次开启
# sudo chronyd -f /etc/chrony/chrony.conf
sudo gpsd -n /dev/ttyS5 /dev/pps0
sudo ptp4l -f /etc/linuxptp/ptp4l.conf -i eth0
sudo ptp4l -i eth0 -H -m


 1647
1647

 被折叠的 条评论
为什么被折叠?
被折叠的 条评论
为什么被折叠?
 到【灌水乐园】发言


