


本篇文章主要对Grounded-SAM项目的部署以及使用进行讲解,目的是使读者可以直接参考文档去使用Grounded-SAM,而无需再去参考Github一步步自己去分析尝试(也算是我使用过程中的心得)。
对于Grounded-SAM 技术报告的paper阅读可以跳转链接:
全自动标注集成项目(Grounded-SAM)技术报告阅读
前言知识:
Grounded-SAM集成项目中包含了多个子项目,下表展示了部分(想要进一步了解各子项目的,可以参考附属链接):
其他的如图像生成项目后续在补充
1.Grounded-Segment-Anything本地部署
github: https://github.com/IDEA-Research/Grounded-Segment-Anything
1.1.Installation
代码需要 python>=3.8 以及 pytorch>=1.7 和 torchvision>=0.8
1.GPU环境
如果要为 Grounded-SAM 构建本地 GPU 环境,则应按如下方式手动设置环境变量:
export AM_I_DOCKER=False
export BUILD_WITH_CUDA=True
export CUDA_HOME=/path/to/cuda-11.3/
这一步很关键,决定了项目是否能在GPU上运行。当然,如果不设置GPU,也是可以在CPU上运行的,这就视个人情况。
2.安装Grounded-SAM项目
将github: https://github.com/IDEA-Research/Grounded-Segment-Anything中的文件下载到本地
3.安装组件模型
- Install Segment Anything:
python -m pip install -e segment_anything
- Install Grounding DINO:
python -m pip install -e GroundingDINO
- Install RAM & Tag2Text:
git clone https://github.com/xinyu1205/recognize-anything.git
pip install -r ./recognize-anything/requirements.txt
pip install -e ./recognize-anything/
- Install diffusers:
pip install --upgrade diffusers[torch]
看个人需求选择安装
1.2.权重下载
- GroundingDINO权重
wget https://github.com/IDEA-Research/GroundingDINO/releases/download/v0.1.0-alpha/groundingdino_swint_ogc.pth
- SAM系列权重(个人选择版本)
SAM:
vit_h:  https://dl.fbaipublicfiles.com/segment_anything/sam_vit_h_4b8939.pth
vit_l:  https://dl.fbaipublicfiles.com/segment_anything/sam_vit_l_0b3195.pth
vit_b:  https://dl.fbaipublicfiles.com/segment_anything/sam_vit_b_01ec64.pth
SAM-HQ:
vit_h: https://drive.google.com/file/d/1qobFYrI4eyIANfBSmYcGuWRaSIXfMOQ8/view?usp=sharing
vit_l: https://drive.google.com/file/d/1Uk17tDKX1YAKas5knI4y9ZJCo0lRVL0G/view?usp=sharing
vit_b: https://drive.google.com/file/d/11yExZLOve38kRZPfRx_MRxfIAKmfMY47/view?usp=sharing
- RAM系列权重
RAM++ (14M):    https://huggingface.co/xinyu1205/recognize-anything-plus-model/blob/main/ram_plus_swin_large_14m.pth
RAM (14M):      https://huggingface.co/spaces/xinyu1205/Recognize_Anything-Tag2Text/blob/main/ram_swin_large_14m.pth
Tag2Text (14M): https://huggingface.co/spaces/xinyu1205/Recognize_Anything-Tag2Text/blob/main/tag2text_swin_14m.pth
1.3.本地文件展示
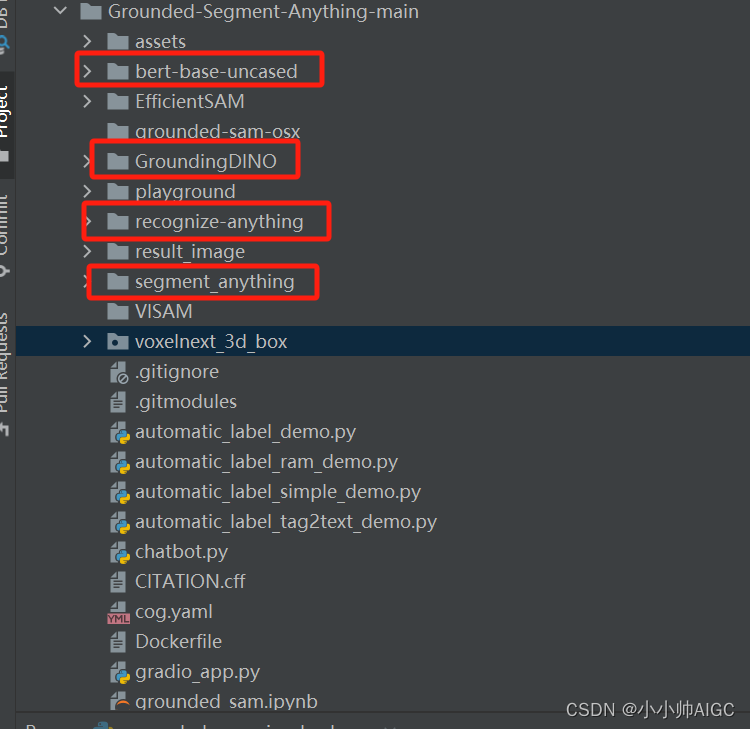
图中展示了本地的Grounded-Segment-Anything-main项目,图中圈出的bert-base-uncased是GroundingDINO运行需要使用的文本编码器的权重,如果因为网络问题无法下载的,可以像我一样提前下载到本地。
1.2中下载的权重文件也直接放在Grounded-Segment-Anything-main目录下即可
至此,整个Grounded-Segment-Anything的本地部署完成,下面就介绍组件的单独使用和联合使用
2. Grounded-SAM的使用
2.1.GroundingDINO的简单使用
1.代码演示
在Grounded-Segment-Anything目录下,有一个grouding_dino_demo.py文件,这个python文件就是GroundingDINO的简单demo:
from groundingdino.util.inference import load_model, load_image, predict, annotate, Model
import cv2

CONFIG_PATH = "GroundingDINO/groundingdino/config/GroundingDINO_SwinT_OGC.py"
CHECKPOINT_PATH = "./groundingdino_swint_ogc.pth"  #权重文件
DEVICE = "cpu"  #cuda or cpu
IMAGE_PATH = "assets/demo4.jpg"  # target image
TEXT_PROMPT = "Two dogs with a stick." # text prompt (classifity)
BOX_TRESHOLD = 0.35
TEXT_TRESHOLD = 0.25

image_source, image = load_image(IMAGE_PATH)  #image pre-process
model = load_model(CONFIG_PATH, CHECKPOINT_PATH)  #load GroundingDINO model

boxes, logits, phrases = predict(   #excute predict (image,text)->target box
    model=model,
    image=image,
    caption=TEXT_PROMPT,
    box_threshold=BOX_TRESHOLD,
    text_threshold=TEXT_TRESHOLD,
    device=DEVICE,
)

annotated_frame = annotate(image_source=image_source, boxes=boxes, logits=logits, phrases=phrases)
cv2.imwrite("./result_image/annotated_image.jpg", annotated_frame) #save result image
DINO 检测一个句子中的多个对象,建议在每个名称之间用 . 分隔。 例如:猫 . 狗 . 椅子 .
如果对GroundingDINO内部是如何构造的感兴趣,可以参考我的另一篇文章:
文本提示检测图像任意目标(Grounding DINO) 的使用以及全网最详细源码讲解
2.结果展示
本例使用一些电商领域的演示图来说明GroundingDINO的性能以及上述代码是否存在bug
输入:IMAGE_PATH = "assets/demo4.jpg"修改输入图片的路径
输出:cv2.imwrite("./result_image/annotated_image.jpg", annotated_frame)修改输出路径
| Text Prompt | Input Image | Result Image |
|---|---|---|
| goods . |  |  |
| diaper skirt . |  |  |
2.2.GroundingDINO+SAM的简单使用
1.代码演示
在Grounded-Segment-Anything目录下,提供了两个版本的Grounded-SAM演示,分别是:
grounded_sam_demo.py: Grounded-SAM原始演示grounded_sam_simple_demo.py: Grounded-SAM优化演示
本次以grounded_sam_demo.py为例,进行代码运行与结果展示,具体代码如下:
import argparse
import os
import sys
import numpy as np
import json
import torch
from PIL import Image

sys.path.append(os.path.join(os.getcwd(), "GroundingDINO"))
sys.path.append(os.path.join(os.getcwd(), "segment_anything"))


# Grounding DINO
import GroundingDINO.groundingdino.datasets.transforms as T
from GroundingDINO.groundingdino.models import build_model
from GroundingDINO.groundingdino.util.slconfig import SLConfig
from GroundingDINO.groundingdino.util.utils import clean_state_dict, get_phrases_from_posmap
# segment anything
from segment_anything import (sam_model_registry,sam_hq_model_registry,SamPredictor)
import cv2
import numpy as np
import matplotlib.pyplot as plt

def load_image(image_path):
    # load image
    ....
    ....
def load_model(model_config_path, model_checkpoint_path, device):
    ....
    ....
def get_grounding_output(model, image, caption, box_threshold, text_threshold, with_logits=True, device="cpu"):
    ....
    ....
def show_mask(mask, ax, random_color=False):
    ....
    ....
def show_box(box, ax, label):
    ....
    ....
def save_mask_data(output_dir, mask_list, box_list, label_list):
    ....
    ....
if __name__ == "__main__":

    parser = argparse.ArgumentParser("Grounded-Segment-Anything Demo", add_help=True)
    parser.add_argument("--config", type=str,default="GroundingDINO/groundingdino/config/GroundingDINO_SwinT_OGC.py", required=False, help="path to config file")
    parser.add_argument(
        "--grounded_checkpoint", type=str,default="./groundingdino_swint_ogc.pth", required=False, help="path to checkpoint file")
    parser.add_argument(
        "--sam_version", type=str, default="vit_b", required=False, help="SAM ViT version: vit_b / vit_l / vit_h")
    parser.add_argument(
        "--sam_checkpoint", type=str,default="./sam_vit_b_01ec64.pth", required=False, help="path to sam checkpoint file")
    parser.add_argument(
        "--sam_hq_checkpoint", type=str, default=None, help="path to sam-hq checkpoint file")
    parser.add_argument(
        "--use_sam_hq", action="store_true", help="using sam-hq for prediction")
    parser.add_argument("--input_image", type=str, default="./input_image/1.jpg",required=False, help="path to image file")
    parser.add_argument("--text_prompt", type=str,default="food .", required=False, help="text prompt")
    parser.add_argument(
        "--output_dir", "-o", type=str, default="output_image", required=False, help="output directory")
    parser.add_argument("--box_threshold", type=float, default=0.7, help="box threshold")
    parser.add_argument("--text_threshold", type=float, default=0.25, help="text threshold")

    parser.add_argument("--device", type=str, default="cpu", help="running on cpu only!, default=False")
    args = parser.parse_args()

    # cfg
    config_file = args.config  # change the path of the model config file
    grounded_checkpoint = args.grounded_checkpoint  # change the path of the model
    sam_version = args.sam_version
    sam_checkpoint = args.sam_checkpoint
    sam_hq_checkpoint = args.sam_hq_checkpoint
    use_sam_hq = args.use_sam_hq
    image_path = args.input_image
    text_prompt = args.text_prompt
    output_dir = args.output_dir
    box_threshold = args.box_threshold
    text_threshold = args.text_threshold
    device = args.device

    # make dir
    os.makedirs(output_dir, exist_ok=True)
    # load image
    image_pil, image = load_image(image_path)
    # load model
    model = load_model(config_file, grounded_checkpoint, device=device)

    # visualize raw image
    image_pil.save(os.path.join(output_dir, "raw_image.jpg"))

    # run grounding dino model
    boxes_filt, pred_phrases = get_grounding_output(
        model, image, text_prompt, box_threshold, text_threshold, device=device
    )

    # initialize SAM
    if use_sam_hq:
        predictor = SamPredictor(sam_hq_model_registry[sam_version](checkpoint=sam_hq_checkpoint).to(device))
    else:
        predictor = SamPredictor(sam_model_registry[sam_version](checkpoint=sam_checkpoint).to(device))
    image = cv2.imread(image_path)
    image = cv2.cvtColor(image, cv2.COLOR_BGR2RGB)
    predictor.set_image(image)

    size = image_pil.size
    H, W = size[1], size[0]
    for i in range(boxes_filt.size(0)):
        boxes_filt[i] = boxes_filt[i] * torch.Tensor([W, H, W, H])
        boxes_filt[i][:2] -= boxes_filt[i][2:] / 2
        boxes_filt[i][2:] += boxes_filt[i][:2]

    boxes_filt = boxes_filt.cpu()
    transformed_boxes = predictor.transform.apply_boxes_torch(boxes_filt, image.shape[:2]).to(device)

    masks, _, _ = predictor.predict_torch( point_coords = None,point_labels = None,boxes = transformed_boxes.to(device),multimask_output = False)
    # draw output image
    plt.figure(figsize=(10, 10))
    plt.imshow(image)
    for mask in masks:
        show_mask(mask.cpu().numpy(), plt.gca(), random_color=True)
    for box, label in zip(boxes_filt, pred_phrases):
        show_box(box.numpy(), plt.gca(), label)
    plt.axis('off')
    plt.savefig(os.path.join(output_dir, "grounded_sam_output.jpg"),bbox_inches="tight", dpi=300, pad_inches=0.0)
    save_mask_data(output_dir, masks, boxes_filt, pred_phrases)
代码中:
- config ->
"GroundingDINO/groundingdino/config/GroundingDINO_SwinT_OGC.py" - grounded_checkpoint ->
"./groundingdino_swint_ogc.pth" - sam_version ->
"vit_b" - sam_checkpoint ->
"./sam_vit_b_01ec64.pth" - output_dir ->
"output_image" - input_image ->
"./input_image/1.jpg" - text_prompt ->
"food ."
按照自己的需求,修改相应的超参数
2.结果展示
通过演示图来说明Groundinged-SAM的性能以及上述代码是否存在bug
输入:input_image修改输入图片的路径
输出:output_dir 修改输出路径
| Text Prompt | Input Image | Result Image |
|---|---|---|
| diaper skirt . | |  |
2.3.GroundingDINO+SAM-HQ的简单使用
1.代码演示
对于该演示,只需要将2.2中的SAM换成SAM-HQ即可,即不需要改变代码结构,只需要修改上述代码中:
parser.add_argument( "--use_sam_hq", default='True',action="store_true", help="using sam-hq for prediction")parser.add_argument( "--sam_hq_checkpoint", type=str, default='./sam_hq_vit_b.pth', help="path to sam-hq checkpoint file")
2.结果展示
使用2.2中相同的演示图片
| Text Prompt | Input Image | Result Image |
|---|---|---|
| diaper skirt . | |  |
这里我使用的都是vit_b最小的模型,所以在此不比较SAM与SAM-HQ之间的性能差异。
2.4.RAM+GroundingDINO+SAM的简单使用
在Grounded-Segment-Anything目录下,提供了RAM-Grounded-SAM演示:automatic_label_ram_demo.py,但是直接使用会存在bug,需要修改4处地方,(问题出在SAM model的初始化)
- 将引入SAM的依赖修改:
from segment_anything import (
    build_sam,
    build_sam_hq,
    SamPredictor
)
-> 修改为
from segment_anything import (
    sam_model_registry,
    sam_hq_model_registry,
    SamPredictor
)
- 添加新的超参数:
parser.add_argument(
        "--sam_version", type=str, default="vit_b", required=False, help="SAM ViT version: vit_b / vit_l / vit_h")
)
- 添加:
sam_version = args.sam_version
- 修改SAM model的初始化:
  # initialize SAM
    if use_sam_hq:
        print("Initialize SAM-HQ Predictor")
        predictor = SamPredictor(build_sam_hq(checkpoint=sam_hq_checkpoint).to(device))
    else:
        predictor = SamPredictor(build_sam(checkpoint=sam_checkpoint).to(device))
->修改为
   # initialize SAM
    if use_sam_hq:
        predictor = SamPredictor(sam_hq_model_registry[sam_version](checkpoint=sam_hq_checkpoint).to(device))
    else:
        predictor = SamPredictor(sam_model_registry[sam_version](checkpoint=sam_checkpoint).to(device))
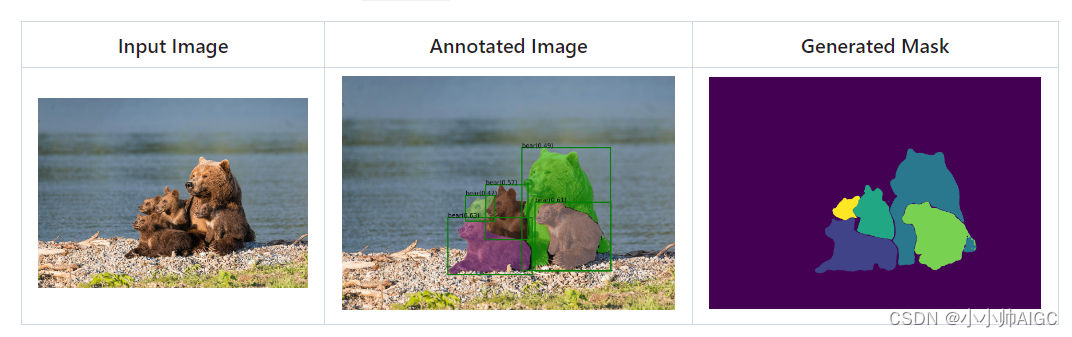
2.结果展示
使用2.3中相同的演示图片:
| SAM result | Input Image | Result Image |
|---|---|---|
| Image Tags: baby, blanket, child, infant bed, key, lay, pillow, sleep, sleepwear, toy | |  |
后续还有一些其他项目:
- Grounded-SAM + VISAM
- Grounded-SAM + OSX
- Grounded-SAM ChatBot
- Grounded-SAM + Whisper
- Grounded-SAM + BLIP
- Grounded-SAM + Inpainting
因目前并没有用到,所以没有更新,后续使用到会在更新这些项目,可能有的细节问题我并没有注意到,在这里先给大家说声抱歉~, 有什么问题我们可以一起讨论哦~


 775
775

 被折叠的 条评论
为什么被折叠?
被折叠的 条评论
为什么被折叠?
 到【灌水乐园】发言


