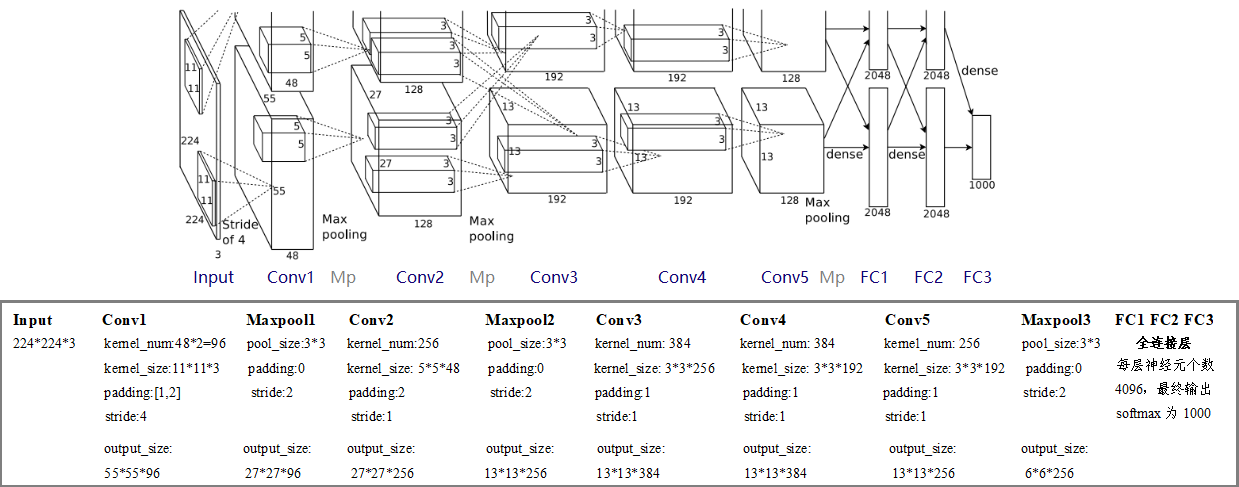
AlexNet 是 2012 年 ImageNe t竞赛冠军获得者 Hinton 和他的学生 Alex Krizhevsky 设计的。这对于当时的传统的机器学习分类算法而言,已经很出色了。自此之后,更多的更深的神经网络被提出。
论文:ImageNet Classification with Deep Convolutional Neural Networks 原文链接
AlexNet特点
(1)成功使用 ReLU 作为 CNN 的激活函数:基于 ReLU 的深度卷积网络比基于 tanh 和 sigmoid 的网络训练快数倍。
(2)提出 LRU 标准化:一般在 ReLU 之后会做一个 normalization,LRN 全称为 Local Response Normalization,即局部响应归一化层,
(3)应用 Dropout 随机忽略一部分神经元:神经网络中 Dropout 通过修改神经网络本身结构来有效地防止神经网络的过拟合。在 AlexNet 中主要是最后几个全连接层使用了 Dropout。
(4)使用 GPU 进行运算加速:使用 CUDA 加速深度卷积网络的训练,利用 GPU 强大的并行计算能力,处理神经网络训练时大量的矩阵运算。
AlexNet网络结构
网络包含 8 个带权重的层;前 5 层是卷积层,剩下的 3 层是全连接层。最后一层全连接层的输出是 1000 维 softmax 的输入,softmax 会产生 1000 类标签的分布。
经卷积后的矩阵尺寸大小计算公式为:(除不尽的结果都向上取整)
N
=
W
−
F
+
2
P
S
+
1
N = \frac{W-F+2P}{S}+1
N=SW−F+2P+1 输入图片大小:W*W 卷积核大小:F*F 步长:S padding的像素数:P
注意:
TensorFlow tensor 的通道排序:[batch, height, width, channels]
Pytorch tensor 的通道排序:[batch, channels, height, width]
输入的原始图像的通道排序:[height, width, channels]
代码
这里使用 pytorch 框架搭建 AlexNet 网络,训练花卉数据集
model.py
import torch.nn as nn
import torch

class AlexNet(nn.Module):
    def __init__(self, num_classes=1000, init_weights=False):
        super(AlexNet, self).__init__()
        # 这里的channel取的一半
        self.features = nn.Sequential(                              # input[3, 224, 224]
            nn.Conv2d(3, 48, kernel_size=11, stride=4, padding=2),  # output[48, 55, 55]
            nn.ReLU(inplace=True),
            nn.MaxPool2d(kernel_size=3, stride=2),                  # output[48, 27, 27]
            nn.Conv2d(48, 128, kernel_size=5, padding=2),           # output[128, 27, 27]
            nn.ReLU(inplace=True),
            nn.MaxPool2d(kernel_size=3, stride=2),                  # output[128, 13, 13]
            nn.Conv2d(128, 192, kernel_size=3, padding=1),          # output[192, 13, 13]
            nn.ReLU(inplace=True),
            nn.Conv2d(192, 192, kernel_size=3, padding=1),          # output[192, 13, 13]
            nn.ReLU(inplace=True),
            nn.Conv2d(192, 128, kernel_size=3, padding=1),          # output[128, 13, 13]
            nn.ReLU(inplace=True),
            nn.MaxPool2d(kernel_size=3, stride=2),                  # output[128, 6, 6]
        )
        self.classifier = nn.Sequential(
            nn.Dropout(p=0.5),  # 失活率0.5,默认
            nn.Linear(128 * 6 * 6, 2048),
            nn.ReLU(inplace=True),
            nn.Dropout(p=0.5),
            nn.Linear(2048, 2048),
            nn.ReLU(inplace=True),
            nn.Linear(2048, num_classes),  # num_classes最终分类的类别个数
        )
        # 初始化权重
        if init_weights:
            self._initialize_weights()

    def forward(self, x):
        x = self.features(x)
        x = torch.flatten(x, start_dim=1)  # flatten展平为一维向量,start_dim=1从channel开始
        x = self.classifier(x)
        return x

    def _initialize_weights(self):
        for m in self.modules():  # 遍历每一个模块
            if isinstance(m, nn.Conv2d):
                # 若m类型与nn.Conv2d的类型相同则返回True,否则False
                # 正态分布均值为0,标准差为sqrt(2/((1 + a^2) * fan_out)),a默认是0
                # "fan_in"保留正向传播时权值方差的量级,"fan_out"保留反向传播时的量级
                nn.init.kaiming_normal_(m.weight, mode='fan_out', nonlinearity='relu')
                if m.bias is not None:
                    nn.init.constant_(m.bias, 0)
            elif isinstance(m, nn.Linear):
                nn.init.normal_(m.weight, 0, 0.01) # 正态分布的平均值0,标准偏差0.01
                nn.init.constant_(m.bias, 0) # 使用值0填充输入m.bias
train.py
import torch
import torch.nn as nn
from torchvision import transforms, datasets, utils
import matplotlib.pyplot as plt
import numpy as np
import torch.optim as optim
from model import AlexNet
import os
import json
import time

# 检测使用 gpu or cpu
device = torch.device("cuda:0" if torch.cuda.is_available() else "cpu")
print(device)

data_transform = {
    "train": transforms.Compose([transforms.RandomResizedCrop(224),
                                 transforms.RandomHorizontalFlip(),
                                 transforms.ToTensor(),
                                 transforms.Normalize((0.5, 0.5, 0.5), (0.5, 0.5, 0.5))]),
    "val": transforms.Compose([transforms.Resize((224, 224)),  # 不能只写224,必须(224, 224)
                               transforms.ToTensor(),
                               transforms.Normalize((0.5, 0.5, 0.5), (0.5, 0.5, 0.5))])}

image_path = "data_set/flower_data/"  # 数据集路径
train_dataset = datasets.ImageFolder(root=image_path + "/train",
                                     transform=data_transform["train"])
train_num = len(train_dataset)

# {'daisy':0, 'dandelion':1, 'roses':2, 'sunflower':3, 'tulips':4}
flower_list = train_dataset.class_to_idx
cla_dict = dict((val, key) for key, val in flower_list.items())
# 将字典写入json文件中
json_str = json.dumps(cla_dict, indent=4)
with open('class_indices.json', 'w') as json_file:
    json_file.write(json_str)

batch_size = 32
train_loader = torch.utils.data.DataLoader(train_dataset,
                                           batch_size=batch_size, shuffle=True,
                                           num_workers=0)

validate_dataset = datasets.ImageFolder(root=image_path + "/val",
                                        transform=data_transform["val"])
val_num = len(validate_dataset)
validate_loader = torch.utils.data.DataLoader(validate_dataset,
                                              batch_size=batch_size, shuffle=True,
                                              num_workers=0)

net = AlexNet(num_classes=5, init_weights=True) # 模型,花数据集5个类别
net.to(device)
loss_function = nn.CrossEntropyLoss() # 损失函数
optimizer = optim.Adam(net.parameters(), lr=0.0002) # 优化器Adam,定义学习率0.0002

# 开始训练
print('Start training...')
save_path = './AlexNet.pth'  # 保存
best_acc = 0.0  # 最高精度
for epoch in range(10):  # epoch训练次数--10次

    net.train() # train训练数据需要dropout
    running_loss = 0.0
    t1 = time.perf_counter()
    for step, data in enumerate(train_loader, start=0):
        # data是一个list,包括[inputs, labels]
        images, labels = data
        optimizer.zero_grad() # 清空过往梯度
        outputs = net(images.to(device)) # 将输入图片载入模型中,得到输出图像
        loss = loss_function(outputs, labels.to(device)) # 计算损失
        loss.backward() # 反向传播,计算当前梯度
        optimizer.step() # 根据梯度更新网络参数

        # 打印输出
        running_loss += loss.item() # 累加损失值
        rate = (step + 1) / len(train_loader)
        a = "*" * int(rate * 50)
        b = "." * int((1 - rate) * 50)
        print("\rtrain loss: {:^3.0f}%[{}->{}]{:.3f}".format(int(rate * 100), a, b, loss))
    print("running_time: ", end="")
    print(time.perf_counter()-t1) #输出一个epoch花费的时间

    net.eval() # val测试数据不需要dropout
    acc = 0.0  # accumulate accurate number / epoch
    with torch.no_grad():
        for val_data in validate_loader:
            val_images, val_labels = val_data
            outputs = net(val_images.to(device))
            predict_y = torch.max(outputs, dim=1)[1] # 寻找最大的index的位置,即标签类别
            # 将预测的标签类别和真实的进行比较,相同返回TRUE
            # 分子:预测正确的数值,分母:总共的图片数量,得到准确率
            acc += (predict_y == val_labels.to(device)).sum().item()
        val_accurate = acc / val_num
        if val_accurate > best_acc:
            best_acc = val_accurate
            torch.save(net.state_dict(), save_path)
        print('[epoch %d] train_loss: %.3f  test_accuracy: %.3f' %
              (epoch + 1, running_loss / step, val_accurate))

print('Finished Training')
predict.py
import torch
from model import AlexNet
from PIL import Image
from torchvision import transforms
import matplotlib.pyplot as plt
import json

data_transform = transforms.Compose(
    [transforms.Resize((224, 224)),
     transforms.ToTensor(),
     transforms.Normalize((0.5, 0.5, 0.5), (0.5, 0.5, 0.5))])

img = Image.open("data_set/flower_data/predict_flower.jpg") # 载入图像
plt.imshow(img)
img = data_transform(img) # [C, H, W],转换图像为tensor
img = torch.unsqueeze(img, dim=0) # [N, C, H, W],增加一个维度N

# 读取类别
try:
    json_file = open('class_indices.json', 'r')
    class_indict = json.load(json_file)
except Exception as e:
    print(e)
    exit(-1)

# 建立模型
model = AlexNet(num_classes=5)
# 载入保存的权重文件
model_weight_path = "AlexNet.pth"
model.load_state_dict(torch.load(model_weight_path))
model.eval()
with torch.no_grad():
    output = torch.squeeze(model(img))
    predict = torch.softmax(output, dim=0)
    predict_cla = torch.argmax(predict).numpy()
print(class_indict[str(predict_cla)], predict[predict_cla].item())
# 画图
name1 = class_indict[str(predict_cla)]
name2 =predict[predict_cla].numpy()
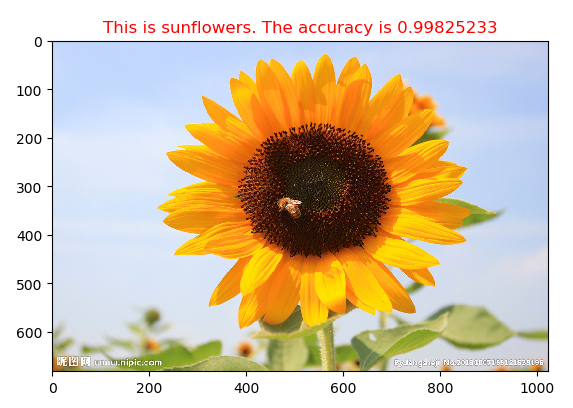
plt.title("This is %s. The accuracy is %s"%(name1, name2),color='red')
plt.show()


 5819
5819


 被折叠的 条评论
为什么被折叠?


