


应用场景:我们有的时候需要定向指定生成某些数据,比如在训练MINST数据集时,我们想让G只生成数字9的图片,因此要给网络的输入噪声数据增加一些类别上的信息,给定某些类别条件下,生成指定的数据,所以输入数据会有一些变化(y可以是类别标签,或者其他类型的数据等);然后在损失函数那里,我们目标不再是输出1/0,也就是不再是简单的输出真实和构造。当判定是真实数据的时候,还需要判定出是哪一类别的图片。一般使用one-hot(https://blog.csdn.net/Dorothy_Xue/article/details/84641417)表示。
代码参考:参考代码来源

一 导入相关功能包
import torch
from torch.utils.data import DataLoader
from torchvision.datasets import MNIST
from torchvision import transforms
from torch import optim
import torch.nn as nn
import matplotlib.pyplot as plt
import numpy as np
from torch.autograd import Variable
import pickle
import copy

import matplotlib.gridspec as gridspec
from torchvision.utils import save_image
import os
二 加载数据
# step 1: ===========================================加载数据
batch_size = 128
noise_dim = 100  # 噪声维度,还是选择100维度
label_dim = 10  # 标签维度,10个数字,10个维度
z_dimension = noise_dim + label_dim  # z dimension = 100 noise dim + 10 one-hot dim

transform_img = transforms.Compose([transforms.ToTensor()])
trainset = MNIST('./data', train=True, transform=transform_img, download=True)
trainloader = DataLoader(trainset, batch_size=batch_size, shuffle=True)
运行程序会自动下载MINST数据集到指定路径,如下所示。包括四个压缩包及其解压文件。

三 定义并实例化模型
对于判别器网络,其结构如下所示:

对于生成器网络,其结构如下所示:

# step 2: ===========================================定义模型
class discriminator(nn.Module):  # 输入图片批为[128, 1, 28, 28]
    def __init__(self):
        super(discriminator, self).__init__()
        self.dis = nn.Sequential(
            nn.Conv2d(1, 32, 5, stride=1, padding=2),  # in_channels, out_channels, kernel_size卷积核, stride,padding
                                                       # 输入一个通道,输出32通道  32*28*28
            nn.LeakyReLU(0.2, True),
            nn.MaxPool2d((2, 2)),  # 32*14*14

            nn.Conv2d(32, 64, 5, stride=1, padding=2),  # 64*14*14
            nn.LeakyReLU(0.2, True),
            nn.MaxPool2d((2, 2))  # 64*7*7
        )
        self.fc = nn.Sequential(
            nn.Linear(7 * 7 * 64, 1024),  # 全连接层
            nn.LeakyReLU(0.2, True),
            nn.Linear(1024, 10),  # 分类
            nn.Sigmoid()
        )

    def forward(self, x):  # x: [batch_size, 1, 28, 28]
        x = self.dis(x)
        x = x.view(x.size(0), -1)
        x = self.fc(x)
        return x  # [batch_size, 10]


class generator(nn.Module):
    def __init__(self, input_size, num_feature):  # 110 1*56*56
        super(generator, self).__init__()
        self.fc = nn.Linear(input_size, num_feature)  # 110 1*56*56
        self.gen = nn.Sequential(
            nn.BatchNorm2d(1),
            nn.ReLU(True),

            nn.Conv2d(1, 50, 3, stride=1, padding=1),  # 50*56*56  56-3+2/1+1=56
                                                       # in_channels, out_channels, kernel_size卷积核, stride,padding
            nn.BatchNorm2d(50),
            nn.ReLU(True),

            nn.Conv2d(50, 25, 3, stride=1, padding=1),  # 25*56*56 56-3+2/1+1=56
            nn.BatchNorm2d(25),
            nn.ReLU(True),

            nn.Conv2d(25, 1, 2, stride=2),  # 56-2/2+1=28  1*28*28
            nn.Tanh()
        )

    def forward(self, x):  # x: [batch_size, 110]
        x = self.fc(x)
        x = x.view(x.size(0), 1, 56, 56)
        x = self.gen(x)
        return x  # [batch_size, 1, 28, 28]

# 实例化模型
D_Net = discriminator()
G_Net = generator(z_dimension, 3136)  # 110 1*56*56
四 定义优化器和损失函数
# step 3: ===========================================定义优化器和损失函数
criterion = nn.BCELoss()
d_optimizer = optim.Adam(D_Net.parameters(), lr=0.0003)
g_optimizer = optim.Adam(G_Net.parameters(), lr=0.0003)
五 开始训练
# 定义展示图片的函数
def show_images(images):  # 定义画图工具
    print('images: ', images.shape)
    images = np.reshape(images, [images.shape[0], -1])
    sqrtn = int(np.ceil(np.sqrt(images.shape[0])))
    sqrtimg = int(np.ceil(np.sqrt(images.shape[1])))

    fig = plt.figure(figsize=(sqrtn, sqrtn))
    gs = gridspec.GridSpec(sqrtn, sqrtn)
    gs.update(wspace=0.05, hspace=0.05)

    for i, img in enumerate(images):
        ax = plt.subplot(gs[i])
        plt.axis('off')
        ax.set_xticklabels([])
        ax.set_yticklabels([])
        ax.set_aspect('equal')
        plt.imshow(img.reshape([sqrtimg, sqrtimg]))
    return

def deprocess_img(img):
    out = 0.5 * (img + 1)
    out = out.clamp(0, 1)
    out = out.view(-1, 1, 28, 28)
    return out


# step 4: ===========================================开始训练
if __name__ == "__main__":
    iter_count = 0
    show_every = 100

    epoch = 100
    gepoch = 1
    for i in range(epoch):
        for (img, label) in trainloader:
            img = Variable(img)
            print(img.shape) # 输出(batch数量,维度,大小,大小) [128, 1, 28, 28]

            # 生成 lable 的 one-hot 向量,且设置对应类别位置是 1
            labels_onehot = np.zeros((img.shape[0], label_dim))
            labels_onehot[np.arange(img.shape[0]), label.numpy()] = 1

            # 生成随机向量,也就是噪声z,带有标签信息
            z = Variable(torch.randn(img.shape[0], noise_dim))
            z = np.concatenate((z.numpy(), labels_onehot), axis=1) # 噪音和one-hot 向量加在一起
            z = Variable(torch.from_numpy(z).float())

            # 真实数据标签和虚假数据标签,
            real_label = Variable(torch.from_numpy(labels_onehot).float())  # 真实label对应类别是为1
            fake_label = Variable(torch.zeros(img.shape[0], label_dim))  # 假的label全是为0

            # compute loss of real_img 计算真实图片在判别器的loss
            real_out = D_Net(img)  # 真实图片送入判别器D输出0~1
            d_loss_real = criterion(real_out, real_label)  # 得到loss

            # compute loss of fake_img
            fake_img = G_Net(z)  # 将向量放入生成网络G生成一张图片 torch.Size([128, 1, 28, 28])
            fake_out = D_Net(fake_img)  # 判别器判断假的图片
            d_loss_fake = criterion(fake_out, fake_label)  # 假的图片的loss

            # D bp and optimize
            d_loss = d_loss_real + d_loss_fake
            d_optimizer.zero_grad()  # 判别器D的梯度归零
            d_loss.backward()  # 反向传播
            d_optimizer.step()  # 更新判别器D参数

            # 生成器G的训练compute loss of fake_img
            for j in range(gepoch):
                fake_img = G_Net(z)  # 将向量放入生成网络G生成一张图片
                output = D_Net(fake_img)  # 经过判别器得到结果
                g_loss = criterion(output, real_label)  # 得到假的图片与真实标签的loss
                # bp and optimize
                g_optimizer.zero_grad()  # 生成器G的梯度归零
                g_loss.backward()  # 反向传播
                g_optimizer.step()  # 更新生成器G参数
                print("G")

            # 利用模型进行测试,指定按照顺序生成0~9的数字
            if (iter_count % show_every == 0):
                test_batch_size = 10
                test_label = torch.from_numpy(np.array([0, 1, 2, 3, 4, 5, 6, 7, 8, 9]))
                labels_onehot = np.zeros((test_batch_size, label_dim))
                labels_onehot[np.arange(test_batch_size), test_label.numpy()] = 1

                # 生成随机向量,也就是噪声z,带有标签信息
                test_z = Variable(torch.randn(test_batch_size, noise_dim))
                test_z = np.concatenate((test_z.numpy(), labels_onehot), axis=1)
                test_z = Variable(torch.from_numpy(test_z).float())
                fake_img = G_Net(test_z)  # 将向量放入生成网络G生成一张图片

                # imgs_numpy = deprocess_img(fake_img.data.cpu().numpy())
                # show_images(imgs_numpy)
                # plt.show()
                real_images = deprocess_img(fake_img.data)
                save_image(real_images, 'E:\python\CGAN/test_%d.png' % (iter_count))

            iter_count += 1
            print('iter_count: ', iter_count)
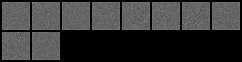
训练100次后的结果如下:
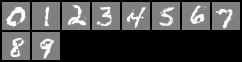
训练1000次后的结果如下:


 1537
1537


 被折叠的 条评论
为什么被折叠?
被折叠的 条评论
为什么被折叠?
 到【灌水乐园】发言


