


MLP-Mixer网络结构分析:MLP-Mixer: An all-MLP Architecture for Vision_HHzdh的博客-CSDN博客
Mixer的Pytorch代码实现的难点在于矩阵旋转,我们使用einops中的Rearrange实现矩阵旋转,同时使用torchsummary和tensorboardX来查看网络结构。

1、导入相关库
import torch
import torch.nn as nn
from torchsummary import summary
from torch.nn import Conv2d
from einops.layers.torch import Rearrange, Reduce
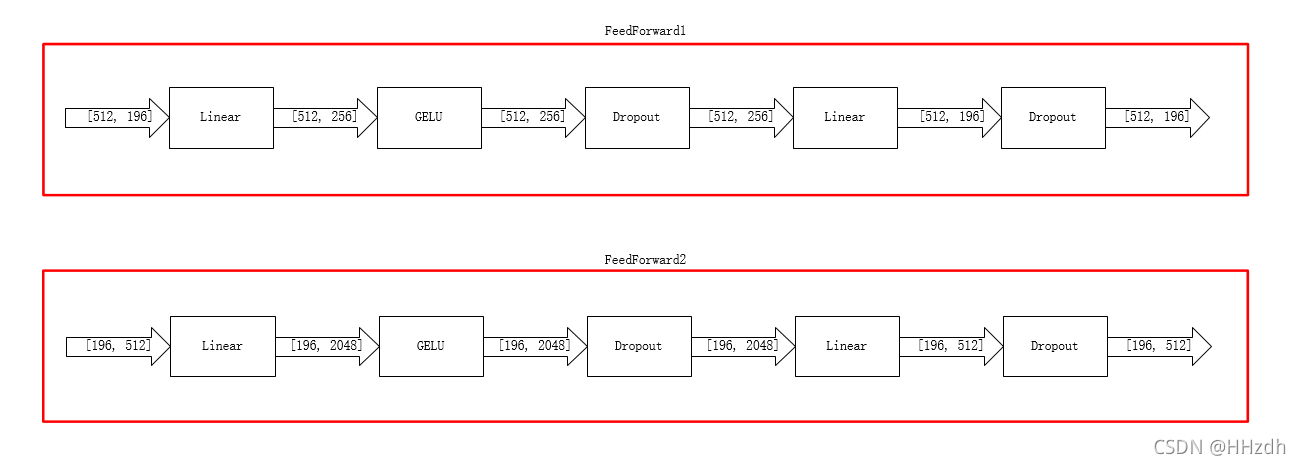
from tensorboardX import SummaryWriter2、首先实现MLP(多层感知机),即上结构的MLP1和MLP2
可以看到MLP的结构如下所示:Fully-connected、GELU、Fully-connected。

# 这个是两层FC加一个激活函数的mlp block
# 因为有两个mixing,进出的维度都不变,只是中间全连接层的神经元数量不同
# 定义多层感知机
class FeedForward(nn.Module):
    def __init__(self,dim,hidden_dim,dropout=0.):
        super().__init__()
        self.net=nn.Sequential(
            #由此可以看出 FeedForward 的输入和输出维度是一致的
            nn.Linear(dim,hidden_dim),
            #激活函数
            nn.GELU(),
            #防止过拟合
            nn.Dropout(dropout),
            #重复上述过程
            nn.Linear(hidden_dim,dim),
            nn.Dropout(dropout)
        )
    def forward(self,x):
        x=self.net(x)
        return x
2、接着来实现Mixer Block

class MixerBlock(nn.Module):
    def __init__(self,dim,num_patch,token_dim,channel_dim,dropout=0.):
        super().__init__()
        self.token_mixer=nn.Sequential(
            nn.LayerNorm(dim),
            Rearrange('b n d -> b d n'),
            FeedForward(num_patch,token_dim,dropout),
            Rearrange('b d n -> b n d')

         )
        self.channel_mixer=nn.Sequential(
            nn.LayerNorm(dim),
            FeedForward(dim,channel_dim,dropout)
        )
    def forward(self,x):
        x = x+self.token_mixer(x)
        x = x+self.channel_mixer(x)
        return x
3、搭建MLPMixer
class MLPMixer(nn.Module):
def __init__(self,in_channels,dim,num_classes,patch_size,image_size,depth,token_dim,channel_dim,dropout=0.):
super().__init__()
assert image_size%patch_size==0
self.num_patches=(image_size//patch_size)**2 # (224/16)**2=196
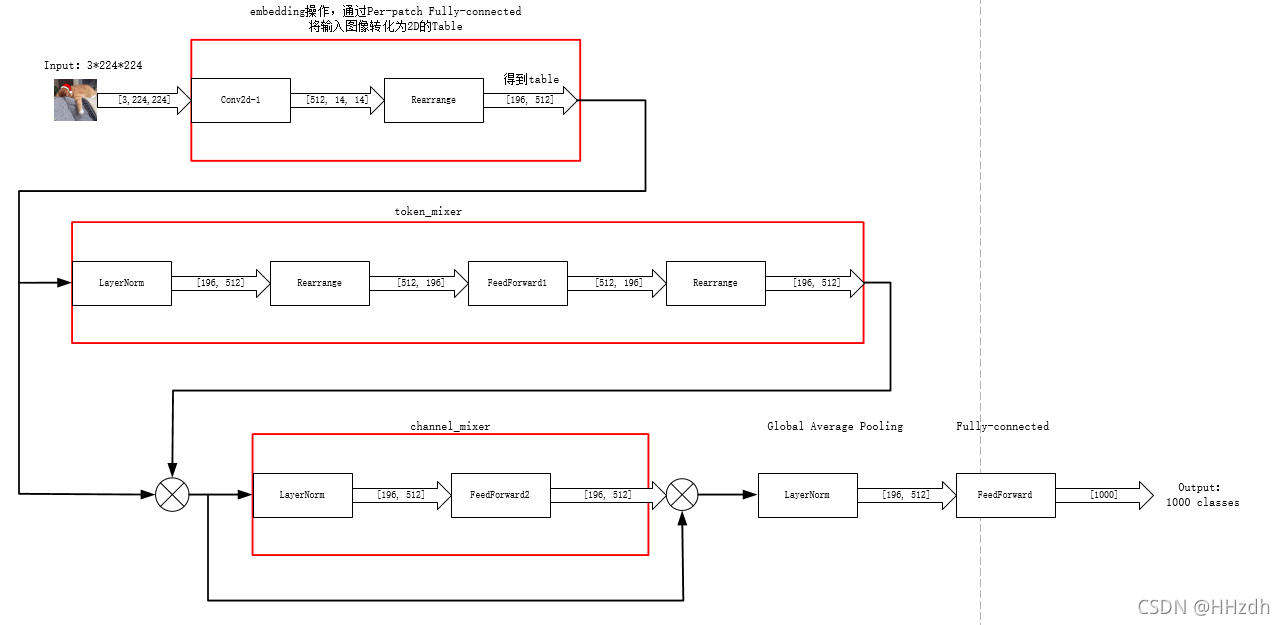
# embedding 操作,看见没用卷积来分成一小块一小块的
# 通过embedding可以将这张3*224*224的图片转换为Channel*Patches=512*196,再通过Rearrange转为196*512
self.to_embedding=nn.Sequential(Conv2d(in_channels=in_channels,out_channels=dim,kernel_size=patch_size,stride=patch_size),
Rearrange('b c h w -> b (h w) c')
)
# 输入为196*512的table
# 以下为token-mixing MLPs(MLP1)和channel-mixing MLPs(MLP2)各一层
self.mixer_blocks=nn.ModuleList([])
for _ in range(depth):
self.mixer_blocks.append(MixerBlock(dim,self.num_patches,token_dim,channel_dim,dropout))
#
self.layer_normal=nn.LayerNorm(dim)
#
self.mlp_head=nn.Sequential(
nn.Linear(dim,num_classes)
)
def forward(self,x):
x = self.to_embedding(x)
for mixer_block in self.mixer_blocks:
x = mixer_block(x)
x = self.layer_normal(x)
x = x.mean(dim=1)
x = self.mlp_head(x)
return x
4、测试MLPMixer
#测试Mlp-Mixer
if __name__ == '__main__':
    device = torch.device("cuda:0" if torch.cuda.is_available() else "cpu")
    model = MLPMixer(in_channels=3, dim=512, num_classes=1000, patch_size=16, image_size=224, depth=1, token_dim=256,
                     channel_dim=2048).to(device)
    summary(model,(3,224,224))

    # torch.Tensor([1, 2, 3, 4, 5, 6])
    inputs = torch.Tensor(1, 3, 224, 224)
    inputs = inputs.to(device)
    print(inputs.shape)

    # 将model保存为graph
    with SummaryWriter(log_dir='logs', comment='model') as w:
        w.add_graph(model, (inputs,))
        print("success")
得到网络结构如下:
----------------------------------------------------------------
        Layer (type)               Output Shape         Param #
================================================================
            Conv2d-1          [-1, 512, 14, 14]         393,728
         Rearrange-2             [-1, 196, 512]               0
         LayerNorm-3             [-1, 196, 512]           1,024
         Rearrange-4             [-1, 512, 196]               0
            Linear-5             [-1, 512, 256]          50,432
              GELU-6             [-1, 512, 256]               0
           Dropout-7             [-1, 512, 256]               0
            Linear-8             [-1, 512, 196]          50,372
           Dropout-9             [-1, 512, 196]               0
      FeedForward-10             [-1, 512, 196]               0
        Rearrange-11             [-1, 196, 512]               0
        LayerNorm-12             [-1, 196, 512]           1,024
           Linear-13            [-1, 196, 2048]       1,050,624
             GELU-14            [-1, 196, 2048]               0
          Dropout-15            [-1, 196, 2048]               0
           Linear-16             [-1, 196, 512]       1,049,088
          Dropout-17             [-1, 196, 512]               0
      FeedForward-18             [-1, 196, 512]               0
       MixerBlock-19             [-1, 196, 512]               0
        LayerNorm-20             [-1, 196, 512]           1,024
           Linear-21                 [-1, 1000]         513,000
通过tensorboardX可以查看网络

5、网络输入输出框图


 3649
3649


 被折叠的 条评论
为什么被折叠?
被折叠的 条评论
为什么被折叠?
 到【灌水乐园】发言


