pytorch搭建RNN-LSTM循环神经网络[回归]详解

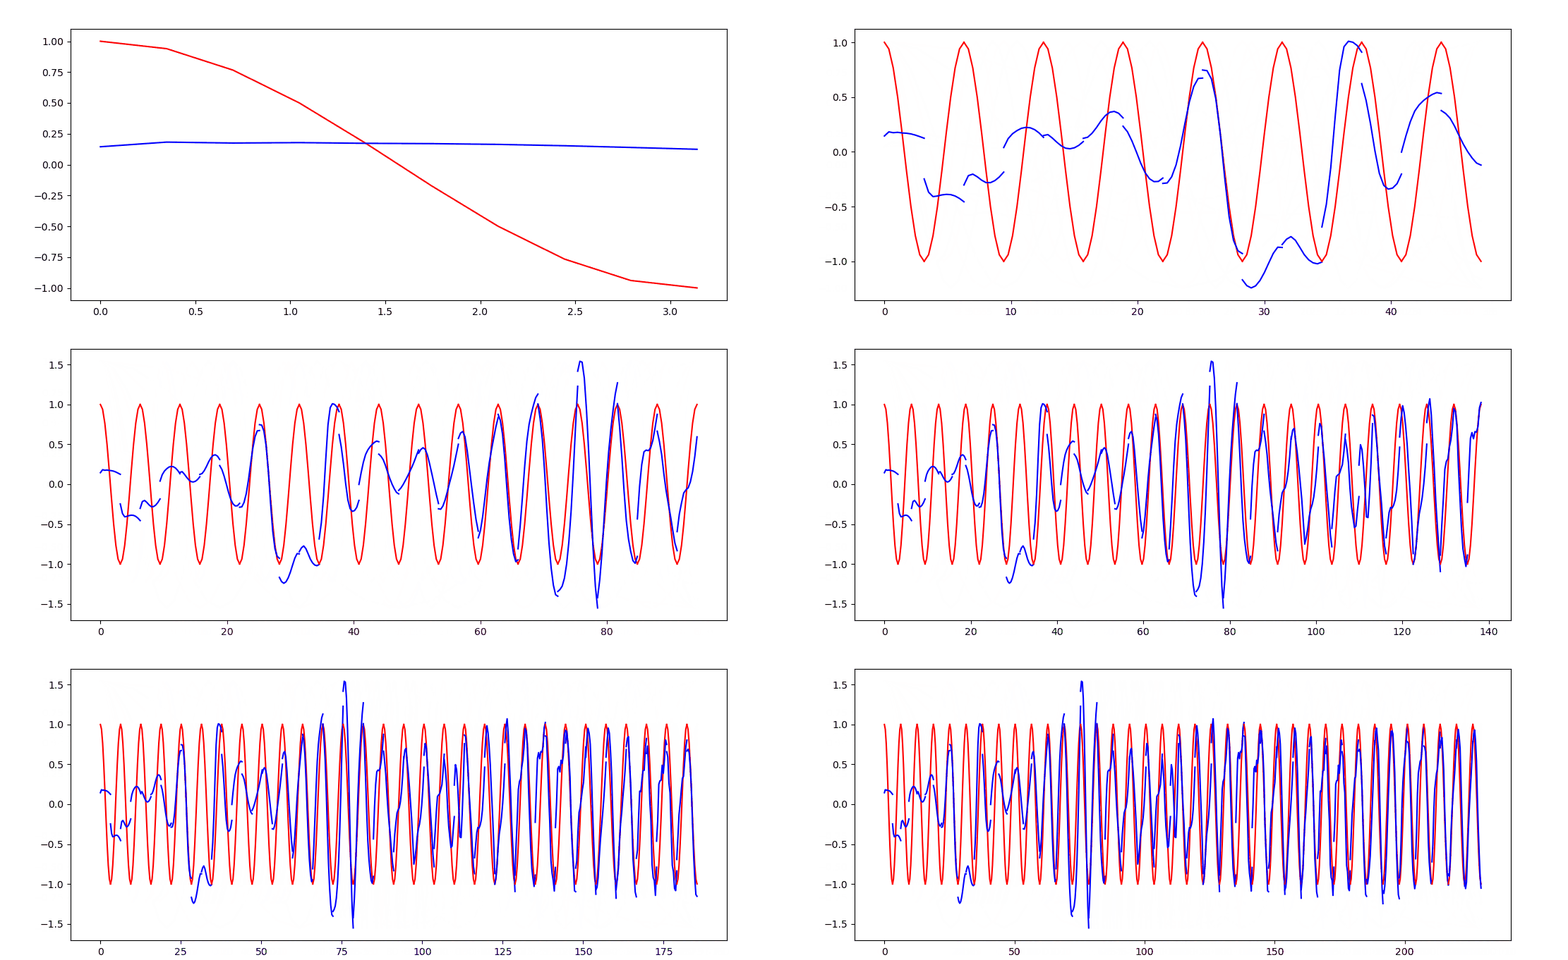
实验结果:

在这里插入图片描述

  • 这次用RNN_LSTM实现回归任务
    • 代码中使用sin函数 拟合 cos函数
  • 这里主要讲解搭建RNN部分,其他部分和前文中CNN搭建类似。

🌵 搭建RNN(该任务使用RNN足矣)

class RNN(nn.Module):
    def __init__(self):
        super(RNN, self).__init__()
        self.rnn = nn.RNN(
            input_size=input_size, # 输入特征
            hidden_size=hidden_size,# 隐藏层个数
            num_layers=num_layers,  # RNN层数
            batch_first=True,  #True:batch的纬度放在第一位
        )
        self.output_layer = nn.Linear(in_feature, out_feature)
    def forward(self, x, h_state):
        # x (batch, time_step, input_size)
        # h_state (n_layers, batch, hidden_size)
        # rnn_out (batch, time_step, hidden_size)
        rnn_out, h_state = self.rnn(x, h_state)  
        # 因为rnn_out 包含了所有时间步长中RNN的输出,需要拿到每一时刻RNN的输出
        # 然后在输入到输出层
        out=[]
        for time in range(rnn_out.size(1)):
            every_time_out = rnn_out[:, time, :]
            out.append(self.output_layer(every_time_out))
        # torch.stack扩成[1, output_size, 1]
       	return torch.stack(out, dim=1), h_state 

完整代码:

"""
    作者:Troublemaker
    日期:2020/4/11 10:59
    脚本:rnn_regression.py
"""
import torch
import torch.nn as nn
import numpy as np
import matplotlib.pyplot as plt


class RNN(nn.Module):
    """搭建rnn网络"""
    def __init__(self):
        super(RNN, self).__init__()
        self.rnn = nn.RNN(
            input_size=input_size,
            hidden_size=hidden_size,
            num_layers=num_layers,
            batch_first=True,)
        self.output_layer = nn.Linear(in_features=hidden_size, out_features=output_size)

    def forward(self, x, h_state):
        # x (batch, time_step, input_size)
        # h_state (n_layers, batch, hidden_size)
        # rnn_out (batch, time_step, hidden_size)
        rnn_out, h_state = self.rnn(x, h_state)   # h_state是之前的隐层状态

        out = []
        for time in range(rnn_out.size(1)):
            every_time_out = rnn_out[:, time, :]       # 相当于获取每个时间点上的输出,然后过输出层
            out.append(self.output_layer(every_time_out))
        return torch.stack(out, dim=1), h_state       # torch.stack扩成[1, output_size, 1]


# 设置超参数
input_size = 1
output_size = 1
num_layers = 1
hidden_size = 32
learning_rate = 0.02
train_step = 100
time_step = 10

# 准备数据
steps = np.linspace(0, 2*np.pi, 100, dtype=np.float32)
x_np = np.sin(steps)
y_np = np.cos(steps)

# plt.plot(steps, y_np, 'r-', label='target (cos)')
# plt.plot(steps, x_np, 'b-', label='input (sin)')
# plt.legend(loc='best')
# plt.show()

rnn = RNN()
print(rnn)

# 设置优化器和损失函数
optimizer = torch.optim.Adam(rnn.parameters(), lr=learning_rate)
loss_function = nn.MSELoss()

plt.figure(1, figsize=(12, 5))
plt.ion()

# 训练
h_state = None   # 初始化隐藏层状态

for step in range(train_step):
    start, end = step * np.pi, (step+1) * np.pi
    steps = np.linspace(start, end, time_step, dtype=np.float32)
    x_np = np.sin(steps)
    y_np = np.cos(steps)

    x = torch.from_numpy(x_np[np.newaxis, :, np.newaxis])
    y = torch.from_numpy(y_np[np.newaxis, :, np.newaxis])
    pridect, h_state = rnn(x, h_state)
    h_state = h_state.detach()     # 重要!!! 需要将该时刻隐藏层的状态作为下一时刻rnn的输入

    loss = loss_function(pridect, y)
    optimizer.zero_grad()

    loss.backward()
    optimizer.step()

    # plotting
    plt.plot(steps, y_np.flatten(), 'r-')
    plt.plot(steps, pridect.detach().numpy().flatten(), 'b-')
    plt.draw()
    plt.pause(0.05)

plt.ioff()
plt.show()
  • 0
    点赞
  • 26
    收藏
    觉得还不错? 一键收藏
  • 3
    评论
下面是基于PyTorch搭建CNN-LSTM-Attention的示例代码: ```python import torch import torch.nn as nn import torch.nn.functional as F class CNN_LSTM_Attention(nn.Module): def __init__(self, vocab_size, embedding_dim, hidden_dim, num_layers, dropout, output_dim, kernel_sizes, num_filters, bidirectional): super().__init__() # 定义嵌入层 self.embedding = nn.Embedding(vocab_size, embedding_dim) # 定义卷积层 self.convs = nn.ModuleList([ nn.Conv2d(in_channels=1, out_channels=num_filters, kernel_size=(fs, embedding_dim)) for fs in kernel_sizes ]) # 定义LSTMself.lstm = nn.LSTM(num_filters * len(kernel_sizes), hidden_dim, num_layers=num_layers, dropout=dropout, bidirectional=bidirectional) # 定义attention层 self.attention = nn.Linear(hidden_dim * 2 if bidirectional else hidden_dim, 1) # 定义全连接层 self.fc = nn.Linear(hidden_dim * 2 if bidirectional else hidden_dim, output_dim) # 定义dropout self.dropout = nn.Dropout(dropout) def forward(self, text): # text: [batch_size, sent_len] # 嵌入 embedded = self.embedding(text) # embedded: [batch_size, sent_len, emb_dim] # 变形 embedded = embedded.unsqueeze(1) # embedded: [batch_size, 1, sent_len, emb_dim] # 卷积 conved = [F.relu(conv(embedded)).squeeze(3) for conv in self.convs] # conved: [batch_size, num_filters, sent_len - fs + 1] # 池化 pooled = [F.max_pool1d(conv, conv.shape[2]).squeeze(2) for conv in conved] # pooled: [batch_size, num_filters] # 拼接 cat = self.dropout(torch.cat(pooled, dim=1)) # cat: [batch_size, num_filters * len(kernel_sizes)] # LSTM output, (hidden, cell) = self.lstm(cat.unsqueeze(0)) # output: [1, batch_size, hidden_dim * num_directions], hidden: [num_layers * num_directions, batch_size, hidden_dim], cell: [num_layers * num_directions, batch_size, hidden_dim] # attention attention_weights = F.softmax(self.attention(output.squeeze(0)), dim=1) # attention_weights: [batch_size, 1, hidden_dim * num_directions] attention_output = torch.bmm(attention_weights.transpose(1, 2), output.transpose(0, 1)).squeeze(1) # attention_output: [batch_size, hidden_dim * num_directions] # 全连接 return self.fc(self.dropout(attention_output)) ``` 此模型采用了CNN-LSTM-Attention结构,其中包含了嵌入层、卷积层、LSTM层、attention层和全连接层。在前向传播过程中,先将输入的文本通过嵌入层转换为词向量,然后通过多个不同大小的卷积核提取文本的不同特征,接着通过最大池化操作将各个特征的值取最大,最后将各个特征拼接起来输入到LSTM层中进行序列建模。在LSTM层之后,通过attention层对LSTM层的输出进行加权平均,得到文本的表示,最后通过全连接层输出分类结果。

“相关推荐”对你有帮助么?

  • 非常没帮助
  • 没帮助
  • 一般
  • 有帮助
  • 非常有帮助
提交
评论 3
添加红包

请填写红包祝福语或标题

红包个数最小为10个

红包金额最低5元

当前余额3.43前往充值 >
需支付:10.00
成就一亿技术人!
领取后你会自动成为博主和红包主的粉丝 规则
hope_wisdom
发出的红包
实付
使用余额支付
点击重新获取
扫码支付
钱包余额 0

抵扣说明:

1.余额是钱包充值的虚拟货币,按照1:1的比例进行支付金额的抵扣。
2.余额无法直接购买下载,可以购买VIP、付费专栏及课程。

余额充值