


自己做好的插件,放到用户机上
如果还手动让用户在custom_dirs.dat文件后面追加目录,就有点不专业了
下面介绍如何自动部署插件
1、读取客户机安装的NX软件版本及其目录
NX会在如下注册表位置写入安装目录
SOFTWARE\Unigraphics Solutions\Installed Applications
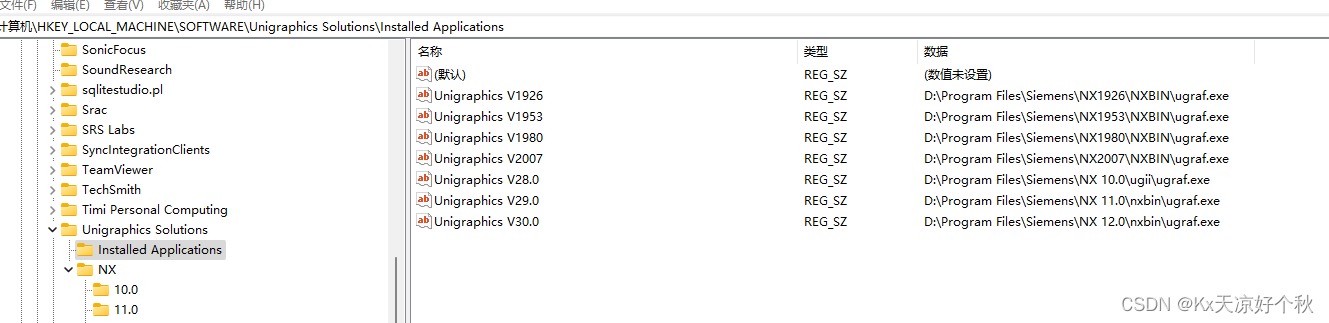
可以看到键值与版本对应关系
2、自动将本目录追加写入custom_dirs.dat
注意要先用管理权限改变此文件,使其可读写,否则会写入失败
总的示例代码放下面了
	// IntallAdd.cpp : 此文件包含 "main" 函数。程序执行将在此处开始并结束。
//


#include "GetRegValue.h"


using namespace std;
typedef std::vector<std::string>  StringList;

string GetExePath()
{
        char szFilePath[MAX_PATH + 1] = { 0 };
        GetModuleFileNameA(NULL, szFilePath, MAX_PATH);
        (strrchr(szFilePath, '\\'))[0] = 0; // 删除文件名,只获得路径字串//
        (strrchr(szFilePath, '\\'))[0] = 0; // 删除文件名,只获得路径字串//
        string path = szFilePath;
        return path;
}
StringList splitstr(const std::string& str, const std::string& pattern)
{
    StringList  li;
    std::string subStr;
    std::string tPattern;
    size_t      patternLen = pattern.length();
    size_t      strLen = str.length();

    for (size_t i = 0; i < str.length(); i++)
    {
        if (pattern[0] == str[i] && ((strLen - i) >= patternLen))
        {
            if (memcmp(&pattern[0], &str[i], patternLen) == 0)
            {
                i += patternLen - 1;
                if (!subStr.empty())
                {
                    li.push_back(subStr);
                    subStr.clear();
                }
            }
            else
            {
                subStr.push_back(str[i]);
            }
        }
        else
        {
            subStr.push_back(str[i]);
        }
    }

    if (!subStr.empty())
    {
        li.push_back(subStr);
    }

    return li;
}
void WriterInstallPath(string strValue) {


    if (strValue.empty())
    {
        std::cout << "未检测到NX安装位置,自动挂载停止\n软件安装将继续完成" << std::endl;
        std::cout << "\n输入任意键关闭窗口" << std::endl;
        std::cin.get();
        return;
    }

    StringList strlist = splitstr(strValue, "\\");
    string NXrootDirectory = "";
    for (size_t i = 0; i < strlist.size() - 2; i++)
    {
        if (i != 0)
        {
            NXrootDirectory = NXrootDirectory + "\\";
        }
        NXrootDirectory = NXrootDirectory + strlist[i];
    }

    string Installpath = GetExePath();

    string custom_dirsPath = NXrootDirectory + "\\UGII\\menus\\custom_dirs.dat";

    //文件属性设为一般
    SetFileAttributesA(custom_dirsPath.c_str(), FILE_ATTRIBUTE_NORMAL);
    fstream f;
    //追加写入,在原来基础上加了ios::app
    f.open(custom_dirsPath, ios::out | ios::app);
    //输入你想写入的内容
    if (!f.is_open())
    {
        f.close();


        std::cout << "尝试自动配置插件失败!请将下面文件只读属性去除" << std::endl;
        std::cout << custom_dirsPath << std::endl;
        std::cout << "" << std::endl;
        std::cin.get();
    }
    else
    {
        f << Installpath << endl;
    }

    f.close();


}

int main()
{


	map<string, string> NxName;
	NxName["1926"] = "Unigraphics V1926";
	NxName["1953"] = "Unigraphics V1953";
    NxName["1980"] = "Unigraphics V1980";
    NxName["12"] = "Unigraphics V30.0";


    //计算机\HKEY_LOCAL_MACHINE\SOFTWARE\Unigraphics Solutions\Installed Applications

    std::string strValue01 = GetRegValue(2, "SOFTWARE\\Unigraphics Solutions\\Installed Applications", NxName["1980"]);

    WriterInstallPath(strValue01);

    std::string strValue02 = GetRegValue(2, "SOFTWARE\\Unigraphics Solutions\\Installed Applications", NxName["1926"]);

    WriterInstallPath(strValue02);

}
#include <Windows.h>
#include "GetRegValue.h"
#include <fstream>

//可移植版本 wstring => string
std::string ws2s(const std::wstring& ws)
{
    std::string curLocale = setlocale(LC_ALL, "");
    const wchar_t* _Source = ws.c_str();
    size_t _Dsize = wcstombs(NULL, _Source, 0) + 1;
    char* _Dest = new char[_Dsize];
    memset(_Dest, 0, _Dsize);
    wcstombs(_Dest, _Source, _Dsize);
    std::string result = _Dest;
    delete[]_Dest;
    setlocale(LC_ALL, curLocale.c_str());
    return result;
}

//可移植版本 string => wstring
std::wstring s2ws(const std::string& s)
{
    std::string curLocale = setlocale(LC_ALL, "");
    const char* _Source = s.c_str();
    size_t _Dsize = mbstowcs(NULL, _Source, 0) + 1;
    wchar_t* _Dest = new wchar_t[_Dsize];
    wmemset(_Dest, 0, _Dsize);
    mbstowcs(_Dest, _Source, _Dsize);
    std::wstring result = _Dest;
    delete[]_Dest;
    setlocale(LC_ALL, curLocale.c_str());
    return result;
}

std::string GetRegValue(int nKeyType, const std::string& strUrl, const std::string& strKey)
{
    std::string strValue("");
    HKEY hKey = NULL;
    HKEY  hKeyResult = NULL;
    DWORD dwSize = 0;
    DWORD dwDataType = 0;
    std::wstring wstrUrl = s2ws(strUrl);
    std::wstring wstrKey = s2ws(strKey);

    switch (nKeyType)
    {
    case 0:
    {
        hKey = HKEY_CLASSES_ROOT;
        break;
    }
    case 1:
    {
        hKey = HKEY_CURRENT_USER;
        break;
    }
    case 2:
    {
        hKey = HKEY_LOCAL_MACHINE;
        break;
    }
    case 3:
    {
        hKey = HKEY_USERS;
        break;
    }
    case 4:
    {
        hKey = HKEY_PERFORMANCE_DATA;
        break;
    }
    case 5:
    {
        hKey = HKEY_CURRENT_CONFIG;
        break;
    }
    case 6:
    {
        hKey = HKEY_DYN_DATA;
        break;
    }
    case 7:
    {
        hKey = HKEY_CURRENT_USER_LOCAL_SETTINGS;
        break;
    }
    case 8:
    {
        hKey = HKEY_PERFORMANCE_TEXT;
        break;
    }
    case 9:
    {
        hKey = HKEY_PERFORMANCE_NLSTEXT;
        break;
    }
    default:
    {
        return strValue;
    }
    }

    //打开注册表
    if (ERROR_SUCCESS == ::RegOpenKeyEx(hKey, wstrUrl.c_str(), 0, KEY_QUERY_VALUE||KEY_WOW64_64KEY, &hKeyResult))
    {
        // 获取缓存的长度dwSize及类型dwDataType
        ::RegQueryValueEx(hKeyResult, wstrKey.c_str(), 0, &dwDataType, NULL, &dwSize);
        switch (dwDataType)
        {
        case REG_MULTI_SZ:
        {
            //分配内存大小
            BYTE* lpValue = new BYTE[dwSize];
            //获取注册表中指定的键所对应的值
            LONG lRet = ::RegQueryValueEx(hKeyResult, wstrKey.c_str(), 0, &dwDataType, lpValue, &dwSize);
            delete[] lpValue;
            break;
        }
        case REG_SZ:
        {
            //分配内存大小
            wchar_t* lpValue = new wchar_t[dwSize];
            memset(lpValue, 0, dwSize * sizeof(wchar_t));
            //获取注册表中指定的键所对应的值
            if (ERROR_SUCCESS == ::RegQueryValueEx(hKeyResult, wstrKey.c_str(), 0, &dwDataType, (LPBYTE)lpValue, &dwSize))
            {
                std::wstring wstrValue(lpValue);
                strValue = ws2s(wstrValue);
            }
            delete[] lpValue;
            break;
        }
        default:
            break;
        }
    }

    //关闭注册表
    ::RegCloseKey(hKeyResult);


    return strValue;
}
编译成exe后,双击执行就安装上了


 808
808


 被折叠的 条评论
为什么被折叠?
被折叠的 条评论
为什么被折叠?
 到【灌水乐园】发言


