


0.摘要
最近一段时间在学习yolo3,看了很多博客,理解了一些理论知识,但是学起来还是有些吃力,之后看了源码,才有了更进一步的理解。在这里,我不在赘述网络方面的代码,网络方面的代码比较容易理解,下面将给出整个yolo3代码的详解解析,整个源码中函数的作用以及调用关系见下图

def yolo_head(feats, anchors, num_classes, input_shape, calc_loss=False):
    """Convert final layer features to bounding box parameters."""
    num_anchors = len(anchors)#num_anchors=3
    # Reshape to batch, height, width, num_anchors, box_params.
    anchors_tensor = K.reshape(K.constant(anchors), [1, 1, 1, num_anchors, 2])
    #anchors=anchors[anchors_mask[1]]=anchors[[6,7,8]]= [116,90],  [156,198],  [373,326]
    """#通过arange、reshape、tile的组合,根据grid_shape(13x13、26x26或52x52)创建y轴的0~N-1的组合grid_y,再创建x轴的0~N-1的组合grid_x,将两者拼接concatenate,形成NxN的grid(13x13、26x26或52x52)"""
    grid_shape = K.shape(feats)[1:3] # height, width,#13x13或26x26或52x52
    grid_y = K.tile(K.reshape(K.arange(0, stop=grid_shape[0]), [-1, 1, 1, 1]),
        [1, grid_shape[1], 1, 1])
    grid_x = K.tile(K.reshape(K.arange(0, stop=grid_shape[1]), [1, -1, 1, 1]),
        [grid_shape[0], 1, 1, 1])
    grid = K.concatenate([grid_x, grid_y])
    grid = K.cast(grid, K.dtype(feats))
    #cast函数用法:cast(x, dtype, name=None),x:待转换的张量,type:需要转换成什么类型
    """grid形式:(0,0),(0,1),(0,2)......(1,0),(1,1).....(12,12)"""
    feats = K.reshape(
        feats, [-1, grid_shape[0], grid_shape[1], num_anchors, num_classes + 5])
    """(batch_size,13,13,3,85)"""
    "此时的xy为中心坐标,相对于左上角的中心坐标"

    # Adjust preditions to each spatial grid point and anchor size.
    """将预测值调整为真实值"""
    "将中心点相对于网格的坐标转换成在整张图片中的坐标,相对于13/26/52的相对坐标"
    "将wh转换成预测框的wh,并处以416归一化"
    box_xy = (K.sigmoid(feats[..., :2]) + grid) / K.cast(grid_shape[::-1], K.dtype(feats))#实际上就是除以13或26或52
    #box_xy = (K.sigmoid(feats[:,:,:,:2]) + grid) / K.cast(grid_shape[::-1], K.dtype(feats))
    # ...操作符,在Python中,“...”(ellipsis)操作符,表示其他维度不变,只操作最前或最后1维;
    box_wh = K.exp(feats[..., 2:4]) * anchors_tensor / K.cast(input_shape[::-1], K.dtype(feats))
    box_confidence = K.sigmoid(feats[..., 4:5])
    box_class_probs = K.sigmoid(feats[..., 5:])
    #切片省略号的用法,省略前面左右的冒号,参考博客:https://blog.csdn.net/z13653662052/article/details/78010654?depth_1-utm_source=distribute.pc_relevant.none-task&utm_source=distribute.pc_relevant.none-task

    if calc_loss == True:
        return grid, feats, box_xy, box_wh
    return box_xy, box_wh, box_confidence, box_class_probs
    #预测框相对于整张图片中心点的坐标与预测框的wh
参考:https://blog.csdn.net/weixin_41943311/article/details/95672137?depth_1-utm_source=distribute.pc_relevant.none-task&utm_source=distribute.pc_relevant.none-task
1.model.py
1.1 yolo_head()
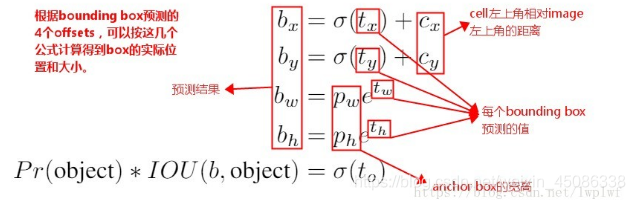
yolo_head()函数的输入是Darknet53的最后输出的三个特征图feats,anchors,num_class,input_shpe,此函数的功能是将特征图的进行解码,这一步极为重要,如其中一个特征图的shape是(13,13,255),其实质就是对应着(13,13,3,85),分别对应着13*13个网格,每个网格3个anchors,85=(x,y,w,h,confident),此时box的xy是相对于网格的偏移量,所以还需要经过一些列的处理,处理方式见下图:

def yolo_head(feats, anchors, num_classes, input_shape, calc_loss=False):
    """Convert final layer features to bounding box parameters."""
    num_anchors = len(anchors)#num_anchors=3
    # Reshape to batch, height, width, num_anchors, box_params.
    anchors_tensor = K.reshape(K.constant(anchors), [1, 1, 1, num_anchors, 2])
    #anchors=anchors[anchors_mask[1]]=anchors[[6,7,8]]= [116,90],  [156,198],  [373,326]
    """#通过arange、reshape、tile的组合,根据grid_shape(13x13、26x26或52x52)创建y轴的0~N-1的组合grid_y,再创建x轴的0~N-1的组合grid_x,将两者拼接concatenate,形成NxN的grid(13x13、26x26或52x52)"""
    grid_shape = K.shape(feats)[1:3] # height, width,#13x13或26x26或52x52
    grid_y = K.tile(K.reshape(K.arange(0, stop=grid_shape[0]), [-1, 1, 1, 1]),
        [1, grid_shape[1], 1, 1])
    grid_x = K.tile(K.reshape(K.arange(0, stop=grid_shape[1]), [1, -1, 1, 1]),
        [grid_shape[0], 1, 1, 1])
    grid = K.concatenate([grid_x, grid_y])
    grid = K.cast(grid, K.dtype(feats))
    #cast函数用法:cast(x, dtype, name=None),x:待转换的张量,type:需要转换成什么类型
    """grid形式:(0,0),(0,1),(0,2)......(1,0),(1,1).....(12,12)"""
    feats = K.reshape(
        feats, [-1, grid_shape[0], grid_shape[1], num_anchors, num_classes + 5])
    """(batch_size,13,13,3,85)"""
    "此时的xy为中心坐标,相对于左上角的中心坐标"

    # Adjust preditions to each spatial grid point and anchor size.
    """将预测值调整为真实值"""
    "将中心点相对于网格的坐标转换成在整张图片中的坐标,相对于13/26/52的相对坐标"
    "将wh转换成预测框的wh,并处以416归一化"
    box_xy = (K.sigmoid(feats[..., :2]) + grid) / K.cast(grid_shape[::-1], K.dtype(feats))#实际上就是除以13或26或52
    #box_xy = (K.sigmoid(feats[:,:,:,:2]) + grid) / K.cast(grid_shape[::-1], K.dtype(feats))
    # ...操作符,在Python中,“...”(ellipsis)操作符,表示其他维度不变,只操作最前或最后1维;
    box_wh = K.exp(feats[..., 2:4]) * anchors_tensor / K.cast(input_shape[::-1], K.dtype(feats))
    box_confidence = K.sigmoid(feats[..., 4:5])
    box_class_probs = K.sigmoid(feats[..., 5:])
    #切片省略号的用法,省略前面左右的冒号,参考博客:https://blog.csdn.net/z13653662052/article/details/78010654?depth_1-utm_source=distribute.pc_relevant.none-task&utm_source=distribute.pc_relevant.none-task

    if calc_loss == True:
        return grid, feats, box_xy, box_wh
    return box_xy, box_wh, box_confidence, box_class_probs
    #预测框相对于整张图片中心点的坐标与预测框的wh
1.2 yolo_correct_box()
此函数的功能是将yolo_head()输出,也即是box相对于整张图片的中心坐标转换成box的左上角右下角的坐标
def yolo_correct_boxes(box_xy, box_wh, input_shape, image_shape):
    '''Get corrected boxes'''
    '''对上面函数输出的预测的坐标进行修正
    比如
    image_shape
    为[600,800],input_shape
    为[300, 500],那么
    new_shape
    为[300, 400]

    offset
    为[0, 0.125]
    scales
    为[0.5, 0.625]'''


    # 将box_xy, box_wh转换为输入图片上的真实坐标,输出boxes是框的左下、右上两个坐标(y_min, x_min, y_max, x_max)
    # ...操作符,在Python中,“...”(ellipsis)操作符,表示其他维度不变,只操作最前或最后1维;
    # np.array[i:j:s],当s<0时,i缺省时,默认为-1;j缺省时,默认为-len(a)-1;所以array[::-1]相当于array[-1:-len(a)-1:-1],也就是从最后一个元素到第一个元素复制一遍,即倒序
    box_yx = box_xy[..., ::-1]#将xy坐标进行交换,反序(y,x)
    box_hw = box_wh[..., ::-1]
    input_shape = K.cast(input_shape, K.dtype(box_yx))
    image_shape = K.cast(image_shape, K.dtype(box_yx))
    new_shape = K.round(image_shape * K.min(input_shape/image_shape))
    #.round用于取近似值,保留几位小数,第一个参数是一个浮点数,第二个参数是保留的小数位数,可选,如果不写的话默认保留到整数
    offset = (input_shape-new_shape)/2./input_shape
    scale = input_shape/new_shape
    box_yx = (box_yx - offset) * scale
    box_hw *= scale
    """获得预测框的左上角与右下角的坐标"""
    box_mins = box_yx - (box_hw / 2.)
    box_maxes = box_yx + (box_hw / 2.)
    boxes =  K.concatenate([
        box_mins[..., 0:1],  # y_min
        box_mins[..., 1:2],  # x_min
        box_maxes[..., 0:1],  # y_max
        box_maxes[..., 1:2]  # x_max
    ])#...操作符,在Python中,“...”(ellipsis)操作符,表示其他维度不变,只操作最前或最后1维;

    # Scale boxes back to original image shape.
    boxes *= K.concatenate([image_shape, image_shape])
    return boxes#得到预测框的左下角坐标与右上角坐标
1.3 yolo_box_and_score
获得box与得分
def yolo_boxes_and_scores(feats, anchors, num_classes, input_shape, image_shape):
    '''Process Conv layer output'''
    box_xy, box_wh, box_confidence, box_class_probs = yolo_head(feats,
        anchors, num_classes, input_shape)
    boxes = yolo_correct_boxes(box_xy, box_wh, input_shape, image_shape)
    boxes = K.reshape(boxes, [-1, 4])#reshape,将不同网格的值转换为框的列表。即(?,13,13,3,4)->(?,4)  ?:框的数目
    box_scores = box_confidence * box_class_probs
    box_scores = K.reshape(box_scores, [-1, num_classes])#reshape,将框的得分展平,变为(?,80); ?:框的数目
    return boxes, box_scores#返回预测框的左下角与右上角的坐标与得分
1.4 yolo_eval()
此函数的作用是删除冗余框,保留最优框,用到非极大值抑制算法
def yolo_eval(yolo_outputs,
              anchors,
              num_classes,
              image_shape,
              max_boxes=20,
              score_threshold=.6,
              iou_threshold=.5):
    """Evaluate YOLO model on given input and return filtered boxes."""
    """      yolo_outputs        #模型输出,格式如下【(?,13,13,255)(?,26,26,255)(?,52,52,255)】 ?:bitch size; 13-26-52:多尺度预测; 255:预测值(3*(80+5))
              anchors,            #[(10,13), (16,30), (33,23), (30,61), (62,45), (59,119), (116,90), (156,198),(373,326)]
              num_classes,     # 类别个数,coco集80类
              image_shape,        #placeholder类型的TF参数,默认(416, 416);
              max_boxes=20,       #每张图每类最多检测到20个框同类别框的IoU阈值,大于阈值的重叠框被删除,重叠物体较多,则调高阈值,重叠物体较少,则调低阈值
              score_threshold=.6, #框置信度阈值,小于阈值的框被删除,需要的框较多,则调低阈值,需要的框较少,则调高阈值;
              iou_threshold=.5):  #同类别框的IoU阈值,大于阈值的重叠框被删除,重叠物体较多,则调高阈值,重叠物体较少,则调低阈值"""
    num_layers = len(yolo_outputs)# #yolo的输出层数;num_layers = 3  -> 13-26-52
    anchor_mask = [[6,7,8], [3,4,5], [0,1,2]] if num_layers==3 else [[3,4,5], [1,2,3]] # default setting
    # 每层分配3个anchor box.如13*13分配到[6,7,8]即[(116,90)(156,198)(373,326)]
    input_shape = K.shape(yolo_outputs[0])[1:3] * 32
    # 输入shape(?,13,13,255);即第一维和第二维分别*32  ->13*32=416; input_shape:(416,416)
    #yolo_outputs=[(batch_size,13,13,255),(batch_size,26,26,255),(batch_size,52,52,255)]
    #input_shape=416*416
    boxes = []
    box_scores = []
    for l in range(num_layers):
        _boxes, _box_scores = yolo_boxes_and_scores(yolo_outputs[l],
            anchors[anchor_mask[l]], num_classes, input_shape, image_shape)
        boxes.append(_boxes)
        box_scores.append(_box_scores)
    boxes = K.concatenate(boxes, axis=0)
    box_scores = K.concatenate(box_scores, axis=0)
最低0.47元/天 解锁文章


 8090
8090


 被折叠的 条评论
为什么被折叠?
被折叠的 条评论
为什么被折叠?
 到【灌水乐园】发言


