


YOLOv5-lite主要就是用改进的ShuffleNetv2作为YOLOv5新的Backbone。跟YOLOv5一样分为四个版本,按模型大小由低到高的顺序依次为:v5lite-e、v5lite-s、v5lite-c和v5lite-g。之前做课题都是用的YOLOv4,趁这段时间通过v5lite-s源码学习一下YOLOv5相关的知识。
本次采用Oenvino框架对转换成ONNX的模型进行推理,不需要依靠pytorch等库。不想模型转换的直接复制 “利用Oenvino推理”的代码。
参考
YOLOv5-lite源码地址:https://github.com/ppogg/YOLOv5-Lite
YOLOv5-lite结构详解:https://zhuanlan.zhihu.com/p/481554269
YOLOv5源码解读:https://blog.csdn.net/qq_38253797/category_11222727.html
Bubbliiiing大神的YOLOv5复现:https://blog.csdn.net/weixin_44791964/article/details/121626848?spm=1001.2014.3001.5502
模型训练
YOLOv5-lite的工程文件与YOLOv5基本一致,训练也比较容易上手,根据源码地址的教程准备图片和标签,修改相应的配置文件即可。本次练习采用的数据集是吸烟+打电话:吸烟数据集就是现在网络上其它大神爬取的吸烟图片,一搜都有。电话图片是直接从COCO数据集里面筛选出来的。因为标签都是xml格式的,需要将其转换为YOLOv5用的txt格式。转换代码如下:
xml_2_txt.py
(主要在if name == "main"修改自己数据集的路径)
import xml.etree.ElementTree as ET
import pickle
import os
from os import listdir, getcwd
from os.path import join

def convert(size, box):
    x_center = (box[0] + box[1]) / 2.0
    y_center = (box[2] + box[3]) / 2.0
    x = x_center / size[0]
    y = y_center / size[1]

    w = (box[1] - box[0]) / size[0]
    h = (box[3] - box[2]) / size[1]

    # print(x, y, w, h)
    return (x, y, w, h)

def convert_annotation(xml_files_path, save_txt_files_path, classes):
    xml_files = os.listdir(xml_files_path)
    # print(xml_files)
    for xml_name in xml_files:
        # print(xml_name)
        xml_file = os.path.join(xml_files_path, xml_name)
        out_txt_path = os.path.join(save_txt_files_path, xml_name.split('.')[0] + '.txt')
        out_txt_f = open(out_txt_path, 'w')
        tree = ET.parse(xml_file)
        root = tree.getroot()
        size = root.find('size')
        w = int(size.find('width').text)
        h = int(size.find('height').text)

        for obj in root.iter('object'):
            difficult = obj.find('difficult').text
            cls = obj.find('name').text
            if cls not in classes or int(difficult) == 1:
                continue
            cls_id = classes.index(cls)
            xmlbox = obj.find('bndbox')
            b = (float(xmlbox.find('xmin').text), float(xmlbox.find('xmax').text), float(xmlbox.find('ymin').text),
                 float(xmlbox.find('ymax').text))
            # b=(xmin, xmax, ymin, ymax)
            # print(w, h, b)
            bb = convert((w, h), b)
            out_txt_f.write(str(cls_id) + " " + " ".join([str(a) for a in bb]) + '\n')

if __name__ == "__main__":
    # 1、数据集类别名称
    classes = ['smoke','cell phone']
    # 2、voc格式的xml标签文件路径
    xml_files1 = r'Annotations'
    # 3、转化为yolo格式后的txt标签文件存储路径
    save_txt_files1 = r'labels/train2017'

    convert_annotation(xml_files1, save_txt_files1, classes)
ONNX模型导出
export.py文件用于导出相应的模型,根据自己情况修改配置参数,主要可修改的参数如下:
–weights:要转换的权重文件
–img-size:模型输入图像大小
–device:我最终目的是为了CPU推理,因此选择的是CPU。还可以用GPU,将模型量化(可参考YOLOv5中的代码)
conf_thres = 0.5 nms_thres = 0.4,分别为置信度和NMS筛选的阈值,根据实际情况适当调整
import argparse
import sys
import time
import torch
import torch.nn as nn
import models
from models.experimental import attempt_load
from utils.activations import Hardswish, SiLU
from utils.general import set_logging, check_img_size
from utils.torch_utils import select_device
sys.path.append('./')  # to run '$ python *.py' files in subdirectories
"""Exports a YOLOv5 *.pt model to ONNX and TorchScript formats
Usage:
    $ export PYTHONPATH="$PWD" && python models/export.py --weights ./weights/yolov5s.pt --img 640 --batch 1
    这个部分是模型的转换部分,将模型转换为torchscript、 onnx、coreml等格式,用于后面的应用中,方便将模型加载到各种设备上
    torchscript 不需要下载对应的包 有Torch就可以
    onnx: pip install onnx
    coreml: pip install coremltools
"""

if __name__ == '__main__':
    parser = argparse.ArgumentParser()
    parser.add_argument('--weights', type=str, default='weights/v5lite-s.pt', help='要转换的权重文件')
    parser.add_argument('--img-size', nargs='+', type=int, default=[640, 640], help='输入图片大小')  # height, width
    parser.add_argument('--concat', type=str, default=True, help='concat or not')
    parser.add_argument('--batch-size', type=int, default=1, help='batch size,默认为1')
    parser.add_argument('--dynamic', action='store_true',default=False, help='dynamic ONNX axes,ONNX转换是否要进行批处理变量,默认False')
    parser.add_argument('--grid', action='store_true', help='export Detect() layer grid')
    parser.add_argument('--device', default='cpu', help='cuda device, i.e. 0 or 0,1,2,3 or cpu')
    opt = parser.parse_args()
    opt.img_size *= 2 if len(opt.img_size) == 1 else 1  # expand
    print(opt)
    set_logging()
    t = time.time()

    # Load PyTorch model
    device = select_device(opt.device)
    model = attempt_load(opt.weights, map_location=device)  # load FP32 model
    labels = model.names

    # Checks
    gs = int(max(model.stride))  # grid size (max stride) =32
    opt.img_size = [check_img_size(x, gs) for x in opt.img_size]  # verify img_size are gs-multiples

    # Input
    img = torch.randn(opt.batch_size, 3, *opt.img_size).to(device)  # image size(1,3,640,640) iDetection

    # Update model
    for k, m in model.named_modules():
        # pytorch 1.6.0 compatibility(关于版本兼容的设置) 使模型兼容pytorch 1.6.0
        m._non_persistent_buffers_set = set()
        if isinstance(m, models.common.Conv):  # assign export-friendly activations
            if isinstance(m.act, nn.Hardswish):
                m.act = Hardswish()
            elif isinstance(m.act, nn.SiLU):
                m.act = SiLU()
        elif isinstance(m, models.yolo.Detect):
            m.forward = m.cat_forward if opt.concat else m.forward  # assign forward (optional)
    """
    model.model[-1]:Detect(
  ``(m): ModuleList(
    (0): Conv2d(64, 21, kernel_size=(1, 1), stride=(1, 1))
    (1): Conv2d(128, 21, kernel_size=(1, 1), stride=(1, 1))
    (2): Conv2d(256, 21, kernel_size=(1, 1), stride=(1, 1))))
    """
    model.model[-1].export = not opt.grid  # set Detect() layer grid export
    print(model.model[-1])
    print(model.model[-1].export)
    y = model(img)  # 前向推理

# ONNX export --------------------------------------------------------------------------------------------------------------
    try:
        import onnx
        print('\nStarting ONNX export with onnx %s...' % onnx.__version__)
        f = opt.weights.replace('.pt', '.onnx')  # filename

        torch.onnx.export(model,img,f,verbose=False,opset_version=12,input_names=['images'],
            output_names=['output'],dynamic_axes={'images': {0: 'batch',2: 'height',3: 'width'},  # shape(1,3,640,640)
                                                   'output': {0: 'batch',1: 'anchors'}  # shape(1,25200,85)
                                                } if opt.dynamic else None)
        # Checks
        onnx_model = onnx.load(f)  # load onnx model
        onnx.checker.check_model(onnx_model)  # check onnx model
        # print(onnx.helper.printable_graph(onnx_model.graph))  # print a human readable model
        print('ONNX export success, saved as %s' % f)
    except Exception as e:
        print('ONNX export failure: %s' % e)
    print('\nExport complete (%.2fs). Visualize with https://github.com/lutzroeder/netron.' % (time.time() - t))
v5-lite源码中的cat_forward我觉得少两行处理步骤,调整了一下yolo.py中的cat_forward函数,也是为了后续方便处理。
    def cat_forward(self, x):
        z = []  # inference output
        for i in range(self.nl):
            x[i] = self.m[i](x[i])  # conv
            bs, _, ny, nx = x[i].shape  # x(bs,255,20,20) to x(bs,3,20,20,85)
            x[i] = x[i].view(bs, self.na, self.no, ny, nx).permute(0, 1, 3, 4, 2).contiguous()

            if self.grid[i].shape[2:4] != x[i].shape[2:4]:
                # [(1,1,80,80,2), (1,1,40,40,2), (1,1,20,20,2)]
                self.grid[i] = self._make_grid(nx, ny).to(x[i].device)

            y = x[i].sigmoid()
            y[..., 0:2] = (y[..., 0:2] * 2. - 0.5 + self.grid[i]) * self.stride[i]  # xy
            y[..., 2:4] = (y[..., 2:4] * 2) ** 2 * self.anchor_grid[i]  # wh
            z.append(y.view(bs, -1, self.no))
        return torch.cat(z, 1)
利用Oenvino推理
letterbox:将输入图像通过填充灰边的方式调整至(640,640)大小。YOLOv5可以自适应图像缩放,但用openvino推理必须保证传入网络的图像大小和模型转换时的输入图像大小相等
non_max_suppression:非极大值抑制函数。为了避免其它第三方库的依赖,用numpy实现
plot_one_box:可视化函数,将检测结果可视化
需要自己修改的地方:
if __name__ == '__main__':
    names = ['smoke','cell phone']  # 类别名称
    conf_thres = 0.5  # 置信度阈值
    nms_thres = 0.4  # 非极大值抑制阈值
    model_path = "smoke_phone.onnx"  # 权重文件
    img_path = '000000356403.jpg'  # 测试图片路径
import cv2
import numpy as np
import yaml
from openvino.runtime import Core  # the version of openvino >= 2022.1
import random

def letterbox(img, new_shape=(640, 640), color=(114, 114, 114), scaleup=False):
    """
    将图片缩放调整到指定大小,1920x1080的图片最终会缩放到640x384的大小,和YOLOv4的letterbox不一样
    Resize and pad image while meeting stride-multiple constraints
    https://github.com/ultralytics/yolov3/issues/232
    :param img: 原图 hwc
    :param new_shape: 缩放后的最长边大小
    :param color: pad的颜色
    :param auto: True:进行矩形填充  False:直接进行resize
    :param scale_up: True:仍进行上采样 False:不进行上采样
    :return: img: letterbox后的图片 HWC
             ratio: wh ratios
             (dw, dh): w和h的pad
    """
    shape = img.shape[:2]  # current shape [height, width]
    if isinstance(new_shape, int):
        new_shape = (new_shape, new_shape)
    r = min(new_shape[0] / shape[0], new_shape[1] / shape[1])
    # 只进行下采样 因为上采样会让图片模糊
    # (for better test mAP) scale_up = False 对于大于new_shape(r<1)的原图进行缩放,小于new_shape(r>1)的不变
    if not scaleup:  # only scale down, do not scale up (for better test mAP)
        r = min(r, 1.0)
    ratio = r  # width, height ratios
    new_unpad = int(round(shape[1] * r)), int(round(shape[0] * r))
    dw, dh = new_shape[1] - new_unpad[0], new_shape[0] - new_unpad[1]  # wh padding
    # 这里的取余操作可以保证padding后的图片是32的整数倍(416x416),如果是(512x512)可以保证是64的整数倍
    # dw, dh = np.mod(dw, stride), np.mod(dh, stride)  # wh padding
    # 在较小边的两侧进行pad, 而不是在一侧pad
    # divide padding into 2 sides
    dw /= 2
    dh /= 2
    if shape[::-1] != new_unpad:  # resize
        img = cv2.resize(img, new_unpad, interpolation=cv2.INTER_LINEAR)
    top, bottom = int(round(dh - 0.1)), int(round(dh + 0.1))
    left, right = int(round(dw - 0.1)), int(round(dw + 0.1))
    img = cv2.copyMakeBorder(img, top, bottom, left, right, cv2.BORDER_CONSTANT, value=color)  # add border
    return img,ratio,(dw,dh)

def iou(b1,b2):
    b1_x1, b1_y1, b1_x2, b1_y2 = b1[0], b1[1], b1[2], b1[3]
    b2_x1, b2_y1, b2_x2, b2_y2 = b2[:,0], b2[:,1], b2[:,2], b2[:,3]

    inter_rect_x1 = np.maximum(b1_x1, b2_x1)
    inter_rect_y1 = np.maximum(b1_y1, b2_y1)
    inter_rect_x2 = np.minimum(b1_x2, b2_x2)
    inter_rect_y2 = np.minimum(b1_y2, b2_y2)

    inter_area = np.maximum(inter_rect_x2 - inter_rect_x1, 0) * \
                 np.maximum(inter_rect_y2 - inter_rect_y1, 0)

    area_b1 = (b1_x2 - b1_x1) * (b1_y2 - b1_y1)
    area_b2 = (b2_x2 - b2_x1) * (b2_y2 - b2_y1)

    iou = inter_area / np.maximum((area_b1+area_b2-inter_area),1e-6)
    return iou


def non_max_suppression(boxes, conf_thres=0.5, nms_thres=0.4, ratio=1, pad=(20,20),shape=(640,640)):
    # 取出batch_size
    bs = np.shape(boxes)[0]
    # xywh___ to____ xyxy
    shape_boxes = np.zeros_like(boxes[:,:,:4])
    shape_boxes[:, :, 0] = boxes[:, :, 0] - boxes[:, :, 2] / 2
    shape_boxes[:, :, 1] = boxes[:, :, 1] - boxes[:, :, 3] / 2
    shape_boxes[:, :, 2] = boxes[:, :, 0] + boxes[:, :, 2] / 2
    shape_boxes[:, :, 3] = boxes[:, :, 1] + boxes[:, :, 3] / 2
    boxes[:, :, :4] = shape_boxes
    boxes[:, :, 5:] *= boxes[:, :, 4:5]

    # output存放每一张图片的预测结果,推理阶段一般是一张图片
    output = []
    for i in range(bs):
        predictions = boxes[i]  # 预测位置xyxy  shape==(12700,85)
        score = np.max(predictions[:, 5:], axis=-1)
        # score = predictions[:,4]  # 存在物体置信度,shape==12700
        mask = score > conf_thres  # 物体置信度阈值mask==[False,False,True......],shape==12700,True将会被保留,False列将会被删除
        detections = predictions[mask]  # 第一次筛选  shape==(115,85)
        class_conf = np.expand_dims(np.max(detections[:,5:],axis=-1),axis=-1)  # 获取每个预测框预测的类别置信度
        class_pred = np.expand_dims(np.argmax(detections[:,5:],axis=-1),axis=-1)  # 获取每个预测框的类别下标
        # 结果堆叠,(num_boxes,位置信息4+包含物体概率1+类别置信度1+类别序号1)
        detections = np.concatenate([detections[:,:4],class_conf,class_pred],axis=-1)  # shape=(numbox,7)

        unique_class = np.unique(detections[:,-1])  # 取出包含的所有类别
        if len(unique_class)==0:
            continue
        best_box = []
        for c in unique_class:
            # 取出类别为c的预测结果
            cls_mask = detections[:,-1] == c
            detection = detections[cls_mask] # shape=(82,7)

            # 包含物体类别概率从高至低排列
            scores = detection[:,4]
            arg_sort = np.argsort(scores)[::-1]  # 返回的是索引
            detection = detection[arg_sort]

            while len(detection) != 0:
                best_box.append(detection[0])
                if len(detection) == 1:
                    break
                # 计算当前置信度最大的框和其它预测框的iou
                ious = iou(best_box[-1],detection[1:])
                detection = detection[1:][ious < nms_thres]  # 小于nms_thres将被保留,每一轮至少减少一个
        output.append(best_box)

    boxes_loc = []  # 存储的是x1y1x2y2
    conf_loc = []  # 存储置信度
    class_loc = []  # 存储物体类别id
    if len(output):
        for i in range(len(output)):
            pred = output[i]
            for i, det in enumerate(pred):
                if len(det):
                    # 将框坐标调整回原始图像中
                    det[0] = max(0, np.floor((det[0] - pad[0]) / ratio))
                    det[2] = max(0, np.floor((det[2] - pad[0]) / ratio))
                    det[1] = min(shape[1],np.floor((det[1] - pad[1]) / ratio))
                    det[3] = min(shape[0],np.floor((det[3] - pad[1]) / ratio))

                    boxes_loc.append([det[0],det[1],det[2],det[3]])
                    conf_loc.append(det[4])
                    class_loc.append(det[5])

    return boxes_loc,conf_loc,class_loc

def plot_one_box(img,boxes,conf,clas_id,line_thickness=1,names=None,color=(0,255,0)):
    # 画位置框
    # tl = 框的线宽  要么等于line_thickness要么根据原图im长宽信息自适应生成一个
    tl = line_thickness or round(0.002 * (img.shape[0] + img.shape[1]) / 2) + 1

    c1, c2 = (int(boxes[0]), int(boxes[1])), (int(boxes[2]),int(boxes[3]))
    cv2.rectangle(img, c1, c2, color, thickness=tl, lineType=cv2.LINE_AA)

    # 画类别信息框
    label = f'{names[int(clas_id)]} {conf:.2f}'
    print(label)
    tf = max(tl - 1, 1)  # label字体的线宽 font thickness
    t_size = cv2.getTextSize(label, 0, fontScale=tl / 3, thickness=tf)[0]
    c2 = (c1[0] + t_size[0], c1[1] - t_size[1] - 3)
    cv2.rectangle(img, c1, c2, color, -1, cv2.LINE_AA)
    cv2.putText(img, label, (c1[0], c1[1] - 2), 0, tl / 3, [225, 255, 255], thickness=tf, lineType=cv2.LINE_AA)


if __name__ == '__main__':
    # # COCO 80类别数据集
    # names = ['person', 'bicycle', 'car', 'motorcycle', 'airplane', 'bus', 'train', 'truck', 'boat', 'traffic light',
    #         'fire hydrant', 'stop sign', 'parking meter', 'bench', 'bird', 'cat', 'dog', 'horse', 'sheep', 'cow',
    #         'elephant', 'bear', 'zebra', 'giraffe', 'backpack', 'umbrella', 'handbag', 'tie', 'suitcase', 'frisbee',
    #         'skis', 'snowboard', 'sports ball', 'kite', 'baseball bat', 'baseball glove', 'skateboard', 'surfboard',
    #         'tennis racket', 'bottle', 'wine glass', 'cup', 'fork', 'knife', 'spoon', 'bowl', 'banana', 'apple',
    #         'sandwich', 'orange', 'broccoli', 'carrot', 'hot dog', 'pizza', 'donut', 'cake', 'chair', 'couch',
    #         'potted plant', 'bed', 'dining table', 'toilet', 'tv', 'laptop', 'mouse', 'remote', 'keyboard',
    #         'cell phone','microwave', 'oven', 'toaster', 'sink', 'refrigerator', 'book', 'clock', 'vase', 'scissors',
    #         'teddy bear', 'hair drier', 'toothbrush']
    names = ['smoke','cell phone']
    conf_thres = 0.5
    nms_thres = 0.4
    model_path = "smoke_phone.onnx"
    img_path = '000000356403.jpg'
    color = [random.randint(0, 255) for _ in range(3)]  # 框的颜色
    """
    # model_type='image'是检测图片
    # model_type='video'是检测视频
    """
    model_type = 'video'
    ie = Core()  # Initialize Core version>=2022.1
    net = ie.compile_model(model=model_path, device_name="AUTO:CPU")

    if model_type == 'image':
        frame = cv2.imread(img_path)
        img, ratio, (dw,dh) = letterbox(frame)

        # np.ascontiguousarray()将一个内存不连续存储的数组转换为内存连续存储的数组,使得运行速度更快
        blob = cv2.dnn.blobFromImage(np.ascontiguousarray(img), 1/255.0, (img.shape[0], img.shape[1]), swapRB=True, crop=False)
        outs = net([blob])[next(iter(net.outputs))]  # API version>=2022.1
        boxes_loc,conf_loc,class_loc = non_max_suppression(outs, conf_thres=conf_thres, nms_thres=nms_thres,
                                                           ratio=ratio, pad=(dw,dh))

        # 结果可视化
        for i in range(len(boxes_loc)):
            boxes = boxes_loc[i]
            conf = conf_loc[i]
            clas_id = class_loc[i]
            plot_one_box(frame, boxes, conf, clas_id, line_thickness=3, names=names)

        cv2.imshow("result", frame)
        cv2.waitKey(0)
    elif model_type == 'video':
        cap = cv2.VideoCapture(0)
        while True:
            ret,frame = cap.read()
            img, ratio, (dw, dh) = letterbox(frame)
            blob = cv2.dnn.blobFromImage(np.ascontiguousarray(img), 1 / 255.0, (img.shape[0], img.shape[1]),
                                         swapRB=True, crop=False)
            outs = net([blob])[next(iter(net.outputs))]  # API version>=2022.1
            boxes_loc, conf_loc, class_loc = non_max_suppression(outs, conf_thres=conf_thres, nms_thres=nms_thres,
                                                                 ratio=ratio, pad=(dw, dh))
            # 结果可视化
            for i in range(len(boxes_loc)):
                boxes = boxes_loc[i]
                conf = conf_loc[i]
                clas_id = class_loc[i]
                plot_one_box(frame, boxes, conf, clas_id, line_thickness=3, names=names)

            cv2.imshow("result", frame)
            key = cv2.waitKey(1) & 0xff
            if key == 27:
                cap.release()
                break
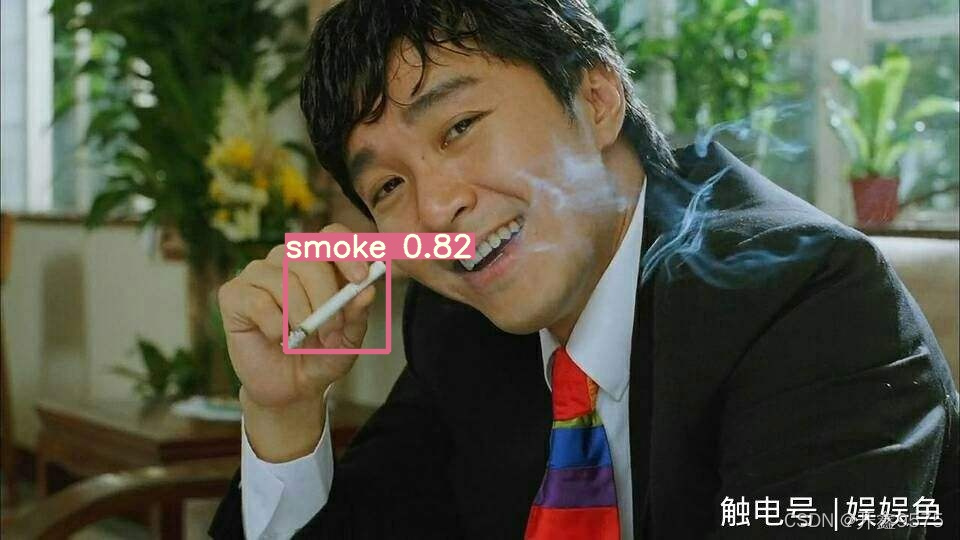
检测效果

模型权重
1、pip安装openvino的时候注意版本是 >= 2022.1
2、模型转换的时候如果报错,首先看看pytorch版本是否太高,一开始我是pytorch1.11 版本的会抱错,后来换了个环境用的pytorch1.7的就可以了
下面放两个ONNX模型权重文件,作为测试和练习:
链接:https://pan.baidu.com/s/1thYBcVJdZYpv5A2wjBzexQ
提取码:lite
–来自百度网盘超级会员V1的分享


 5631
5631


 被折叠的 条评论
为什么被折叠?
被折叠的 条评论
为什么被折叠?
 到【灌水乐园】发言


