


 本文介绍了如何将DNA-Net的密集嵌套交互模块(DNIM)应用到yolov5中,以解决红外小目标检测中深层特征丢失的问题。作者详细描述了DNIM模块的工作原理,并提供了将DNIM作为yolov5主干网络的代码实现步骤,以期增强yolov5对小目标的检测能力。
将yolov5的主干网络替换为DNA-Net的DNIM模块
Why DNA-Net?
论文地址:Dense Nested Attention Network for Infrared Small Target Detection
现有的以cnn为主方法不能直接应用于红外小目标,因为在网络中汇集层可能会导致损失深层的目标特征丢失。为了解决这个问题,论文作者提出一种密集嵌套注意力网络(DNA-Net)。具体来说,作者设计了一个密集嵌套交互模块(DNIM),实现高层与低层的渐进式互动。
虽然该模块初衷被设计为分割红外小目标,在网络深层很好地保留其特征,但我们可以将密集嵌套交互模块(DNIM) 运用在yolov5中,以提高对小目标的检测能力。
理解DNA-Net及其DNIM模块
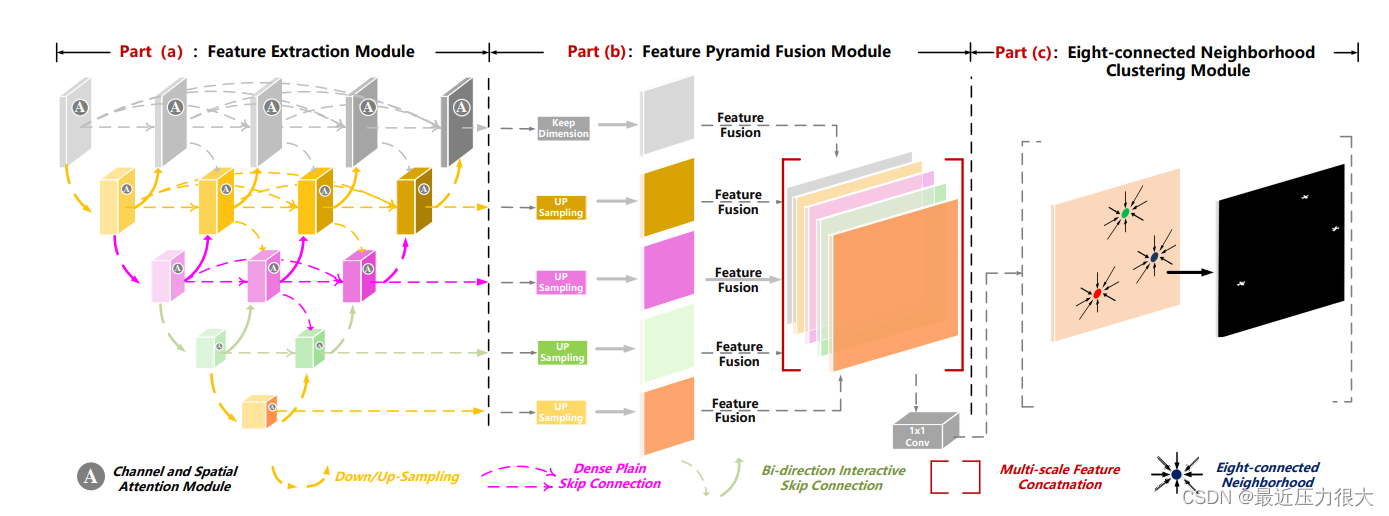
(a)特征提取模块:输入图像首先输入到密集嵌套交互模块(DNIM)中,以聚合来自多个尺度的信息。注意,来自不同语义层次的特征由通道和空间注意力模块(CSAM)自适应增强。
(b)特征金字塔融合模块(FPFM):对增强后的特征进行上采样和级联,实现多层输出融合。
(c )八连通邻域聚类算法:对分割图进行聚类,确定每个目标区域的质心。
尽管该网络被设计为分割红外小目标、我们的任务是目标检测,然而我们关心的是它的特征提取模块,也就是DNIM,用以替换掉yolov5的主干网络,而对于它的特征金字塔融合模块(FPFM)以及八连通邻域聚类算法,我们并不关心,因为yolov5的检测头已经有了复杂高效的FPN-PAN结构。

设计以DNIM为主干的yolov5网络
首先我们观察yolov5的backbone:在网络的第4、6、9层往后的颈部,来自不同层级的网络的特征相互交织融合。
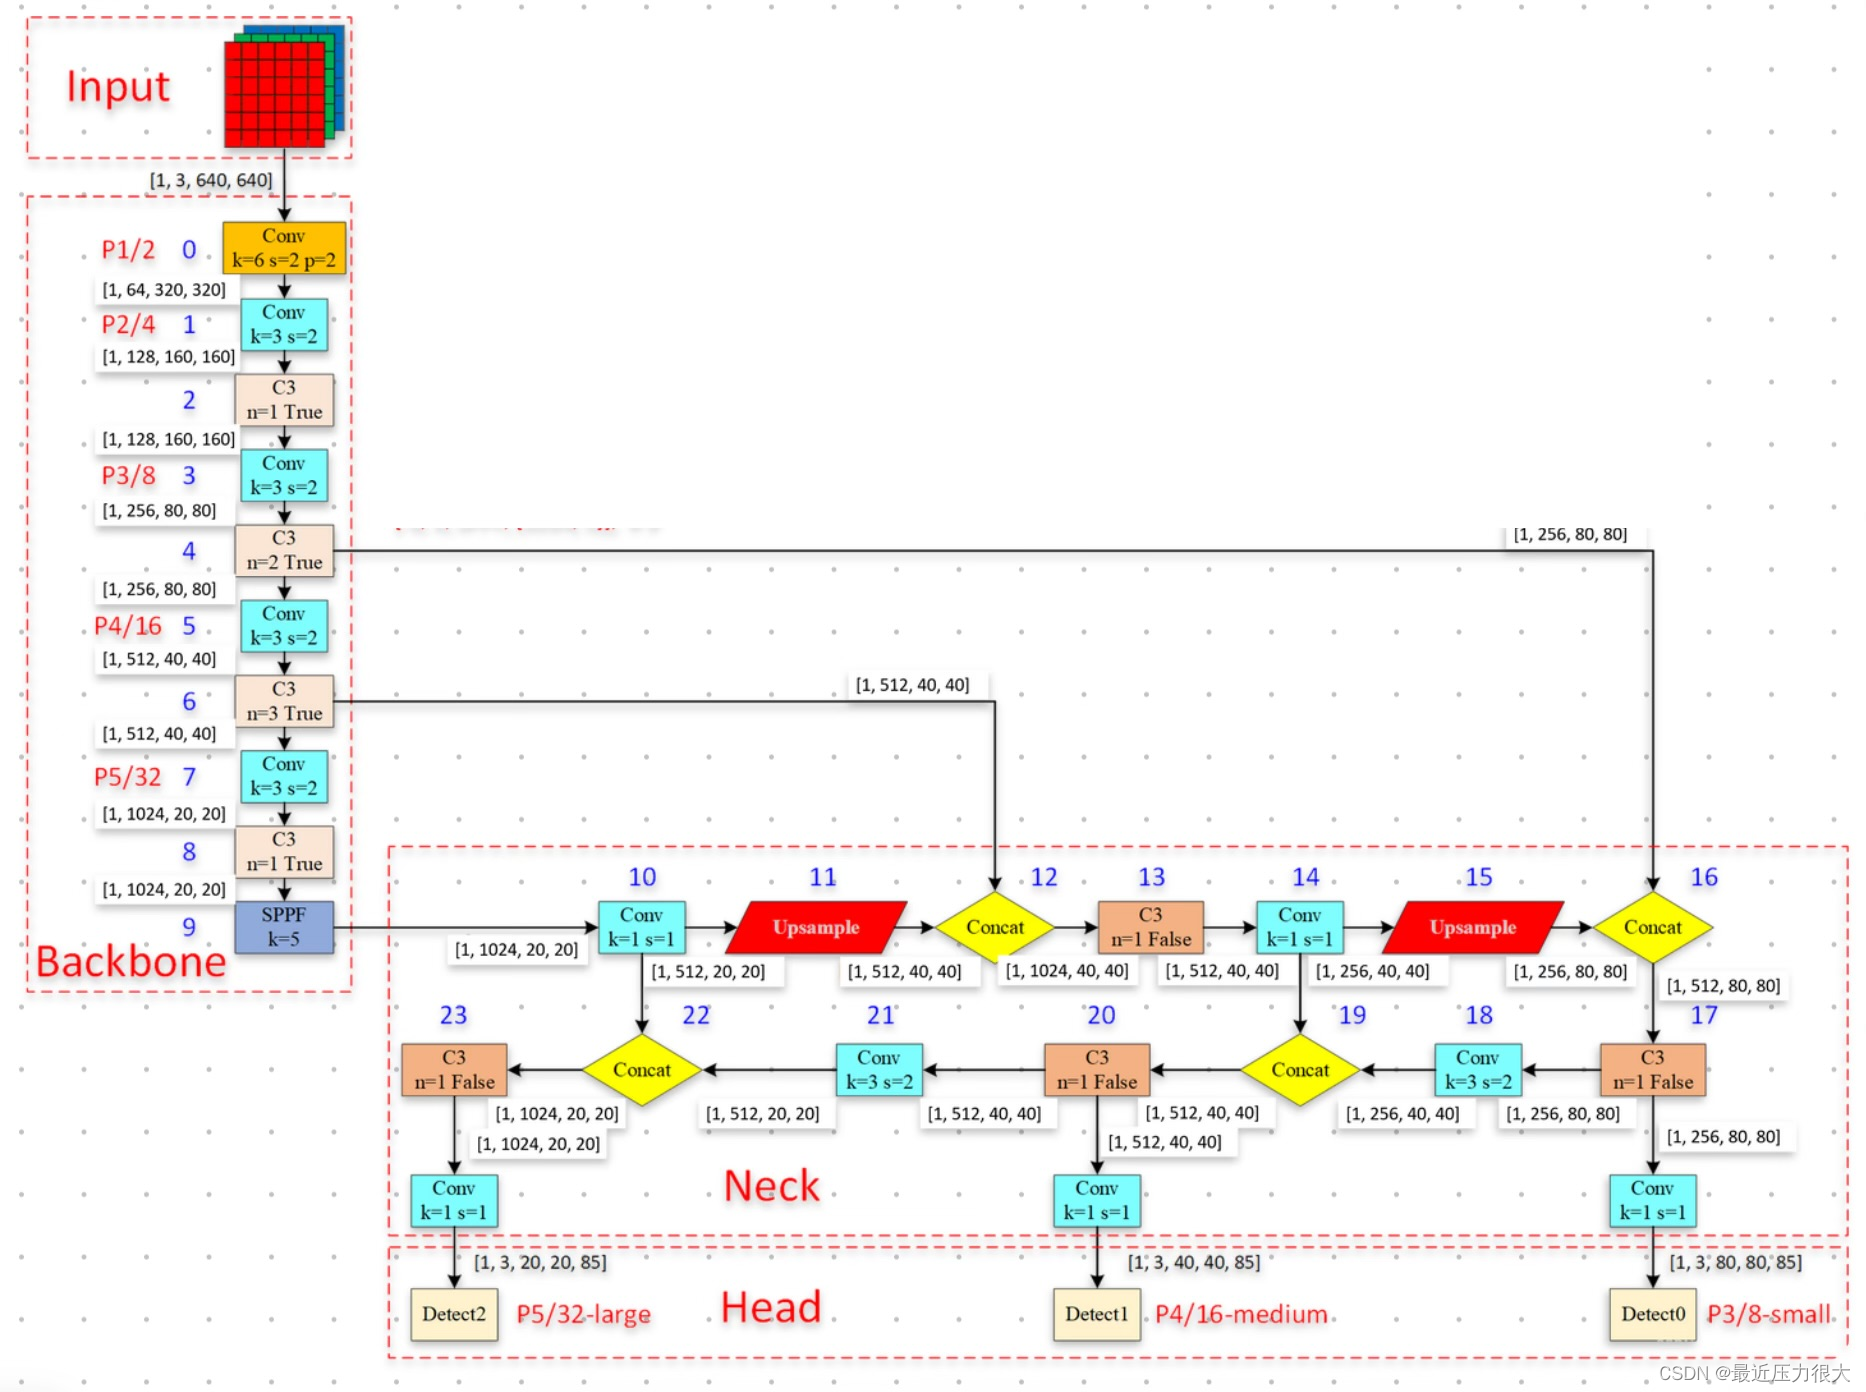
猜想:是否能以类似的方式实现DNIM + yolov5的Neck + yolov5的Head?

由于在yolov5的主干网络中,随着网络层数加深,特征图通道上升,尺寸变小;而在DNIM中,随着网络层数加深,特征图通道数下降,尺寸变大,因此我们采用倒置的DNIM作为backbone,并仿照yolov5的颈部和头部,设计好精密的网络。
代码实操
首先观察DNIM的前项传播算法,主要运用到的算子有卷积、池化、拼接、上(下)采样。
    def forward(self, input):
        x0_0 = self.conv0_0(input)
        x1_0 = self.conv1_0(self.pool(x0_0))
        x0_1 = self.conv0_1(torch.cat([x0_0, self.up(x1_0)], 1))

        x2_0 = self.conv2_0(self.pool(x1_0))
        x1_1 = self.conv1_1(torch.cat([x1_0, self.up(x2_0), self.down(x0_1)], 1))
        x0_2 = self.conv0_2(torch.cat([x0_0, x0_1, self.up(x1_1)], 1))

        x3_0 = self.conv3_0(self.pool(x2_0))
        x2_1 = self.conv2_1(torch.cat([x2_0, self.up(x3_0), self.down(x1_1)], 1))
        x1_2 = self.conv1_2(torch.cat([x1_0, x1_1, self.up(x2_1), self.down(x0_2)], 1))
        x0_3 = self.conv0_3(torch.cat([x0_0, x0_1, x0_2, self.up(x1_2)], 1))

        x4_0 = self.conv4_0(self.pool(x3_0))
        x3_1 = self.conv3_1(torch.cat([x3_0, self.up(x4_0), self.down(x2_1)], 1))
        x2_2 = self.conv2_2(torch.cat([x2_0, x2_1, self.up(x3_1), self.down(x1_2)], 1))
        x1_3 = self.conv1_3(torch.cat([x1_0, x1_1, x1_2, self.up(x2_2), self.down(x0_3)], 1))
        x0_4 = self.conv0_4(torch.cat([x0_0, x0_1, x0_2, x0_3, self.up(x1_3)], 1))

        Final_x0_4 = self.conv0_4_final(
            torch.cat([self.up_16(self.conv0_4_1x1(x4_0)), self.up_8(self.conv0_3_1x1(x3_1)),
                       self.up_4(self.conv0_2_1x1(x2_2)), self.up(self.conv0_1_1x1(x1_3)), x0_4], 1))
由于卷积操作中,作者还运用到了构造序列器的方法:
    def _make_layer(self, block, input_channels, output_channels, num_blocks=1):
        layers = []
        layers.append(block(input_channels, output_channels))
        for i in range(num_blocks - 1):
            layers.append(block(output_channels, output_channels))
        return nn.Sequential(*layers)
因此我们需要在yolov5的common.py里自定义我们的DNIM算子,而其他算子则使用原版yolov5定义好了的,或者pytorch自带的运算。
操作1
根据forward的内容,精炼需要用到的算子,复制以下代码到models/common.py的末尾
class ChannelAttention_DNANet(nn.Module):
    def __init__(self, in_planes, ratio=16):
        super(ChannelAttention_DNANet, self).__init__()
        self.avg_pool = nn.AdaptiveAvgPool2d(1)
        self.max_pool = nn.AdaptiveMaxPool2d(1)
        self.fc1 = nn.Conv2d(in_planes, in_planes // 16, 1, bias=False)
        self.relu1 = nn.ReLU()
        self.fc2 = nn.Conv2d(in_planes // 16, in_planes, 1, bias=False)
        self.sigmoid = nn.Sigmoid()

    def forward(self, x):
        avg_out = self.fc2(self.relu1(self.fc1(self.avg_pool(x))))
        max_out = self.fc2(self.relu1(self.fc1(self.max_pool(x))))
        out = avg_out + max_out
        return self.sigmoid(out)


class SpatialAttention_DNANet(nn.Module):
    def __init__(self, kernel_size=7):
        super(SpatialAttention_DNANet, self).__init__()
        assert kernel_size in (3, 7), 'kernel size must be 3 or 7'
        padding = 3 if kernel_size == 7 else 1
        self.conv1 = nn.Conv2d(2, 1, kernel_size, padding=padding, bias=False)
        self.sigmoid = nn.Sigmoid()

    def forward(self, x):
        avg_out = torch.mean(x, dim=1, keepdim=True)
        max_out, _ = torch.max(x, dim=1, keepdim=True)
        x = torch.cat([avg_out, max_out], dim=1)
        x = self.conv1(x)
        return self.sigmoid(x)


class Res_CBAM_block(nn.Module):
    def __init__(self, in_channels, out_channels, stride=1):
        super(Res_CBAM_block, self).__init__()
        self.conv1 = nn.Conv2d(in_channels, out_channels, kernel_size=3, stride=stride, padding=1)
        self.bn1 = nn.BatchNorm2d(out_channels)
        self.relu = nn.ReLU(inplace=True)
        self.conv2 = nn.Conv2d(out_channels, out_channels, kernel_size=3, padding=1)
        self.bn2 = nn.BatchNorm2d(out_channels)
        if stride != 1 or out_channels != in_channels:
            self.shortcut = nn.Sequential(
                nn.Conv2d(in_channels, out_channels, kernel_size=1, stride=stride),
                nn.BatchNorm2d(out_channels))
        else:
            self.shortcut = None

        self.ca = ChannelAttention_DNANet(out_channels)
        self.sa = SpatialAttention_DNANet()

    def forward(self, x):
        residual = x
        if self.shortcut is not None:
            residual = self.shortcut(x)
        out = self.conv1(x)
        out = self.bn1(out)
        out = self.relu(out)
        out = self.conv2(out)
        out = self.bn2(out)
        out = self.ca(out) * out
        out = self.sa(out) * out
        out += residual
        out = self.relu(out)
        return out


class DNIM_operator(nn.Module):
    def __init__(self, c_in, c_out, num_blocks=1):
        super(DNIM_operator, self).__init__()
        # self.pool = nn.MaxPool2d(2, 2)
        # self.up = nn.Upsample(scale_factor=2, mode='bilinear', align_corners=True)
        # self.down = nn.Upsample(scale_factor=0.5, mode='bilinear', align_corners=True)

        self.conv = self._make_layer(c_in, c_out, num_blocks)

    def _make_layer(self, input_channels, output_channels, num_blocks=1):
        block = Res_CBAM_block(input_channels, output_channels)
        layers = []
        layers.append(block)
        for i in range(num_blocks - 1):
            layers.append(block)
        return nn.Sequential(*layers)

    def forward(self, input):
        out=self.conv(input)
        # print(out.shape)
        return out
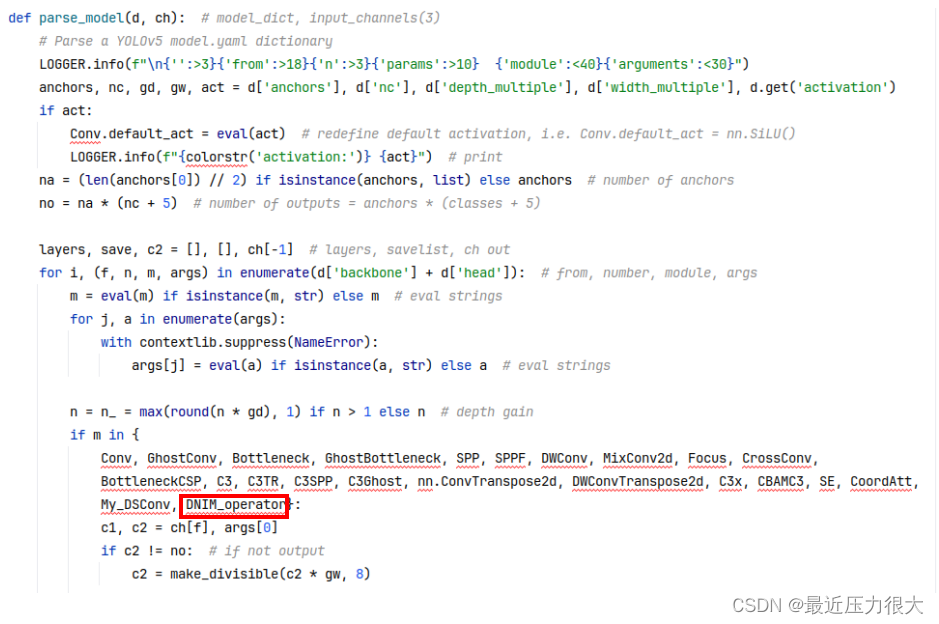
操作2
为了让刚才自定义的模块能被yolov5网络解析,找到models/yolo.py里定义的parse_model方法,将DNIM_operator添加到此处(忽略我这里添加的其他模块)。
操作3
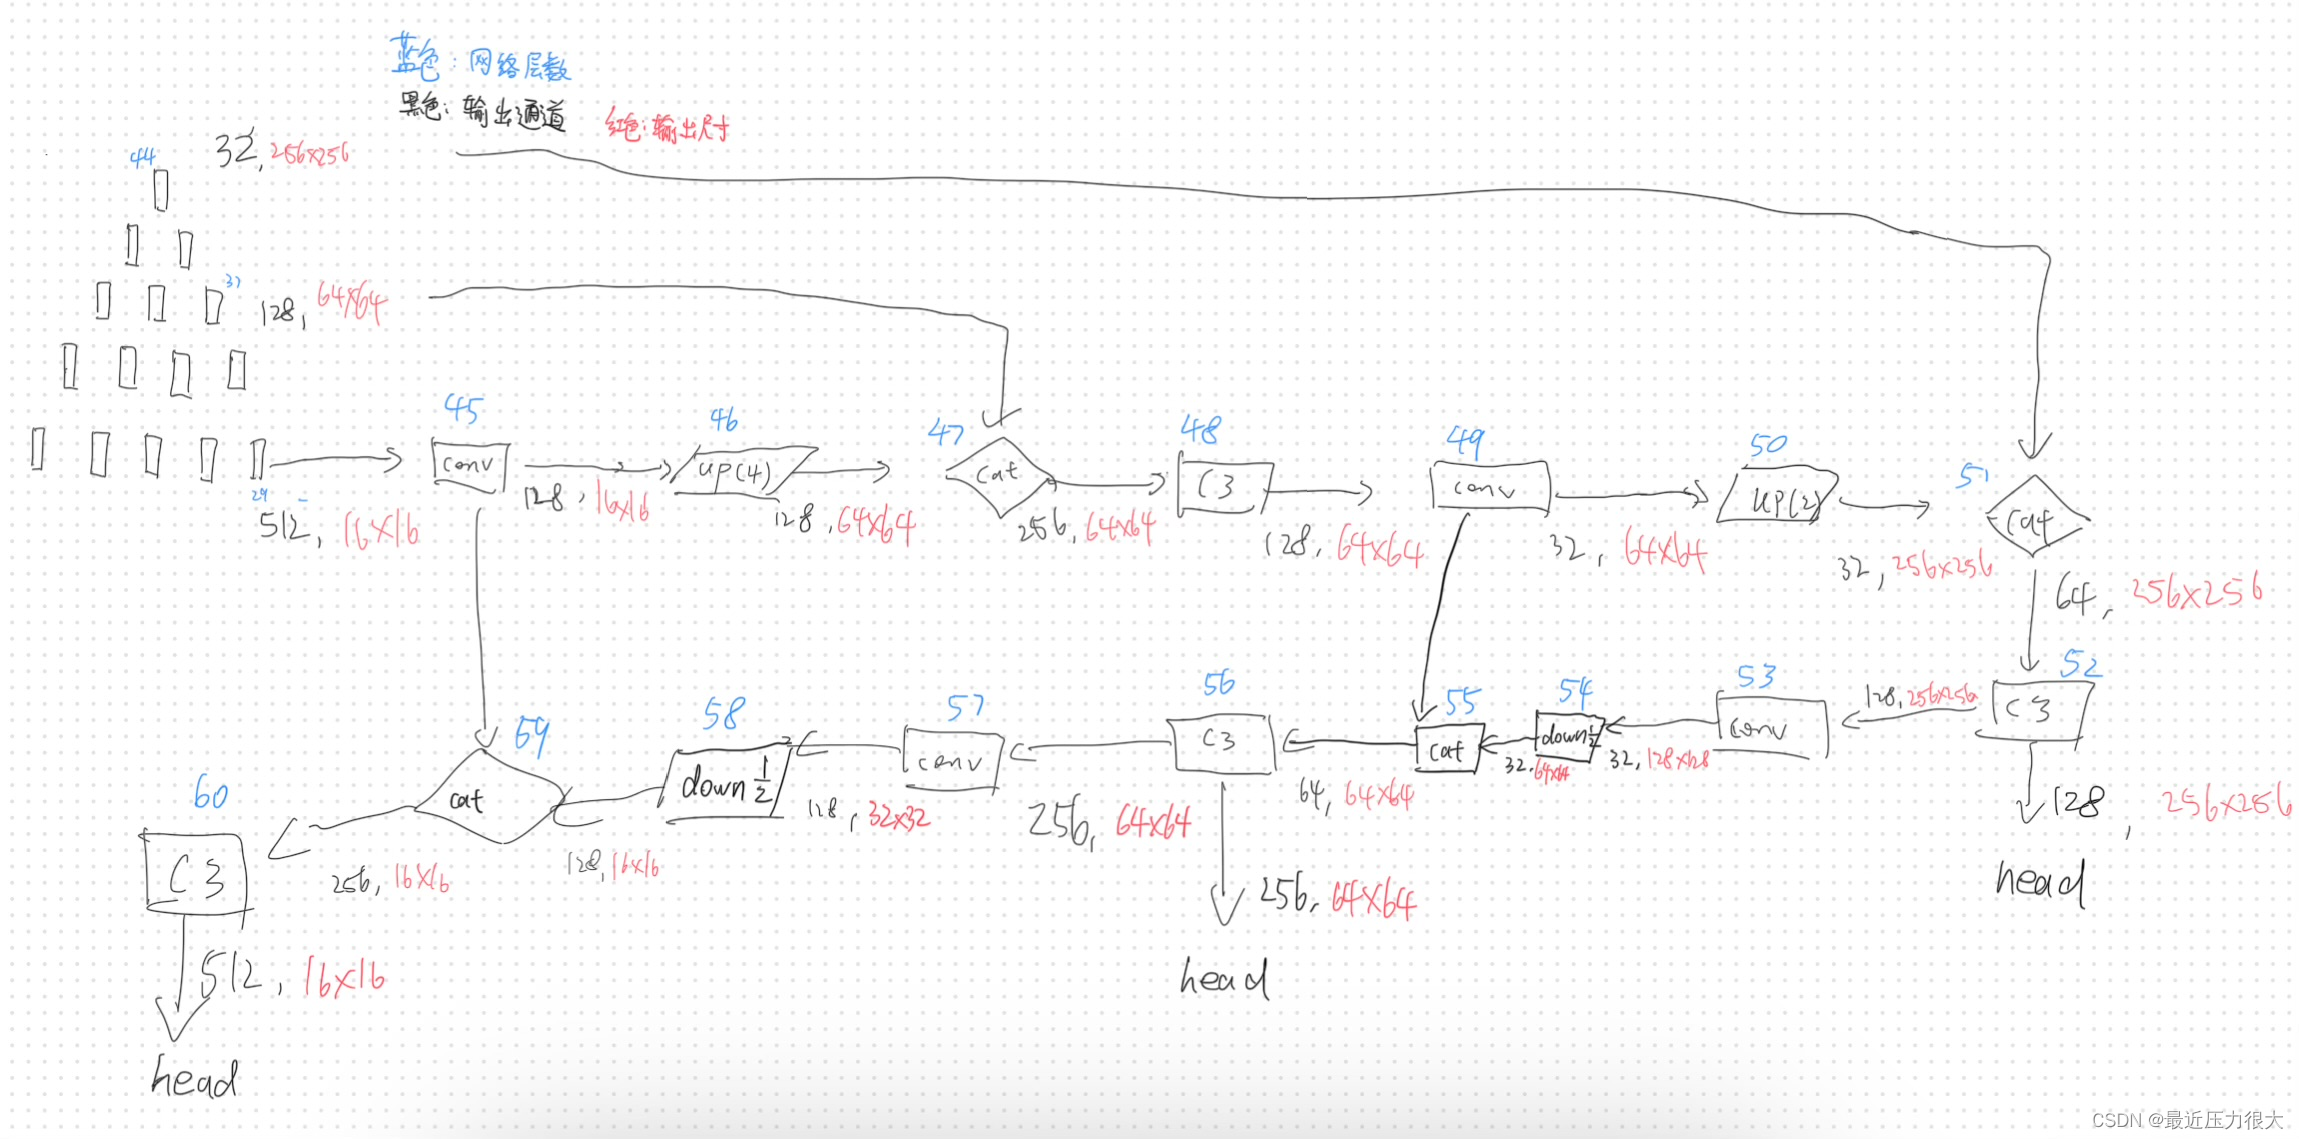
在此处我们将实现完整的网络构建,我们按照DNA-Net网络模块源码里forward方法的内容,以及如图我所画的网络结构,搭建我们的创造物——以DNIM为主干的yolov5网络:
在models文件夹内新建文件yolov5s-DNIM.yaml,将以下内容复制进去:
# Parameters
nc: 9  # number of classes
depth_multiple: 0.33  # model depth multiple
width_multiple: 0.50  # layer channel multiple
anchors:
  - [ 10,13, 16,30, 33,23 ]  # P3/8
  - [ 30,61, 62,45, 59,119 ]  # P4/16
  - [ 116,90, 156,198, 373,326 ]  # P5/32

# YOLOv5 v6.0 backbone
backbone:
  # [from, number, module, args]
  [

    [ -1,1,DNIM_operator, [ 64 ] ],  #0 x0_0

    [ -1,1,nn.MaxPool2d, [ 2,2 ] ],
    [ -1,1,DNIM_operator, [ 128 ] ], #2 x1_0

    [ -1, 1, nn.Upsample, [ None, 2, 'bilinear',True ] ],
    [ [ -1, 0 ], 1, Concat, [ 1 ] ],
    [ -1,1,DNIM_operator, [ 64 ] ],  #5 x0_1


    [ 2,1,nn.MaxPool2d, [ 2,2 ] ],
    [ -1,1,DNIM_operator, [ 256 ] ],  #7 x2_0

    [ -1, 1, nn.Upsample, [ None, 2, 'bilinear',True ] ],
    [ 5, 1, nn.Upsample, [ None, 0.5, 'bilinear' ,True ] ],
    [ [ -2, -1,2 ], 1, Concat, [ 1 ] ],
    [ -1,1,DNIM_operator, [ 128 ] ],  #11 x1_1

    [ -1, 1, nn.Upsample, [ None, 2, 'bilinear',True ] ],
    [ [ -1,0,5 ], 1, Concat, [ 1 ] ],
    [ -1,1,DNIM_operator, [ 64 ] ],  #14 x0_2


    [ 7,1,nn.MaxPool2d, [ 2,2 ] ],
    [ -1,1,DNIM_operator, [ 512 ] ],  #16 x3_0

    [ -1, 1, nn.Upsample, [ None, 2, 'bilinear',True ] ],
    [ 11, 1, nn.Upsample, [ None, 0.5, 'bilinear' ,True ] ],
    [ [ -2, -1,7 ], 1, Concat, [ 1 ] ],
    [ -1,1,DNIM_operator, [ 256 ] ],  #20 x2_1

    [ -1, 1, nn.Upsample, [ None, 2, 'bilinear',True ] ],
    [ 14, 1, nn.Upsample, [ None, 0.5, 'bilinear' ,True ] ],
    [ [ -2, -1,2,11 ], 1, Concat, [ 1 ] ],
    [ -1,1,DNIM_operator, [ 128 ] ],  #24 x1_2

    [ -1, 1, nn.Upsample, [ None, 2, 'bilinear',True ] ],
    [ [ -1,0,5,14 ], 1, Concat, [ 1 ] ],
    [ -1,1,DNIM_operator, [ 64 ] ],  #27 x0_3


    [ 16,1,nn.MaxPool2d, [ 2,2 ] ],
    [ -1,1,DNIM_operator, [ 1024 ] ],  #29 x4_0

    [ -1, 1, nn.Upsample, [ None, 2, 'bilinear',True ] ],
    [ 20, 1, nn.Upsample, [ None, 0.5, 'bilinear' ,True ] ],
    [ [ -2, -1,16 ], 1, Concat, [ 1 ] ],
    [ -1,1,DNIM_operator, [ 512 ] ],  #33 x3_1

    [ -1, 1, nn.Upsample, [ None, 2, 'bilinear',True ] ],
    [ 24, 1, nn.Upsample, [ None, 0.5, 'bilinear' ,True ] ],
    [ [ -2, -1,7,20 ], 1, Concat, [ 1 ] ],
    [ -1,1,DNIM_operator, [ 256 ] ],  #37 x2_2

    [ -1, 1, nn.Upsample, [ None, 2, 'bilinear',True ] ],
    [ 27, 1, nn.Upsample, [ None, 0.5, 'bilinear' ,True ] ],
    [ [ -2, -1,2,11,24 ], 1, Concat, [ 1 ] ],
    [ -1,1,DNIM_operator, [ 128 ] ],  #41 x1_3

    [ -1, 1, nn.Upsample, [ None, 2, 'bilinear',True ] ],
    [ [ -1,0,5,14,27 ], 1, Concat, [ 1 ] ],
    [ -1,1,DNIM_operator, [ 64 ] ],  #44 x0_4
  ]


# YOLOv5 v6.0 head
head:
  [
    [ 29, 1, Conv, [ 128, 1, 1 ] ],
    [ -1, 1, nn.Upsample, [ None, 4, 'nearest' ] ],
    [ [ -1, 37 ], 1, Concat, [ 1 ] ],  # cat backbone P4
    [ -1, 3, C3, [ 128, False ] ],  # 48
#
#
    [ -1, 1, Conv, [ 32, 1, 1 ] ],
    [ -1, 1, nn.Upsample, [ None, 4, 'nearest' ] ],
    [ [ -1, 44 ], 1, Concat, [ 1 ] ],  # cat backbone P3
    [ -1, 3, C3, [ 128, False ] ],  # 52 (P3/8-small) head
#
    [ -1, 1, Conv, [ 32, 3, 2 ] ],
    [ -1, 1, nn.Upsample, [ None, 0.5, 'nearest' ] ],
    [ [ -1, 49 ], 1, Concat, [ 1 ] ],  # cat head P4
    [ -1, 3, C3, [ 256, False ] ],  # 56 (P4/16-medium) head
#
    [ -1, 1, Conv, [ 128, 3, 2 ] ],
    [ -1, 1, nn.Upsample, [ None, 0.5, 'nearest' ] ],
    [ [ -1, 45 ], 1, Concat, [ 1 ] ],  # cat head P5
    [ -1, 3, C3, [ 512, False ] ],  #  (P5/32-large) head

    [ [ 52, 56, 60 ], 1, Detect, [ nc, anchors ] ],  # Detect(P3, P4, P5)

  ]
大功告成!现在别忘了打开train.py,将cfg参数的内容替换为我们刚搭建好的yolov5s-DNIM.yaml。

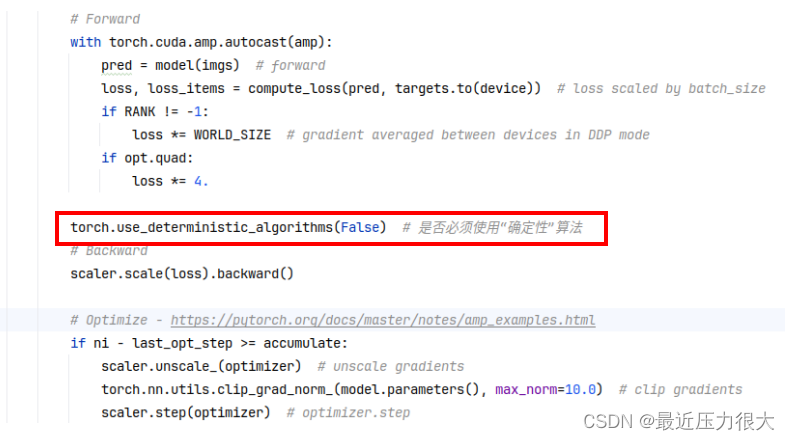
开始训练,如果训练过程中报错:
RuntimeError: adaptive_max_pool2d_backward_cuda does not have a deterministic implementation, but you set 'torch.use_deterministic_algorithms(True)'. You can turn off determinism just for this operation, or you can use the 'warn_only=True' option, if that's acceptable for your application. You can also file an issue at https://github.com/pytorch/pytorch/issues to help us prioritize adding deterministic support for this operation.
则需要关闭“确定性”算法:在train.py中找到代码scaler.scale(loss).backward(),在其上方添加
torch.use_deterministic_algorithms(False)
现在可以开始训练了!


 1898
1898


 被折叠的 条评论
为什么被折叠?
被折叠的 条评论
为什么被折叠?
 到【灌水乐园】发言


