


环境:Qt Creator 5.9,7
目录
TCP服务端:
第一步:创建监听套接字的QTcpSever第二步:listen------监听是否有新的连接进来
第三步:取出套接字
第四步:读取套接字的内容
TCP客户端:
第一步:创建套接字,与服务端的IP地址和端口号连接.(注:这里的端口号和上面服务端绑定的那个端口号是一样的,别搞错了.)第二步:连接成功后就可以直接向服务端发消息了.
若要多次向服务端发消息,可以while循环或者是其他.在这里要注意如果要多次发消息的话,waitForBytesWritten()这个函数是必不可少的,不然多次的话可能通信会失败.
注:write()函数和被触发的读的readyRead()信号并不是一一对应的,比如可能你客户端write了三次,服务端那边的readyRead可能才被触发一次.
1. 准备工作
需创建两个project,一个服务器端 server,一个客户端 client。

服务器端 server:

客户端 client:

注意: .pro文件记得添加
QT += network //引用头文件 TcpServer 和 TcpSocket 的前提 
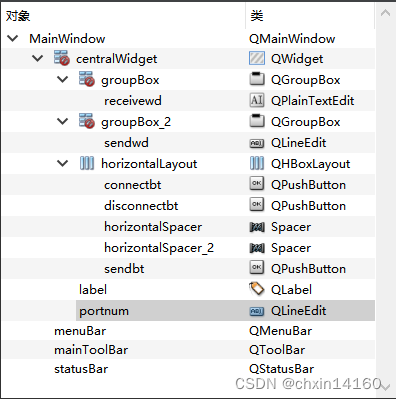
2.服务器端 server项目
2.1 ui设计界面

2.2 .h文件代码
#ifndef MAINWINDOW_H
#define MAINWINDOW_H

#include <QMainWindow>
#include <QTcpServer>
#include <QTcpSocket>
#include <QString>


namespace Ui {
class MainWindow;
}

class MainWindow : public QMainWindow
{
    Q_OBJECT

public:
    explicit MainWindow(QWidget *parent = nullptr);
    ~MainWindow();

    QTcpServer *tcpserver; //第一步:创建监听套接字的QTcpSever
    QTcpSocket *tcpsocket;

private slots:
    void on_connectbt_clicked();

    void newConnection_Slot();
    void readyRead_Slot();

    void on_disconnectbt_clicked();

    void on_sendbt_clicked();

private:
    Ui::MainWindow *ui;
};

#endif // MAINWINDOW_H
2.3 .cpp文件代码
#include "mainwindow.h"
#include "ui_mainwindow.h"

MainWindow::MainWindow(QWidget *parent) :
    QMainWindow(parent),
    ui(new Ui::MainWindow)
{
    ui->setupUi(this);

    tcpserver=new QTcpServer(this);
    tcpsocket=new QTcpSocket(this);

    //若有新的客户端连接的话,会触发信号newConnection_Slot()
    connect(tcpserver,SIGNAL(newConnection()),this,SLOT(newConnection_Slot()));
}


void MainWindow::newConnection_Slot()
{
    //第三步:取出套接字
    tcpsocket=tcpserver->nextPendingConnection(); //获取已经连接的客户端的SOCKET套接字
    connect(tcpsocket,SIGNAL(readyRead()),this,SLOT(readyRead_Slot()));//若客户端有消息进来的话,会触发信号readyRead_Slot();

    //获取对方的IP和端口
    QString sIp = tcpsocket->peerAddress().toString();
    quint16 sPort = tcpsocket->peerPort();
    qDebug() << sIp << sPort;

    //connect(tcpsocket, SIGNAL(disconnected()), this, SLOT(slotServerDisConnection()));//断开连接的话会触发disconnected();
}
void MainWindow::readyRead_Slot()
{
    //第四步:读取套接字的内容
    //从socket中读出数据
     QString buf;
     buf=tcpsocket->readAll();
     ui->receivewd->appendPlainText(buf);

     /*或
     QByteArray baArray = tcpsocket->readAll();
     QString sMsg = baArray;
     ui->receivewd->appendPlainText(receivewd);
     */
}


MainWindow::~MainWindow()
{
    delete ui;
}


void MainWindow::on_connectbt_clicked()//连接服务器
{
    //第二部步:listen------监听是否有新的连接进来
    tcpserver->listen(QHostAddress::Any,ui->portnum->text().toUInt());//监听端口号
}

void MainWindow::on_disconnectbt_clicked()//关闭服务器
{
    tcpserver->close();
}

void MainWindow::on_sendbt_clicked()//发送信息
{
//    toLatin1()
//    tcpsocket->write(ui->sendwd->text().toLatin1());
//    tcpsocket->write(ui->sendwd->text().toLocal8Bit(),ui->sendwd->text().length());
    tcpsocket->write(ui->sendwd->text().toLocal8Bit().data());
}
3. 客户端 client项目
3.1 ui设计界面


3.2 .h文件代码
#ifndef MAINWINDOW_H
#define MAINWINDOW_H

#include <QMainWindow>
//#include <QTcpServer>
#include <QTcpSocket>//服务端只用socket

namespace Ui {
class MainWindow;
}

class MainWindow : public QMainWindow
{
    Q_OBJECT

public:
    explicit MainWindow(QWidget *parent = nullptr);
    ~MainWindow();

    QTcpSocket *tcpsocket;

private slots:
    void on_openclient_clicked();

    void connected_SLOT();
    void readyRead_Slot();

    void on_closeclient_clicked();

    void on_sent_clicked();

private:
    Ui::MainWindow *ui;
};

#endif // MAINWINDOW_H
3.3 .cpp文件代码
#include "mainwindow.h"
#include "ui_mainwindow.h"
#include "QString"
#include "stdio.h"

//#pragma execution_character_set("utf-8")

MainWindow::MainWindow(QWidget *parent) :
    QMainWindow(parent),
    ui(new Ui::MainWindow)
{
    ui->setupUi(this);

    tcpsocket=new QTcpSocket(this);
}

MainWindow::~MainWindow()
{
    delete ui;
}


void MainWindow::connected_SLOT()
{
    QObject::connect(tcpsocket, &QTcpSocket::readyRead, this, &MainWindow::readyRead_Slot);
//    connect(tcpsocket,SIGNAL(readyRead()),this,SLOT(readyRead_Slot()));//将信号连接到槽,书写比较明确
}
void MainWindow::readyRead_Slot()//定义接收信号的槽
{
    QString buf;
    buf=tcpsocket->readAll();
    ui->receivewd->appendPlainText(buf);//接收由tcp发送过来的信息
//    ui->receivewd->appendPlainText(buf.toUtf8());//接收由tcp发送过来的信息
}


void MainWindow::on_openclient_clicked()
{
    //第一步:创建套接字,与服务端的IP地址和端口号连接.
    //注:这里的端口号和上面服务端绑定的那个端口号是一样的,别搞错了.
	//连接服务端
    tcpsocket->connectToHost(ui->ipnum->text(),ui->portnum->text().toInt());//转为无符号,连接服务器端口
    connect(tcpsocket,SIGNAL(connected()),this,SLOT(connected_SLOT()));
    printf("打开客户端 ");

    /*
    //成功连接返回true,错误返回false
    if(m_tsTcpSocket->waitForConnected())
    {
        qDebug() << "connect success";
    }
    */
}

void MainWindow::on_closeclient_clicked()
{
    tcpsocket->close();
    printf("关闭客户端 ");
}

void MainWindow::on_sent_clicked()
{
    tcpsocket->write(ui->sendwd->text().toLocal8Bit().data(),ui->sendwd->text().length());//丽丽
    //tcpsocket->write(ui->sendwd->text().toLocal8Bit().data());//网上
    //tcpsocket->write(ui->sendwd->toPlainText().toLatin1());//xie宏伟

    /*
	QString str;
	int iSize = tcpsocket->write(str.toUtf8().data());//返回字节的大小
    //等待write写完再写下一次的write
    if(!tcpsocket->waitForBytesWritten(50000))
    {
        return;
    }
    if(iSize ==-1) //判断发送是否成功
    {
        qDebug() << "write error";
        return;
    }
    若要多次向服务端发消息,可以while循环或者是其他.在这里要注意如果要多次发消息的
    话,waitForBytesWritten()这个函数是必不可少的,不然多次的话可能通信会失败.

    注:write()函数和被触发的读的readyRead()信号并不是一一对应的,比如可能你客户端
    write了三次,服务端那边的readyRead可能才被触发一次.
    */
}
主函数代码(两个工程皆相同):
#include "mainwindow.h"
#include <QApplication>
//#include <QtNetwork>

int main(int argc, char *argv[])
{
    QApplication a(argc, argv);
    MainWindow w;
    w.show();

    return a.exec();
}
补充:客户端主动断开服务的连接
void TcpClient::disConnectSever()
{
    //方式一
    m_tcpSocket->flush();
    m_tcpSocket->disconnectFromHost();

    //方式二
    m_tcpSocket->abort();
}
注:方式二abort与方式一的区别:abort中止当前连接并重置套接字。与disConnectFromHost()不同,该函数会立即关闭套接字,丢弃写缓冲区中的所有挂起数据。
4. 测试演示
注意:
端口号须一致(端口号相当于房间号,进入同一房间后才可进行通讯)
服务器端须先点击 “ 连接服务器 ”
客户端须先点击 “ 打开客户端 ”
其次两者皆是输入内容再点击 “ 发送 ” 按钮
即可实现两者间的通讯
(暂不支持发送中文)

5.补充笔记
connect 函数:
connect(Sender,SIGNAL(signal),Receiver,SLOT(slot)); // 按键单击信号连接到按键槽函数
函数4个参数:发射信号的对象,发射的信号,接受信号的对象,要执行的槽;
(以上学习笔记参考了(3条消息) qt中socket编程_真爱是蓝色的博客-CSDN博客_qt socket)


 1335
1335


 被折叠的 条评论
为什么被折叠?
被折叠的 条评论
为什么被折叠?
 到【灌水乐园】发言


