


使用YOLOv5 opencv dnn (c++)进行对象检测
仅为记录下自己的学习过程,进行了注释。
YOLOv5 模型转换
由于 YOLOv5 的源平台是 PyTorch,因此权重的模型以 .pt格式提供。但是OpenCV DNN 支持 .onnx 格式的模型。因此需要执行模型转换。按照以下步骤将模型转换为所需的格式:
克隆YOLOv5项目
安装要求(Install the requirements)
下载 PyTorch 模型
导出到 ONNX(可使用项目中自带的export.py文件将pt文件转换为ONNX文件)
注意:为方便代码直接运行, yolov5n、yolov5s、yolov5m的 ONNX 模型包含在代码文件夹中,文件下方已给出。

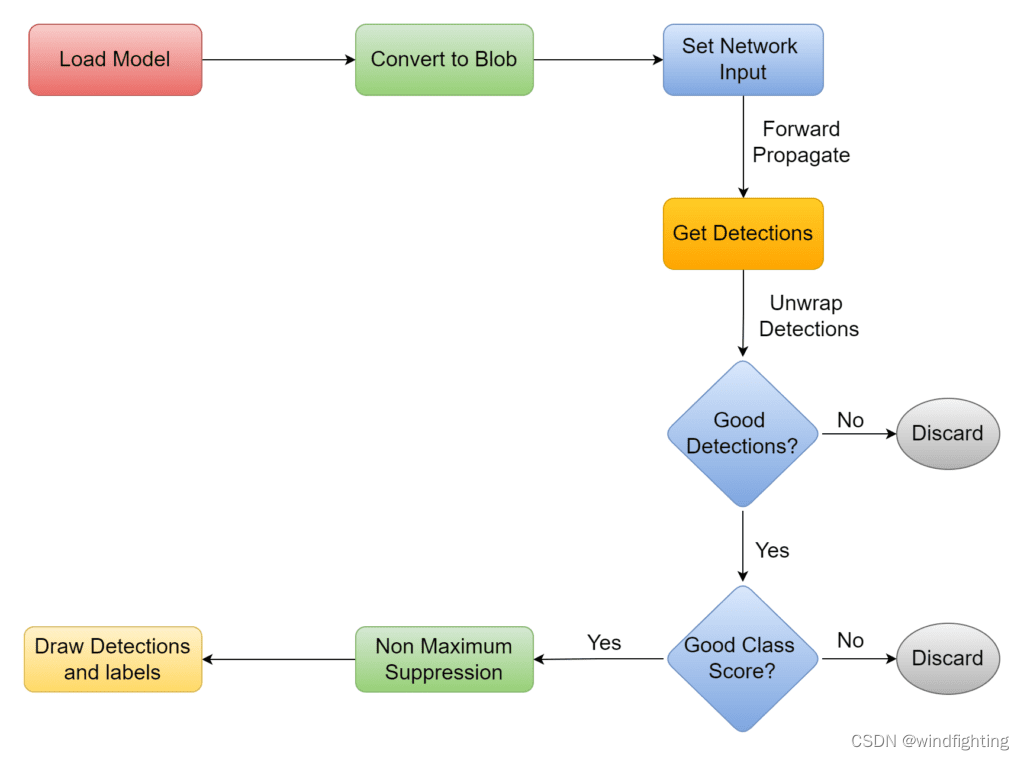
流程图与代码说明 |YOLOv5 OpenCV DNN
以下是模型opencv dnn中YOLOv5的工作流程图:
导入所需库

定义全局变量
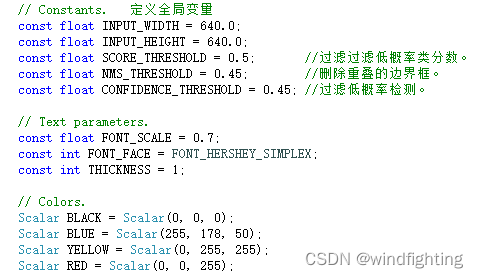
常量 INPUT_WIDTH 和 INPUT_HEIGHT 适用于 Blob 尺寸。BLOB 代表二进制类型大型对象。它包含可读原始格式的数据。必须将图像转换为 Blob,以便网络可以对其进行处理。在本例子中,它是一个形状为 (1, 3, 640,640) 的 4D 数组对象。
定义超参数:
SCORE_THRESHOLD:过滤低概率类分数。
NMS_THRESHOLD:删除重叠的边界框。
CONFIDENCE_THRESHOLD:过滤低概率检测。
定义颜色:
Scalar BLACK
Scalar BLUE
Scalar YELLOW
Scalar RED
绘制YOLOv5预测标签
该函数draw_label()表示锚框在边界框左上角的类名。代码相当简单。通过将label的文本字符串作为参数进行传递,该label传递给 OpenCV 函数 getTextSize()。
它将返回文本字符串将占用的边界框大小。这些维度值用于绘制一个黑色背景矩形,label由 putText() 函数在其上呈现。

预处理YOLOv5模型
函数pre_process()将图像和网络作为参数。首先,将图像转换为 blob。然后将其设置为网络的输入。该函数提供输出图层的名称。它具有所有层的特征,图像通过这些层向前传播以获取检测。在处理后,返回检测结果。
函数:blobFromImage() 输出4D blob
参数:image:输入图像(1、3或者4通道)
可选参数
scalefactor:图像各通道数值的缩放比例
size:输出图像的空间尺寸,如size=(640,640)表示高h=640,宽w=640
mean:用于各通道减去的值,以降低光照的影响(e.g. image为bgr3通道的图像,mean=[104.0, 177.0, 123.0],表示b通道的值-104,g-177,r-123)
swapRB:交换RB通道,默认为False.(cv2.imread读取的是彩图是bgr通道)
crop:图像裁剪,默认为False.当值为True时,先按比例缩放,然后从中心裁剪成size尺寸
ddepth:输出的图像深度,可选CV_32F 或者 CV_8U.
函数:net.forward()
参数:OutputArrayOfArrays outputBlobs
const String & outputName = String()这个函数只需要提供layer的name即可;
参数函数返回一个Mat变量,返回值是指输入的layername 首次出现 的输出。
函数:getUnconnectedOutLayerNames() 获得末端连接神经网络名字,用于指定forward输出层的名字(三个输出层名称)
YOLOv5预测结果的后处理
在前面的函数中,我们以对象的形式获得检测结果。它需要进行进一步处理。在进一步讨论代码之前,让我们看看这个对象的形状及其包含的内容:函数pre_process
返回的对象是一个二维数组。输出取决于输入的大小。例如,默认输入大小为 2 时,我们得到大小为 640×2(行和列)的 25200D 数组。这些行表示检测数。因此,每次网络运行时,它都会预测 85 个边界框。每个边界框都有一个包含 25200 个条目的一维数组,用于告知检测的质量。此信息足以筛选出所需的检测。

前两个位置是检测到的边界框的规范化中心坐标。然后是标准化的宽度和高度。索引 4 具有置信度分数,该分数告知检测对象的可能性。以下 80 个条目讲述了 COCO 数据集 80 中 2017 个对象的类分数,模型已在其上训练。
A. 筛选 YOLOv5 模型给出的良好检测
在展开时,我们需要注意形状。在 OpenCV-Python 4.5.5 中,对象是大小为 3x 行 x 列的 1D 数组的元组。它应该是行 x 列。因此,从第 <> 个索引访问数组。在C++的情况下不会观察到此问题。
网络根据 blob 的输入大小(即 640)生成输出坐标。因此,坐标应乘以调整大小因子以获得实际输出。以下步骤涉及解包检测:
	1.循环检测。
    2.筛选出良好的检测。
	3.获取最佳班级分数的索引。
	4.丢弃类分数低于阈值的检测。
B. 删除 YOLOv5 预测的重叠框
过滤良好的检测后,我们留下了所需的边界框。但是,可以有多个重叠的边界框,可能如下所示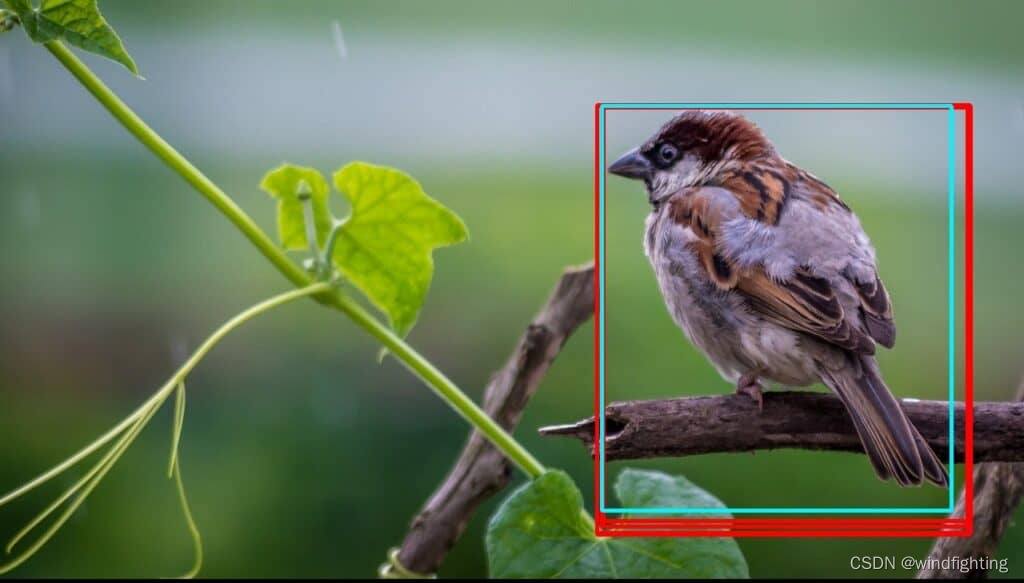
这可以通过执行非最大抑制来解决。该函数获取框列表,计算 IOU(交并集),并决定根据 .对它的工作原理感到好奇吗?查看非极大值抑制以了解更多信息。NMSBoxes()NMS_THRESHOLD
4.3.6 主要功能
最后,我们加载模型。执行预处理和后处理,然后显示预测结果。
完整代码如下:
// Import Libraries.
//# 的功能是将其后面的宏参数进行字符串化操作(Stringfication),简单说就是在对它所引用的宏变量通过替换后在其左右各加上一个双引号。
#include <opencv2/opencv.hpp>   //opencv 头文件(opencv.hpp)包含了opencv各模块的头文件
#include <fstream>            //用于同时向文件进行读取和写入操作的输入/输出文件流类;(ifstream/ofstream)

// Namespaces.
using namespace cv;
using namespace std;
using namespace cv::dnn;

// Constants.   定义全局变量
const float INPUT_WIDTH = 640.0;
const float INPUT_HEIGHT = 640.0;
const float SCORE_THRESHOLD = 0.5;       //过滤过滤低概率类分数。
const float NMS_THRESHOLD = 0.45;        //删除重叠的边界框。
const float CONFIDENCE_THRESHOLD = 0.45; //过滤低概率检测。

// Text parameters.  文本参数
const float FONT_SCALE = 0.7;
const int FONT_FACE = FONT_HERSHEY_SIMPLEX;
const int THICKNESS = 1;

// Colors.     颜色设定
Scalar BLACK = Scalar(0, 0, 0);
Scalar BLUE = Scalar(255, 178, 50);
Scalar YELLOW = Scalar(0, 255, 255);
Scalar RED = Scalar(0, 0, 255);


// Draw the predicted bounding box.   绘制 YOLOv5 预测标签
void draw_label(Mat& input_image, string label, int left, int top)
{
	// Display the label at the top of the bounding box.
	int baseLine;
	Size label_size = getTextSize(label, FONT_FACE, FONT_SCALE, THICKNESS, &baseLine);   //返回一个文字的宽度和高度(文本字符串,字形,比例因子,粗细,baseLine是指距离文本最低点对应的y坐标)
	top = max(top, label_size.height);                                                   // Top left corner.
	// Top left corner.
	Point tlc = Point(left, top);                                                        // 建立一个point类(横,纵)坐标.标签矩形左上角
	// Bottom right corner.
	Point brc = Point(left + label_size.width, top + label_size.height + baseLine);       // 建立一个point类(横,纵)坐标.标签矩形右下角
	// Draw black rectangle.
	rectangle(input_image, tlc, brc, BLACK, FILLED);                                     // 绘制一个黑色背景矩形
	// Put the label on the black rectangle.
	putText(input_image, label, Point(left, top + label_size.height), FONT_FACE, FONT_SCALE, YELLOW, THICKNESS);   //输出文字((图像,文本字符串,文本字符串左下角,字体,比例因子,颜色,粗细,)
}

//前处理
vector<Mat> pre_process(Mat &input_image, Net &net)   //预处理yolov5模型
{
	// Convert to blob.               //将图像转换为bolb(创建4D blob),
	Mat blob;
	blobFromImage(input_image, blob, 1. / 255., Size(INPUT_WIDTH, INPUT_HEIGHT), Scalar(), true, false);   //图像预处理cv2.dnn.blobFromImage(image, scalefactor, size, mean, swapRB, crop, ddepth),转换为模型标准输入

	net.setInput(blob);               //将输出的blob作为网络模型的输入

	// Forward propagate.前向传播
	vector<Mat> outputs;
	net.forward(outputs, net.getUnconnectedOutLayersNames());     //

	return outputs;
}

//后处理
Mat post_process(Mat &input_image, vector<Mat> &outputs, const vector<string> &class_name)
{
	// Initialize vectors to hold respective outputs while unwrapping detections.
	vector<int> class_ids;
	vector<float> confidences;
	vector<Rect> boxes;

	// Resizing factor.
	float x_factor = input_image.cols / INPUT_WIDTH;
	float y_factor = input_image.rows / INPUT_HEIGHT;

	float *data = (float *)outputs[0].data;

	const int dimensions = 85;
	const int rows = 25200;
	// Iterate through 25200 detections.
	for (int i = 0; i < rows; ++i)
	{
		float confidence = data[4];
		// Discard bad detections and continue.
		if (confidence >= CONFIDENCE_THRESHOLD)
		{
			float * classes_scores = data + 5;
			// Create a 1x85 Mat and store class scores of 80 classes.
			Mat scores(1, class_name.size(), CV_32FC1, classes_scores);
			// Perform minMaxLoc and acquire index of best class score.
			Point class_id;
			double max_class_score;
			minMaxLoc(scores, 0, &max_class_score, 0, &class_id);
			// Continue if the class score is above the threshold.
			if (max_class_score > SCORE_THRESHOLD)
			{
				// Store class ID and confidence in the pre-defined respective vectors.

				confidences.push_back(confidence);
				class_ids.push_back(class_id.x);

				// Center.
				float cx = data[0];
				float cy = data[1];
				// Box dimension.
				float w = data[2];
				float h = data[3];
				// Bounding box coordinates.
				int left = int((cx - 0.5 * w) * x_factor);
				int top = int((cy - 0.5 * h) * y_factor);
				int width = int(w * x_factor);
				int height = int(h * y_factor);
				// Store good detections in the boxes vector.
				boxes.push_back(Rect(left, top, width, height));
			}

		}
		// Jump to the next column.
		data += 85;
	}

	// Perform Non Maximum Suppression and draw predictions.
	vector<int> indices;
	NMSBoxes(boxes, confidences, SCORE_THRESHOLD, NMS_THRESHOLD, indices);
	for (int i = 0; i < indices.size(); i++)
	{
		int idx = indices[i];
		Rect box = boxes[idx];

		int left = box.x;
		int top = box.y;
		int width = box.width;
		int height = box.height;
		// Draw bounding box.
		rectangle(input_image, Point(left, top), Point(left + width, top + height), BLUE, 3 * THICKNESS);

		// Get the label for the class name and its confidence.
		string label = format("%.2f", confidences[idx]);
		label = class_name[class_ids[idx]] + ":" + label;
		// Draw class labels.
		draw_label(input_image, label, left, top);
	}
	return input_image;
}


int main()
{
	// Load class list.
	vector<string> class_list;
	ifstream ifs("coco.names");
	string line;

	while (getline(ifs, line))
	{
		class_list.push_back(line);
	}

	// Load image.
	Mat frame;
	frame = imread("sample.jpg");

	// Load model.
	Net net;
	net = readNet("yolov5s.onnx");

	vector<Mat> detections;
	detections = pre_process(frame, net);
	Mat cloneMat = frame.clone();

	//Mat img = post_process(frame.clone(), detections, class_list);
	Mat img = post_process(cloneMat, detections, class_list);

	// Put efficiency information.
	// The function getPerfProfile returns the overall time for inference(t) and the timings for each of the layers(in layersTimes)

	vector<double> layersTimes;
	double freq = getTickFrequency() / 1000;
	double t = net.getPerfProfile(layersTimes) / freq;
	string label = format("Inference time : %.2f ms", t);
	putText(img, label, Point(20, 40), FONT_FACE, FONT_SCALE, RED);

	imshow("Output", img);
	waitKey(0);

	return 0;
}
参考网址:(https://learnopencv.com/object-detection-using-yolov5-and-opencv-dnn-in-c-and-python/)


 7216
7216

 被折叠的 条评论
为什么被折叠?
被折叠的 条评论
为什么被折叠?
 到【灌水乐园】发言


