


LVGL移植说明
移植LVGL版本:8.3.6
主控:STM32F407ZGT6
github链接:https://github.com/lvgl/lvgl.git
STM32移植LVGL
步骤说明:
- 下载lvgl的数据包
- 将lvgl的依赖文件加入工程当中
- 修改LVGL的配置文件,主要就是lv_port_disp_template文件和lv_conf文件的配置。
- 配置心跳
- 修改栈堆空间配置
注意事项:
在官方的文档说明当中有这样的一个说明:
基本上,每个能够驱动显示器的现代控制器都适合运行 LVGL。最低要求是:
-
16、32 或 64 位微控制器或处理器
-
> 推荐 16 MHz 时钟速度
-
闪存/ROM:> 64 kB 用于非常重要的组件(建议 > 180 kB)
-
内存:
静态 RAM 使用:~2 kB,具体取决于使用的功能和对象类型堆栈:> 2kB(建议> 8 kB)动态数据(堆):> 2 KB(如果使用多个对象,建议> 48 kB)。
LV_MEM_SIZE在lv_conf.h中设置。显示缓冲区:> *“水平分辨率”*像素(建议>10 *“水平分辨率” )*MCU 或外部显示控制器中的一个帧缓冲器 -
C99 或更新的编译器
①需要的依赖文件

还有examples里面的porting文件,里面有三个.c文件和.h文件
其中lv_port_indev文件是对接触摸事件的
lv_port_disp对接显示事件
lv_port_fs对接文件管理事件
另外,里面的三个文件的.c和.h都有一个开关,需要用到哪个文件需得把相对应的开关打开。
除此之外,还有一个lv_conf_template.h文件,默认是把文件关闭的,需要打开。除此之外 LVGL 的核心实现中,都是使用 #include “lv_conf.h”,所以 lv_conf_template.h 文件改名为 lv_conf.h 是必须要做的;
②移植显示驱动文件
在这一个部分当中主要的就是lv_port_disp文件。要对屏幕的显示驱动进行对接。在这个文件当中,主要配置两个函数。即:disp_flush、lv_port_disp_init。主要对这两个文件进行配置。
首先要定义一下屏幕的分辨率大小
#define MY_DISP_HOR_RES    240
#define MY_DISP_VER_RES    320
lv_port_disp_init函数:
void lv_port_disp_init(void)
{
    /*-------------------------
     * Initialize your display
     * -----------------------*/
    disp_init();

    /*-----------------------------
     * Create a buffer for drawing
     *----------------------------*/

    /**
     * LVGL requires a buffer where it internally draws the widgets.
     * Later this buffer will passed to your display driver's `flush_cb` to copy its content to your display.
     * The buffer has to be greater than 1 display row
     *
     * There are 3 buffering configurations:
     * 1. Create ONE buffer:
     *      LVGL will draw the display's content here and writes it to your display
     *
     * 2. Create TWO buffer:
     *      LVGL will draw the display's content to a buffer and writes it your display.
     *      You should use DMA to write the buffer's content to the display.
     *      It will enable LVGL to draw the next part of the screen to the other buffer while
     *      the data is being sent form the first buffer. It makes rendering and flushing parallel.
     *
     * 3. Double buffering
     *      Set 2 screens sized buffers and set disp_drv.full_refresh = 1.
     *      This way LVGL will always provide the whole rendered screen in `flush_cb`
     *      and you only need to change the frame buffer's address.
     */

    /* Example for 1) */
    static lv_disp_draw_buf_t draw_buf_dsc_1;
    static lv_color_t buf_1[MY_DISP_HOR_RES * MY_DISP_VER_RES/4];                          /*A buffer for 10 rows*/
    lv_disp_draw_buf_init(&draw_buf_dsc_1, buf_1, NULL, MY_DISP_HOR_RES * MY_DISP_VER_RES/4);   /*Initialize the display buffer*/

    /* Example for 2) */
//    static lv_disp_draw_buf_t draw_buf_dsc_2;
//    static lv_color_t buf_2_1[MY_DISP_HOR_RES * 10];                        /*A buffer for 10 rows*/
//    static lv_color_t buf_2_2[MY_DISP_HOR_RES * 10];                        /*An other buffer for 10 rows*/
//    lv_disp_draw_buf_init(&draw_buf_dsc_2, buf_2_1, buf_2_2, MY_DISP_HOR_RES * 10);   /*Initialize the display buffer*/

//    /* Example for 3) also set disp_drv.full_refresh = 1 below*/
//    static lv_disp_draw_buf_t draw_buf_dsc_3;
//    static lv_color_t buf_3_1[MY_DISP_HOR_RES * MY_DISP_VER_RES];            /*A screen sized buffer*/
//    static lv_color_t buf_3_2[MY_DISP_HOR_RES * MY_DISP_VER_RES];            /*Another screen sized buffer*/
//    lv_disp_draw_buf_init(&draw_buf_dsc_3, buf_3_1, buf_3_2,
//                          MY_DISP_VER_RES * LV_VER_RES_MAX);   /*Initialize the display buffer*/

    /*-----------------------------------
     * Register the display in LVGL
     *----------------------------------*/

    static lv_disp_drv_t disp_drv;                         /*Descriptor of a display driver*/
    lv_disp_drv_init(&disp_drv);                    /*Basic initialization*/

    /*Set up the functions to access to your display*/

    /*Set the resolution of the display*/
    disp_drv.hor_res = MY_DISP_HOR_RES;
    disp_drv.ver_res = MY_DISP_VER_RES;

    /*Used to copy the buffer's content to the display*/
    disp_drv.flush_cb = disp_flush;

    /*Set a display buffer*/
    disp_drv.draw_buf = &draw_buf_dsc_1;

    /*Required for Example 3)*/
    //disp_drv.full_refresh = 1;

    /* Fill a memory array with a color if you have GPU.
     * Note that, in lv_conf.h you can enable GPUs that has built-in support in LVGL.
     * But if you have a different GPU you can use with this callback.*/
    //disp_drv.gpu_fill_cb = gpu_fill;

    /*Finally register the driver*/
    lv_disp_drv_register(&disp_drv);
}
在官方文档中有这么一个说明,要有一个显示缓冲区,帧缓冲区和至少 1/10 屏幕大小的缓冲区用于渲染。在这个函数里面官方给出了三种缓冲区模式,分别是单缓冲区,非全尺寸双缓冲区,全尺寸双缓冲区。
初始化了屏幕的宽和高。即分辨率:
	disp_drv.hor_res = MY_DISP_HOR_RES;
    disp_drv.ver_res = MY_DISP_VER_RES;
还调用了一个回调函数,对接底层和芯片平台相关的刷图接口。
disp_drv.flush_cb = disp_flush;
这个接口主要就是要对一个区域进行绘制,并把颜色传入到里面。
static void disp_flush(lv_disp_drv_t * disp_drv, const lv_area_t * area, lv_color_t * color_p)
{
//    if(disp_flush_enabled) {
//        /*The most simple case (but also the slowest) to put all pixels to the screen one-by-one*/

//        int32_t x;
//        int32_t y;
//        for(y = area->y1; y <= area->y2; y++) {
//            for(x = area->x1; x <= area->x2; x++) {
//                /*Put a pixel to the display. For example:*/
//                /*put_px(x, y, *color_p)*/
//                color_p++;
//            }
//        }
//    }
		LCD_Color_Fill(area->x1,area->y1,area->x2,area->y2,(u16*)color_p);
    /*IMPORTANT!!!
     *Inform the graphics library that you are ready with the flushing*/
    lv_disp_flush_ready(disp_drv);
}
这样就把基本的显示接口对接完成。
另外,在配置lv_conf.h文件。
/*Color depth: 1 (1 byte per pixel), 8 (RGB332), 16 (RGB565), 32 (ARGB8888)*/
#define LV_COLOR_DEPTH 16

/*Size of the memory available for `lv_mem_alloc()` in bytes (>= 2kB)*/
  #define LV_MEM_SIZE (48U * 1024U)          /*[bytes]*/
// 用于渲染和 LVGL 内部处理机制的 buffer 个数,如果配置不够的话,LVGL 会打印 ERROR 信息
 // 这个其实是一个 lv_mem_buf_arr_t[LV_MEM_BUF_MAX_NUM] 结构的数组个数;
#define LV_MEM_BUF_MAX_NUM 16

// 这个参数决定了多久处理一起屏幕刷新,默认情况是 30ms
#define LV_DISP_DEF_REFR_PERIOD 30      /*[ms]*/

/*Input device read period in milliseconds*/
// 这个参数决定了多久处理一起input,默认情况是 30ms
#define LV_INDEV_DEF_READ_PERIOD 30     /*[ms]*/

/*1: Show CPU usage and FPS count*/
#define LV_USE_PERF_MONITOR 1

/*1: Show the used memory and the memory fragmentation
 * Requires LV_MEM_CUSTOM = 0*/
#define LV_USE_MEM_MONITOR 0

/*Default Dot Per Inch. Used to initialize default sizes such as widgets sized, style paddings.
 *(Not so important, you can adjust it to modify default sizes and spaces)*/
#define LV_DPI_DEF 130     /*[px/inch]*/
- LV_COLOR_DEPTH参数是设置颜色的深度。有三种模式可以供我们选择,RGB332,RGB565,ARGB8888。三种,根据自己屏幕进行选择即可。
- LV_MEM_SIZE是用于 LVGL 的动态申请/释放内存,这里我们配置的 48KB 的全局数组给 LVGL 使用
- LV_MEM_BUF_MAX_NUM用于渲染和 LVGL 内部处理机制的 buffer 个数
- LV_DISP_DEF_REFR_PERIOD和LV_DISP_DEF_REFR_PERIOD用于处理屏幕的刷新周期,在默认当中处于30ms刷新一次,即满帧为33FPS。
- LV_USE_PERF_MONITOR用于打开或者关闭帧率的监控管理。
- LV_USE_MEM_MONITOR用于打开或者关闭内存的监控管理。
③将文件加入工程当中

将examples里面的porting文件加入工程、src里面的所有文件加入工程当中。
④配置心跳
LVGL 的任务都是基于时间的,包含绘制,响应触摸等等;所以呢,我们需要给它一个时间基准;
LVGL 提供了一个 lv_tick_inc 的函数,我们需要在系统中去周期性调用他,告诉 LVGL 的时间基准;可以用硬件 Timer,也可以使用 SystemTick;
 void TIM3_IRQHandler(void)
 {
   /* USER CODE BEGIN TIM3_IRQn 0 */

   /* USER CODE END TIM3_IRQn 0 */
   /* USER CODE BEGIN TIM3_IRQn 1 */

   /* USER CODE END TIM3_IRQn 1 */
  if(LL_TIM_IsActiveFlag_UPDATE(TIM3) == SET)
   {
     LL_TIM_ClearFlag_UPDATE(TIM3);
     lv_tick_inc(1);
    // LL_GPIO_TogglePin(GPIOF, LL_GPIO_PIN_9);
   }
 }
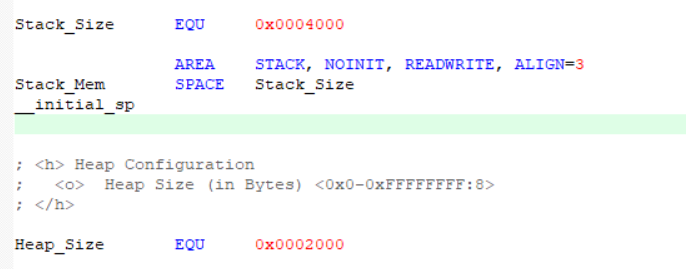
④修改栈堆的空间
在官方文档当中的最小配置文档说明,根据其要求进行对栈堆的大小进行修改。
⑤编译链接
在文档中说明使用C99的风格进行编码,因此,需要将KEIL配置中的C99选项进行勾选。
另外,编译当中会有一些无关紧要的warning,在 Options->C/C++ 的 Misc Controls 中加入以下命令即可。
--diag_suppress=188 --diag_suppress=111 --diag_suppress=550


 3万+
3万+


 被折叠的 条评论
为什么被折叠?
被折叠的 条评论
为什么被折叠?
 到【灌水乐园】发言


