


提示:文章写完后,目录可以自动生成,如何生成可参考右边的帮助文档
前言
第一次写,无原理解析,只有代码!简单又粗暴嘿嘿
一、Cube配置(F407VET6)
1、勾选的是ADC1的5678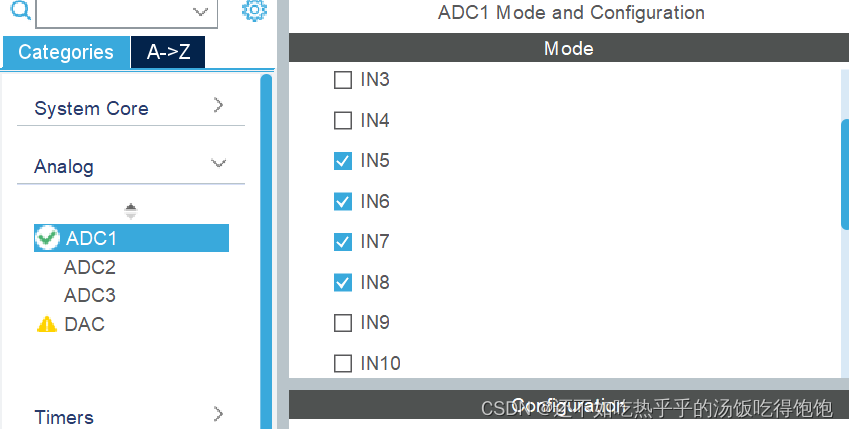
2、


3、DMA 设置

二、使用步骤
1. 代码总览
/* Includes ------------------------------------------------------------------*/
#include "main.h"
#include "adc.h"
#include "dma.h"
#include "usart.h"
#include "gpio.h"

/* Private includes ----------------------------------------------------------*/
/* USER CODE BEGIN Includes */
#include "stdio.h"
#include "string.h"
/* USER CODE END Includes */

/* Private typedef -----------------------------------------------------------*/
/* USER CODE BEGIN PTD */

/* USER CODE END PTD */

/* Private define ------------------------------------------------------------*/
/* USER CODE BEGIN PD */
/* USER CODE END PD */

/* Private macro -------------------------------------------------------------*/
/* USER CODE BEGIN PM */

/* USER CODE END PM */

/* Private variables ---------------------------------------------------------*/

/* USER CODE BEGIN PV */
uint16_t ADCRes[4]; //变量易变,编译器不能随便优化
/* USER CODE END PV */

/* Private function prototypes -----------------------------------------------*/
void SystemClock_Config(void);
/* USER CODE BEGIN PFP */

/* USER CODE END PFP */

/* Private user code ---------------------------------------------------------*/
/* USER CODE BEGIN 0 */

/* USER CODE END 0 */

/**
  * @brief  The application entry point.
  * @retval int
  */
int main(void)
{
  /* USER CODE BEGIN 1 */

  /* USER CODE END 1 */

  /* MCU Configuration--------------------------------------------------------*/

  /* Reset of all peripherals, Initializes the Flash interface and the Systick. */
  HAL_Init();

  /* USER CODE BEGIN Init */

  /* USER CODE END Init */

  /* Configure the system clock */
  SystemClock_Config();

  /* USER CODE BEGIN SysInit */

  /* USER CODE END SysInit */

  /* Initialize all configured peripherals */
  MX_GPIO_Init();
  MX_DMA_Init();//DMA初始化一定要在ADC之前
  MX_ADC1_Init();
  MX_USART1_UART_Init();
  /* USER CODE BEGIN 2 */
  HAL_ADC_Start_DMA(&hadc1,(uint32_t*)ADCRes,8);//4个通道8个,3个就为6,长度不对数据就会出错
  /* USER CODE END 2 */

  /* Infinite loop */
  /* USER CODE BEGIN WHILE */
  while (1)
  {
    /* USER CODE END WHILE */

    /* USER CODE BEGIN 3 */

		char str[64];

		sprintf(str,"%f,%f,%f,%f\r\n",(ADCRes[0]*3.3)/4095,(ADCRes[1]*3.3)/4095,(ADCRes[2]*3.3)/4095,(ADCRes[3]*3.3)/4095);   //一次触发无限次采样
	    HAL_UART_Transmit(&huart1,(uint8_t*)str,strlen(str),HAL_MAX_DELAY);
		HAL_Delay(5000);
  }
  /* USER CODE END 3 */
}
2.代码注意事项以及解析
代码如下(示例):
 /* Initialize all configured peripherals */
  MX_GPIO_Init();
  MX_DMA_Init();//DMA初始化一定要在ADC之前
  MX_ADC1_Init();
  MX_USART1_UART_Init();
DMA初始化一定要在ADC之前!!!!!否则数据就有问题
总结
完整工程如下:
链接:https://pan.baidu.com/s/1gyvAwMwa2n63BWtqZ0wQHw
提取码:5umm


 357
357


 被折叠的 条评论
为什么被折叠?
被折叠的 条评论
为什么被折叠?
 到【灌水乐园】发言


