


游戏角色
一、准备工作
1、场景重命名为Farm
2、导入资源
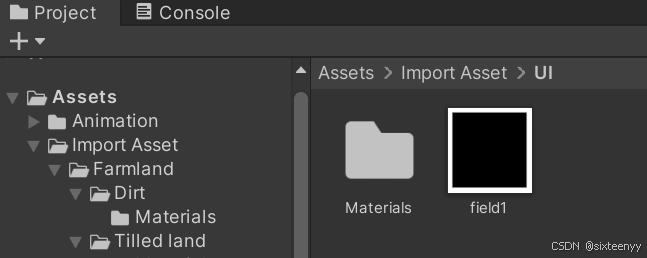
(1) 新建文件夹。Import Asset
(2) 导入:人物、走、跑、休息
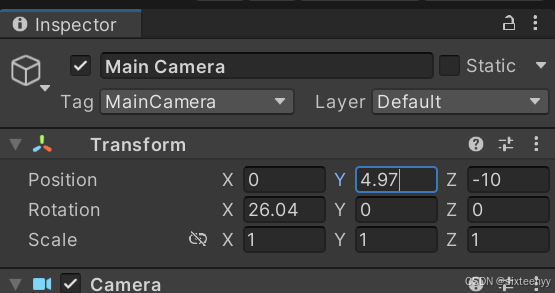
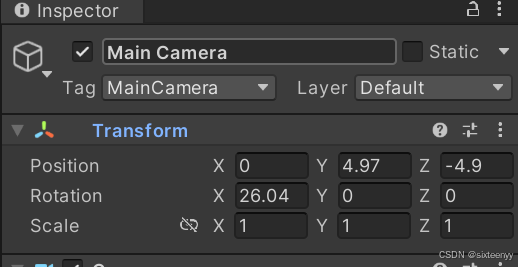
3、设置摄像机
二、制作角色预制体
1、增加角色,命名为Player,设置材质、人类角色
2、设置角色的空闲、走、跑的材质等
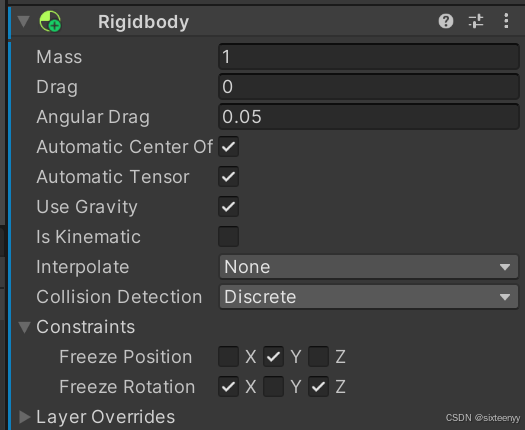
3、添加Rigidbody组件,约束Position上的Y轴AZ,Rotation上的X、Z轴
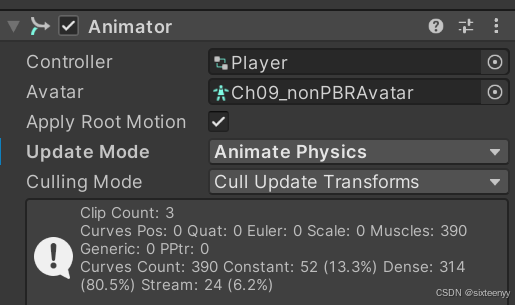
4、设置Update Mode
5、新建Prefabs文件夹,将角色制成预制体
三、设置角色动画
1、新建文件夹Animation,在Animation文件夹下新建文件夹Controllers
2、在Controller文件夹下Create Animator Controller,命名为Player
3、选中Hierarchy中的人物,在Inspector面板中给Animator中的Controller选择Player
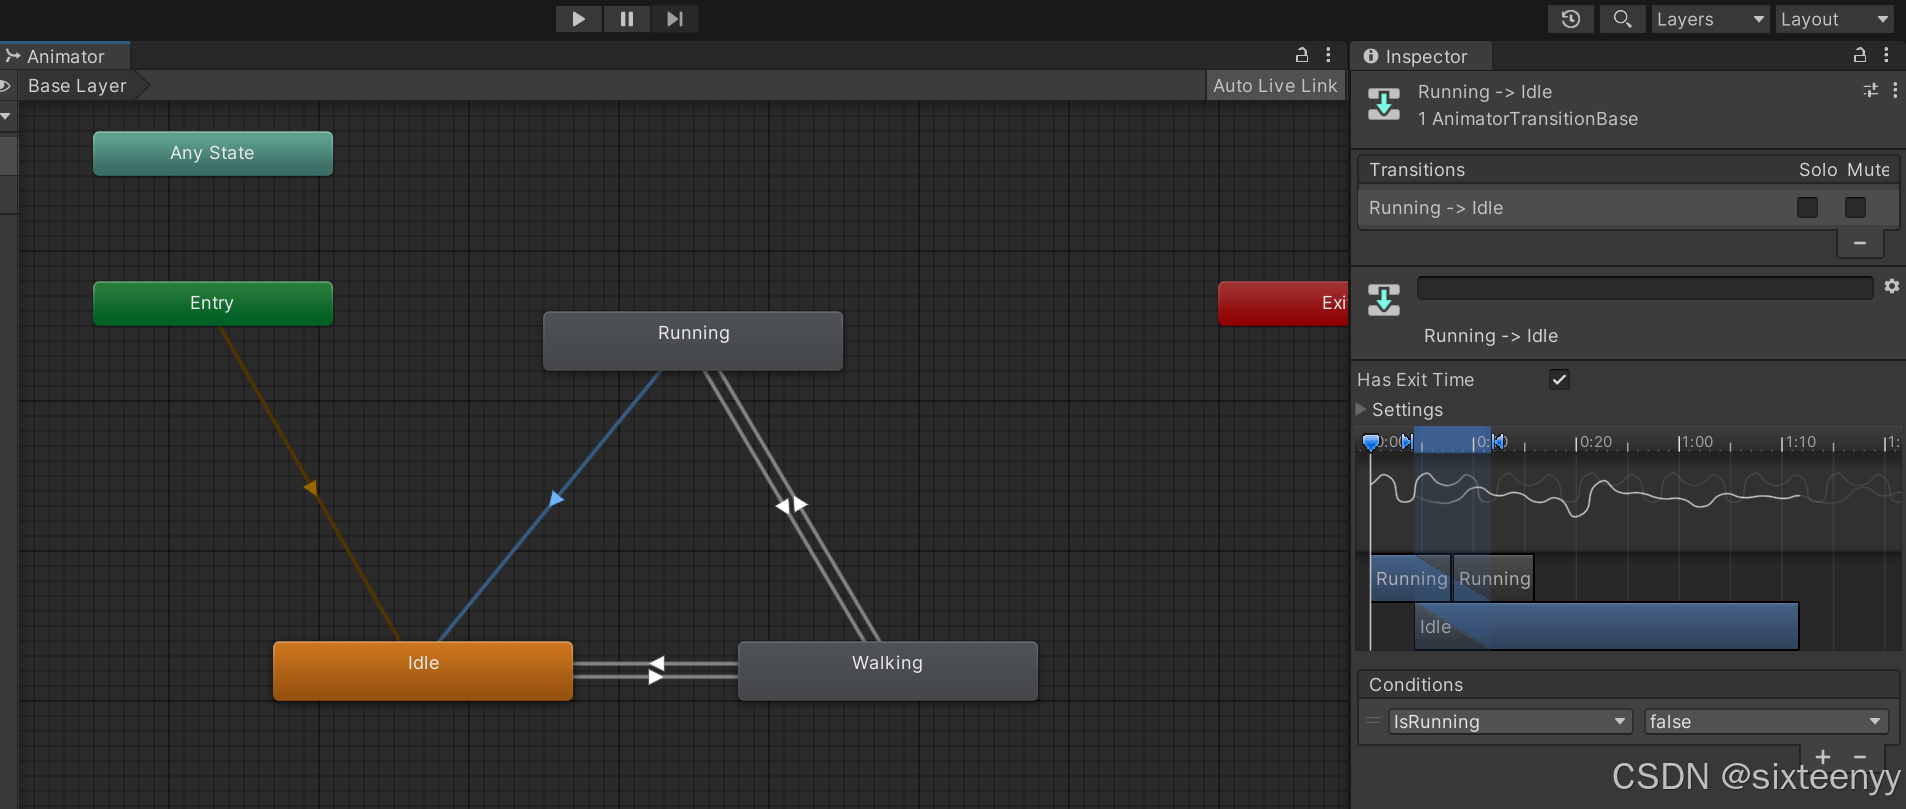
4、打开Controller文件夹下的Player,设置动画
(1) 复制mixano.com,分别重命名为Walking、Running和Idle
(2) 将复制的Walking、Running和Idle转移到Animation文件夹
(3) 分别选择Walking、Running和Idle,设置循环播放(Loop Pose也勾选上)
(4) 打开Controller文件夹下的Player,依次将Idle(默认)、Walking、Running拖入新界面
(5) 选择Parameters,添加Bool,Bool,分别命名为IsWalking,Running。不勾选(默认状态)
(6) 选中Idle到Walk的箭头,右侧点加号,出现IsWalking true,取消勾选Hash Exit Time
(7) 同样的方法设定Walking转换为Idle。将IsWalking设置为false。取消勾选Hash Exit Time
(8) 选中动画编辑器中的Idle、Walking、Running,将Speed改为2
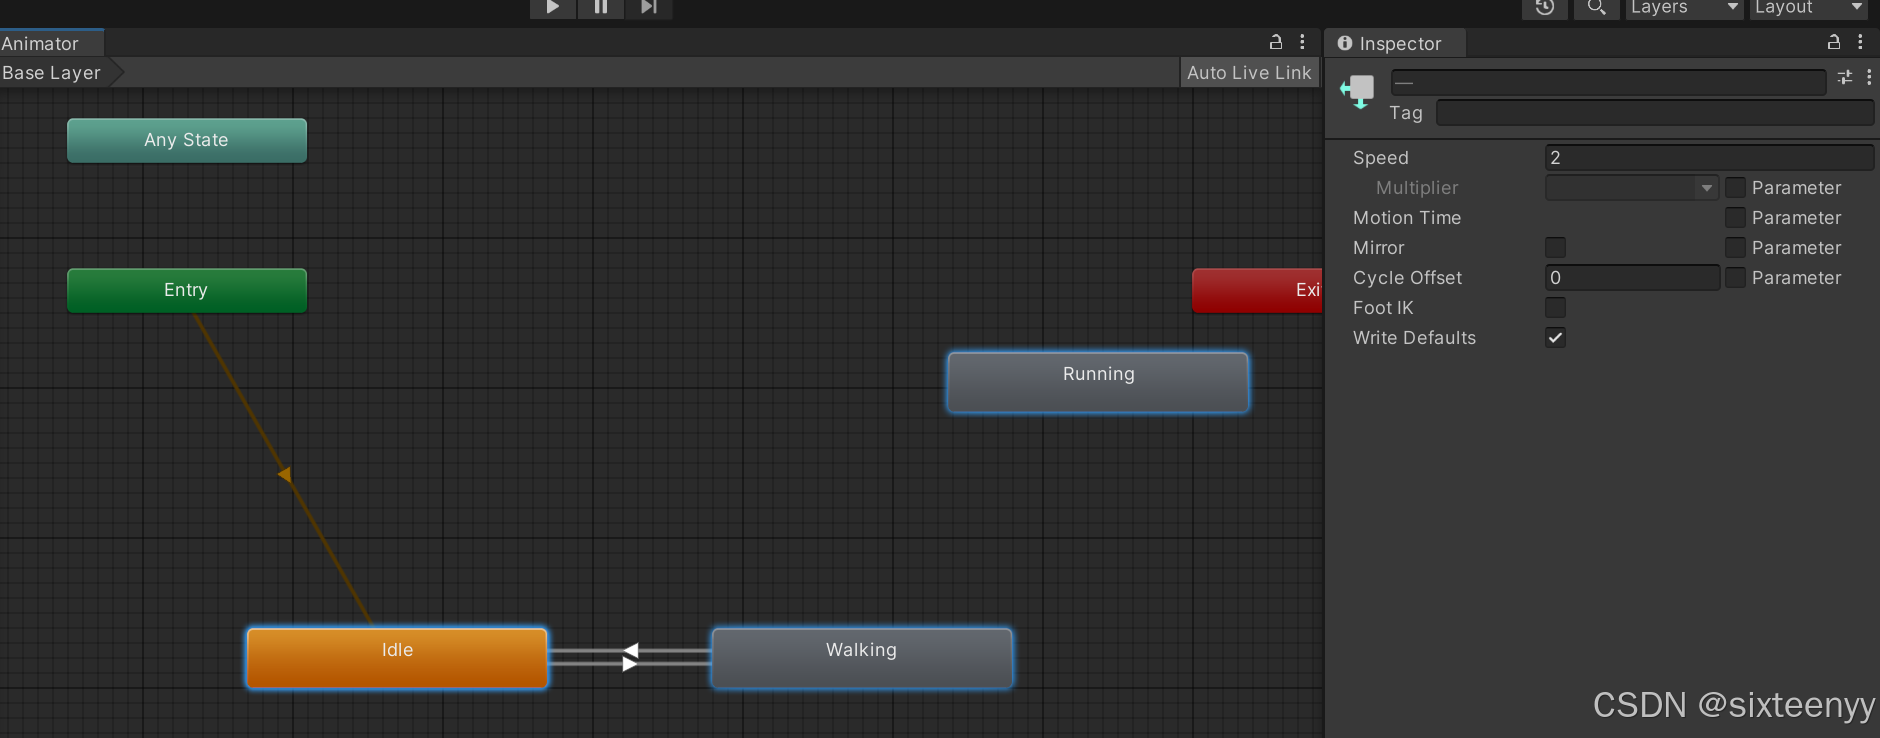
(9) 同样的方法设置Running
四、控制角色行走
1、给角色预制体,添加Character Controller(角色控制器)组件,调节参数至笼罩全身
2、给角色预制体添加PlayerController.cs组件
using System.Collections;
using System.Collections.Generic;
using UnityEngine;

public class PlayerController : MonoBehaviour
{
    public float turnSpeed = 20f;
    Animator animator;
    Rigidbody rb;
    Vector3 movement;
    Quaternion rotation = Quaternion.identity;
    [Header("Movement System")]
    public float walkSpeed = 1f;
    public float runSpeed = 3f;

    private void Start()
    {
        animator = GetComponent<Animator>();
        rb = GetComponent<Rigidbody>();
    }
    private void FixedUpdate()
    {
        float horizontal = Input.GetAxis("Horizontal");
        float vertical = Input.GetAxis("Vertical");
        movement.Set(horizontal, 0f, vertical);

        bool hasHorizontalInput = !Mathf.Approximately(horizontal, 0);
        bool hasVerticalInput = !Mathf.Approximately(vertical, 0);

        float movementSpeed = walkSpeed;

        movement.Normalize();
        Vector3 desiredForward = Vector3.RotateTowards(transform.forward, movement, turnSpeed * Time.deltaTime, 0f);
        rotation = Quaternion.LookRotation(desiredForward);

        rb.MovePosition(rb.position + movement * movementSpeed * Time.deltaTime);
    }
    private void OnAnimatorMove()
    {
        animator.SetBool("IsWalking", movement.magnitude > 0);
        rb.MoveRotation(rotation);
    }
}
3、增加奔跑
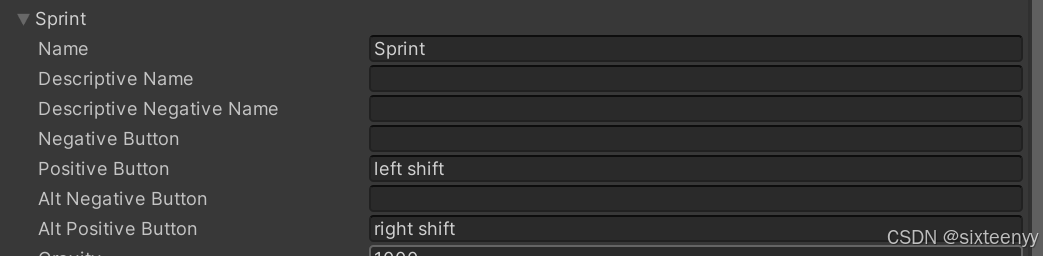
(1) 添加加速键Sprint(left shift right shift)
(2) 回到PlayerController.cs,设置加速和奔跑
using System.Collections;
using System.Collections.Generic;
using UnityEngine;

public class PlayerController : MonoBehaviour
{
    public float turnSpeed = 20f;
    Animator animator;
    Rigidbody rb;
    Vector3 movement;
    Quaternion rotation = Quaternion.identity;
    [Header("Movement System")]
    public float walkSpeed = 1.5f;
    public float runSpeed = 3f;

    private void Start()
    {
        animator = GetComponent<Animator>();
        rb = GetComponent<Rigidbody>();
    }
    private void FixedUpdate()
    {
        float horizontal = Input.GetAxis("Horizontal");
        float vertical = Input.GetAxis("Vertical");
        movement.Set(horizontal, 0f, vertical);

        bool hasHorizontalInput = !Mathf.Approximately(horizontal, 0);
        bool hasVerticalInput = !Mathf.Approximately(vertical, 0);

        float movementSpeed = walkSpeed;
        if (Input.GetButton("Sprint") && (hasHorizontalInput || hasVerticalInput))
        {
            movementSpeed = runSpeed;
        }

        movement.Normalize();
        Vector3 desiredForward = Vector3.RotateTowards(transform.forward, movement, turnSpeed * Time.deltaTime, 0f);
        rotation = Quaternion.LookRotation(desiredForward);

        rb.MovePosition(rb.position + movement * movementSpeed * Time.deltaTime);
    }
    private void OnAnimatorMove()
    {
        animator.SetBool("IsWalking", movement.magnitude > 0);
        animator.SetBool("IsRunning", Input.GetButton("Sprint") && (movement.magnitude > 0));
        rb.MoveRotation(rotation);
    }
}
(3) AI提供的优化
using UnityEngine;

public class PlayerController : MonoBehaviour
{
    public float turnSpeed = 20f;
    public Animator animator;
    public Rigidbody rb;
    public Vector3 movement;
    public Quaternion rotation = Quaternion.identity;
    private float speed;
    private bool isInputUpdated;

    [Header("Movement System")]
    public float walkSpeed = 6f;
    public float runSpeed = 12f;

    void Start()
    {
        animator = GetComponent<Animator>();
        rb = GetComponent<Rigidbody>();
    }

    private void FixedUpdate()
    {
        float horizontal = Input.GetAxis("Horizontal");
        float vertical = Input.GetAxis("Vertical");
        movement.Set(horizontal, 0f, vertical);
        movement.Normalize();

        bool hasHorizontalInput = !Mathf.Approximately(horizontal, 0f);
        bool hasVerticalInput = !Mathf.Approximately(vertical, 0f);

        if (Input.GetButton("Sprint"))
        {
            speed = runSpeed;
            animator.SetBool("IsRunning", true);
        }
        else if (hasHorizontalInput || hasVerticalInput)
        {
            speed = walkSpeed;
            animator.SetBool("IsWalking", true);
        }
        else
        {
            speed = 0f;
            animator.SetBool("IsWalking", false);
            animator.SetBool("IsRunning", false);
        }

        Vector3 desireForward = Vector3.RotateTowards(transform.forward, movement, turnSpeed * Time.fixedDeltaTime, 0f);
        rotation = Quaternion.LookRotation(desireForward);

        isInputUpdated = true;
    }

    private void OnAnimatorMove()
    {
        if (isInputUpdated)
        {
            Vector3 movementSpeed = movement * speed;
            rb.MovePosition(rb.position + movementSpeed * Time.fixedDeltaTime);
            rb.MoveRotation(rotation);

            isInputUpdated = false; // Reset the flag after applying the input
        }
    }
}
五、相机跟随
1、调整相机的Transform
2、给Main Camera增加CameraController.cs组件
using System.Collections;
using System.Collections.Generic;
using UnityEngine;

public class CameraController : MonoBehaviour
{
    public float offsetz = 6f;
    public float smoothing = 8f;
    Transform playerPos;
    void Start()
    {
        playerPos = FindObjectOfType<PlayerController>().transform;
    }

    void Update()
    {
        FollowPlayer();
    }
    void FollowPlayer()
    {
        Vector3 targetPos = new Vector3(playerPos.position.x,
transform.position.y, playerPos.position.z-offsetz);
        transform.position = Vector3.Lerp(transform.position, targetPos, smoothing*Time.deltaTime);
    }
}
农田处理
一、准备工作
1、导入资源:在Import Asset文件夹下新建文件夹Farmland
(1) 新建文件夹Dirt,移入aerial_ground相关文件
(2) 新建文件夹Tilled land,移入 brown_mud_dry相关文件
(3) 新建文件夹Watered land,移入brown_mud相关文件
2、设置一块耕地 Land
3、制备预制体 Land(标签Land)
4、在Scripts文件夹下新建Farming 文件夹,其下新建Land.cs
二、制作农田
1、设置三种状态的耕地
(1) 打开Land预制体,给它添加Land.cs组件,使不同类型的土地渲染不同的材质,赋值
using System.Collections;
using System.Collections.Generic;
using UnityEngine;

public class Land : MonoBehaviour
{
    public enum LandStatus { Soil, Farmland, Watered }
    public LandStatus landStatus;
    public Material soilMat, farmlandMat, wateredMat;
    new Renderer renderer;

    void Start()
    {
        renderer = GetComponent<Renderer>();
        SwitchLandStatus(LandStatus.Soil);
    }
    public void SwitchLandStatus(LandStatus statusToSwitch)
    {
        landStatus = statusToSwitch;
        Material materialToSwitch = soilMat;
        switch (statusToSwitch)
        {
            case LandStatus.Soil: materialToSwitch = soilMat; break;
            case LandStatus.Farmland: materialToSwitch = farmlandMat; break;
            case LandStatus.Watered: materialToSwitch = wateredMat; break;
        }
        renderer.material = materialToSwitch;
    }
}
2、设置选中的土地块的形态
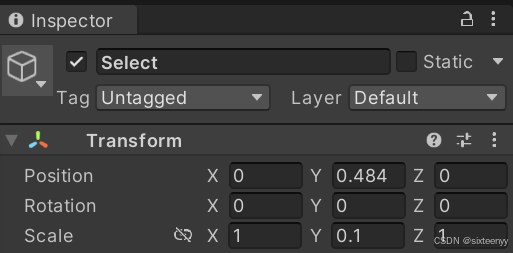
(1) 以Land为父物体,3D Object-Cube,命名Select,设置transform,移除Collider组件。
(2) 给Select制作并导入贴图,放在UI文件夹(新建)
(3) 打开Land预制体,选中Select,将贴图拖放到Select上,UI文件夹中出现新的文件夹Materials
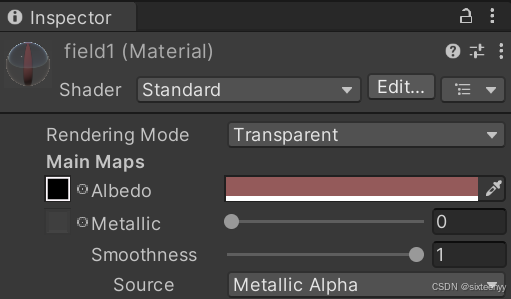
(4) 打开文件夹Materials,选中新生成的材质球,将Rendering Mode更改为Transparent,更改Albedo的颜色,Smoothness设置为1
(5) 隐藏Select或在Land.cs的Start方法中添加select.SetActive(false);或Select(false);
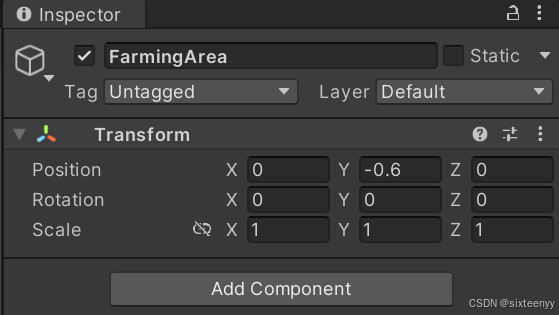
3、回到Unity,复制这个Land,平铺这些田地,并转入FarmingArea空物体中
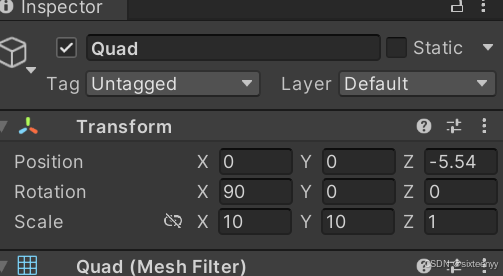
4、创建陆地:3D Object-Quad
三、人与耕地的交互
1、创建和设置检测射线
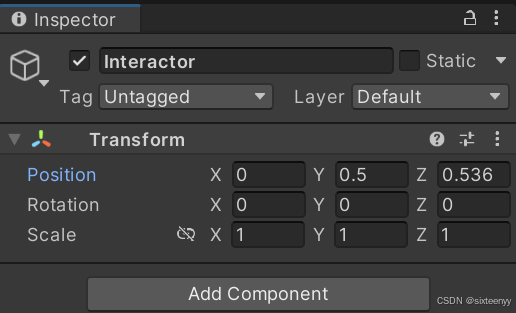
(1) 打开Player预制体,以Player为父物体,Create Empty,命名为 Interactor(发出射线方)
(2) 给Interactor添加PlayerInteraction.cs组件,设置检测射线
using System.Collections;
using System.Collections.Generic;
using UnityEngine;

public class PlayerInteraction : MonoBehaviour
{
    PlayerController playerController;
    void Start()
    {
        playerController = transform.parent.GetComponent<PlayerController>();
    }

    void Update()
    {
        RaycastHit hit;
        if(Physics.Raycast(transform.position, Vector3.down, out hit, 1))
        {
            OnInteractableHit(hit);
        }
    }
    void OnInteractableHit(RaycastHit hit)
    {
        Collider other = hit.collider;
        Debug.Log(other.name);
    }
}
2、设置选中耕地时,出现选中状态
(1) 编辑Land.cs,增加是否被选中的方法
public GameObject select;

void Start()
{
    renderer = GetComponent<Renderer>();
    SwitchLandStatus(LandStatus.Soil);
    Select(false);
}

public void Select(bool toggle)
{
    select.SetActive(toggle);
}
(2) 赋值
(3) 编辑 PlayerInteraction.cs,区分农田和其他土地、设置选中框的显示
using System.Collections;
using System.Collections.Generic;
using UnityEngine;

public class PlayerInteraction : MonoBehaviour
{
    PlayerController playerController;
    Land selectLand = null;
    void Start()
    {
        playerController = transform.parent.GetComponent<PlayerController>();
    }

    void Update()
    {
        RaycastHit hit;
        if (Physics.Raycast(transform.position, Vector3.down, out hit, 1))
        {
            OnInteractableHit(hit);
        }
    }
    void OnInteractableHit(RaycastHit hit)
    {
        Collider other = hit.collider;
        if (other != null && other.CompareTag("Land"))
        {
            Land land = other.GetComponent<Land>();
            if (land != null)
            {
                SelectLand(land); return;
            }
            else { Debug.Log("未选中任何田地"); }
        }
        if (selectLand != null)
        {
            DeselectLand(selectLand);
        }
    }
    void SelectLand(Land land)
    {
        if (land == null) { Debug.Log("你未选择田地"); return; }
        if (selectLand != null) { selectLand.Select(false); }
        selectLand = land;
        land.Select(true);
    }
    void DeselectLand(Land land)
    {
        if(land == null) { Debug.Log("你没有选择田地");return; }
        land.Select(false);
        selectLand = null;
    }
}
3、建立交互系统
(1) 编辑 Land.cs,添加 Interact 方法
public void Interact()
{
   SwitchLandStatus(LandStatus.Farmland);
}
(2) 编辑 PlayerInteraction.cs,添加 Interact 方法,调用Land中的Inseract方法
public void Interact()
{
    if(selectLand != null)
    {
        selectLand.Interact();return;
    }
    Debug.Log("未站在田地上");
}
(3) 编辑 PlayerController.cs,添加 Interact 方法:当点击鼠标或按下左Ctrl键时,调用PlayerInteraction.cs中的Interact方法
PlayerInteraction playerInteraction;
void Start()
{
    animator = GetComponent<Animator>();
    rb = GetComponent<Rigidbody>();
    playerInteraction = GetComponentInChildren<PlayerInteraction>();
}
public void Update()
{
    Interact();
}
public void Interact()
{
    if (Input.GetButtonDown("Fire1"))
    {
        playerInteraction.Interact();
    }
}
农具管理
详细教程 标题四
水壶 标题一
一、准备工作
1、点击Windows- Package Manager,安装2D Sprite(标题四)
2、导入农具资源到UI 文件夹
3、拆分蔬菜和工具
4、在Scripts下创Inventory文件夹,在该文件夹下新建ItemData.cs
5、在Assets文件下创建Data文件夹,在Data下创建两个文件夹:Items和Tools
6、在Tools文件夹新建文件夹Seeds
二、准备农具模型
1、模型下载
(1) Watering Can https://www.cgtrader.com/free-3d-models/household/other/watering-can-c76fe658-8352-4ed8-8d08-b2bc0b0af9e6
(2) hoe https://www.cgtrader.com/items/4145952/download-page
(3) axe https://www.cgtrader.com/free-3d-models/industrial/tool/axe-lowpoly-pbr-simple
(4) pickaxe https://www.cgtrader.com/free-3d-models/various/various-models/pickaxe-5903c86c-f84f-44bd-af34-8f7ce07666b9
2、改变轴心点的简易方法:
使用Empty GameObject作为容器:在Unity中创建一个空的GameObject,将预制体作为其子对象。然后,在父对象的Transform组件中调整其Position属性,将其移动到期望的位置。父对象的轴心点即是预制体的轴心点
3、导入模型资源
(1) 注意:下载后在各自的文件夹中将需要导入的文件夹名改为Texture
(2) 在Import Asset 文件夹分别新建Tools和Items文件夹
(3) 在Tools文件夹中分别创建WarteringCan,Axe,Pickaxe,Shovel,Hoe文件夹
(4) 导入相应农具(将含有下列资源的Textures文件夹直接拖入相应文件夹)
4、制作模型预制体
(1) Create Empty,命名工具
(2) 以步骤(1) 的物体为父物体,添加子物体农具
(3) 制作预制体
三、创建农具的类(ItemData对象)
1、编辑 ItemData.cs,设置所有农具都具备的节点
using System.Collections;
using System.Collections.Generic;
using UnityEngine;

[CreateAssetMenu(menuName = "Items/Item")]
public class ItemData : ScriptableObject
{
    public string description;
    public Sprite thumbnail;
    public GameObject gameModel;
}
2、创建ItemData对象——卷心菜
(1) 在Items文件夹下Create-Item,命名为Cabbage
(2) 选中Cabbage,设置description为A leafy Green vegetable
3、创建工具
(1) 打开Scripts下的Inventory文件夹,新建EquipmentData.cs
using System.Collections;
using System.Collections.Generic;
using UnityEditor.Search;
using UnityEngine;
[CreateAssetMenu(menuName = ("Items/Equipment"))]
public class EquipmentData : ItemData
{
public enum ToolType { Hoe, WateringCan, Axe, Pickaxt, Shovel}
public ToolType Type;
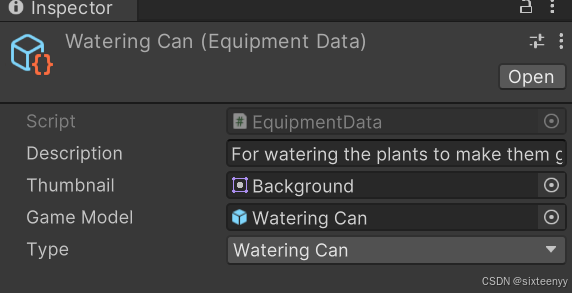
}(2) Tools文件夹Create-Items-Equipment,命名为Hoe,
(3) 同样的方法创建WarteringCan,Axe,Pickaxe,Shovel
(4) 设置它们的description
Axe:For cleaning wood obstacles
Hoe:For tilling the land
Pickaxe:For cleaning rock obstacles
Watering Can:For watering the plants to make them grow
Shovel:Clear plant material
(4) 设置它们的thumbnail:Axe:12;Hoe:13;Pickaxe:11;Shovel:10
4、设置ItemData的Game Model
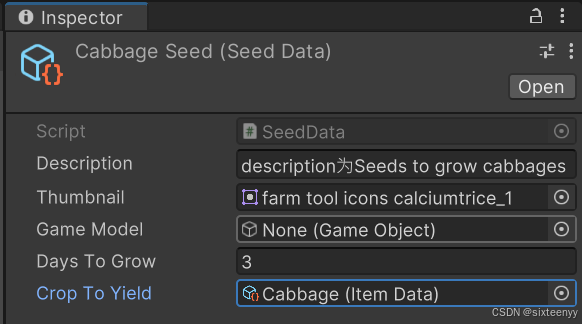
5、创建种子
(1) 在Scripts下的Inventory文件夹下创建SeedData.cs
using System.Collections;
using System.Collections.Generic;
using UnityEngine;

[CreateAssetMenu(menuName =("Items/Seed"))]

public class SeedData : ItemData
{
    public int daysToGrow;
    public ItemData cropToYield;
}
(2) Seed文件夹下创建Seed文件,命名为Cabbage Seed。description为Seeds to grow cabbages
(3) 设置Cabbage Seed的各节点
UI面板
详细教程 标题六
一、准备工作
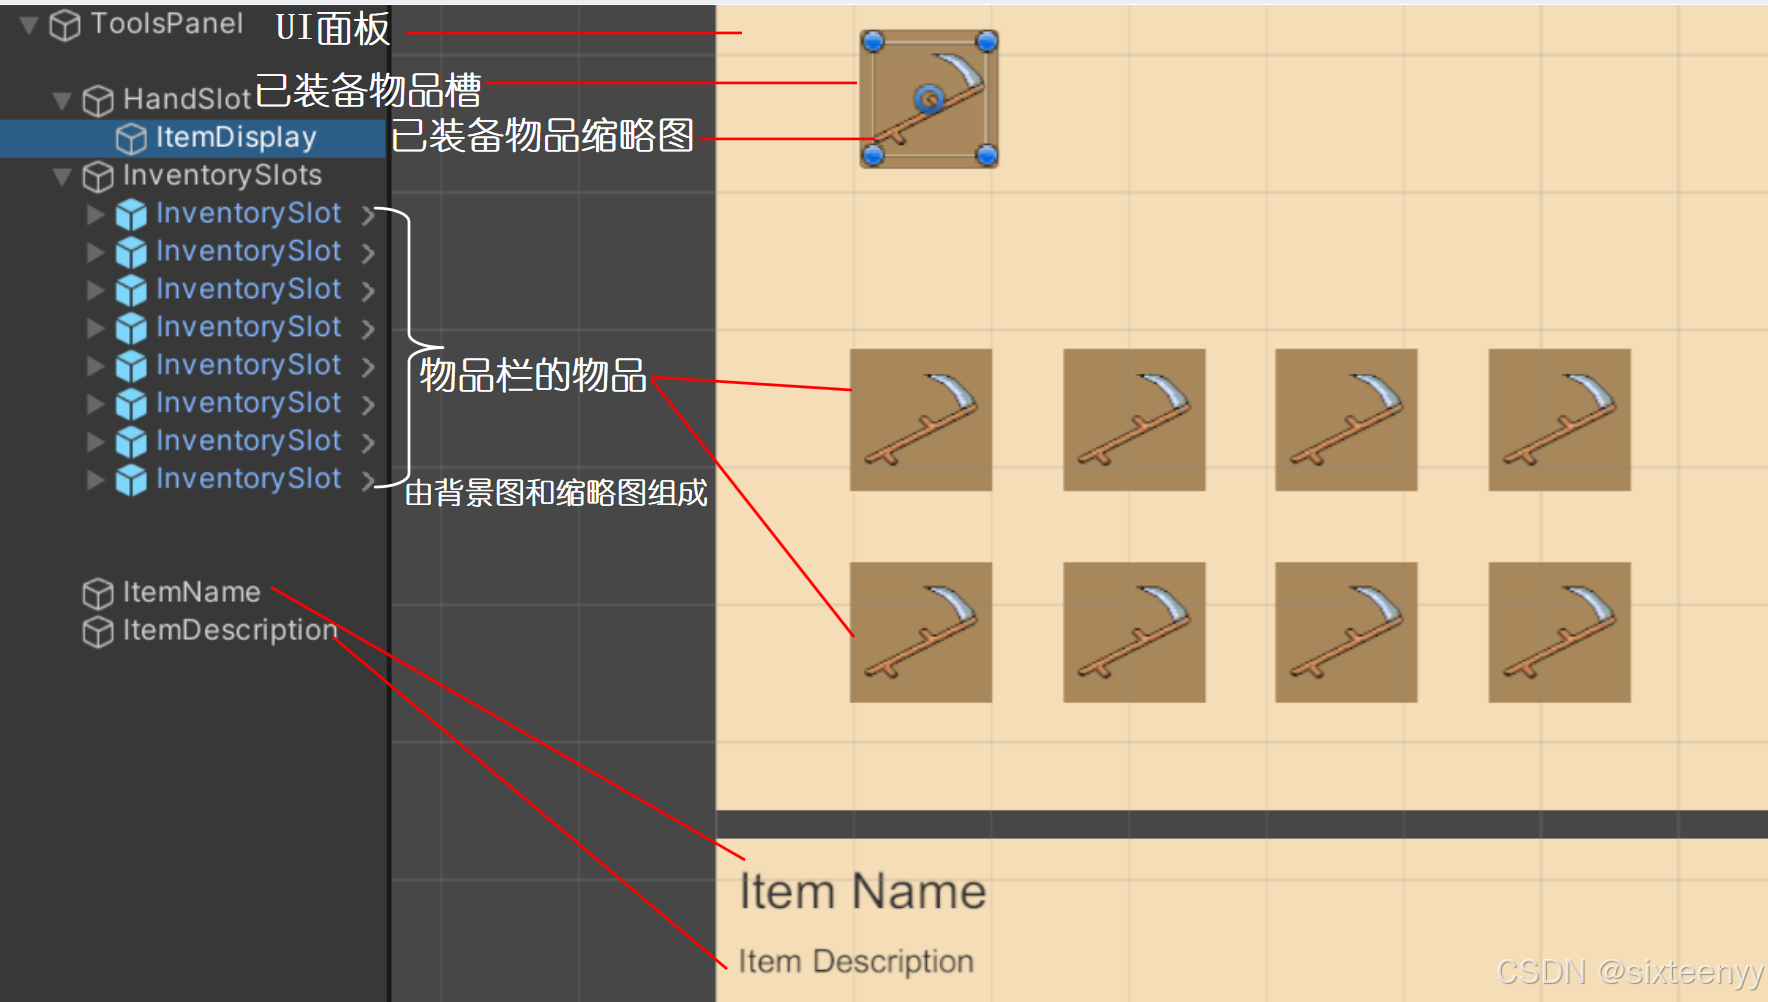
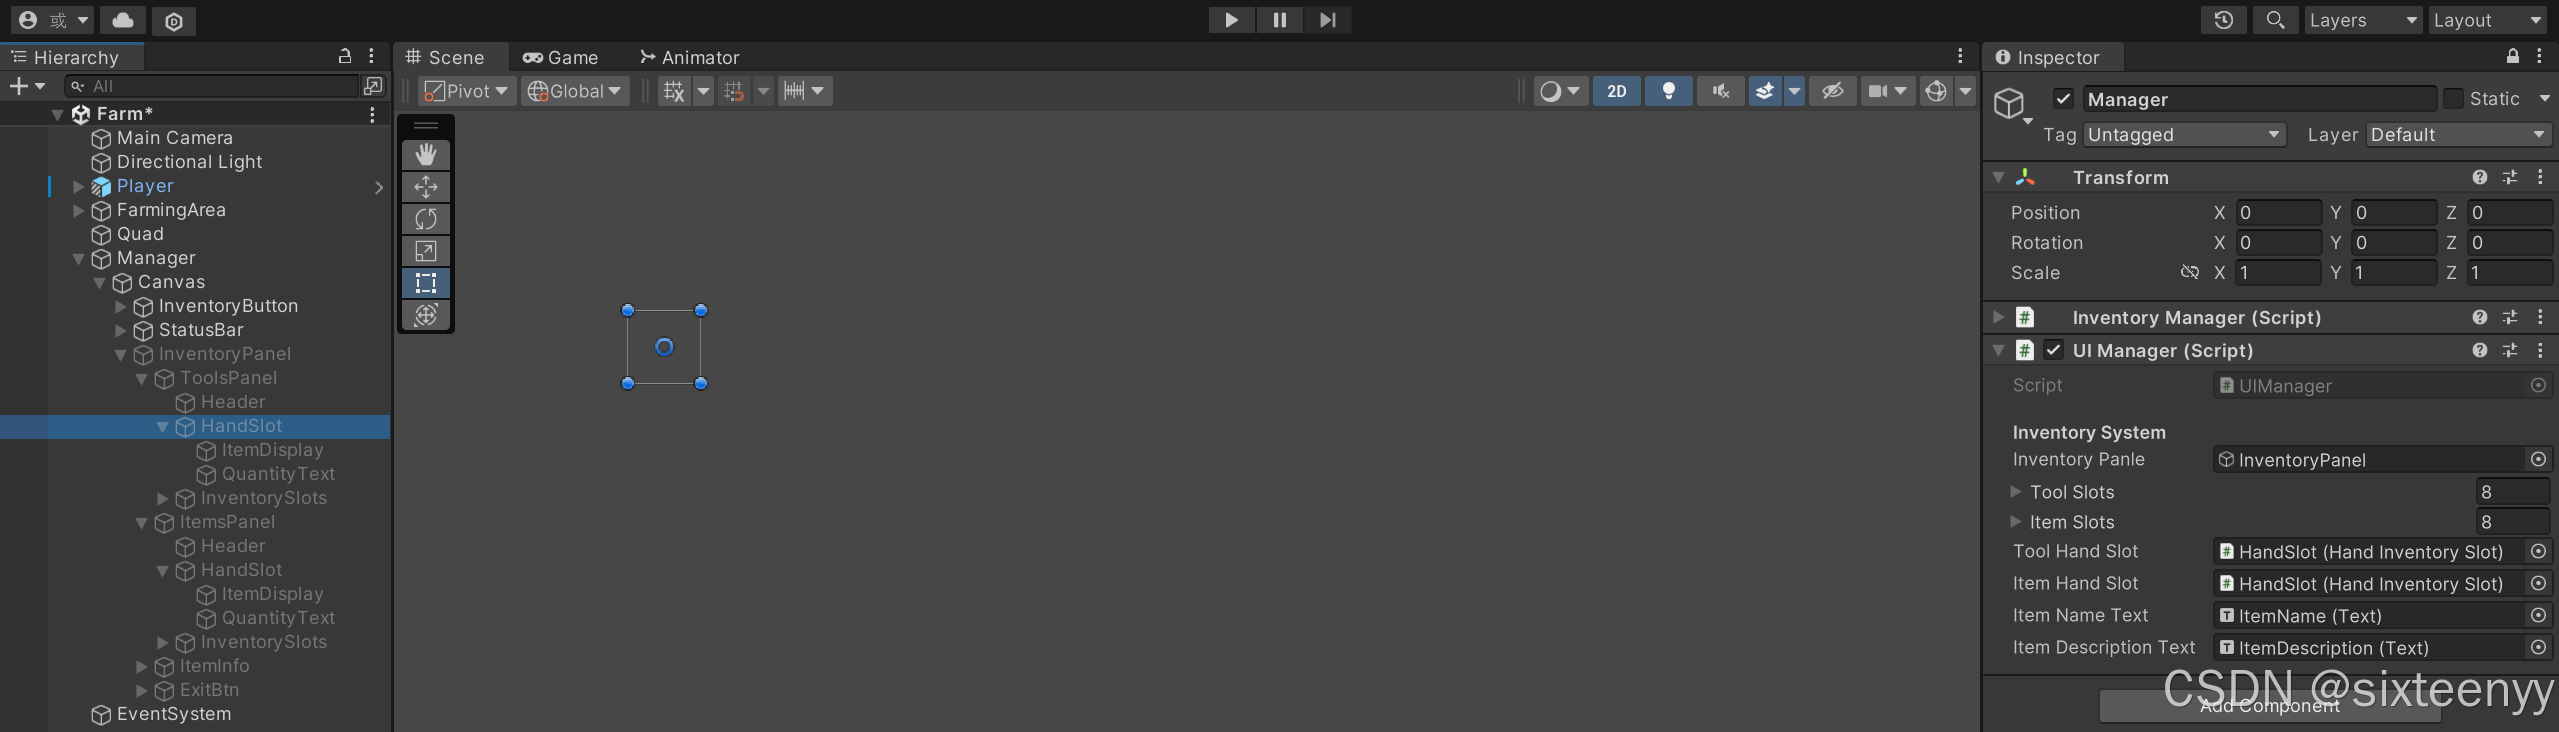
1、Create Empty,命名为Manager
(1) 打开Scripts文件夹,新建UI文件夹
(2) 在UI文件夹中,添加InventoryManager.cs和UIManager.cs
(3) 给 Manager 添加UIManager.cs组件
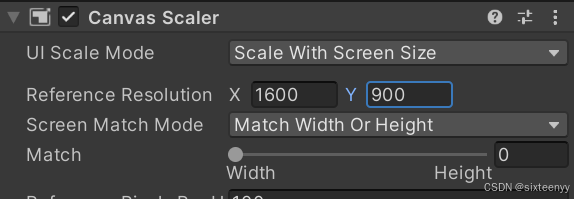
2、新建Canvas:以Manager为父物体,UI-Canvas,设置UI Scale Mode和Reference Resolution
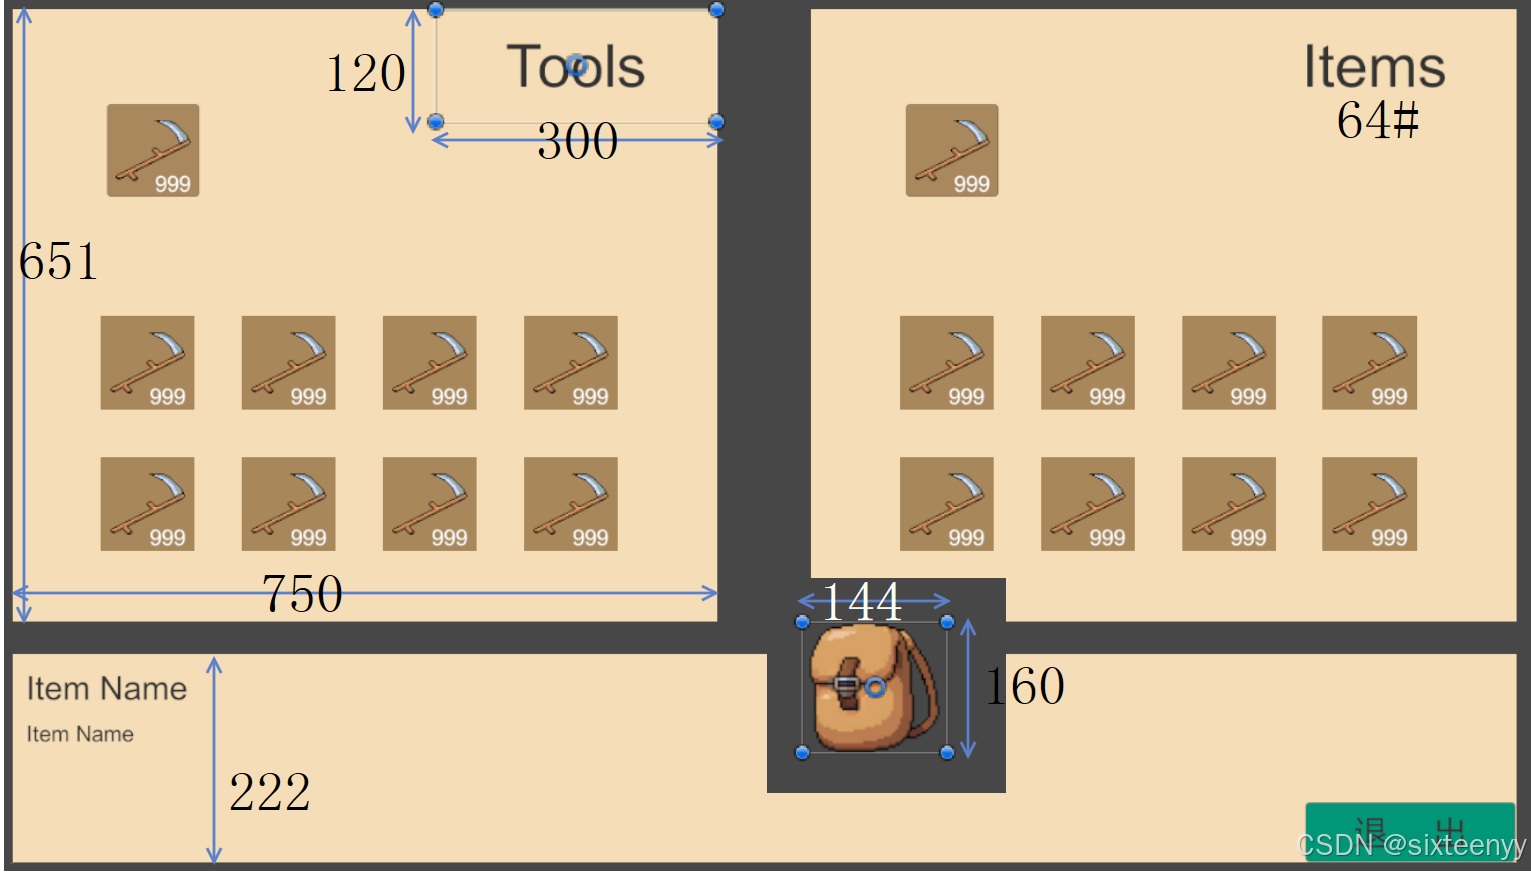
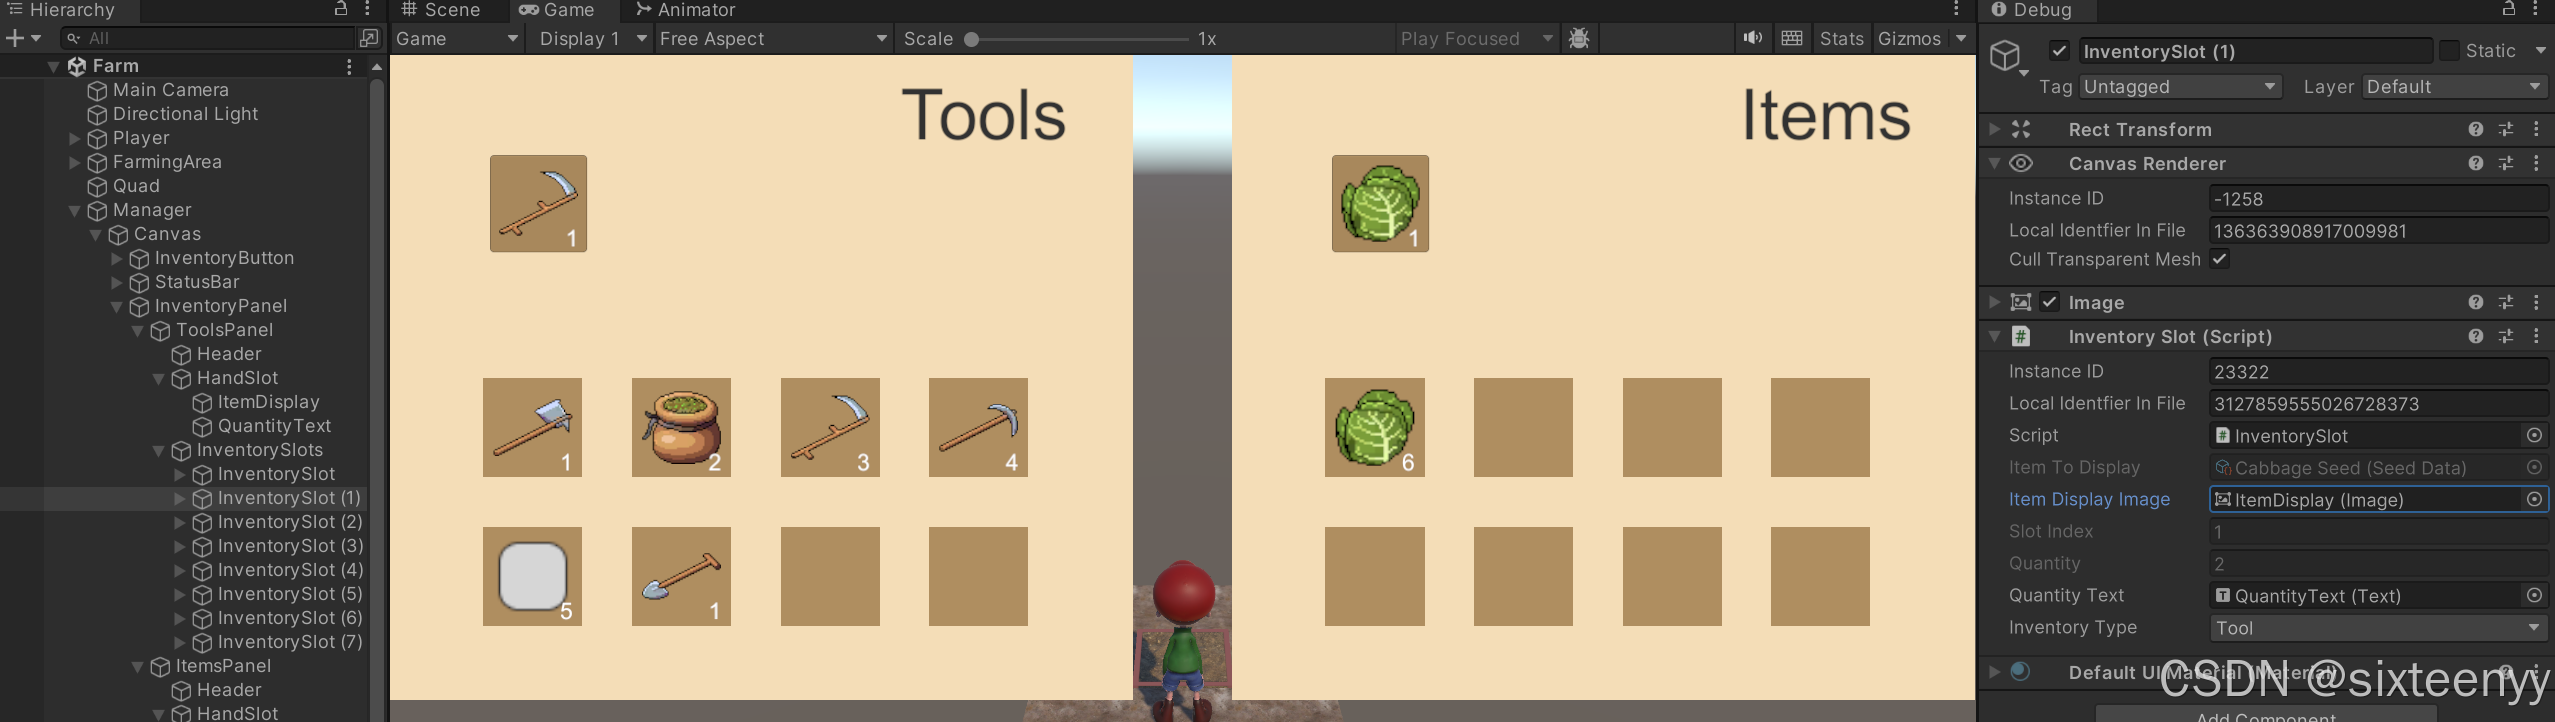
3、创建背包按钮:以Canvas为父物体,创建按钮,命名为InventoryButton,大小160,144
4、以Canvas为父物体,Create Empty。命名为InventoryPanel。Alt+Strech
5、工具栏
(1) 工具栏背景:以InventoryPanel为父物体,UI-Image,命名为ToolsPanel
(2) 工具栏名称:以ToolsPanel为父物体,UI-Text,命名为Header
(3) 选中的工具槽:以ToolsPanel为父物体,UI-Image,命名为HandSlot。
(4) 工具槽预制体:
① 工具槽区域:
以ToolsPanel为父物体,Create Empty。命名为InventorySlots
添加Grid Layout Group组件
② 工具槽背景:
以InventorySlots为父物体,UI-Image
复制得到 8 个工具槽。选中InventorySlots,设置Grid Layout Group,使工具槽均匀分列两行
③ 工具槽预制体
删除复制出的Image,保留的Image重命名为InventorySlot,设置颜色AF8E60,
打开Prefabs文件夹,新建UI 文件夹,将InventorySlot制成预制体
④ 工具槽中工具缩略图
以InventorySlot(物品背景)为父物体,UI-Image,命名为ItemDisplay(物品缩略图)。
设置大小位置图片,勾选Preserve Aspect
⑤ 工具槽中的工具位:复制InventorySlot,得到8个工具位
6、物品栏(收获的物品)
(1) 复制ToolsPanel,重命名为ItemsPanel,调整到适当位置
(2) 更改文本Tools为Items
7、说明面板
(1) 背景:以InventoryPanel为父物体,UI-Image。命名为ItemInfo
(2) 说明文本(名称):以ItemInfo为父物体,UI-text,命名为ItemName
(3) 说明文本(描述):复制ItemName,命名为ItemDescription,设置大小字号等
8、隐藏InventoryPanel面板
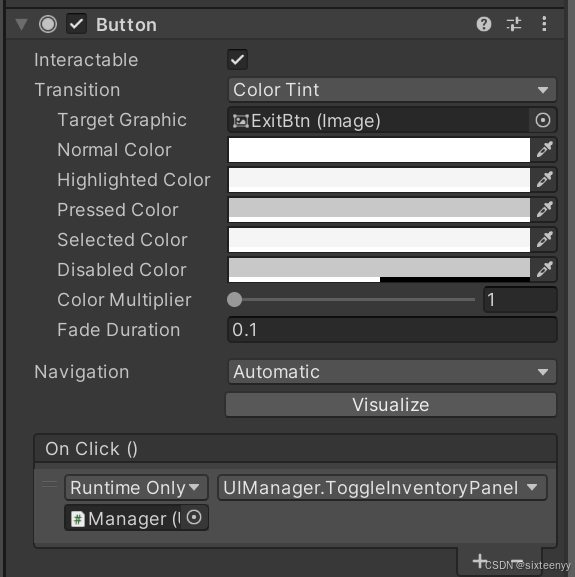
9、创建返回按钮:复制背包按钮,重命名为ExitBtn。放入InventoryPanel面板,设置大小颜色等
10、设置按钮
(1) 编辑UIManager.cs,设置UI面板显示或隐藏
using System.Collections;
using System.Collections.Generic;
using UnityEngine;

public class UIManager : MonoBehaviour
{
    public static UIManager Instance { get; private set; }
    public GameObject inventoryPanle;
    private void Awake()
    {
        if (Instance != null && Instance != this) { Destroy(gameObject); }
        else { Instance = this; }
    }
    private void OnDestroy()
    {
        if (Instance == this) { Instance = null; }
    }
    public void ToggleInventoryPanel()
    {
        inventoryPanle.SetActive(!inventoryPanle.activeSelf);
    }
}
(2) 赋值
(3) 设置按钮:背包、返回两个按钮
二、显示物品缩略图
1、管理一个物品槽中的物品的属性和数量
(1) 打开Scripts-Inventory文件新建 ItemSlotData.cs
using System.Collections;
using System.Collections.Generic;
using UnityEngine;

[System.Serializable]
public class ItemSlotData
{
    public ItemData itemData;
    public int quantity;
    public ItemSlotData(ItemData itemData, int quantity)
    {
        this.itemData = itemData;
        this.quantity = quantity;
        ValidateQuantity();
    }
    public ItemSlotData(ItemData itemData)
    {
        this.itemData = itemData;
        quantity = 1;
        ValidateQuantity();
    }
    public void AddQuantity()
    {
        AddQuantity(1);
    }
    public void AddQuantity(int amountToAdd)
    {
        quantity += amountToAdd;
    }
    public void Remove()
    {
        quantity--;
        ValidateQuantity();
    }
    public void ValidateQuantity()
    {
        if (quantity <= 0 || itemData ==null)
        {
            Empty();
        }
    }
    public void Empty()
    {
        itemData = null;
        quantity = 0;
    }
}
(2) 作用:根据传入的参数不同,创建不同的ItemSlotData对象,并设置该对象的数量
2、显示物品槽中物品的缩略图的方法
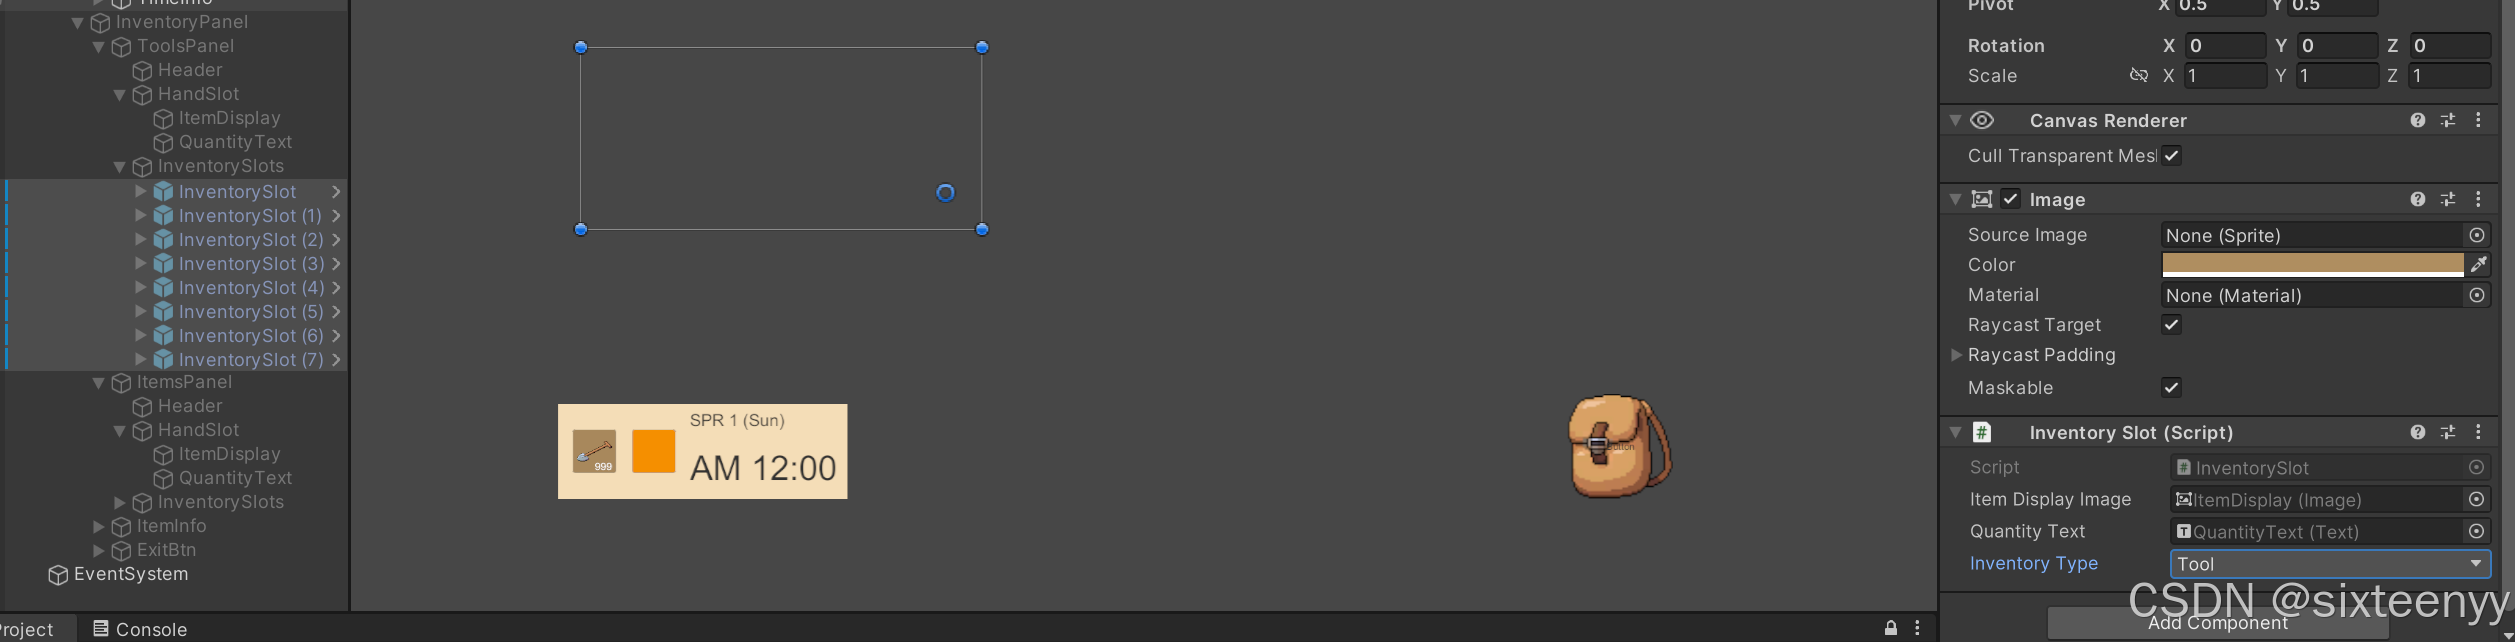
(1) 在UI文件夹下新建InventorySlot.cs,给打开预制体InventorySlot,添加这个组件
(2) 编辑InventorySlot.cs,通过Display方法显示物品缩略图
using System.Collections;
using System.Collections.Generic;
using UnityEngine;
using UnityEngine.UI;

public class InventorySlot : MonoBehaviour
{
    ItemData itemToDisplay;
    public Image itemDisplayImage;

    public enum InventoryType { Item, Tool }
    public InventoryType inventoryType;

    public void Display(ItemSlotData itemSlot)
    {
        itemToDisplay = itemSlot.itemData;
        if (itemToDisplay != null && itemToDisplay.thumbnail != null)
        {
            itemDisplayImage.sprite = itemToDisplay.thumbnail;
            itemDisplayImage.gameObject.SetActive(true);
            return;
        }
        itemDisplayImage.gameObject.SetActive(false);
        this.itemToDisplay = null;
    }
}
(3) 打开InventorySlot 预制体,赋值
(4) 在Hierarchy面板,赋值Type
3、编辑InventoryManager.cs
(1) 初始化工具槽数组和工具槽,检查选中物体类型
using System.Collections;
using System.Collections.Generic;
using UnityEngine;
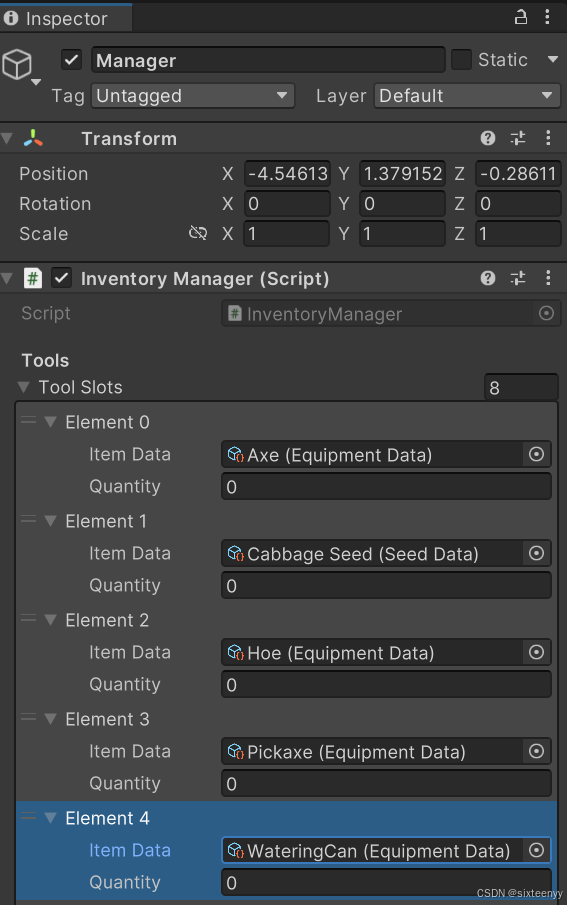
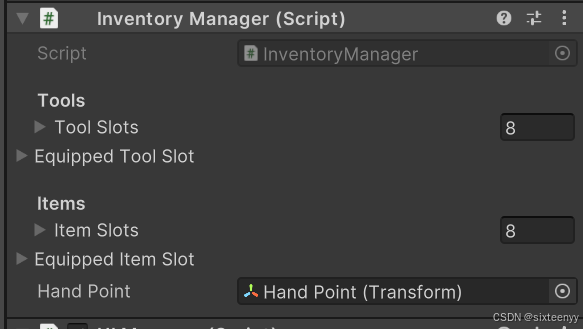
public class InventoryManager : MonoBehaviour
{
public static InventoryManager Instance { get; private set; }
[Header("Tools")]
[SerializeField] private ItemSlotData[] toolSlots = new ItemSlotData[8];
[SerializeField] private ItemSlotData equippedToolSlot = null;
[Header("Items")]
[SerializeField] private ItemSlotData[] itemSlots = new ItemSlotData[8];
[SerializeField] private ItemSlotData equippedItemSlot = null;
private void Awake()
{
if (Instance != null && Instance != this) { Destroy(gameObject); }
else { Instance = this; }
}
private void OnDestroy()
{
if(Instance == this) { Instance = null; }
}
#region Gets and Checks
public ItemSlotData[] GetInventorySlots(InventorySlot.InventoryType inventoryType)
{
if(inventoryType == InventorySlot.InventoryType.Item) { return itemSlots; }
return toolSlots;
}
#endregion
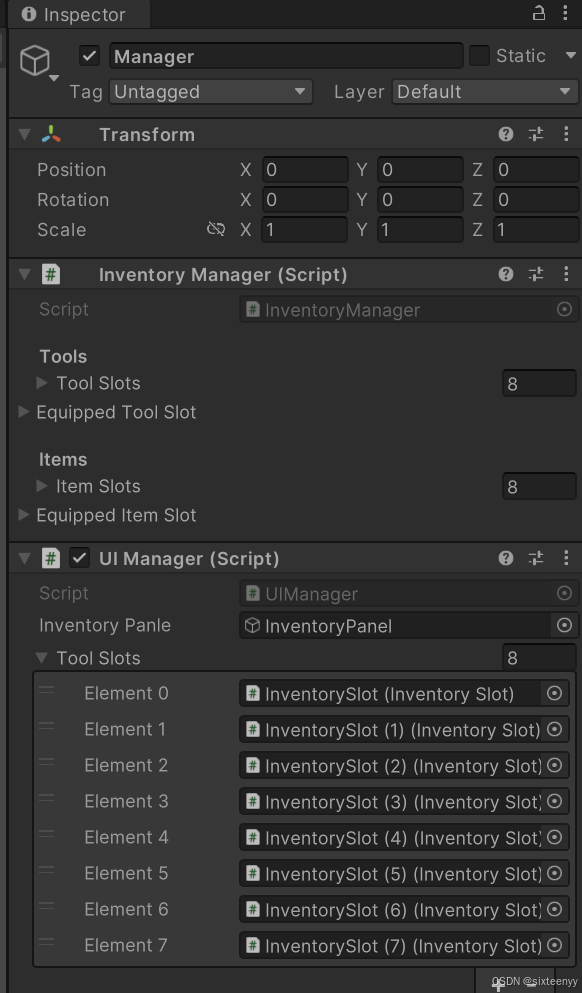
}(2) 赋值
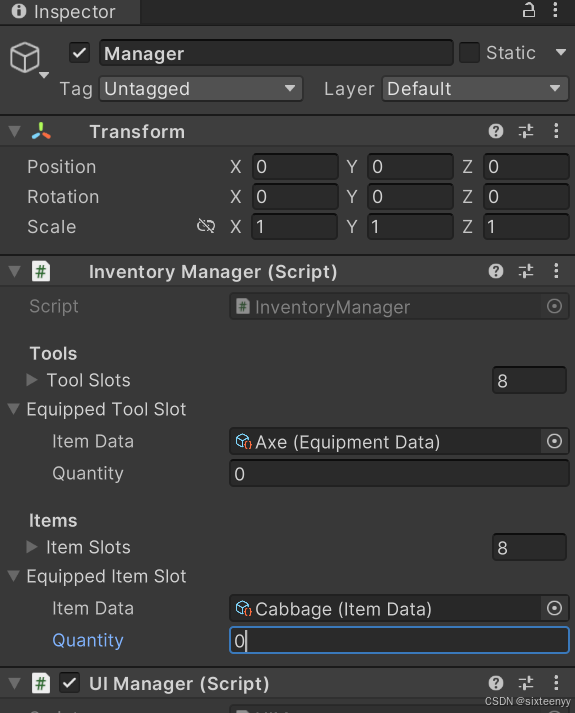
4、编辑UIManager.cs
(1) 显示工具栏中工具的缩略图
using System.Collections;
using System.Collections.Generic;
using UnityEngine;

public class UIManager : MonoBehaviour
{
    public static UIManager Instance { get; private set; }

    public GameObject inventoryPanle;
    public InventorySlot[] toolSlots;

    private void Awake()
    {
        if (Instance != null && Instance != this) { Destroy(gameObject); }
        else { Instance = this; }
    }
    private void OnDestroy()
    {
        if (Instance == this) { Instance = null; }
    }
    void Start()
    {
        RenderInventory();
    }

    public void RenderInventory()
    {
        ItemSlotData[] inventoryToolSlots =InventoryManager.Instance.
GetInventorySlots(InventorySlot.InventoryType.Tool);
        RenderInventoryPanel(inventoryToolSlots,toolSlots);
    }

    void RenderInventoryPanel(ItemSlotData[] slots, InventorySlot[] uiSlots)
    {
        for (int i = 0; i < uiSlots.Length; i++)
        {
            uiSlots[i].Display(slots[i]);
        }
    }
    public void ToggleInventoryPanel()
    {
        inventoryPanle.SetActive(!inventoryPanle.activeSelf);
        //注意增加更新物品栏内容的方法
        RenderInventory();
    }
}
(2) 赋值
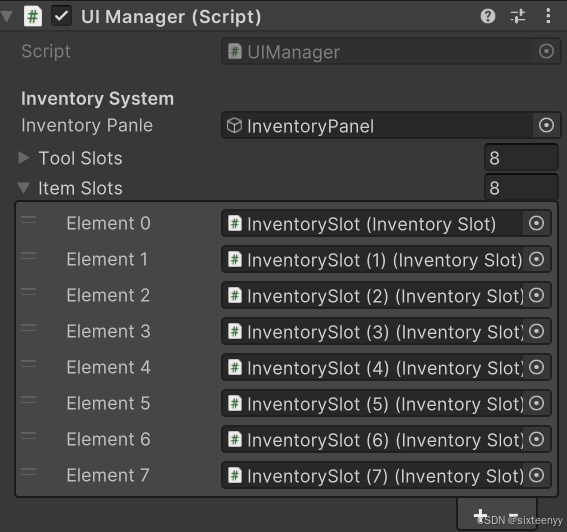
5、显示物品栏(收获物品)缩略图
(1) 编辑UIManager.cs,显示物品栏的缩略图
using System.Collections;
using System.Collections.Generic;
using UnityEngine;

public class UIManager : MonoBehaviour
{
    public static UIManager Instance { get; private set; }
    //归类管理Unity编辑器的Inspector面板
    [Header("Inventory System")]
    public GameObject inventoryPanle;
    public InventorySlot[] toolSlots;
    //物品槽
    public InventorySlot[] itemSlots;

    private void Awake()
    {
        if (Instance != null && Instance != this) { Destroy(gameObject); }
        else { Instance = this; }
    }
    private void OnDestroy()
    {
        if (Instance == this) { Instance = null; }
    }
    void Start()
    {
        RenderInventory();
    }
    public void RenderInventory()
    {
        ItemSlotData[] inventoryToolSlots = InventoryManager.Instance.GetInventorySlots(InventorySlot.InventoryType.Tool);
        //物品槽
        ItemSlotData[] inventoryItemSlots = InventoryManager.Instance.GetInventorySlots(InventorySlot.InventoryType.Item);
        RenderInventoryPanel(inventoryToolSlots, toolSlots);
        //物品槽
        RenderInventoryPanel(inventoryItemSlots, itemSlots);
    }

    void RenderInventoryPanel(ItemSlotData[] slots, InventorySlot[] uiSlots)
    {
        for (int i = 0; i < uiSlots.Length; i++)
        {
            uiSlots[i].Display(slots[i]);
        }
    }
    public void ToggleInventoryPanel()
    {
        inventoryPanle.SetActive(!inventoryPanle.activeSelf);
        RenderInventory();
    }
}
(2) 赋值
三、显示物品名称和描述
1、设置文本
(1) 编辑UIManager.cs,设置文本应该显示的信息
//物品名称和描述文本
public Text itemNameText;
public Text itemDescriptionText;
public void DisplayItemInfo(ItemData data)
{
    if (data == null)
    {
        itemNameText.text = "";
        itemDescriptionText.text = "";
        return;
    }
    itemNameText.text = data.name;
    itemDescriptionText.text = data.description;
}
(2) 赋值
2、编辑InventorySlot.cs, 增加鼠标悬停事件
//增加接口
public class InventorySlot : MonoBehaviour,IPointerEnterHandler,IPointerExitHandler
{
    public void OnPointerEnter(PointerEventData eventData)
    {
        UIManager.Instance.DisplayItemInfo(itemToDisplay);
    }

    public void OnPointerExit(PointerEventData eventData)
    {
        UIManager.Instance.DisplayItemInfo(null);
    }
}
四、显示物品数量
详细教程步骤二
1、添加物品数量文本
(1) 以HandSlot为父物体,UI-Text,重命名为QuantityText,设置大小位置文本字体段落颜色
(2) Apply 预制体InventorySlot的更改
2、验证物品栏槽位的有效性
(1) 编辑InventoryManager.cs
#region Inventory Slot validation
//在Unity编辑器中当脚本发生变化时自动调用,用于验证物品栏槽位的有效性
public void OnValidate()
{
    ValidateInventorySlots(itemSlots);
    ValidateInventorySlots(toolSlots);
}
//验证单个物品栏槽位的有效性。如果物品栏槽位中的物品存在但数量为0,则将数量设置为1
void ValidateInventorySlots(ItemSlotData slot)
{
    if(slot.itemData != null && slot.quantity == 0)
    {
        slot.quantity = 1;
    }
}
//用于验证物品栏槽位数组中的所有槽位的有效性。
//通过循环调用ValidateInventorySlots(ItemSlotData slot)方法来验证每个槽位的有效性
void ValidateInventorySlots(ItemSlotData[] array)
{
    foreach(ItemSlotData slot in array)
    {
        ValidateInventorySlots(slot);
    }
}
#endregion
(2) 假设各物品的初始数量(用于后续测试)
3、显示物品数量
(1) 编辑InventorySlot.cs, 增加需要显示物品的数量
using System.Collections;
using System.Collections.Generic;
using UnityEngine;
using UnityEngine.EventSystems;
using UnityEngine.UI;

public class InventorySlot : MonoBehaviour,IPointerEnterHandler,IPointerExitHandler
{
    ItemData itemToDisplay;
    public Image itemDisplayImage;
    //物品数量
    int quantity;
    //数量文本
    public Text quantityText;

    public enum InventoryType { Item, Tool }
    public InventoryType inventoryType;

    public void Display(ItemSlotData itemSlot)
    {
        itemToDisplay = itemSlot.itemData;
        //初始化数量
        quantity = itemSlot.quantity;
        //初始的数量文本
        quantityText.text = "";
        if (itemToDisplay != null && itemToDisplay.thumbnail != null)
        {
            itemDisplayImage.sprite = itemToDisplay.thumbnail;
            //数量文本
            if (quantity > 1)
            {
                quantityText.text = quantity.ToString();
            }
            itemDisplayImage.gameObject.SetActive(true);
            return;
        }
        itemDisplayImage.gameObject.SetActive(false);
        this.itemToDisplay = null;
    }

    public void OnPointerEnter(PointerEventData eventData)
    {
        UIManager.Instance.DisplayItemInfo(itemToDisplay);
    }

    public void OnPointerExit(PointerEventData eventData)
    {
        UIManager.Instance.DisplayItemInfo(null);
    }
}
(2) 赋值
物品槽和状态栏UI
详细教程 步骤十一、步骤十四
一、准备工作
1、状态栏背景:UI-Image,命名为StatusBar,调整大小、位置等。颜色F4DDB7
2、手持物品:复制一个HandSlot,作为StatusBar的子物体
3、时间框:以StatusBar为父物体,Create Empty,命名为TimeInfo
4、天气位:复制步骤 2 中的HandSlot,作为TimeInfo的子物体,命名为Weather
5、季节和星期:以TimeInfo为父物体UI-Text,重命名为Date
6、时间:以TimeInfo为父物体UI-Text,重命名为Time
7、在UI文件夹新建 HandInventorySlot.cs 作为InventorySlot.cs的子类
using System.Collections;
using System.Collections.Generic;
using UnityEngine;
public class HandInventorySlot : InventorySlot
{
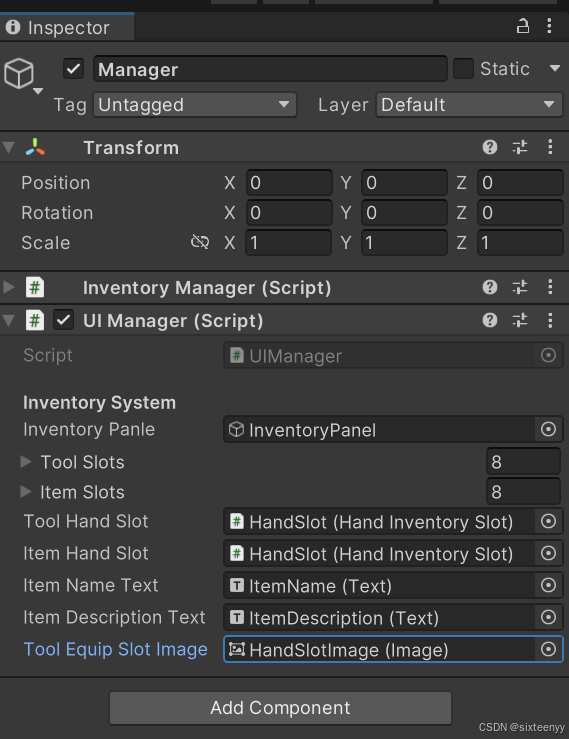
}8、装备物品槽缩略图和数量:
(1) 复制InventorySlot下的ItemDisplay,作为子物体粘贴到ToolPanel下的 HandSlot下
(2) 复制InventorySlot下的QuantityText,作为子物体粘贴到ToolPanel下的 HandSlot下
(3) 给ToolPanel下的 HandSlot 添加HandInventorySlot.cs组件,赋值,更改Inventory Type
(4) 同样的方法设置ItemPanel下的 HandSlot
9、手持物品缩略图和数量:
(1) 以步骤2的HandSlot为父物体,UI-Image,命名为HandSlotImage
(2) 复制InventorySlot下的QuantityText,作为子物体粘贴到StatusBar下的 HandSlot下,调整大小
(3) 给StatusBar下的 HandSlot 添加HandInventorySlot.cs组件,赋值(注意更改Inventory Type)
二、装备物品槽缩略图
1、设定装备物品槽的类型
(1) 编辑 InventoryManager.cs
#region Gets and Checks
//待装备物品的类型
public ItemSlotData GetEquippedSlot(InventorySlot.InventoryType inventoryType)
{
    if(inventoryType == InventorySlot.InventoryType.Item)
    {
        return equippedItemSlot;
    }
    return equippedToolSlot;
}
public ItemSlotData[] GetInventorySlots(InventorySlot.InventoryType inventoryType)
{
    if(inventoryType == InventorySlot.InventoryType.Item) {  return itemSlots; }
    return toolSlots;
}
#endregion
(2) 赋值
2、显示装备槽中的物品
(1) 编辑UIManager.cs
//装备物品槽中的待装备物品
public HandInventorySlot toolHandSlot;
public HandInventorySlot itemHandSlot;
public void RenderInventory()
{
    ItemSlotData[] inventoryToolSlots = InventoryManager.Instance.GetInventorySlots(InventorySlot.InventoryType.Tool);
    RenderInventoryPanel(inventoryToolSlots, toolSlots);
    ItemSlotData[] inventoryItemSlots = InventoryManager.Instance.GetInventorySlots(InventorySlot.InventoryType.Item);
    RenderInventoryPanel(inventoryItemSlots, itemSlots);

    //待装备物品
    toolHandSlot.Display(InventoryManager.Instance.GetEquippedSlot(InventorySlot.InventoryType.Tool));
    itemHandSlot.Display(InventoryManager.Instance.GetEquippedSlot(InventorySlot.InventoryType.Item));
}
(2) 赋值
三、手持槽物品缩略图
1、设定和检查手持物品槽的类型: 编辑 InventoryManager.cs
    #region Gets and Checks
    //手持槽的类型
    public ItemData GetEquippedSlotItem(InventorySlot.InventoryType inventoryType)
    {
        if (inventoryType == InventorySlot.InventoryType.Item)
        {
            return equippedItemSlot.itemData;
        }
        return equippedToolSlot.itemData;
    }
    //装备槽的类型
    public ItemSlotData GetEquippedSlot(InventorySlot.InventoryType inventoryType)
    {
        if(inventoryType == InventorySlot.InventoryType.Item)
        {
            return equippedItemSlot;
        }
        return equippedToolSlot;
    }
    //物品栏中物品槽的类型
    public ItemSlotData[] GetInventorySlots(InventorySlot.InventoryType inventoryType)
    {
        if(inventoryType == InventorySlot.InventoryType.Item) {  return itemSlots; }
        return toolSlots;
    }
    //工具还是种子
    public bool IsTool(ItemData item)
    {
        EquipmentData equipment = item as EquipmentData;
        if (equipment != null) { return true; }
        SeedData seed = item as SeedData;
        return seed != null;
    }
    #endregion
2、显示手持槽中的物品
(1) 编辑UIManager.cs
//手持物品
public Image toolEquipSlotImage;
public void RenderInventory()
{
    ItemSlotData[] inventoryToolSlots = InventoryManager.Instance.GetInventorySlots(InventorySlot.InventoryType.Tool);
    RenderInventoryPanel(inventoryToolSlots, toolSlots);
    ItemSlotData[] inventoryItemSlots = InventoryManager.Instance.GetInventorySlots(InventorySlot.InventoryType.Item);
    RenderInventoryPanel(inventoryItemSlots, itemSlots);

    toolHandSlot.Display(InventoryManager.Instance.GetEquippedSlot(InventorySlot.InventoryType.Tool));
    itemHandSlot.Display(InventoryManager.Instance.GetEquippedSlot(InventorySlot.InventoryType.Item));
    //手持槽物品
    ItemData equippedTool = InventoryManager.Instance.GetEquippedSlotItem(InventorySlot.InventoryType.Tool);
    if (equippedTool != null)
    {
        toolEquipSlotImage.sprite = equippedTool.thumbnail;
        toolEquipSlotImage.gameObject.SetActive(true);
        return;
    }
    toolEquipSlotImage.gameObject.SetActive(false);
}
(2) 赋值
物品交换
一、为物品分配索引值
1、分配被点击物品的索引:编辑InventorySlot.cs,把被点击物品的索引分配给this.slotIndex
//点击的物品槽的索引
int slotIndex;
//把被点击物品的索引分配给this.slotIndex
public void AssignIndex(int slotIndex)
{
    this.slotIndex = slotIndex;
}
2、为物品栏中的每一个物品分配一个索引值:
(1) 编辑UIManager.cs,创建并在Start方法中调用AssignSlotIndex()方法
void Start()
{
    RenderInventory();
    //调用方法
    AssignSlotIndex();
}
//遍历……数组,并为数组中的每个 InventorySlot 对象分配一个索引值
public void AssignSlotIndex()
{
    for(int i = 0; i < toolSlots.Length; i++)
    {
        toolSlots[i].AssignIndex(i);
        itemSlots[i].AssignIndex(i);
    }
}
(2) 索引值被传递给InventorySlot.cs中的AssignIndex(int slotIndex)方法,并在slotIndex中显示出来
二、物品槽到装备槽
1、编辑 ItemSlotData.cs
(1) 比较两个物体的itemData属性是否相同(是不是同一种物体——用于堆叠物品)
(2) 判断某itemData是否为空,可结合Empty方法,用于清空物品槽中的物品
using System.Collections;
using System.Collections.Generic;
using UnityEngine;

[System.Serializable]
public class ItemSlotData
{
    public ItemData itemData;
    public int quantity;
    public ItemSlotData(ItemData itemData, int quantity)
    {
        this.itemData = itemData;
        this.quantity = quantity;
        ValidateQuantity();
    }
    public ItemSlotData(ItemData itemData)
    {
        this.itemData = itemData;
        quantity = 1;
        ValidateQuantity();
    }
    public ItemSlotData(ItemSlotData slotToClone)
    {
        itemData = slotToClone.itemData;
        quantity = slotToClone.quantity;
    }
    public void AddQuantity()
    {
        AddQuantity(1);
    }
    public void AddQuantity(int amountToAdd)
    {
        quantity += amountToAdd;
    }
    public void Remove()
    {
        quantity--;
        ValidateQuantity();
    }
    //比较传入的参数slotToCompare和当前ItemSlotData对象(this)的的itemData属性是否相同
    //并返回一个布尔值
    //具体作用:判断二者是否可以叠加
    //调用方法:A.Stackalbe(B);
    public bool Stackable(ItemSlotData slotToCompare)
    {
        return slotToCompare.itemData == itemData;
    }
    public void ValidateQuantity()
    {
        if (quantity <= 0 || itemData == null)
        {
            Empty();
        }
    }
    public void Empty()
    {
        itemData = null;
        quantity = 0;
    }
    //判断ItemSlotData对象的itemData属性是否为空(null)
    public bool IsEmpty()
    {
        return itemData == null;
    }
}
2、编辑 InventoryManager.cs
(1) 增加两个物品转移的方法
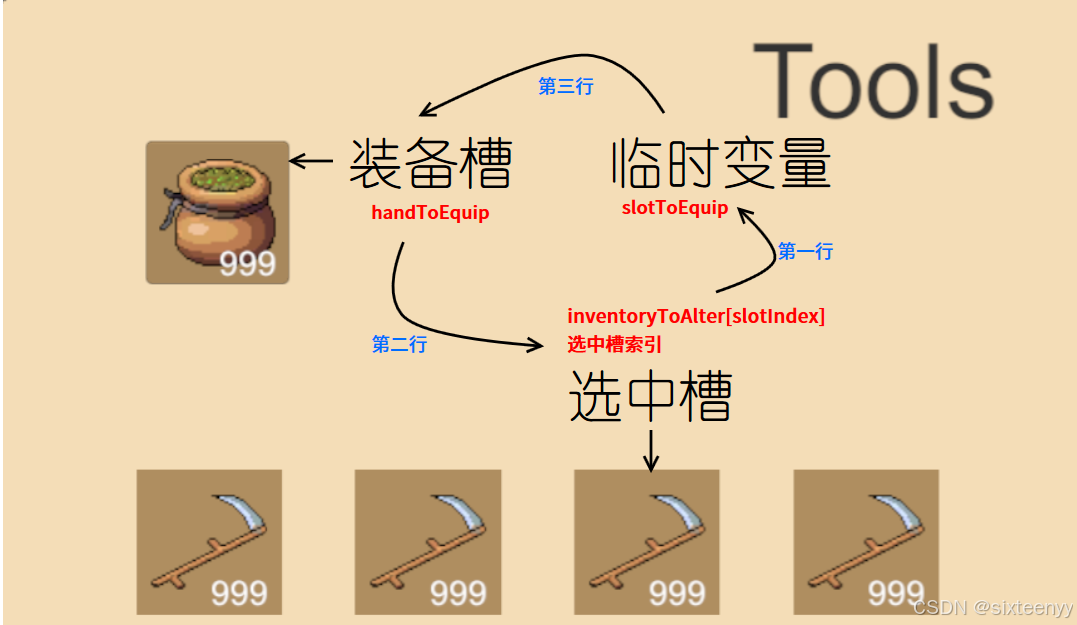
public void InventoryToHand(int slotIndex,InventorySlot.InventoryType inventoryType)
{
    Debug.Log("装备物品");
}
public void HandToInventory(InventorySlot.InventoryType inventoryType)
{
    Debug.Log("收回物品");
}
(2) 检查装备槽位
public void OnValidate()
{
    //检查装备槽位
    ValidateInventorySlots(equippedToolSlot);
    ValidateInventorySlots(equippedItemSlot);
    //检查物品栏中的物品槽位
    ValidateInventorySlots(itemSlots);
    ValidateInventorySlots(toolSlots);
}
(3) 依据选中槽所属的类型,将选中槽赋值给变量handToEquip
    public void InventoryToHand(int slotIndex,InventorySlot.InventoryType inventoryType)
    {
        ItemSlotData handToEquip;
        ItemSlotData[] inventoryToAlter;
        if (inventoryType == InventorySlot.InventoryType.Item)
        {
            handToEquip = equippedItemSlot;
            inventoryToAlter = itemSlots;
        }
        else
        {
            handToEquip = equippedToolSlot;
            inventoryToAlter = toolSlots;
        }
    }
(3) 增加将物品槽中的物品复制到装备槽的方法
public void EquipHandSlot(ItemData item)
{
    if (IsTool(item))
    {
        equippedToolSlot = new ItemSlotData(item);
    }
    else
    {
        equippedItemSlot = new ItemSlotData(item);
    }
}
//根据物品类型将选中物品由物品槽复制到装备槽
public void EquipHandSlot(ItemSlotData itemSlot)
{
    //获取选中物品槽的物品数据
    ItemData item = itemSlot.itemData;
    //调用IsTool方法检查物品类型
    if (IsTool(item))
    {
        //(物品是工具类型)将 itemSlot 中的物品数据复制到 equippedToolSlot 中
        equippedToolSlot = new ItemSlotData(itemSlot);
    }
    else
    {
        //如果物品不是工具类型,将 itemSlot 中的物品数据复制到 equippedItemSlot 中
        equippedItemSlot = new ItemSlotData(itemSlot);
    }
}
(4) 工具槽中的物品转移到装备槽(堆叠或转移)
    public void InventoryToHand(int slotIndex,InventorySlot.InventoryType inventoryType)
    {
        ItemSlotData handToEquip;
        ItemSlotData[] inventoryToAlter;
        if (inventoryType == InventorySlot.InventoryType.Item)
        {
            handToEquip = equippedItemSlot;
            inventoryToAlter = itemSlots;
        }
        else
        {
            handToEquip = equippedToolSlot;
            inventoryToAlter = toolSlots;
        }
        //(选中槽与装备槽物品相同)可以堆叠,同时清空选中槽物品
        if (handToEquip.Stackable(inventoryToAlter[slotIndex]))
        {
            ItemSlotData slotToAlter = inventoryToAlter[slotIndex];
            handToEquip.AddQuantity(slotToAlter.quantity);
            slotToAlter.Empty();
        }
        //不能堆叠,选中槽物品转移到装备槽,同时清空选中槽物品
        else
        {
            //将 inventoryToAlter 数组中的指定索引 slotIndex 的值赋给临时变量 slotToEquip
            ItemSlotData slotToEquip = new ItemSlotData(inventoryToAlter[slotIndex]);
            //将 handToEquip 的值赋给 inventoryToAlter 数组中的指定索引 slotIndex
            inventoryToAlter[slotIndex] = new ItemSlotData(handToEquip);
            //临时变量中的物品复制到装备槽
            EquipHandSlot(slotToEquip);
            //清空handToEquip 的值
            handToEquip.Empty();
        }
        UIManager.Instance.RenderInventory();
} 
3、编辑 InventorySlot.cs,实现物品转移
(1) 增加鼠标点击事件,调用InventoryManager.cs方法
using System.Collections;
using System.Collections.Generic;
using UnityEngine;
using UnityEngine.EventSystems;
using UnityEngine.UI;

//增加点击事件接口
public class InventorySlot : MonoBehaviour,IPointerEnterHandler,IPointerExitHandler,IPointerClickHandler
{
    ItemData itemToDisplay;
    public Image itemDisplayImage;
    //点击的物品槽的索引
    int slotIndex;

    int quantity;
    public Text quantityText;

    public enum InventoryType { Item, Tool }
    public InventoryType inventoryType;

    public void Display(ItemSlotData itemSlot)
    {
        itemToDisplay = itemSlot.itemData;
        quantity = itemSlot.quantity;
        quantityText.text = "";
        if (itemToDisplay != null && itemToDisplay.thumbnail != null)
        {
            itemDisplayImage.sprite = itemToDisplay.thumbnail;
            if (quantity > 1)
            {
                quantityText.text = quantity.ToString();
            }
            itemDisplayImage.gameObject.SetActive(true);
            return;
        }
        itemDisplayImage.gameObject.SetActive(false);
        this.itemToDisplay = null;
    }
    public void AssignIndex(int slotIndex)
    {
        this.slotIndex = slotIndex;
    }

    public void OnPointerEnter(PointerEventData eventData)
    {
        UIManager.Instance.DisplayItemInfo(itemToDisplay);
    }

    public void OnPointerExit(PointerEventData eventData)
    {
        UIManager.Instance.DisplayItemInfo(null);
    }
    //点击事件(注意可重写)
    public virtual void OnPointerClick(PointerEventData eventData)
    {
        InventoryManager.Instance.InventoryToHand(slotIndex, inventoryType);
    }
}
(2) 解析:调用InventoryManager.cs方法。传入的参数:点击的物品槽索引,所处的物品栏类型
4、重写点击事件:
(1) 目的:点击已装备槽时,调用InventoryMagager类中的HandToInventory方法
(2) 编辑HandInventorySlot.cs,传入参数为点击选中槽所属的类型
using System.Collections;
using System.Collections.Generic;
using UnityEngine;
using UnityEngine.EventSystems;

public class HandInventorySlot : InventorySlot
{
    public override void OnPointerClick(PointerEventData eventData)
    {
        InventoryManager.Instance.HandToInventory(inventoryType);
    }
}
三、装备槽到物品槽
1、编辑 InventoryManager.cs
(1) 增加装备槽复制到物品槽的方法
    #region 物品交换的方法
    //根据物品类型将装备槽中的物品由装备槽复制到物品槽
    public bool StackItemToInventory(ItemSlotData itemSlot, ItemSlotData[] inventoryArray)
    {
        //遍历inventoryArray(某类物品栏的物品槽数组)
        for (int i = 0; i < inventoryArray.Length; i++)
        {
            //可以堆叠(装备槽物品与物品栏中的某种物品是同种物品)
            if (inventoryArray[i].Stackable(itemSlot))
            {
                inventoryArray[i].AddQuantity(itemSlot.quantity);
                itemSlot.Empty();
                return true;
            }
        }
        return false;
    }

    public void EquipHandSlot(ItemSlotData itemSlot)
    {
        ItemData item = itemSlot.itemData;
        if (IsTool(item))
        {
            equippedToolSlot = new ItemSlotData(itemSlot);
        }
        else
        {
            equippedItemSlot = new ItemSlotData(itemSlot);
        }
    }
    #endregion
(2) 编辑物品由装备槽转移到物品槽的方法
    public void HandToInventory(InventorySlot.InventoryType inventoryType)
    {
        ItemSlotData handSlot;
        ItemSlotData[] inventoryToAlter;
        //确定点击物品的类型并赋值
        if(inventoryType == InventorySlot.InventoryType.Item)
        {
            handSlot = equippedItemSlot;
            inventoryToAlter = itemSlots;
        }
        else
        {
            handSlot = equippedToolSlot;
            inventoryToAlter = toolSlots;
        }

        if(!StackItemToInventory(handSlot, inventoryToAlter))
        {
            for(int i = 0; i < inventoryToAlter.Length; i++)
            {
                if (inventoryToAlter[i].IsEmpty())
                {
                    inventoryToAlter[i] = new ItemSlotData(handSlot);
                    handSlot.Empty();
                    break;
                }
            }
        }
        UIManager.Instance.RenderInventory();
    }
if (!StackItemToInventory(handSlot, inventoryToAlter)){}
① 先执行StackItemToInventory() 方法,返回一个bool值
② 若物品可以堆叠,则StackItemToInventory() 方法返回的值为true,
if (!StackItemToInventory(handSlot, inventoryToAlter)){}该语句不能执行
③ 若物品不能堆叠,则StackItemToInventory() 方法返回的值为false,
执行 if (!StackItemToInventory(handSlot, inventoryToAlter)){}
2、InventoryManager.cs 的完整代码
using System.Collections;
using System.Collections.Generic;
using UnityEngine;

public class InventoryManager : MonoBehaviour
{
    public static InventoryManager Instance { get; private set; }

    [Header("Tools")]
    [SerializeField] private ItemSlotData[] toolSlots = new ItemSlotData[8];
    [SerializeField] private ItemSlotData equippedToolSlot = null;
    [Header("Items")]
    [SerializeField] private ItemSlotData[] itemSlots = new ItemSlotData[8];
    [SerializeField] private ItemSlotData equippedItemSlot = null;
    private void Awake()
    {
        if (Instance != null && Instance != this) { Destroy(gameObject); }
        else { Instance = this; }
    }
    private void OnDestroy()
    {
        if(Instance == this) { Instance = null; }
    }
    public void InventoryToHand(int slotIndex,InventorySlot.InventoryType inventoryType)
    {
        ItemSlotData handToEquip;
        ItemSlotData[] inventoryToAlter;
        if (inventoryType == InventorySlot.InventoryType.Item)
        {
            handToEquip = equippedItemSlot;
            inventoryToAlter = itemSlots;
        }
        else
        {
            handToEquip = equippedToolSlot;
            inventoryToAlter = toolSlots;
        }
        if (handToEquip.Stackable(inventoryToAlter[slotIndex]))
        {
            ItemSlotData slotToAlter = inventoryToAlter[slotIndex];
            handToEquip.AddQuantity(slotToAlter.quantity);
            slotToAlter.Empty();
        }
        else
        {
            ItemSlotData slotToEquip = new ItemSlotData(inventoryToAlter[slotIndex]);
            inventoryToAlter[slotIndex] = new ItemSlotData(handToEquip);
            EquipHandSlot(slotToEquip);
            handToEquip.Empty();
        }
        UIManager.Instance.RenderInventory();
    }
    public void HandToInventory(InventorySlot.InventoryType inventoryType)
    {
        ItemSlotData handSlot;
        ItemSlotData[] inventoryToAlter;
        if(inventoryType == InventorySlot.InventoryType.Item)
        {
            handSlot = equippedItemSlot;
            inventoryToAlter = itemSlots;
        }
        else
        {
            handSlot = equippedToolSlot;
            inventoryToAlter = toolSlots;
        }
        //将装备槽中的物品堆叠到相应的物品槽中
        if (!StackItemToInventory(handSlot, inventoryToAlter))
        {
            for(int i = 0; i < inventoryToAlter.Length; i++)
            {
                if (inventoryToAlter[i].IsEmpty())
                {
                    inventoryToAlter[i] = new ItemSlotData(handSlot);
                    handSlot.Empty();
                    break;
                }
            }
        }
        UIManager.Instance.RenderInventory();
    }

    #region Gets and Checks
    //手持物品槽的类型
    public ItemData GetEquippedSlotItem(InventorySlot.InventoryType inventoryType)
    {
        if (inventoryType == InventorySlot.InventoryType.Item)
        {
            return equippedItemSlot.itemData;
        }
        return equippedToolSlot.itemData;
    }
    //选中物品槽的类型
    public ItemSlotData GetEquippedSlot(InventorySlot.InventoryType inventoryType)
    {
        if(inventoryType == InventorySlot.InventoryType.Item)
        {
            return equippedItemSlot;
        }
        return equippedToolSlot;
    }
    //物品栏中物品槽的类型
    public ItemSlotData[] GetInventorySlots(InventorySlot.InventoryType inventoryType)
    {
        if(inventoryType == InventorySlot.InventoryType.Item) {  return itemSlots; }
        return toolSlots;
    }
    //检查特定类型的槽位是否已经装备了物品
    public bool SlotEquipped(InventorySlot.InventoryType inventoryType)
    {
        if (inventoryType == InventorySlot.InventoryType.Item)
        {
            return !equippedItemSlot.IsEmpty();
        }
        return !equippedToolSlot.IsEmpty();
    }
    //检查给定的物品是否为工具,若为工具或种子,返回为true,否则返回false
    public bool IsTool(ItemData item)
    {
        //将 item 强制转换为 EquipmentData 类型,并将结果赋值给 equipment 变量
        EquipmentData equipment = item as EquipmentData;
        if (equipment != null)
        {
            return true;
        }
        SeedData seed = item as SeedData;
        return seed != null;
    }
    #endregion

    #region 物品交换的方法
    //根据物品类型将装备槽中的物品由装备槽复制到物品槽
    public bool StackItemToInventory(ItemSlotData itemSlot, ItemSlotData[] inventoryArray)
    {
        //遍历inventoryArray(某类物品栏的物品槽数组)
        for (int i = 0; i < inventoryArray.Length; i++)
        {
            //可以堆叠(装备槽物品与物品栏中的某种物品是同种物品)
            if (inventoryArray[i].Stackable(itemSlot))
            {
                inventoryArray[i].AddQuantity(itemSlot.quantity);
                itemSlot.Empty();
                return true;
            }
        }
        return false;
    }

    //根据物品类型将选中物品由物品槽复制到装备槽
    public void EquipHandSlot(ItemSlotData itemSlot)
    {
        //获取选中物品槽的物品数据
        ItemData item = itemSlot.itemData;
        //调用IsTool方法检查物品类型
        if (IsTool(item))
        {
            //(物品是工具类型)将 itemSlot 中的物品数据复制到 equippedToolSlot 中
            equippedToolSlot = new ItemSlotData(itemSlot);
        }
        else
        {
            //如果物品不是工具类型,将 itemSlot 中的物品数据复制到 equippedItemSlot 中
            equippedItemSlot = new ItemSlotData(itemSlot);
        }
    }
    #endregion

    #region Inventory Slot validation(验证物品栏槽位的有效性)
    public void OnValidate()
    {
        //检查装备槽位
        ValidateInventorySlots(equippedToolSlot);
        ValidateInventorySlots(equippedItemSlot);

        ValidateInventorySlots(itemSlots);
        ValidateInventorySlots(toolSlots);
    }
    void ValidateInventorySlots(ItemSlotData slot)
    {
        if(slot.itemData != null && slot.quantity == 0)
        {
            slot.quantity = 1;
        }
    }
    void ValidateInventorySlots(ItemSlotData[] array)
    {
        foreach(ItemSlotData slot in array)
        {
            ValidateInventorySlots(slot);
        }
    }
    #endregion
}状态栏物品和数量
1、编辑UIManager.cs
using System.Collections;
using System.Collections.Generic;
using UnityEngine;
using UnityEngine.UI;

public class UIManager : MonoBehaviour
{
    public static UIManager Instance { get; private set; }

    [Header("Inventory System")]
    public GameObject inventoryPanle;
    public InventorySlot[] toolSlots;
    public InventorySlot[] itemSlots;

    public HandInventorySlot toolHandSlot;
    public HandInventorySlot itemHandSlot;

    public Text itemNameText;
    public Text itemDescriptionText;
    //状态栏工具数量
    public Text toolQuantityText;

    public Image toolEquipSlotImage;

    private void Awake()
    {
        if (Instance != null && Instance != this) { Destroy(gameObject); }
        else { Instance = this; }
    }
    private void OnDestroy()
    {
        if (Instance == this) { Instance = null; }
    }
    void Start()
    {
        RenderInventory();
        AssignSlotIndex();
    }
    public void AssignSlotIndex()
    {
        for(int i = 0; i < toolSlots.Length; i++)
        {
            toolSlots[i].AssignIndex(i);
            itemSlots[i].AssignIndex(i);
        }
    }
    public void RenderInventory()
    {
        ItemSlotData[] inventoryToolSlots = InventoryManager.Instance.GetInventorySlots
(InventorySlot.InventoryType.Tool);
        RenderInventoryPanel(inventoryToolSlots, toolSlots);
        ItemSlotData[] inventoryItemSlots = InventoryManager.Instance.GetInventorySlots
(InventorySlot.InventoryType.Item);
        RenderInventoryPanel(inventoryItemSlots, itemSlots);

        toolHandSlot.Display(InventoryManager.Instance.GetEquippedSlot
(InventorySlot.InventoryType.Tool));
        itemHandSlot.Display(InventoryManager.Instance.GetEquippedSlot
(InventorySlot.InventoryType.Item));
        //手持槽物品
        ItemData equippedTool = InventoryManager.Instance.GetEquippedSlotItem
(InventorySlot.InventoryType.Tool);
        //状态栏工具数量的文本
        toolQuantityText.text = "";
        if (equippedTool != null)
        {
            toolEquipSlotImage.sprite = equippedTool.thumbnail;
            toolEquipSlotImage.gameObject.SetActive(true);
            //显示状态栏上的工具的数量
            int quantity = InventoryManager.Instance.GetEquippedSlot
(InventorySlot.InventoryType.Tool).quantity;
            if (quantity > 1)
            {
                toolQuantityText.text = quantity.ToString();
            }
            return;
        }
        toolEquipSlotImage.gameObject.SetActive(false);
    }

    void RenderInventoryPanel(ItemSlotData[] slots, InventorySlot[] uiSlots)
    {
        for (int i = 0; i < uiSlots.Length; i++)
        {
            uiSlots[i].Display(slots[i]);
        }
    }
    public void DisplayItemInfo(ItemData data)
    {
        if (data == null)
        {
            itemNameText.text = "";
            itemDescriptionText.text = "";
            return;
        }
        itemNameText.text = data.name;
        itemDescriptionText.text = data.description;
    }
    public void ToggleInventoryPanel()
    {
        inventoryPanle.SetActive(!inventoryPanle.activeSelf);
        RenderInventory();
    }
}
2、赋值
更换土壤状态
详细教程步骤六、2
一、手持农具
1、编辑Player预制体,添加手持物体的位置
以mixamorig6:RightHand为父物体,Create Empty,重命名为Hand Point
2、添加农具模型
(1) 编辑InventoryManager.cs,创建并调用手持农具的方法
//手持物体的位置
public Transform handPoint;
public void InventoryToHand(int slotIndex,InventorySlot.InventoryType inventoryType)
{
    //其它代码
    //手持农具
    if (inventoryType == InventorySlot.InventoryType.Tool)
    {
        RenderHand();
    }
    UIManager.Instance.RenderInventory();
}
//手持农具的方法
public void RenderHand()
{
    if (handPoint.childCount > 0)
    {
        Destroy(handPoint.GetChild(0).gameObject);
    }
    if (SlotEquipped(InventorySlot.InventoryType.Tool))
    {
        Instantiate(GetEquippedSlotItem(InventorySlot.InventoryType.Tool).gameModel, handPoint);
    }
}
//检查手持的槽位是否已经装备了物品
    public bool SlotEquipped(InventorySlot.InventoryType inventoryType)
    {
        if (inventoryType == InventorySlot.InventoryType.Item)
        {
            return !equippedItemSlot.IsEmpty();
        }
        return !equippedToolSlot.IsEmpty();
    }
(2) 解析
public bool IsEmpty()
{
    return itemData == null;
}
equippedToolSlot.IsEmpty() :判断 equippedToolSlot 是否为空,如果为空,IsEmpty()返回 true
public bool SlotEquipped(InventorySlot.InventoryType inventoryType)
{
    return !equippedToolSlot.IsEmpty();
}
!equippedToolSlot.IsEmpty() :取反。
如果equippedToolSlot为空,IsEmpty()返回 true,SlotEquipped()返回false,即:槽位未装备物品
if (SlotEquipped(InventorySlot.InventoryType.Tool))
{
    Instantiate(GetEquippedSlotItem(InventorySlot.InventoryType.Tool).gameModel,handPoint);
}
if (SlotEquipped(InventorySlot.InventoryType.Tool)) :如果槽位装备物品,在手持位生成该物品模型
(3) 赋值
3、装备和卸下农具
(1) 编辑InventoryManager.cs
    public void HandToInventory(InventorySlot.InventoryType inventoryType)
    {
        //其它代码
        //卸下农具
        if(inventoryType == InventorySlot.InventoryType.Tool)
        {
            RenderHand();
        }
        UIManager.Instance.RenderInventory();
    }
二、更改土壤状态
1、编辑Land.cs
    public void Interact()
    {
        //根据点击事件决定土壤状态
        ItemData toolSlot = InventoryManager.Instance.GetEquippedSlotItem(InventorySlot.InventoryType.Tool);
        if (!InventoryManager.Instance.SlotEquipped(InventorySlot.InventoryType.Tool))
        {
            return;
        }
        EquipmentData equipmentTool = toolSlot as EquipmentData;
        if (equipmentTool != null)
        {
            EquipmentData.ToolType toolType = equipmentTool.Type;
            switch (toolType)
            {
                case EquipmentData.ToolType.Hoe: SwitchLandStatus(LandStatus.Farmland); break;
                case EquipmentData.ToolType.WateringCan:
                    if (landStatus == LandStatus.Farmland||landStatus ==LandStatus.Watered)
                    {
                        SwitchLandStatus(LandStatus.Watered);
                    }
                    break;
            }
        }
    }
时间管理系统
详细教程 步骤二
一、设置时间逻辑
1、设定年季周、日时分:Scripts文件夹下创建Time 文件夹,其下创建GameTimestamp.cs,
using System.Collections;
using System.Collections.Generic;
using UnityEngine;
[Serializable]
public class GameTimestamp
{
    public int year;
    public enum Season { Spring, Summer, Fall, Winter }
    public Season season;
    public enum DayOfTheWeek { Saturday, Sunday, Monday, Tuesday, Wednesday, Thursday, Friday }
    public int day, hour, minute;

    public GameTimestamp(int year, Season season, int day, int hour, int minute)
    {
        this.year = year;
        this.season = season;
        this.day = day;
        this.hour = hour;
        this.minute = minute;
    }
    public void UpdateClock()
    {
        minute++;
        if (minute >= 60) { minute = 0; hour++; }
        if (hour >= 24) { hour = 0; day++; }
        if (day > 30)
        {
            day = 1;
            if (season == Season.Winter)
            {
                season = Season.Spring;
                year++;
            }
            else
            {
                season++;
            }
        }
    }
    public GameTimestamp(GameTimestamp timestamp)
    {
        this.year = timestamp.year;
        this.season = timestamp.season;
        this.day = timestamp.day;
        this.hour = timestamp.hour;
        this.minute = timestamp.minute;
    }

    public static int HoursToMinutes(int hour) { return hour * 60; }
    public static int DaysToHours(int day) { return day * 24; }
    public static int SeasonsToDays(Season season)
    {
        int seasonIndex = (int)season;
        return seasonIndex * 30;
    }
    public static int YearsToDays(int year) { return year * 4 * 30; }
    public DayOfTheWeek GetDayOfTheWeek()
    {
        int daysPassed = YearsToDays(year) + SeasonsToDays(season) + day;
        int dayIndex = daysPassed % 7;
        return (DayOfTheWeek)dayIndex;
    }
}
AI的建议
using System;
using System.Collections;
using System.Collections.Generic;
using UnityEngine;
[Serializable]
public class GameTimestamp
{
// 时间的定义
public enum Season { Spring, Summer, Autumn, Winter }
public int hour;
public Season season;
public int day;
public int month;
public int year;
public int minute;
public GameTimestamp(int hour, Season season, int day, int month, int year)
{
this.hour = hour;
this.season = season;
this.day = day;
this.month = month;
this.year = year;
}
public void UpdateClock()
{
minute++;
if (minute >= 60)
{
minute = 0;
hour++;
if (hour >= 24)
{
hour = 0;
day++;
if (day > GetDaysInMonth(month))
{
day = 1;
month++;
if (month > 12){ month = 1;year++; }
}
}
}
}
private int GetDaysInMonth(int month)
{
switch (month)
{
case 2:
return 28;
case 4:
case 6:
case 9:
case 11:
return 30;
default:
return 31;
}
}
public static int HoursToMinutes(int hours)
{
return hours * 60;
}
}
public class TimeManager : MonoBehaviour
{
public static TimeManager Instance { get; private set; }
[SerializeField]
private GameTimestamp timestamp;
public float timeScale = 1.0f;
//太阳的位置
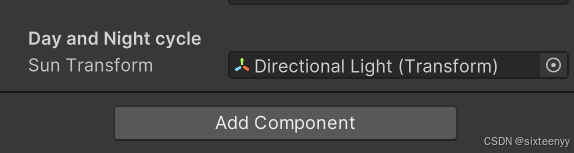
[Header("Day and Night cycle")]
public Transform sunTransform;
private void Awake()
{
if (Instance != null && Instance != this){ Destroy(gameObject); }
else { Instance = this; }
}
private void OnDestroy()
{
if (Instance == this) { Instance = null; }
}
void Start()
{
timestamp = new GameTimestamp(0, GameTimestamp.Season.Spring, 1, 6, 0);
StartCoroutine(TimeUpdate());
}
IEnumerator TimeUpdate()
{
while (true)
{
Tick();
yield return new WaitForSeconds(1f / timeScale);
}
}
public void Tick()
{
timestamp.UpdateClock();
//游戏运行的时间转换成分钟数
int timeInminutes = GameTimestamp.HoursToMinutes(timestamp.hour) + timestamp.minute;
//太阳与地平线间的夹角
float sunAngle = 360f / (24f * 60f) * timeInminutes - 90;
//设置太阳的欧拉角(在三维空间中旋转的向量)
sunTransform.eulerAngles = new Vector3(sunAngle, 0, 0);
}
}2、时间流逝
(1) 给Manager添加TimeManager.cs组件
using System.Collections;
using System.Collections.Generic;
using UnityEngine;

public class TimeManager : MonoBehaviour
{
    public static TimeManager Instance { get; private set; }
    [SerializeField]
    public GameTimestamp timestamp;
    public float timeScale = 1.0f;

    private void Awake()
    {
        if (Instance != null && Instance != this) { Destroy(gameObject); }
        else { Instance = this; }
    }
    private void OnDestroy()
    {
        if (Instance == this) { Instance = null; }
    }
    void Start()
    {
        timestamp = new GameTimestamp(0, GameTimestamp.Season.Spring, 1, 6, 0);
        StartCoroutine(TimeUpdate());
    }
    IEnumerator TimeUpdate()
    {
        while (true)
        {
            Tick();
            yield return new WaitForSeconds(1 / timeScale);
        }
    }
    public void Tick()
    {
        timestamp.UpdateClock();
    }
}
(2) 流逝逻辑:每隔1秒钟,minute ++;
二、时间与光照
1、编辑TimeManager.cs,设置太阳旋转
//太阳的位置
[Header("Day and Night cycle")]
public Transform sunTransform;

void UpdateSunMovement()
{
    //游戏运行的时间转换成分钟数
    int timeInminutes = GameTimestamp.HoursToMinutes(timestamp.hour) + timestamp.minute;
    //太阳与地平线间的夹角
    float sunAngle = 360f / (24f * 60f) * timeInminutes - 90;
    //设置太阳的欧拉角(在三维空间中旋转的向量)
    sunTransform.eulerAngles = new Vector3(sunAngle, 0, 0);
}
public void Tick()
{
    timestamp.UpdateClock();
    UpdateSunMovement();
}
2、赋值
3、测试
(1) 编辑PlayerController.cs
public void Update()
{
    Interact();
    //时间加速
    if(Input.GetKey(KeyCode.RightBracket))
    {
        TimeManager.Instance.Tick();
    }
}
(2) 测试:按下右方括号,时间加速
三、时间管理
1、时间接口:新建ITimeTracker.cs
using System.Collections;
using System.Collections.Generic;
using UnityEngine;

public interface ITimeTracker
{
    void ClockUpdate(GameTimestamp timestamp);
}
2、实时更新时间,并将时间信息传递给已注册的时间跟踪器:编辑TimeManager.cs
using System.Collections;
using System.Collections.Generic;
using UnityEngine;

public class TimeManager : MonoBehaviour
{
    public static TimeManager Instance { get; private set; }
    //内部时钟
    [Header("Internal Clock")]
    [SerializeField]
    GameTimestamp timestamp;
    public float timeScale = 1.0f;

    [Header("Day and Night cycle")]
    public Transform sunTransform;
    //存储所有已注册的时间跟踪器
    List<ITimeTracker> listeners = new List<ITimeTracker>();

    public void Tick()
    {
        timestamp.UpdateClock();
        //遍历所有已注册的时间跟踪器
        foreach(ITimeTracker listener in listeners)
        {
            listener.ClockUpdate(timestamp);
        }
        UpdateSunMovement();
    }
    //注册时间跟踪器,并添加到listerns列表中
    public void RegisterTracker(ITimeTracker listener)
    {
        listeners.Add(listener);
    }
    //注销时间跟踪器,并从列表移除
    public void UnregisterTracker(ITimeTracker listener)
    {
        listeners.Remove(listener);
    }
}
四、显示时间
1、编辑UIManager.cs,更新状态栏上的时间
//接口
public class UIManager : MonoBehaviour, ITimeTracker
//状态栏
[Header("Status Bar")]
public Image toolEquipSlotImage;
public Text toolQuantityText;
//时间文本
public Text timeText;
public Text dateText;
void Start()
{
    RenderInventory();
    AssignSlotIndex();
    //注册时间跟踪器
    TimeManager.Instance.RegisterTracker(this);
}
//处理UI时间回调
public void ClockUpdate(GameTimestamp timestamp)
{
    int hours = timestamp.hour;
    int minutes = timestamp.minute;

    string prefix = "AM";
    if (hours > 12) { prefix = "PM"; hours -= 12; }
    //timeText.text = $"{prefix} {hours:00} :{minutes:00}";
    timeText.text = prefix + hours + ":" + minutes.ToString("00");
    int day = timestamp.day;
    string season = timestamp.season.ToString();
    string dayOfTheWeek = timestamp.GetDayOfTheWeek().ToString();

    //dateText.text = $"{season} {day} ({dayOfTheWeek})";
    dateText.text = season + " " + day + " (" + dayOfTheWeek + ")";
}
2、赋值
五、土壤状态随时间改变
1、比较两个时间戳:编辑GameTimestamp.cs
using System;
using System.Collections;
using System.Collections.Generic;
using UnityEngine;

[Serializable]
public class GameTimestamp
{
    public int year;
    public enum Season { Spring, Summer, Fall, Winter }
    public Season season;
    public enum DayOfTheWeek { Saturday, Sunday, Monday, Tuesday, Wednesday, Thursday, Friday }
    public int day, hour, minute;

    public GameTimestamp(int year, Season season, int day, int hour, int minute)
    {
        this.year = year;
        this.season = season;
        this.day = day;
        this.hour = hour;
        this.minute = minute;
    }
    public void UpdateClock()
    {
        minute++;
        if (minute >= 60) { minute = 0; hour++; }
        if (hour >= 24) { hour = 0; day++; }
        if (day > 30)
        {
            day = 1;
            if (season == Season.Winter)
            {
                season = Season.Spring;
                year++;
            }
            else{ season++; }
        }
    }
    public GameTimestamp(GameTimestamp timestamp)
    {
        this.year = timestamp.year;
        this.season = timestamp.season;
        this.day = timestamp.day;
        this.hour = timestamp.hour;
        this.minute = timestamp.minute;
    }

    public static int HoursToMinutes(int hour) { return hour * 60; }
    public static int DaysToHours(int day) { return day * 24; }
    public static int SeasonsToDays(Season season)
    {
        int seasonIndex = (int)season;
        return seasonIndex * 30;
    }
    public static int YearsToDays(int year) { return year * 4 * 30; }
    public DayOfTheWeek GetDayOfTheWeek()
    {
        int daysPassed = YearsToDays(year) + SeasonsToDays(season) + day;
        int dayIndex = daysPassed % 7;
        return (DayOfTheWeek)dayIndex;
    }
    //比较两个时间戳
    public static int CompareTimestamp(GameTimestamp timestamp1, GameTimestamp timestamp2)
    {
        int timestamp1Hours = DaysToHours(YearsToDays(timestamp1.year))
                            + DaysToHours(SeasonsToDays(timestamp1.season))
                            + DaysToHours(timestamp1.day)
                            + timestamp1.hour;
        int timestamp2Hours = DaysToHours(YearsToDays(timestamp2.year))
                            + DaysToHours(SeasonsToDays(timestamp2.season))
                            + DaysToHours(timestamp2.day)
                            + timestamp2.hour;
        int differnce = timestamp2Hours - timestamp1Hours;
        //返回 difference 的绝对值
        return Mathf.Abs(differnce);
    }
}
2、获取时间戳(timestamp):编辑TimeManager.cs
using System.Collections;
using System.Collections.Generic;
using UnityEngine;

public class TimeManager : MonoBehaviour
{
    public static TimeManager Instance { get; private set; }
    [SerializeField]
    [Header("Internal Clock")]
    GameTimestamp timestamp;
    public float timeScale = 1.0f;

    [Header("Day and Night cycle")]
    public Transform sunTransform;
    List<ITimeTracker> listeners = new List<ITimeTracker>();

    private void Awake()
    {
        if (Instance != null && Instance != this) { Destroy(gameObject); }
        else { Instance = this; }
    }
    private void OnDestroy()
    {
        if (Instance == this) { Instance = null; }
    }

    void Start()
    {
        timestamp = new GameTimestamp(0, GameTimestamp.Season.Spring, 1, 6, 0);
        StartCoroutine(TimeUpdate());
    }

    IEnumerator TimeUpdate()
    {
        while (true)
        {
            Tick();
            yield return new WaitForSeconds(1 / timeScale);
        }
    }
    void UpdateSunMovement()
    {
        int timeInminutes = GameTimestamp.HoursToMinutes(timestamp.hour) + timestamp.minute;
        float sunAngle = 360f / (24f * 60f) * timeInminutes - 90;
        sunTransform.eulerAngles = new Vector3(sunAngle, 0, 0);
    }
    public void Tick()
    {
        timestamp.UpdateClock();
        foreach(ITimeTracker listener in listeners)
        {
            listener.ClockUpdate(timestamp);
        }
        UpdateSunMovement();
    }
    public void RegisterTracker(ITimeTracker listener)
    {
        listeners.Add(listener);
    }
    public void UnregisterTracker(ITimeTracker listener)
    {
        listeners.Remove(listener);
    }
    //获取新的时间戳
    public GameTimestamp GetGameTimestamp()
    {
        return new GameTimestamp(timestamp);
    }
}
3、土壤状态的改变
(1) 编辑Land.cs,
//接口
public class Land : MonoBehaviour,ITimeTracker
{
    //灌溉时间
    GameTimestamp timeWatered;

    void Start()
    {
        renderer = GetComponent<Renderer>();
        SwitchLandStatus(LandStatus.Soil);
        Select(false);
        //注册时间戳
        TimeManager.Instance.RegisterTracker(this);
    }

    public void SwitchLandStatus(LandStatus statusToSwitch)
    {
        landStatus = statusToSwitch;
        Material materialToSwitch = soilMat;
        switch (statusToSwitch)
        {
            case LandStatus.Soil: materialToSwitch = soilMat; break;
            case LandStatus.Farmland: materialToSwitch = farmlandMat; break;
            case LandStatus.Watered:
                materialToSwitch = wateredMat;
                //灌溉的时间戳
                timeWatered = TimeManager.Instance.GetGameTimestamp();
                break;
        }
        renderer.material = materialToSwitch;
    }
    //灌溉后土壤状态的变化
    public void ClockUpdate(GameTimestamp timestamp)
    {
        if(landStatus == LandStatus.Watered)
        {
            int hoursElapsed = GameTimestamp.CompareTimestamp(timeWatered, timestamp);
            if(hoursElapsed > 24)
            {
                SwitchLandStatus(LandStatus.Farmland);
            }
        }
    }
}
作物管理
一、准备工作
1、制作Cabbage预制体,并给预制体Cabbage添加Mesh Collider,勾选Convex和Is Trigger
2、打开Asset-Data-Items,选择Cabbage,设置GameModle
3、素材准备
(1) 导入Cartoon_Farm_Crops(来自Unity官网)
(2) 把Standard Asset文件夹拖到Cartoon_Farm_Crops文件夹中
(3) 把Cartoon_Farm_Crops文件夹转移到Assets-Import Assets文件夹中
3、准备幼苗预制体
(1) 打开Assets-Import Assets-Cartoon_Farm_Crops-Prefabs-Standard文件夹
(2) 复制Carrot_Plant粘贴到Asset-Prefabs文件夹中。重命名为Cabbage Seedling
二、制作卷心菜
1、制作种子预制体
(1) Create Empty,重命名为Crop,Reset它的Transform
(2) 给Crop添加子物体Dirt_Pile、Cabbage Seeding和Cabbage,表示卷心菜的三个阶段
(3) 将Dirt_Pile重命名为Seed,将Crop制成预制体,把相关的预制体都放在新建的文件夹Crops中
(4) 打开Crop预制体,删除子物体Seed的Mesh Collider组件
(5) 删除Hierarchy面板上的Crop
2、设置Item对象Cabbage Seed(卷心菜)
(1) 编辑SeedData.cs,增加卷心菜的幼苗状态
using System.Collections;
using System.Collections.Generic;
using UnityEngine;

[CreateAssetMenu(menuName =("Items/Seed"))]

public class SeedData : ItemData
{
    public int daysToGrow;
    public ItemData cropToYield;
    //幼苗
    public GameObject seedling;
}
(2) 保留预制体Crop的子物体中的Seed,删除预制体Crop下的其他子物体
3、作物生长的状态
(1) 给预制体Crop添加CropBehaviour.cs组件
using System.Collections;
using System.Collections.Generic;
using UnityEngine;

public class CropBehaviour : MonoBehaviour
{
    SeedData seedToGrow;
    [Header("Stages of Life")]
    public GameObject seed;
    private GameObject seedling;
    private GameObject harvestable;
    public CropStage cropStage;
    public enum CropStage { Seed, Seedling, Havestable }

    public void Plant(SeedData seedToGrow)
    {
        this.seedToGrow = seedToGrow;
        seedling = Instantiate(seedToGrow.seedling, transform);
        ItemData CropToYield = seedToGrow.cropToYield;
        harvestable = Instantiate(CropToYield.gameModel, transform);
        SwitchState(CropStage.Seed);
    }
    void SwitchState(CropStage stateToSwitch)
    {
        seed.SetActive(false);
        seedling.SetActive(false);
        harvestable.SetActive(false);
        switch (stateToSwitch)
        {
            case CropStage.Seed: seed.SetActive(true); break;
            case CropStage.Seedling: seedling.SetActive(true); break;
            case CropStage.Havestable: harvestable.SetActive(true); break;
        }
        cropStage = stateToSwitch;
    }
}
(2) 赋值
三、制作番茄
1、ItemData对象——番茄种子
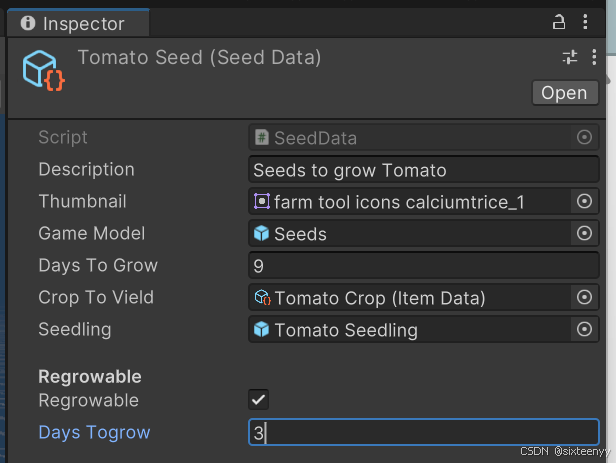
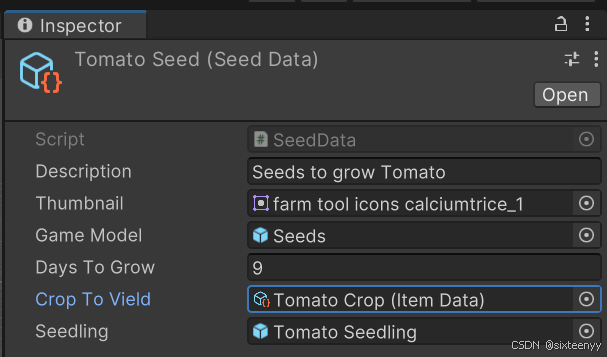
(1) 打开Data-Tools-Seeds文件夹,Create-Items-Seed。命名为Tomato Seed
(2) 编辑 SeedData.cs
using System.Collections;
using System.Collections.Generic;
using UnityEngine;
[CreateAssetMenu(menuName =("Items/Seed"))]
public class SeedData : ItemData
{
    public int daysToGrow;
    public ItemData cropToVield;
    public GameObject seedling;
    //重新生长
    [Header("Regrowable")]
    public bool regrowable;
    public int daysTogrow;
}
(3) 设置ItemData对象番茄种子的属性(Seeds to grow Tomato)
2、果实
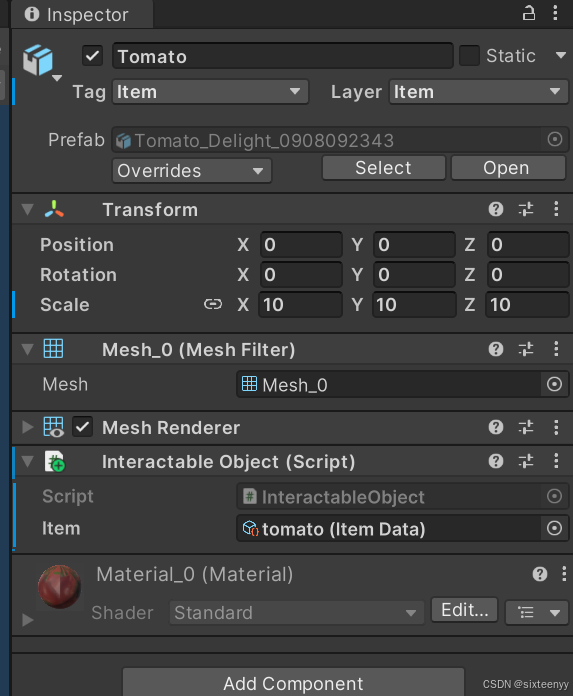
(1) 预制体
① 将Tomato_Fruit拖放到Hierarchy,更改标签为Item,Layer为Item,
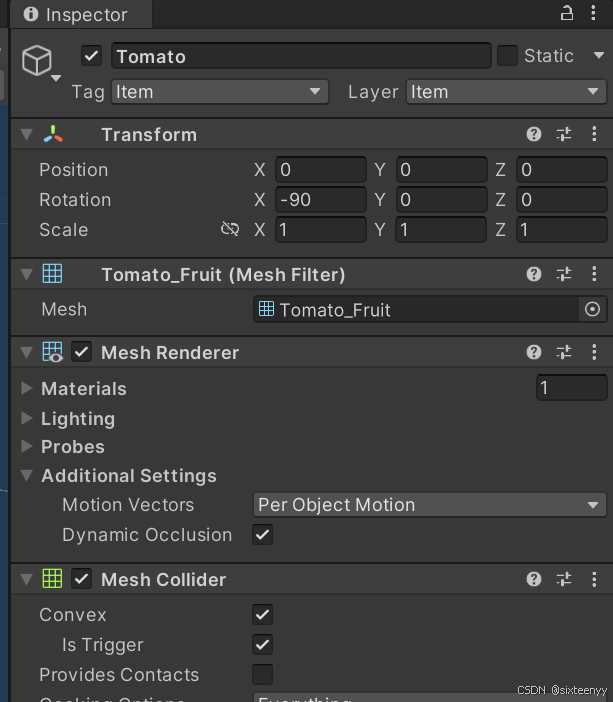
重置Transform,旋转 x=-90。 名Tomato
② 将Tomato制成预制体,删除Hierarchy面板上的Tomato
③ 勾选Mesh Collide中的 Convex和Is Trigger
(2) ItemData对象 :
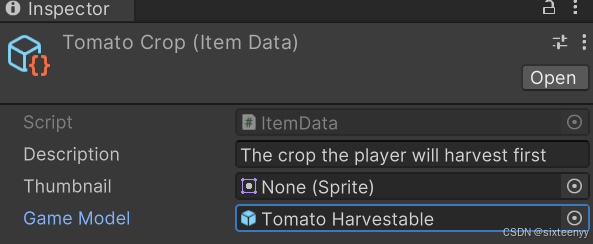
① 打开Data-Item文件夹,Create-Items-Item ,创建一个新项目 Tomato Crop,
The crop the player will harvest first
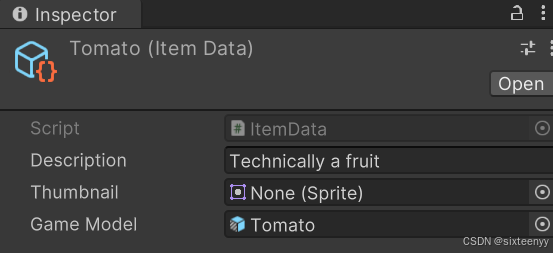
② 打开Data-Item文件夹,Create-Items-Item ,创建 Tomato(Technically a fruit)
③ 打开Data-Tools-Seed文件夹,设置Tomato Seed
(3) 编辑 Tomato预制体,添加InteractableObject.cs组件,赋值
using System.Collections;
using System.Collections.Generic;
using UnityEngine;

public class InteractableObject : MonoBehaviour
{
    public ItemData item;
    public virtual void Pickup()
    {
        InventoryManager.Instance.EquipHandSlot(item);
        InventoryManager.Instance.RenderHand();
        Destroy(gameObject);
    }
}
3、幼苗预制体
(1) 打开Import Asset/Cartoon_Farm_Crops/Prefabs/Standard文件夹
(2) 将Tomato_Plant拖放到Hierarchy,重命名为Tomato Seedling
(3) 移除Tomato_Seedling上的Mesh Collider。制成预制体
(4) 设置ItemData对象 Tomato Seed(番茄种子)的幼苗属性
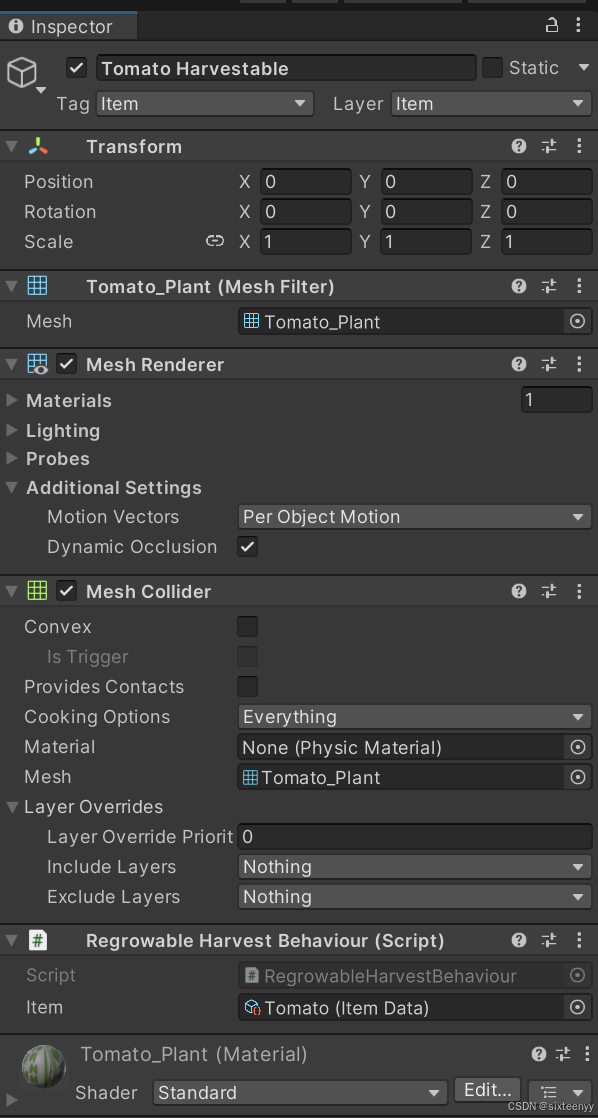
4、成熟植株预制体
(1) 复制Hierarchy面板上的Tomato_Seedling,重命名为Tomato Harvestable,制成预制体
(2) 编辑Tomato Harvestable预制体
① 添加子物体Tomato

② 更改标签和Layer为 Item
(3) 为Tomato Harvestable预制体添加 Mesh Collider组件
(4) 删除面板上的幼苗植株果实
5、设置ItemData对象番茄种子和番茄
四、播种
1、编辑Land.cs
//种子
[Header("Crops")]
public GameObject cropPrefab;
CropBehaviour cropPlanted = null;
public void Interact()
{
    ItemData toolSlot = InventoryManager.Instance.GetEquippedSlotItem(InventorySlot.InventoryType.Tool);
    if (!InventoryManager.Instance.SlotEquipped(InventorySlot.InventoryType.Tool))
    {
        return;
    }
    EquipmentData equipmentTool = toolSlot as EquipmentData;
    if (equipmentTool != null)
    {
        EquipmentData.ToolType toolType = equipmentTool.Type;
        switch (toolType)
        {
            case EquipmentData.ToolType.Hoe: SwitchLandStatus(LandStatus.Farmland); break;
            case EquipmentData.ToolType.WateringCan: SwitchLandStatus(LandStatus.Watered); break;
        }
        //返回
        return;
    }
    //播种
    SeedData seedTool = toolSlot as SeedData;
    if (seedTool != null && landStatus != LandStatus.Soil && cropPlanted == null)
    {
        GameObject cropObject = Instantiate(cropPrefab, transform);
        cropObject.transform.position =
            new Vector3(transform.position.x, 0f, transform.position.z);
        cropPlanted = cropObject.GetComponent<CropBehaviour>();
        cropPlanted.Plant(seedTool);
    }
}
2、赋值
五、生长
1、编辑CropBehaviour.cs
using System.Collections;
using System.Collections.Generic;
using UnityEngine;

public class CropBehaviour : MonoBehaviour
{
    SeedData seedToGrow;
    [Header("Stages of Life")]
    public GameObject seed;
    private GameObject seedling;
    private GameObject harvestable;
    public CropStage cropStage;
    public enum CropStage { Seed, Seedling, Havestable }
    //生长
    int growth;
    int maxGrowth;

    public void Plant(SeedData seedToGrow)
    {
        this.seedToGrow = seedToGrow;
        seedling = Instantiate(seedToGrow.seedling, transform);
        ItemData CropToYield = seedToGrow.cropToYield;
        harvestable = Instantiate(CropToYield.gameModel, transform);
        //生长时间
        int hoursToGrow = GameTimestamp.DaysToHours(seedToGrow.daysToGrow);
        maxGrowth = GameTimestamp.HoursToMinutes(hoursToGrow);

        SwitchState(CropStage.Seed);
    }
    void SwitchState(CropStage stateToSwitch)
    {
        seed.SetActive(false);
        seedling.SetActive(false);
        harvestable.SetActive(false);
        switch (stateToSwitch)
        {
            case CropStage.Seed: seed.SetActive(true); break;
            case CropStage.Seedling: seedling.SetActive(true); break;
            case CropStage: harvestable.SetActive(true); break;
        }
        cropStage = stateToSwitch;
    }
    //生长
    public void Grow()
    {
        growth++;
        //幼苗
        if (growth >= maxGrowth / 2 && cropStage == CropStage.Seed)
        {
            SwitchState(CropStage.Seedling);
        }
        //成熟
        if (growth >= maxGrowth && cropStage == CropStage.Seedling)
        {
            SwitchState(CropStage.Havestable);
        }
    }
}
2、 编辑Land.cs,灌溉后作物生长
    public void ClockUpdate(GameTimestamp timestamp)
    {
        if (landStatus == LandStatus.Watered)
        {
            int hoursElapsed = GameTimestamp.CompareTimestamp(timeWatered, timestamp);
            //作物生长
            if (cropPlanted != null)
            {
                cropPlanted.Grow();
            }
            if (hoursElapsed > 24)
            {
                SwitchLandStatus(LandStatus.Farmland);
            }
        }
    }
六、收获果实后幼苗再生
1、创建一个具有可重生收获行为的对象
(1) 打开Farming文件夹,新建RegrowableHarvestBehaviour.cs
(2) 编辑Tomato Harvestable预制体,添加RegrowableHarvestBehaviour.cs组件
using System.Collections;
using System.Collections.Generic;
using UnityEngine;

public class RegrowableHarvestBehaviour : InteractableObject
{
    CropBehaviour parentCrop;
    public void SetParent(CropBehaviour parentCrop)
    {
        this.parentCrop = parentCrop;
    }
    public override void Pickup()
    {
        InventoryManager.Instance.EquipHandSlot(item);
        InventoryManager.Instance.RenderHand();
    }
}
(3) 赋值
2、将植株重置为幼苗状态
(1) 编辑CropBehaviour.cs
    public void Plant(SeedData seedToGrow)
    {
        //其他代码
        //第一次种植时,检查它是否能生长
        if (seedToGrow.regrowable)
        {
            RegrowableHarvestBehaviour regrowableHarvest = harvestable.GetComponent<RegrowableHarvestBehaviour>();
            // 将可再生收获行为的父物体设置为当前物体
            regrowableHarvest.SetParent(this);
        }
        SwitchStage(CropStage.Seed);
    }
    void SwitchStage(CropStage stateToSwitch)
    {
        seed.SetActive(false);
        seedling.SetActive(false);
        harvestable.SetActive(false);
        //其他代码
        switch (stateToSwitch)
        {
            case CropStage.Havestable:
                harvestable.SetActive(true);
                //如果种子不可再生,将可收获的种子与该作物游戏对象分离并销毁它
                if (!seedToGrow.regrowable)
                {
                    harvestable.transform.parent = null;
                    Destroy(gameObject);
                }
                break;
        }
        cropStage = stateToSwitch;
    }
    //当玩家收获可再生作物时调用。将植物状态重置为幼苗
    public void Regrow()
    {
        int hoursToRegrow = GameTimestamp.DaysToHours(seedToGrow.daysToGrow);
        growth = maxGrowth -GameTimestamp.HoursToMinutes(hoursToRegrow);
        //切换回幼苗状态
        SwitchStage(CropStage.Seedling);
    }
(2) 编辑RegrowableHarvestBehaviour.cs
using System.Collections;
using System.Collections.Generic;
using UnityEngine;

public class RegrowableHarvestBehaviour : InteractableObject
{
    CropBehaviour parentCrop;
    public void SetParent(CropBehaviour parentCrop)
    {
        this.parentCrop = parentCrop;
    }
    public override void Pickup()
    {
        InventoryManager.Instance.EquipHandSlot(item);
        InventoryManager.Instance.RenderHand();
        //将亲本作物重置为幼苗状态
        parentCrop.Regrow();
    }
}
七、枯萎
详细教程 步骤十一
1、制作枯萎的植物的材质
(1) 打开Assets-Import Assets-Farmland-Dirt-Materials,复制Dirt材质,重命名为Wilted Plant
(2) 更改Wilted Plant材质的颜色9A2603,去掉光滑度
2、制作枯萎的植物:编辑Crop预制体
(1) 打开Assets-Import Assets-Cartoon_Farm_Crops-Prefabs-Standard文件夹,将Pumpkin_Plant作为子物体拖放到Crop下,重命名为wilted,将Wilted Plant材质设置给Wilted
(2) 设置它的transform
3、设置枯萎系统:
(1) 编辑CropBehaviour.cs
using System.Collections;
using System.Collections.Generic;
using UnityEngine;

public class CropBehaviour : MonoBehaviour
{
    SeedData seedToGrow;
    [Header("Stages of Life")]
    public GameObject seed;
    private GameObject seedling;
    private GameObject harvestable;
    //枯萎状态的植株
    public GameObject wilted;
    //枯萎状态
    public enum CropStage { Seed, Seedling, Havestable, Wilted }
    public CropStage cropStage;

    int growth;
    int maxGrowth;
    //正常生长的最大时间(48小时)
    int maxHealth = GameTimestamp.HoursToMinutes(48);
    int health;
    public void Plant(SeedData seedToGrow)
    {
        this.seedToGrow = seedToGrow;
        seedling = Instantiate(seedToGrow.seedling, transform);
        ItemData cropToYield = seedToGrow.cropToVield;
        harvestable = Instantiate(cropToYield.gameModel, transform);

        int hoursToGrow = GameTimestamp.DaysToHours(seedToGrow.daysToGrow);
        maxGrowth = GameTimestamp.HoursToMinutes(hoursToGrow);

        //第一次种植时,检查它是否能生长
        if (seedToGrow.regrowable)
        {
            RegrowableHarvestBehaviour regrowableHarvest = harvestable.GetComponent<RegrowableHarvestBehaviour>();
            // 将可再生收获行为的父物体设置为当前物体
            regrowableHarvest.SetParent(this);
        }
        SwitchStage(CropStage.Seed);
    }
    void SwitchStage(CropStage stateToSwitch)
    {
        seed.SetActive(false);
        seedling.SetActive(false);
        harvestable.SetActive(false);
        //枯萎状态
        wilted.SetActive(false);
        switch (stateToSwitch)
        {
            case CropStage.Seed: seed.SetActive(true); break;
            case CropStage.Seedling:
                seedling.SetActive(true);
                //48小时的正常生长时间
                health = maxHealth;
                break;

            case CropStage.Havestable:
                harvestable.SetActive(true);
                //如果种子不可再生,将可收获的种子与该作物游戏对象分离并销毁它
                if (!seedToGrow.regrowable)
                {
                    harvestable.transform.parent = null;
                    Destroy(gameObject);
                }
                break;
            //枯萎植株选择
            case CropStage Wilted: wilted.SetActive(true); break;
        }
        cropStage = stateToSwitch;
    }
    public void Grow()
    {
        growth++;
        //枯萎前的健康时长
        if (health < maxHealth)
        {
            health++;
        }

        if (growth >= maxGrowth / 2 && cropStage == CropStage.Seed)
        {
            SwitchStage(CropStage.Seedling);
        }
        if (growth >= maxGrowth && cropStage == CropStage.Seedling)
        {
            SwitchStage(CropStage.Havestable);
        }
    }
    //枯萎逻辑
    public void Wilted()
    {
        health--;
        if (health <= 0 && cropStage != CropStage.Seed)
        {
            SwitchStage(CropStage.Wilted);
        }
    }
    //当玩家收获可再生作物时调用。将植物状态重置为幼苗
    public void Regrow()
    {
        int hoursToRegrow = GameTimestamp.DaysToHours(seedToGrow.daysToGrow);
        growth = maxGrowth -GameTimestamp.HoursToMinutes(hoursToRegrow);
        //切换回幼苗状态
        SwitchStage(CropStage.Seedling);
    }
}
(2) 赋值
4、编辑Land.cs
    public void ClockUpdate(GameTimestamp timestamp)
    {
        if (landStatus == LandStatus.Watered)
        {
            int hoursElapsed = GameTimestamp.CompareTimestamp(timeWatered, timestamp);
            if (cropPlanted != null)
            {
                cropPlanted.Grow();
            }
            if (hoursElapsed > 24)
            {
                SwitchLandStatus(LandStatus.Farmland);
            }
        }
        //枯萎
        if (landStatus != LandStatus.Watered && cropPlanted != null)
        {
            if(cropPlanted.cropStage !=CropBehaviour.CropStage.Seed)
            {
                cropPlanted.Wilted();
            }
        }
    }
八、收割后重新生长
1、编辑SeedData.cs
using System.Collections;
using System.Collections.Generic;
using UnityEngine;

[CreateAssetMenu(menuName =("Items/Seed"))]

public class SeedData : ItemData
{
    public int daysToGrow;
    public ItemData cropToYield;
    public GameObject seedling;
    //重新生长
    [Header("Regrowable")]
    public bool regrowable;
    public int daysTogrow;
}
农田交互
一、收获
1、增加提示文本
2、编辑PlayerInteraction.cs
六、收割
1、销毁作物:编辑CropBehaviour.cs
    void SwitchState(CropStage stateToSwitch)
    {
        seed.SetActive(false);
        seedling.SetActive(false);
        harvestable.SetActive(false);
        switch (stateToSwitch)
        {
            case CropStage.Seed: seed.SetActive(true); break;
            case CropStage.Seedling: seedling.SetActive(true); break;
            case CropStage: harvestable.SetActive(true);
                //收割
                harvestable.transform.parent = null;
                Destroy(gameObject);
                break;
        }
        cropStage = stateToSwitch;
    }
2、收获作物:编辑InventoryManager.cs
using System.Collections;
using System.Collections.Generic;
using UnityEngine;

public class InventoryManager : MonoBehaviour
{
    public void InventoryToHand(int slotIndex,InventorySlot.InventoryType inventoryType)
    {
        //其他代码##

        //手持收获物
        if(inventoryType == InventorySlot.InventoryType.Item)
        {
            RenderHand();
        }
        UIManager.Instance.RenderInventory();
    }
    public void HandToInventory(InventorySlot.InventoryType inventoryType)
    {
        //其他代码##

        //手持收获物
        if(inventoryType == InventorySlot.InventoryType.Item)
        {
            RenderHand();
        }
        UIManager.Instance.RenderInventory();
    }
    public void RenderHand()
    {
        //其他代码

        //收获物
        if (SlotEquipped(InventorySlot.InventoryType.Item))
        {
            Instantiate(GetEquippedSlotItem(InventorySlot.InventoryType.Item).gameModel, handPoint);
        }
    }
}
3、拾起作物
(1) 编辑InventoryManager.cs,复制物体
#region 物品交换的方法
//根据物品类型将选中物体复制到对应位置
public void EquipHandSlot(ItemData item)
{
    if (IsTool(item))
    {
        equippedToolSlot = new ItemSlotData(item);
    }
    else
    {
        equippedItemSlot = new ItemSlotData(item);
    }
}
//其他代码
#endregion
(2) 创建拾取方法:
① 在Scripts-Inventory文件夹下新建InteractableObject.cs
using System.Collections;
using System.Collections.Generic;
using UnityEngine;

public class InteractableObject : MonoBehaviour
{
    public ItemData item;
    public virtual void Pickup()
    {
        InventoryManager.Instance.EquipHandSlot(item);
    }
}
② 给预制体Cabbage和Tomato,添加InteractableObject.cs组件,赋值,添加标签Item
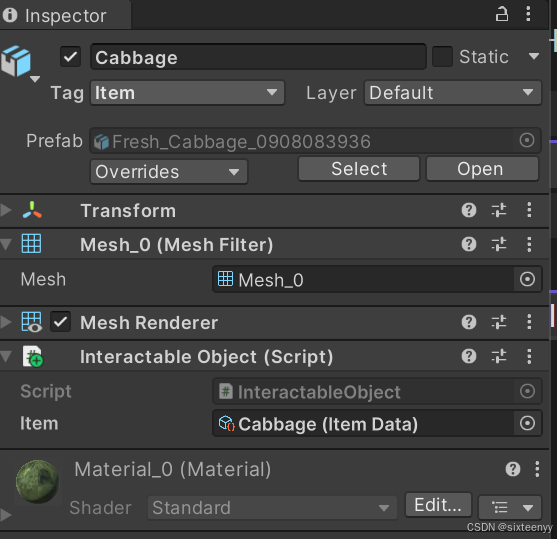
农田交互
:编辑SeedData.cs
一、收获
1、增加提示文本
2、编辑PlayerInteraction.cs
using System.Collections;
using System.Collections.Generic;
using UnityEngine;
using UnityEngine.UI;

public class PlayerInteraction : MonoBehaviour
{
    PlayerController playerController;
    Land selectLand = null;
    //选中的待收获作物
    InteractableObject selectInteractable = null;
    //提示文本
    public Text textComponent;
    void Start()
    {
        playerController = transform.parent.GetComponent<PlayerController>();
    }

    void Update()
    {
        RaycastHit hit;
        if (Physics.Raycast(transform.position, Vector3.down, out hit, 1))
        {
            OnInteractableHit(hit);
        }
    }
    void OnInteractableHit(RaycastHit hit)
    {
        Collider other = hit.collider;
        if (other != null && other.CompareTag("Land"))
        {
            Land land = other.GetComponent<Land>();
            if (land != null)
            {
                SelectLand(land); return;
            }
            else { Debug.Log("未选中任何田地"); }
        }
        //选中的待收获作物
        if (other.CompareTag("Item"))
        {
            selectInteractable = other.GetComponent<InteractableObject>();
            return;
        }
        if (selectInteractable != null)
        {
            selectInteractable = null;
        }
        if (selectLand != null)
        {
            DeselectLand(selectLand);
        }
    }
    public void Interact()
    {
        textComponent.text = "";
        //禁用工具
        if (InventoryManager.Instance.SlotEquipped(InventorySlot.InventoryType.Item))
        {
            textComponent.text = "你腾不出手来!";
            return;
        }
        if (selectLand != null)
        {
            selectLand.Interact(); return;
        }
        Debug.Log("未站在田地上");
    }
    void SelectLand(Land land)
    {
        if (land == null) { Debug.Log("你未选择田地"); return; }
        if (selectLand != null) { selectLand.Select(false); }
        selectLand = land;
        land.Select(true);
    }
    void DeselectLand(Land land)
    {
        if (land == null) { Debug.Log("你没有选择田地"); return; }
        land.Select(false);
        selectLand = null;
    }
    //收割交互
    public void ItemIneract()
    {
        if (InventoryManager.Instance.SlotEquipped(InventorySlot.InventoryType.Item))
        {
            InventoryManager.Instance.HandToInventory(InventorySlot.InventoryType.Item);
            return;
        }
        //拾取作物
        if (selectInteractable != null)
        {
            selectInteractable.Pickup();
        }
    }
}
2、编辑PlayerController.cs,点击 左Alt键,物品返回物品栏
using UnityEngine;

public class PlayerController : MonoBehaviour
{
    PlayerInteraction playerInteraction;
    public float turnSpeed = 20f;
    Animator animator;
    bool isWalking = false;
    bool isRunning = false;

    Rigidbody rb;
    Vector3 movement;
    Quaternion rotation = Quaternion.identity;

    private float speed;
    [Header("Movement System")]
    public float walkSpeed = 6f;
    public float runSpeed = 12f;

    void Start()
    {
        animator = GetComponent<Animator>();
        rb = GetComponent<Rigidbody>();
        playerInteraction = GetComponentInChildren<PlayerInteraction>();
    }
    private void FixedUpdate()
    {
        float horizontal = Input.GetAxis("Horizontal");
        float vertical = Input.GetAxis("Vertical");
        movement.Set(horizontal, 0f, vertical);
        movement.Normalize();

        bool hasHorizontalInput = !Mathf.Approximately(horizontal, 0f);
        bool hasVerticalInput = !Mathf.Approximately(vertical, 0f);

        if (Input.GetButton("Sprint"))
        {
            speed = runSpeed;
            isRunning = true;
        }
        else if (hasHorizontalInput || hasVerticalInput)
        {
            isWalking = true;
            isRunning = false;
            speed = walkSpeed;
        }
        else
        {
            isWalking = false;
            isRunning = false;
            speed = 0f;
        }
        Vector3 desireForward = Vector3.RotateTowards(transform.forward, movement, turnSpeed * Time.deltaTime, 0f);
        rotation = Quaternion.LookRotation(desireForward);
    }
    public void Update()
    {
        Interact();
        if (Input.GetKey(KeyCode.RightBracket))
        {
            TimeManager.Instance.Tick();
        }
    }
    public void Interact()
    {
        if (Input.GetButtonDown("Fire1"))
        {
            playerInteraction.Interact();
        }
        //左Alt
        if (Input.GetButtonDown("Fire2"))
        {
            playerInteraction.ItemIneract();
        }
    }

    private void OnAnimatorMove()
    {
        animator.SetBool("IsWalking", isWalking);
        animator.SetBool("IsRunning", isRunning);
        Vector3 movementSpeed = movement * speed;
        rb.MovePosition(rb.position + movementSpeed * animator.deltaPosition.magnitude);
        rb.MoveRotation(rotation);
    }
}
二、禁止角色上升
1、编辑预制体Cabbage和Player,分别为二者添加新Layer
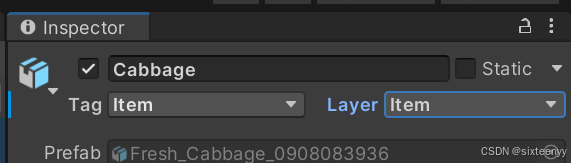
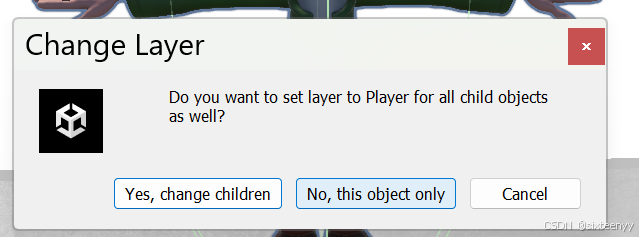
2、禁用Item与Player层的交互
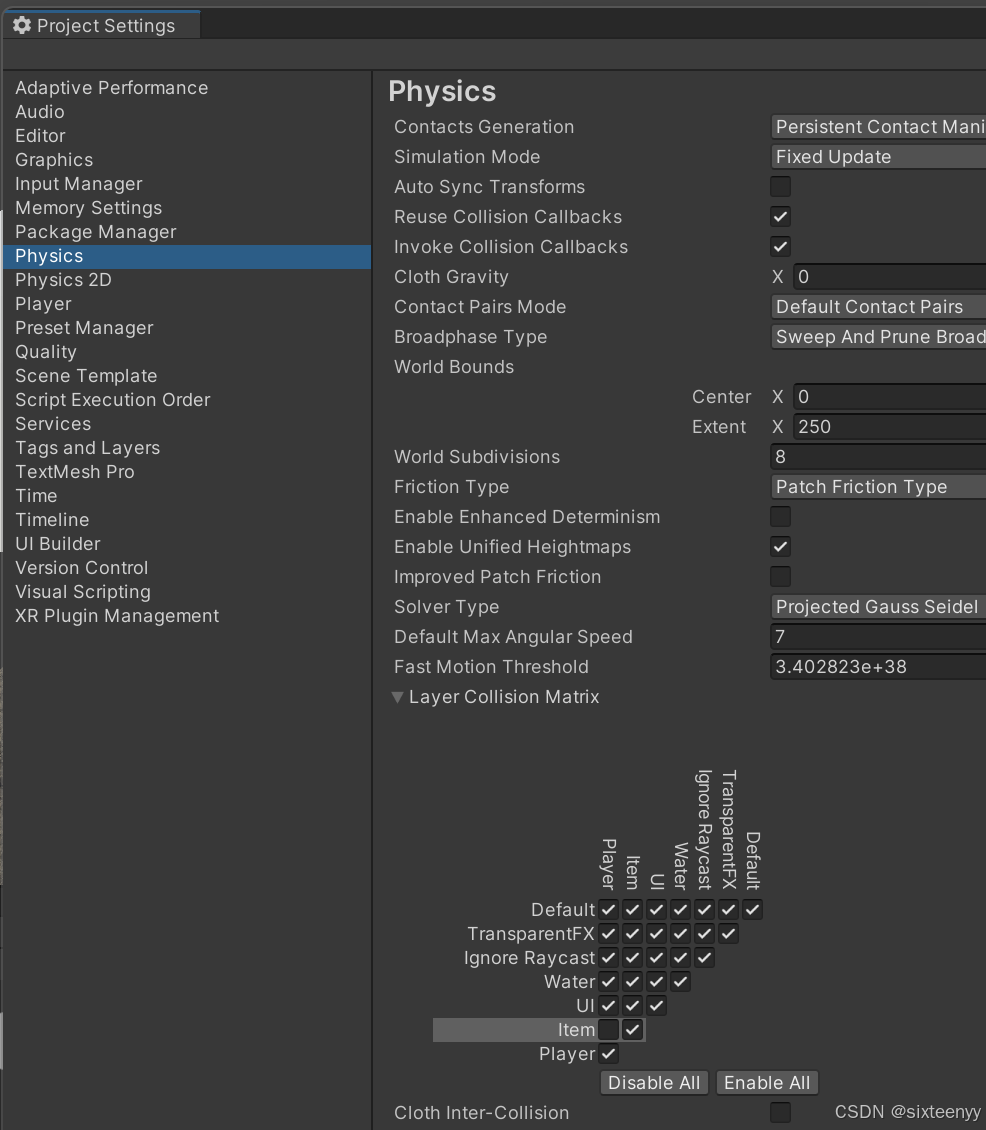
(1)
(2)
(3)
(4)
(1)
(2)
(3)
(4)
(4)
(4)


 3437
3437

 被折叠的 条评论
为什么被折叠?
被折叠的 条评论
为什么被折叠?
 到【灌水乐园】发言


